Snack Platter Catering – Part 20 – Chilli Bites, Deep Fried Chilli Puffs – Quick, Easy & Delicious!!!

chilli bites,deep-fried chilli puffs,how to make chilli bites,homemade chilli bites,chilli bites recipe,authentic indian chilli bites,real chilli bites recipe,chilli bites with chick pea flour,how to make real chilli bites,how to make deep-fried chilli puffs,authentic south african indian chilli bites,best chilli bites recipe,quick chilli bites recipe,easy chilli bites recipe,how to make chilli bites,finger foods,cocktail snack foods


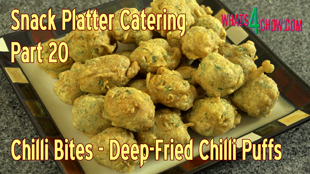
Snack Platter Catering - Part 20 - Chilli Bites, Deep Fried Chilli Puffs - Quick, Easy & Delicious!!!
Author: 
Recipe type: Snack Food / Finger Food / Superbowl
Cuisine: Indian
Prep time: 
Cook time: 
Total time: 
Serves: 40-50
 
This recipe is real lifesaver when you're catering for larger numbers. Chilli bites are dead simple to make, and although they can't be prepared long before the time, they are really quick.
Ingredients
Makes 40-50 Chilli Bites
  • 3 Cups Chickpea flour
  • ½ Tsp Bicarbonate of Soda
  • 1½ Cups Water
  • ½ Cup Chopped coriander
  • 3 Chillis, chopped
  • 1 Onion, finely chopped
  • ½ Cup Spring onion, finely chopped
  • 2 Tsp Toasted cumin seeds
  • 1 Tbs Chilli powder
  • 1 Tsp Garam masala
  • 1 Tsp Salt
Instructions
  1. Combine the chickpea flower and the bicarbonate of soda in a large mixing bowl. Add chopped coriander, chopped chillis, chopped spring onion, chopped onion, toasted cumin seeds, chilli powder, salt and garam masala. Mix these into the flour.
  2. Pour in the water and stir this to a thick batter. For the best result, allow the batter to stand for 15 minutes before proceeding with frying.
  3. Half fill a large pan with oil and heat this to 170c or 340f.
  4. Carefully drop slightly heaped tablespoons of the batter into the oil. Allow the chilli bites to fry for 4 minutes until golden, turning halfway through.
  5. Remove the puffs from the oil using a slotted spoon and drain them on kitchen paper. Continue with second batch of puffs until all them are fried.
  6. Transfer the bites to platters and serve hot or cold.


Caramelized Onion & Blue Cheese Sweet Potatoes. Baked, Stuffed Sweet Potatoes with Balsamic Onion & Blue Cheese.

stuffed sweet potatoes,filled sweet potatoes,baked stuffed sweet potatoes,how to make stuffed sweet potatoes,stuffed sweet potatoes recipe,stuffed sweet potatoes video recipe, sweet potato recipe, loaded sweet potatoes, loaded sweetpotatoes, easy sweet potato recipe, baked sweet potatoes, low fat vegan recipes, stuffed sweet potatoes paleo, stuffed sweet potatoes against all grain,stuffed sweet potatoes caramelized onion


Caramelized Onion & Blue Cheese Sweet Potatoes. Baked, Stuffed Sweet Potatoes with Balsamic Onion & Blue Cheese.
Author: 
Recipe type: Vegetarian / Vegan / Sweet Potato
Prep time: 
Cook time: 
Total time: 
Serves: 2
 
These stuffed sweet potatoes are out of this world! Filled with caramelized balsamic onions and blue cheese, the flavor combination is outstanding!!!
Ingredients
  • 2 Large sweet potatoes
  • Oil
  • 2 Large onions
  • 30ml Brown sugar
  • 15ml Balsamic vinegar
  • 15ml Fresh rosemary, finely chopped
  • 75g Strong blue cheese
  • 5ml Fresh thyme, finely chopped
Instructions
  1. Scrub the sweet potatoes clean and cut away any ugly marks.
  2. Place the potatoes in a roasting pan and brush them liberally with oil. Bake the potatoes in a preheated oven at 200c or 400f for 60 minutes until tender.
  3. Remove from the oven and allow to cool for a few minutes.
  4. While the potatoes bake, cut the onions into half rounds. Heat a pan over medium high heat and add 30ml of oil. Fry the onions for 10 to 15 minutes until well browned.
  5. Add the sugar and balsamic vinegar and continue to fry for 3 to 5 minutes until well caramelized. Remove the pan from the heat and stir in the fresh chopped rosemary.
  6. Using gloves or tongs to hold the potatoes, cut a deep valley into each potato.
  7. Spoon half of the onion into each of the potatoes.
  8. Crumble half of the strong blue cheese over each potato then melt the cheese under the grill in your oven.
  9. Remove the potatoes from the oven, transfer them to platters and serve immediately garnished with little finely chopped fresh thyme.


Best Burger Relish – Famous Wimpy Burger Relish. Amazing Piquant Tomato & Gherkin Burger Relish.

burger relish,burger relish recipe,hamburger relish,hamburger relish recipe,wimpy burger relish,wimpy hamburger relish,wimpy burger relish recipe,wimpy hamburger relish recipe,how to make wimpy hamburger relish,how to make wimpy burger relish,the best burger relish recipe,famous wimpy burger relish,wimpy franchise burger relish, burger relish recipe jamie oliver, burger relish recipe bbc,burger relish recipe tomato


Best Burger Relish - Famous Wimpy Burger Relish. Amazing Piquant Tomato & Gherkin Burger Relish.
Author: 
Recipe type: Sauce / Relish / Burgers
Prep time: 
Cook time: 
Total time: 
 
This burger relish is absolutely outstanding. This is a close copy of the original Wimpy franchise burger relish, which is famous across the globe.
Ingredients
  • 150g Finely chopped onion
  • 15g Finely chopped garlic
  • 600g Peeled and chopped tomato
  • 150ml Red wine vinegar
  • 75g Sugar
  • 100g Finely chopped gherkin
  • 50g Butter
  • 15ml Paprika
  • 15ml Tapioca flour or cornflour mixed with 30ml water
Instructions
  1. Heat a pan over medium heat, melt the butter and fry the onion and garlic for 5 minutes until the onion is soft and translucent.
  2. Add the tomato and continue to fry for a further 10 minutes and most of the tomato has disintegrated. Add the paprika and fry for a further 2 minutes.
  3. Pour in the sugar and the red wine vinegar. Stir this until the sugar has dissolved, bring it back to a boil, reduce the heat and simmer the relish for 30 minutes, stirring every minute or so.
  4. By this stage the relish will be approaching the consistency of a runny jam. Stir the tapioca flour or cornflour into a little water and add this to the pan. Bring back to a boil and stir continuously for a minute until thickened.
  5. Remove the pan from the heat, stir in the finely chopped gherkin and season with salt to taste.
  6. Transfer the relish to a sterilized jar. The relish will last for months stored in your refrigerator.
  7. In the commercial version of this relish, food coloring is added to achieve the deep red color. Whether you add coloring is entirely up to you.


Crispy Oven Baked Potato Croquettes. Easy Golden Baked Herbed Potato Croquettes.

potato croquettes, Croquette (Food), potato croquettes baked, potato croquettes jamie oliver, potato croquettes italian, potato croquettes calories, potato croquettes recipe, potato croquettes recipe laura vitale, potato croquettes by sanjeev kapoor,easy potato croquettes recipe,herbed potato croquettes,how to make potato croquettes,crispy potato croquettes,potato croquettes in your oven,herb flavored potato croquettes


Crispy Oven Baked Potato Croquettes. Easy Golden Baked Herbed Potato Croquettes.
Author: 
Recipe type: Accompaniment / Potato
Prep time: 
Cook time: 
Total time: 
Serves: 4-6
 
Potato croquettes make the perfect accompaniment to any roast dish. These baked croquettes can be flavored with any herb of your choice to match your main course. This quick and easy potato croquette recipe will have the crowds cheering for more!!!
Ingredients
  • 4 Medium Potatoes
  • 2 Eggs
  • 30ml Sour cream
  • 30ml Chopped herbs of your choice
  • 2.5ml Salt
  • 15ml Water
  • 15ml Cornflour
  • 2 Cups fine breadcrumbs or finely crushed corn flakes
Instructions
  1. Peel and quarter the potatoes and boil them for about 20 minutes until soft. Add the sour cream, salt and herbs and mash the potatoes until smooth.
  2. Add one of the eggs and continue to mash until the egg is totally combined.
  3. Refrigerate the mashed potato for at least 30 minutes to firm it up.
  4. For the coating, whisk the second egg with the cornflour and water. Measure out 500ml of fine bread crumbs or finely crushed corn flakes.
  5. Remove the potato from the refrigerator. Lift a heaped tablespoon of the mash and shape it into a cigar shape.
  6. Dip the cigar in the egg mixture, then dredge it gently in the flour to get a good coating all over.
  7. Transfer the croquette to a greased baking sheet. Continue shaping and coating until all of the potato is used.
  8. Bake the croquettes in a preheated oven at 180c or 350f for 30 minutes, turning halfway through.
  9. The croquettes will be crisp and golden with a creamy smooth interior. Serve these immediately as an accompaniment to your main course.


Beetroot Chutney. How to Make Beetroot Chutney at Home

bramley apple; beetroot; chutney; homegrown apples and beetroot;, Chutney (Consumer Product), beetroot, beetroot chutney, Indian recipes, beetroot chutney recipe south africa, beetroot chutney jamie oliver, beetroot chutney recipe south indian, beetroot chutney tamil, beetroot chutney recipe uk, beetroot chutney by vahchef, beetroot chutney recipe, how to make beetroot chutney, how to prepare beetroot chutney


Beetroot Chutney. How to Make Beetroot Chutney at Home
Author: 
Recipe type: Chutney / Accompaniments
Cuisine: Indian
 
Beetroot chutney is a fantastic accompaniment to curries and just about any meat dish, including chicken and seafood. It is easy to make, and although the cooking time is on the longer side, it is well worth the effort.
Ingredients
  • 400g Beetroot, peeled and finely diced
  • 250ml Water
  • 1 Onion, finely chopped
  • 400ml Cider vinegar
  • 50ml Balsamic vinegar
  • 400g Sugar
  • 5ml Ground cinnamon
  • ½ Tsp Fresh ginger paste
Instructions
  1. Place the finely diced beetroot, water, finely chopped onion, cider vinegar, balsamic vinegar, sugar, cinnamon and ginger in a large pan.
  2. Bring to a boil, reduce the heat and simmer for 60 to 90 minutes stirring every 10 minutes.
  3. After about 60 minutes you will notice that the liquid has reduced considerably and is starting to become syrupy.
  4. Continue to reduce the liquid until a clean trail is left when you drag the bottom of the pan.
  5. Remove the chutney from the heat and allow it to cool for 15 minutes before transferring it to sterilized jars. Allow the chutney to age for 2 weeks in a cool, dark place before serving.


Thai Green Curry Potatoes. Rich & Spicy Thai Green Curry with Potatoes

how to cook thai food, how to make thai food, easy thai food, Green Curry (Food), bbc thai green curry potatoes, vegetarian thai green curry potato, how to make thai green curry with potatoes, Vegetarian Thai Green Curry, thai green curry new potatoes green beans, easy thai green curry with potatoes, thai green curry sweet potato chicken, thai food cooking video, thai food video, thai cooking video


Thai Green Curry Potatoes. Rich & Spicy Thai Green Curry with Potatoes
Author: 
Recipe type: Thai Green Curry / Vegetarian / Vegan
Cuisine: Thai
Prep time: 
Cook time: 
Total time: 
Serves: 4-6
 
Thai Green Curry with Potatoes is really easy and really tasty. This makes for a perfect accompaniment or main course. Although this is not authentically Thai in origin, this dish displays all of the flavors and aromas of Thai green curry.
Ingredients
  • 2 Medium onions, peeled and cut into eighths
  • 2 Tbs Chopped Garlic
  • 6 Medium Potatoes, peeled and cubed
  • 45ml Oil
  • 2 Tbs Green Curry Paste (you can adjust this if you prefer hotter or cooler)
  • 400ml Coconut cream
  • 2 Tbs Chopped coriander or garlic chives
Instructions
  1. Place the cubed potatoes, onion and garlic in a large pan along with the oil. Place the pan over medium heat and saute for 7 minutes until the onion is tender.
  2. Add the Thai green curry paste and stir this in for 30 seconds until fragrant.
  3. Add the coconut cream and stir this in. Bring the pan to a boil, reduce the heat to a simmer and allow this to simmer for 20 to 30 minutes until the potato is tender.
  4. Season with salt to taste and transfer the potato to serving bowls. Garnish with fresh coriander or snipped chives and serve immediately.


Pickled Shredded Beetroot. How to Pickle Beetroot at Home – Homemade Pickled Beetroot & Onion.

pickled beetroot,pickled shredded beetroot,pickled beetroot and onion,pickled shredded beetroot with onion,spicy pickled shredded beetroot, pickled grated beetroot, grated pickled beetroot recipe,how to pickle beetroot,how to preserve beetroot,how to picle and bottle beetroot,how to pickle and can beetroot,how to make beetroot chutney,how to make beetroot relish,pickled beetroot relish,chilli pickled beetroot


Pickled Shredded Beetroot. How to Pickle Beetroot at Home - Homemade Pickled Beetroot & Onion.
Author: 
Recipe type: Vegetable / Preserves
Prep time: 
Total time: 
 
Pickled shredded beetroot is quick and easy to make. This recipe uses shredded beetroot and onion, and you can choose whether to make it hot and spicy or plain. If you prefer plain, simply omit the chilli and pepper from the recipe.
Ingredients
  • 2 Medium onions, halved and thinly sliced into half-rounds
  • 4 Medium beetroot, peeled, topped & tailed and grated with the grain
  • 3 Tbs Pickling salt (or Kosher salt)
  • 1 Green chilli sliced thinly (optional)
  • 1 Tsp Black peppercorns (optional)
  • 1½ Cups White wine vinegar
  • ⅓ Cup Cane syrup (or honey)
Instructions
  1. Top and tail and peel the beetroot. The grain of the beetroot runs from top to bottom, so when you grate it make sure you follow the grain otherwise it will disintegrate into small bits as it pickles.
  2. Cut the onions in half, then into thin half rounds. Combine the beetroot and onion in a large mixing bowl. Add the salt and mix this in thoroughly. The salt extracts the excess water from the vegetables. Allow this to stand for 20 minutes.
  3. Whole the veges stand, combine the vinegar, cane syrup, black peppercorns, and sliced chilli in a small saucepan.
  4. Bring this to a boil, remove it from the heat and allow it stand until the vegetables have completed sweating.
  5. Place a colander over a large mixing bowl and pour the beet and onion into the colander. Pick up handfuls of the veg and squeeze out as much liquid as you can, transferring the dry veg back to its original mixing bowl as you go.
  6. Transfer the beet and onion to a sterilized jar and pour the vinegar solution over the vegetables until it is just covered.
  7. Place the lid on the jar and allow this to age for at least a few days before serving.


Butter-Fried Queso Blanco. Slices of Queso Blanco Fried until Golden, Topped with Heavenly Sauce.

Queso Blanco (Cheese), queso fresco, white cheese, recipe, receta, how to make cheese, como hacer queso, Mexican, queso blanco recipe, queso blanco cheese recipe, queso blanco fried, queso blanco velveeta, como hacer queso blanco, Queso Blanco Recipe, Homemade Queso Blanco, preparacion queso, elaboracion de queso, Mexican Queso Dip, Mexican Recipe, Mexican Food, Mexican Cuisine, Queso Ranchero


Butter-Fried Queso Blanco. Slices of Queso Blanco Fried until Golden, Topped with Heavenly Sauce.
Author: 
Recipe type: Cheese
Cuisine: Mexican
Prep time: 
Cook time: 
Total time: 
Serves: 2
 
In our previous episode we made fresh queso blanco or Mexican white cheese. Today we're going fry slices of this cheese in butter until golden, then top it with rich combination of cocktail tomatoes, garlic, sliced pickled gherkin, capers and a unique instant ricotta.
Ingredients
  • 2 x 20mm / ¾ inch Slices of Queso Blanco cheese
  • 40g Butter
  • 8 Cherry / cocktail tomatoes
  • 1 Tbs Chopped garlic
  • 1 Pickled Gherkin, sliced
  • 2 Tbs Pickled capers
  • 90ml Fresh cream
  • Salt to taste
  • Dried red chilli flakes to garnish
Instructions
  1. Cut 2 slices of queso blanco from the center of the round of cheese. Cut them 20mm or ¾ inch thick.
  2. Measure out the garlic, butter, red chilli flakes, cream and capers.
  3. Slice the tomatoes in half length-ways, and slice the gherkins.
  4. Heat your pan over medium high heat, add the butter.
  5. Add the cheese to the pan and wipe it around in the butter to coat all over.
  6. Fry the cheese on the flat sides for 2 to 3 minutes until golden.
  7. Turn the cheese over and fry for a further 2 to 3 minutes until golden.
  8. By this stage, the cheese will have softened, so use a spatula to remove it from the pan to avoid damaging it.
  9. Add the tomatoes to the pan and stir these around in the butter for 60 seconds.
  10. Add the garlic and stir this for further 15 seconds until fragrant.
  11. Add the capers and sliced gherkin and stir this briefly to heat it through.
  12. Pour in the cream. Almost immediately, you will see the cream react with the acid in the tomatoes, capers and gherkin.
  13. This reaction in combination with heat causes the cream to convert to full cream ricotta cheese instantly.
  14. Stir this briefly and remove the pan from the heat.
  15. Transfer the fried cheese to platters, top each with half of the sauce.
  16. Garnish the plates with a scattering of red chilli flakes and serve immediately.


How to Make Sundried Tomatoes in Your Oven. Perfectly Preserved Tomatoes with Brilliant Color.

sun dried tomato, dried tomatoes, Sundried tomatoes, how to make Sundried tomatoes, Sundried tomato recipe, dried tomatoes recipe, make sun dried tomato, Sun-dried Tomato, how to make sundried tomatoes in your oven, how to make your own sun dried tomatoes in the oven, Oven-Dried Tomatoes, easy oven dried tomatoes, homemade oven dried tomatoes, dried dehydrated tomatoes,sundried tomatoes in olive oil,hot to make sundried tomatoes in olive oil


How to Make Sundried Tomatoes in Your Oven. Perfectly Preserved Tomatoes with Brilliant Color.
Author: 
Recipe type: Vegetable / Preserving
Prep time: 
Total time: 
 
How to Make Sundried Tomatoes in Your Oven. This Episode shows you how to make perfectly preserved sundried tomatoes in your oven. Sundried tomatoes with perfect color and excellent shelf-life.
Ingredients
  • 12 Medium size tomatoes
  • ½ Tsp Bicarbonate of soda
  • ½ Tsp Saltpetre
  • 1 Tsp Salt
  • 1 Tsp Sugar
  • 250ml Water
Instructions
  1. Cut the tomatoes in half through the middle. If you prefer, you can skin the tomatoes first, and you can also scoop out the seeds. This is all entirely up to your personal preference. Removing the skin will temper a little of the acidity, but may result jn a less flavorful result. Removing the seeds has no effect on the flavor, but will certainly speed up the drying time.
  2. In a jug, combine the bicarbonate of soda, saltpeter, salt, sugar and water. Stir this until everything has dissolved.
  3. The bicarb preserves the amazing color of the tomatoes, while the saltpeter inhibits the growth of bacteria. Salt adds and enhances flavor, while the sugar combats the toughening effect salt has.
  4. Arrange the halved tomatoes on a rack in a large roasting tin. Brush the tomatoes liberally with the solution.
  5. Place the pan in your oven set to a temperature of 50c. Leave the door of the oven slightly open to allow moisture to escape.
  6. The drying time will be anything between 18 and 36 hours depending on the moisture content of the tomatoes, whether the tomatoes have been de-seeded, and whether they have been skinned.
  7. There is no formula and correct or incorrect procedure for the timing. I prefer my dried tomatoes leathery, but still soft and pliable. If you prefer yours totally dry and on the brittle side, then dry for longer.
  8. At this stage, you need to decide how you're going to store your dried tomatoes. The first way is to pack them in an airtight container, or to vacuum pack them in small quantities.
  9. I prefer mine in oil. To do this, pack them into a sterilized bottle and top the bottle up with oil until the tomatoes are covered. You can add raw garlic cloves and basil or marjoram leaves at this stage to further flavor the tomatoes. I prefer not to do this as it does limit your recipe choices if the tomatoes are already flavored.


Mexican Corn Medallions. Mexican-Style Spicy Corn Medallions. Classic Street Food.

mexican-style corn,mexican street corn,spicy mexican corn,how to make mexican street corn,hot mexican corn,mexican corn medalions,mexican corn medalions recipe,mexican corn medalions, corn on the cob, mexican corn on the cob, grilled corn, how to make corn, Mexican Cuisine (Cuisine), how to cook mexican corn, yellow corn tortillas, mexican recipes vegetarian


Mexican Corn Medallions. Mexican-Style Spicy Corn Medallions. Classic Street Food.
Author: 
Recipe type: Mexican Street Food
Cuisine: Mexican
Prep time: 
Cook time: 
Total time: 
Serves: 4-8
 
You can make this as hot or mild as you like. This spicy Mexican corn is absolutely delicious.
Ingredients
  • 4 Cobs corn
  • 80g Butter
  • 1 Tsp Ground cumin
  • 1 Tsp Ground coriander
  • 1 Tsp Garlic powder
  • 1 Tsp Cayenne pepper
Instructions
  1. Remove the husk and beard from the corn and using a sharp cleaver, cut the corn into medallions of 20mm or 34 inch thick.
  2. Place the corn on a large platter. Melt and heat the butter until very hot, then stir in the ground cumin, coriander, garlic powder and cayenne pepper.
  3. Brush the hot butter over the corn, season to taste with salt and cracked black pepper, and allow this to stand for at least an hour.
  4. Barbecue the corn on a ribbed skillet at medium hot heat for 15 minutes, turning halfway through.
  5. Remove the medallions from the heat and serve immediately.


Marinated Mushrooms. The Magic Ingredient for Toasted Sandwiches, Pizzas and Salads!!!!

marinated mushrooms,how to marinate mushrooms,marinated mushrooms recipe,marinated mushrooms for toasted sandwiches,marinated mushrooms for pizzas,marintaed mushrooms for pizzas, italian marinated mushrooms, marinated mushrooms recipe, marinated mushrooms gordon ramsay, marinated mushrooms for steak, marinated mushrooms calories, marinated mushrooms grilled, marinated mushrooms raw, how to make marinated mushrooms


Marinated Mushrooms. The Magic Ingredient for Toasted Sandwiches, Pizzas and Salads!!!!
Author: 
Recipe type: Accompaniment / Vegetable
Prep time: 
Total time: 
 
How to make quick marinated mushrooms. This ingredient is absolutely magic - it makes pizzas, toasted sandwiches and salads come to life.
Ingredients
  • 6 Mushrooms, sliced
  • 1 Tbs Caster sugar
  • ¼ Tsp Salt
  • ½ Tsp Garlic powder
  • 100ml White wine vinegar
Instructions
  1. Slice the mushrooms and place them in a jug or bowl.
  2. In a separate jug, combine all of the other ingredients and stir until totally combined.
  3. Pour this over the mushrooms, stir together, and allow to marinate for at least 60 minutes before using.


French Fried Onions. Deep-fried Shoe-string Onions. Glorious Crispy Fried Onions.

french fried onions,deep-fried shoe-string onions,crispy fried onion rings,crispy fried onions,deep-fried onions, onion rings recipe, fried onions, onion strings, french fried onions recipe, french fried onions chicken, french fried onions calories, french fried onions meatloaf, how to make french fried onions, onion strings recipes, beer battered onion rings, beer batter onion rings, onion rings batter


French Fried Onions. Deep-fried Shoe-string Onions. Glorious Crispy Fried Onions.
Author: 
Recipe type: Deep-fried / Vegetable
Cuisine: French
Prep time: 
Cook time: 
Total time: 
Serves: 4-6
 
Crispy,golden French fried onions make a perfect accompaniment, garnish or snack. Lightly coated then fried to golden perfection, these will have people lining up for seconds. Sometimes called shoe-string onions, these crispy fried onion rings have become the thing of legends!!!
Ingredients
  • 1 Large onion
  • Milk to cover
  • 2 Cups all-purpose flour
  • Oil to deep-fry
Instructions
  1. Top and tail the onion and remove the outer layer.
  2. Place onion on its end and cut down through the onion to split the rings, then place it on its side and slice rings as thinly as you can.
  3. Place the rings in a mixing bowl and pour in enough full cream milk to cover. Allow these to stand for 60 minutes.
  4. After the soaking time, dredge the rings in the flour and fry them at 190c or 375f until they are crisp and golden.
  5. Remove the onions from the oil with a slotted spoon and drain any excess oil on kitchen paper before serving.


Scroll to top

Kitchen Conversions

Convert:
Masses
to:
Volumes
to:
Temperatures
to:
Lengths
to: