How to Make Strawberry Jam – Whole Strawberry Jam Recipe

strwberry jam,whole strawberry jam,homemade strawberry jam,strawberry jam recipe,how to make strawberry jam,make strawberry jam at home,recipes,cooking kitchen tips,pectin test,testing pectin,strawberry jam,best strawberry jam recipe,gourmet strawberry jam,fruit recipes,how to use excess fruit


How to Make Strawberry Jam - Whole Strawberry Jam Recipe
Author: 
Recipe type: Jams and preserves
Serves: 450-500g
 
With strawberry season in full swing in our part of the world, it's time to use up the excess strawberries by making a batch of delectable strawberry jam.
Ingredients
  • 900g Strawberries
  • 350g White sugar
  • 20ml Lemon juice
  • (15ml Methylated spirits / denatured spirits - for the pectin test)
Instructions
  1. To start, trim away the leaves from 900g berries.
  2. Cut the larger strawberries into quarters lengthways, and the smaller berries in half.
  3. Measure out 350g of sugar and 20ml of lemon juice.
  4. Place the berries in a large heavy base pan over medium low heat and pour in the lemon juice.
  5. Cook the berries gently for about 10 mjnutes until softened.
  6. Use a fork to crush one third of the berries to release the juices and pectin.
  7. Scoop out a teaspoon of the juice and place it in a small cup.
  8. Pour 15ml of methylated spirits into the cup and shake it up.
  9. If the juice coagulates into a large mass, there is enough pectin in the mixture to set the jam. If there are a few lumps, then the jam should still set successfully. If there are many small lumps, there is a pectin deficiency, and you will need to add a further 20ml of lemon juice to the pan, or alternatively, add pectin following the manufacturers instructions.
  10. This has coagulated into a large mass and there is more than enough pectin present.
  11. After the pectin test, add the sugar to the pan.
  12. Continue cooking on medium low heat until the sugar dissolves.
  13. Once all the sugar hass dissolved increase the heat to high and boil the jam rapidly until the mixture reaches 105c or 220f which is the setting point for the jam.
  14. Transfer the hot jam to sterilized jars and you're done.
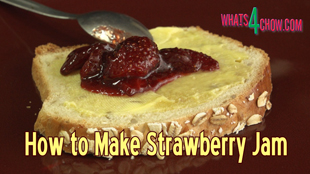
  15. And here is our delicious creation, with excellent color, a brilliant gloss, and sumptuous big pieces of strawberry.
  16. Here the jam is pictured on a slice of fresh honey and oat bread which will be featured in our next episode.
  17. Thanks for joining us today, p,ease like, subscribe and share, and we'll see you again tomorrow.


Creamy Refrigerator Cheesecake Recipe – How to Make Amazing Cheesecake. Double Crust Cheesecake.

cheesecake, refrigerator cheesecake, creamy cheesecake, light and fluffy cheesecake, homemade cheesecake, how to, how to make, recipe, cheesecake recipe, quick cheesecake recipe, making cheesecake at home, best cheesecake recipe, double crust cheesecake, food, dessert, cooking, kfc chicken recipe, easy cheesecake recipe, no-cook cheesecake, fridge cheesecake, how to make fridge cheesecake, cheesecake in 30 minutes,


Creamy Refrigerator Cheesecake Recipe - How to Make Amazing Cheesecake. Double Crust Cheesecake.
Author: 
Recipe type: Dessert
 
Today we're doing something a little different. Cheesecake is an all-time favorite, but it's even better when it's quick and easy, light and creamy, and tastes like heaven.
Ingredients
For the Crust
  • 200g Graham crackers or tennis biscuits
  • 120g Butter, melted
  • 25g Sugar
For the Filling
  • 200g Butter at room temperature
  • 200g Sugar
  • 1Egg
  • 1 Egg yolk
  • 250g Cream cheese (soft)
  • 200g Sour cream
Instructions
  1. To start, break the crackers or t-biscuits into bits and place them in your food processor.
  2. Pulse the machine 3 or 4 times until you have an even mass of crumbs.
  3. Pour in the sugar and melted butter.
  4. Machine this for about 30 seconds rocking the machine back and forth. This helps to get a good even blend.
  5. You will end up with a crumbly mass of pastry.
  6. Cut a circle of baking parchment to fit the bottom of a 10 inch or 25cm springform pan. Lock the bottom of the pan into place and insert the parchment.
  7. Smear a thin layer of butter around the edge of the pan. Cut a long strip of parchment just slightly wider than the height of the pan. Place the strip around the inside pf the pan. The butter will keep this in place. Depending on the size of your roll of parchment, you may have to cut 2 strips to cover the circumference.
  8. Pour two thirds of the crumbed mixture into the pan and spread this evenly across the base. Smooth this off lightly with the back of your spoon. Try not to compress the base, it should be light and crumbly.
  9. Transfer the pan yo your freezer for 30 minutes to set while you continue with the filling.
  10. In a bowl or large jug, combine the sour cream and the cream cheese. Mix it thoroughly making sure you have a soft homogenous mixture.
  11. Add the softened butter to your stand mixer along with the sugar and the egg and additional egg yolk.
  12. Attach the beater paddle and beat the mixture for 10 minutes until it is light and fluffy.
  13. Remove the bowl from your mixer and pour in the cream cheese mixture.
  14. Fold the cream cheese mixture into the butter and egg. This should be done gently so as not to knock the air out of the creamy whipped butter, however you do need to make sure it is quite well combined.
  15. Remove the springform pan from the freezer and pour the filling into the center of the pan.
  16. Spread it out evenly from the center outwards.
  17. Pour the remaining crumbs over the top of the filling and spread this evenly across the filling.
  18. Use the back of a spoon to smooth this off, taking care not to compress the crumb to much.
  19. Cover the cheesecake and transfer it to your refrigerator for 24 hours to set before cutting and serving.


How to Make Egg Rolls – Egg Rolls au Gratin – Superbly Tasty Egg Rolls

egg rolls recipe, cooking, breakfast, cocktail snacks, finger snacks, finger foods, how to, how to make, homemade, egg rolls, japanese omelette recipe, sliced egg rolls, easy egg roll recipe, egg roll recipe youtube, egg roll recipe video, rolls, egg, recipe, food, egg recipes, best egg roll recipe, omelette recipe, best omelette recipe, cheesy egg roll, 2 cheese egg roll, salami and cheese egg roll, breakfast recipes, cocktail party recipes, snack platter recipes, best recipes,


How to Make Egg Rolls - Egg Rolls au Gratin - Superbly Tasty Egg Rolls
Author: 
Recipe type: Eggs / Breakfast
 
Egg rolls are an all-time favorite. These eggs rolls reign supreme in the realm of egg rolls, and whether you serve them as finger snacks or as an accompaniment to breakfast, you will never be disappointed.
Ingredients
  • 4 Large eggs
  • 1 Tomato
  • 50g Good quality aged salami
  • 50g Finely shredded Parmesan cheese
  • 100g finely shredded mature cheddar cheese
  • 45ml Snipped garlic chives
  • 15ml Butter for frying
  • Salt and cracked black pepper to taste
  • Cayenne pepper for garnishing
Instructions
  1. To start, slice the tomato into thin slices.
  2. Slice the cured, aged salami into 1mm slices.
  3. Finely shred the Parmesan cheese.
  4. Whisk the eggs thoroughly... there must be no albumen visible in the egg.
  5. Finely shred the mature cheddar cheese, and snip about 3 tablespoons of fresh garlic chives.
  6. Add a tablespoon of butter to a 32cm pan. When the butter is sizzling, spread it around to coat the base of the pan.
  7. Pour in the egg and swirl it around to spread it evenly across the pan.
  8. Sprinkle 2 thirds of the chopped chives over the egg, followed by half of the shredded Parmesan cheese.
  9. Spread the thinly sliced salami across the egg, followed by the second half of the Parmesan cheese.
  10. Arrange the thinly sliced tomato around the edge of the pan with any leftover slices in the center.
  11. Season the whole lot with salt and cracked black pepper and remove the pan from the heat.
  12. Slide the egg from the pan onto a large chopping board.
  13. Sprinkle half of the mature cheddar cheese over the egg.
  14. For this part, you need teflon fingers.... starting on one side, roll the egg up as tightly as you can. If you don't have heat-proof fingers, allow the egg to cool for a few minutes first.
  15. Trim off the ends of the roll. This step is the most important of all.... put the ends in your mouth and enjoy the first taste.
  16. Cut the remaining roll into slices of 15mm or 3 quarter inch thick.
  17. These can be served just the way they are, but going the extra mile makes them extra special....
  18. Transfer the rolls to a baking sheet and sprinkle the second half of the cheddar cheese over the rolls.
  19. Place the pan in the center of your oven with just the grilling element on full blast for 5 minutes.
  20. Serve the egg rolls au gratin sprinkled with dusting of cayenne pepper and garnished with the remaining snipped chives.


The Best Omelette EVER! An Omelette Made with Noodles – is it a Nomlette???

omelette, how to, how to make, noodle omelette, omelette made from noodles, breakfast recipes, recipes, brunch recipes, fancy breakfast recipes, homemade noodle omelette, using noodles to make an omelette, 2 minute noodles recipe, best omelette recipe, special occasions breakfast recipes, special breakfast recipes, 5 star breakfast recipe, gourmet omelette recipe, unusual omelette recipe, cooking, home cooking, best recipes, fancy recipes, video cooking recipes, video recipe,


The Best Omelette EVER! An Omelette Made with Noodles - is it a Nomlette???
Author: 
Recipe type: Breakfast / Brunch
 
Today's episode is a good fun recipe. This super-tasty omelette made with 2 minute noodles is quick and easy to make, and makes for the perfect breakfast or brunch. It will serve 2 people, one one very hungry giant.
Ingredients
  • 4 Eggs
  • 1 Pack Two minute noodles
  • 6 Rashers streaky bacon
  • Handful of garlic chives, roughly chopped
  • 100g Mozzarella cheese
  • 6 Cocktail tomatoes
  • 60g Butter (2 x 30g)
  • Finely shredded Parmesan cheese
  • Fresh basil to garnish
  • Salt and pepper to taste
Instructions
  1. To start, whisk the eggs in a jug and place the 2 minute noodles in a bowl.
  2. Pour boiling water over the noodles to submerge and cover the bowl.
  3. Cut the streaky bacon across the grain into thin strips.
  4. Roughly chop the garlic chives.
  5. Slice the mozzarella cheese and cut the cocktail tomatoes into halves.
  6. By this time the noodles are ready. Drain the excess water and put these aside.
  7. Heat a 30cm or 12 inch pan over medium high heat and add 30ml of butter.
  8. Add the bacon and fry for 6 to 8 minutes until it has taken on a nice golden color.
  9. Add the chives and tomatoes and fry these for about 60 seconds.
  10. Remove everything from the pan and put this aside.
  11. Add another 30ml of butter to the pan. Spread this evenly over the base of the pan.
  12. Add the noodles to the pan and spread these evenly across the pan.
  13. Allow this to fry for 2 minutes undisturbed.
  14. Pour in the egg making sure to spread it around evenly.
  15. Allow this to cook and set of 2 minutes undisturbed.
  16. Top half of the pan with some of the cheese and the bacon chives and tomato.
  17. Use the remaining cheese on top of the bacon mixture.
  18. Season with salt and cracked black pepper and allow this to fry for a further 2 minutes.
  19. Slide the whole omelette from the pan onto a large platter and flip the empty side of the omelette over the filling.
  20. Cut the omelette in half and slide the halves onto serving platters.
  21. Top the omelettes with finely shredded Parmesan, garnish with fresh basil and serve immediately.
  22. And there we have it... breakfast fit for a hungry king.


Grilled Prawn & Monkfish Skewers – Succulent Prawns and Rich Monkfish, Grilled to Perfection!

grilled prawns, grilled monkfish, grilled prawns and monkfish, prawn skewers, prawn kebabs, seafood skewers, seafood kebabs, prawn and monkfish kebabs, how to grill prawns, how to grill monkfish, how to grill prawn skewers, seafood kebabs, seafood skewers, recipe, how to, homemade grilled prawns, homemade grilled monkfish, easy grilled prawns, easy grilled fish, makiing seafood skewers, how to make seafood skewers, how to make seafood kebabs, fish kebabs recipe,


Grilled Prawn & Monkfish Skewers - Succulent Prawns and Rich Monkfish, Grilled to Perfection!
Author: 
Recipe type: Seafood
Serves: 4
 
Today we're going to grill a batch of seriously tasty prawn and monkfish skewers. Monkfish is found worldwide and is revered for its remarkable similarity in texture and taste to crayfish and lobster. Combine this with the prawns and you have an amazing flavor explosion.
Ingredients
  • 32 Medium size prawns
  • 800g Monkfish tails
  • 16 x 6 inch Bamboo skewers (150mm)
  • 150g Butter
  • 30g Crushed garlic
  • 2 Small lemons
  • Salt to season
  • 4 Portions cooked rice (according to the package instructions)
Instructions
  1. Start with 32 medium size prawns. Use a sharp scissors to cut down the spine of each prawn up until and including the second last segment of the shell.
  2. Use toothpick to hook out the vein. Put this aside and continue until all of the prawns are deveined.
  3. Monkfish only has a central bone. Use a sharp knife to cut the fillets from the bone. For this quantity of prawns, you will need about 800g of monkfish fillets.
  4. Cut through the fillets at an acute angle to get strips of fish 50mm or 2 inches in length.
  5. You will need 16 x 6 inch or 150mm thin bamboo skewers.
  6. Press a skewer through the prawn just behind the head. Press another skewer through the prawn just above the second last segment. Notice that the prawn is lying sideways. The skewers enter the belly and exit the spine.
  7. Thread a strip of monkfish onto the skewers.
  8. Follow this with another prawn, and so on, until each kebab has 4 prawns and 3 strips of monkfish.
  9. Continue until all 8 skewers are complete.
  10. Heat a large pan over high heat. Add the butter.
  11. Once the butter is sizzling, add the garlic. Stir this around the pan for just a few seconds before adding the skewers.
  12. If your pan is not as large as this one, use a smaller pan, half the butter and half the garlic and fry 2 batches.
  13. Fry the skewers for 4 to 5 minutes. Squeeze the fresh lemon over the prawns.
  14. Turn the skewers, squeeze the remaining lemon over the prawns and season liberally with salt. Continue frying for 4 to 5 minutes.
  15. Wipe the skewers around in the pan then turn again. Fry for 60 seconds.
  16. Wipe the skewers around the pan and turn again. Fry the prawns for a final 60 seconds.
  17. Remove the prawns from the pan and add the prepared rice to the pan.
  18. Stirfry the rice in the prawn butter to pick up all the yummy bits from the pan.
  19. Serve a bed of rice onto each platter and top each with 2 of the seafood skewers.
  20. Serve immediately with lemon wedges and the accompaniments of your choice.


How to Make Honeycomb – Honeycomb Candy Recipe, Simple and Quick, and Super Delicious!

how to make honeycomb, honeycomb, honeycomb recipe, honeycomb toffee (dish), baking, sponge candy recipe, easy recipes, crunchie (consumer product), how to make crunchie bars, crunchie bar recipe, homemade cadbury crunchie bars, homemade honeycomb, sponge toffee, how to make honeycomb sweets, how to make honeycomb candy, how to make honeycomb crunchies, candy recipes, cadbury's crunchie, chocolate coated honeycomb, make honeycomb at home, recipe, candy, how to, recipes,


How to Make Honeycomb - Honeycomb Candy Recipe, Simple and Quick, and Super Delicious!
Author: 
Recipe type: Candy
 
How to Make Honeycomb - quick and easy honeycomb recipe! Whether you decide to coat these little wonders with chocolate or just have them plain, honeycomb is just super yummy.
Ingredients
  • 75ml Water
  • 320ml Caster sugar
  • 120ml Corn syrup, Lyle's Golden Syrup, or glucose syrup
  • ⅛ tsp Cream of tartar
  • 5ml White vinegar
  • 7.5ml Bicarbonate of soda (baking soda)
  • Chocolate to coat (optional)
Instructions
  1. Place the corn syrup or Lyles golden syrup or glucose syrup, caster sugar, cream of tartar, white wine vinegar and water in a deep pot.
  2. Half fill a large pan with water at room temperature.
  3. Place the pot over medium high heat and stir the mixture until the sugar has dissolved and everything is well combined.
  4. Bring the mixture up to 300f or 154c. To judge this you will need to use a candy thermometer or an infrared thermometer.
  5. While the mixture heats up, line an 8 x 8 inch baking pan with baking parchment.
  6. As the mixture comes to the correct temperature, remove the pot from the heat and carefully lower it into the pan of water.
  7. Add the bicarbonate of soda and whisk this into the mixture.
  8. The mixture will froth up like a volcano.... this is why you need a deep pot.
  9. The cooling bath cools the mixture just enough to ensure a nice fine texture of bubble in the honeycomb.
  10. Remove the pot from the cooling bath and pour the honeycomb into the lined baking pan. Quickly level off the surface and put this aside to set.
  11. Once the mixture has set solid, turn it out from the pan.
  12. Use your meat mallet and a butter knife as a chisel to fracture the honeycomb into bite sized pieces.
  13. And there it is.... a beautifully finely texture honeycomb to add a little sweetness to the beginning of your new year.


Hunan Sweet and Sour Pork – How to Make Sweet & Sour Pork – Homemade Chinese Food!!!

sweet and sour, sweet and sour pork, how to, how to make, sweet and sour pork recipe, hunan, chinese pork recipe, cheinese food recipes, easy chinese pork recipe, homemade chinese food, how to make sweet and sour pork, how to make sweet and sour pork at home, homemade sweet and sour pork, sweet & sour pork recipe, sweet and sour pork recipe youtube, sweet and sour pork recipe video, best sweet and sour pork recipe, easy chinese food, quick chinese food, make chinese food,


Hunan Sweet and Sour Pork - How to Make Sweet & Sour Pork - Homemade Chinese Food!!!
Author: 
Recipe type: Pork
Cuisine: Chinese
Prep time: 
Cook time: 
Total time: 
Serves: 2-4
 
Hunan crispy sweet and sour pork takes sweet and sour to a whole new level. This succulent dish has a slight bite and tons of amazing flavor. Hunan sweet and piquant pork is super easy to make and will earn accolades from your friends and loved ones.
Ingredients
  • 450g Pork neck steaks or shoulder
For the Coating
  • 2 Eggs
  • 2.5ml Salt
  • 60ml Tapioca flour
The Vegetables
  • 2 Medium carrots
  • 3 Spring onions, whites only
  • 1 Clove garlic, chopped
  • 15ml Chilli sauce
For the Glaze
  • 60ml Caster sugar
  • 45ml White wine vinegar
  • 30ml Light soy sauce
Instructions
  1. Slice the pork into thin strips and transfer this to a mixing bowl.
  2. In a jug, combine the tapioca flour, salt and eggs and whisk this to a smooth batter.
  3. Pour the batter over the pork and mix it in thoroughly. Put this aside.
  4. Peel and cut the carrots into julienne and slice the spring onion whites into rounds.
  5. Measure out the chopped garlic and the chilli sauce.
  6. For the glaze, combine the caster sugar, white wine vinegar and light soy sauce and whisk this until all of the sugar has dissolved.
  7. Half fill your wok with oil and heat this to 190c or 375f.
  8. Carefully drop half of the pork into the oil piece by piece. You need to drop each piece in separately otherwise the pieces will stick together in a clump.
  9. Fry the pork for 3 minutes until crispy and lightly golden.
  10. Use a slotted spoon to lift the pork from the oil, put it to one side and continue with the remaining pork.
  11. Carefully drop the julienne carrots into the oil and deep fry these until tender and golden. Use your slotted spoon to lift these from the oil.
  12. Heat another wok over high heat. Pour in 15ml of oil to the wok and add the spring onions, garlic and chilli sauce. Stirfry these for 15 seconds until fragrant, then add the pork and carrots to the wok.
  13. Pour in the glaze and continue to stirfry this for a further 3 minutes until the glaze has reduced and coated all of the ingredients with a shiny, sticky coating.
  14. Remove the pork from the wok and serve immediately with rice or noodles.


How to Make Peppadew Poppers – Crumbed, Deep-fried Stuffed Piquante’ Peppers

peppadew poppers, how to make peppadew poppers, peppadew poppers recipe, best recipe peppadew poppers, homemade peppadew poppers, crumbed deep-fried peppadew poppers, chillipoppers recipe, how to make chilli poppers, homemade chilli poppers, blue cheese peppadew poppers, easy peppadew poppers, quick peppadew poppers, peppadew poppers video recipe, peppadew poppers recipe youtube,


How to Make Peppadew Poppers - Crumbed, Deep-fried Stuffed Piquante' Peppers
Author: 
Recipe type: Peppers / Deep-Fried
Prep time: 
Cook time: 
Total time: 
Serves: 20-30
 
Peppadews, and registered brand Peppadew originate in South Africa and must be undoubtedly South Africa's greatest culinary contribution this century. These piquant pickled peppers have a thousand different and delicious applications and today we're going to look at one of my favorites.... peppadew poppers. These are very similar to chilli poppers, but with a unique flavor all their own, and far less fire.
Ingredients
  • 100g Blue Cheese
  • Yogurt (approx. 45-60ml)
  • 20-30 Pickled peppadews
  • ½ Cup Finely crushed cornflakes
  • ½ Cup All-purpose flour
  • 2 Eggs
Instructions
  1. Starting with the filling, add just enough yogurt to a 100g of strong blue cheese to make a paste. The paste must be just thinned enough to be pipe-able.
  2. Use a fork to mix this until smooth.
  3. Spoon the creamy mixture into a piping bag.
  4. Use the edge of a ruler to squish the cheese down the bag, then snip about 10mm or just less the a half inch from the tip of the bag.
  5. Use the ruler again to press the mass of cheese down to the tip.
  6. For the coating, whisk 2 eggs thoroughly until all of the albumen has broken down.
  7. Combine the finely crushed cornflakes and all purpose flour.
  8. You will need to count out 20 to 30 pickled peppadews and drain the syrup from them.
  9. Use the filled piping bag to pipe the cheese mixture into each peppadew.
  10. To coat the poppers, sprinkle a layer of the cornflake mixture over a large platter. This where the coated peppadews will set, and the crumbs will prevent the coating from sticking to the platter and getting damaged.
  11. Working with one popper at a time, roll the popper in the crumb mixture.
  12. Transfer this to the egg to wet all of the crumb.
  13. Then back to the crumbs to get a good solid coating all over.
  14. Transfer this to the platter to set and continue with the rest of the poppers.
  15. Allow the coating to set for 20 minutes.
  16. Half fill your wok or a large pan with oil and heat this to 180c or 350f.
  17. Carefully drop the poppers into the oil in batches. The poppers will fry very quickly... about 45 to 60 seconds.
  18. Use slotted spoon to lift the golden poppers from the oil and drain any excess oil on kitchen paper.
  19. Continue frying the remaining poppers.
  20. Serve the poppers piping hot and enjoy....


Crispy Feta and Cream Cheese Fritters – Light & Airy Cheese Fritters Deep-Fried to Golden Perfection

feta cheese fritters, cream cheese fritters, feta and cream cheese fritters, how to make feta and cream cheese fritters, how to make fritters, crispy deep fried fritters, quick fritter recipe, easy fritter recipe, cheese fritter recipe youtube, cheese fritter recipe video, homemade fritter recipe, making crispy deep-fried fritters at home, feta cheese, cream cheese, buttermilk, self-raising flour,


Crispy Feta and Cream Cheese Fritters - Light & Airy Cheese Fritters Deep-Fried to Golden Perfection
Author: 
Recipe type: Cheese / Deep-Fried
Cuisine: Mediterranean
Prep time: 
Cook time: 
Total time: 
 
These cheesy fritters are light and airy, and just full of flavor. Best of all, they are fail proof, so you could even get your children to mix the batter, however I don't suggest allowing kids to do the deep-frying.
Ingredients
  • 250ml Cultured buttermilk
  • 250g Cream cheese (plain or flavored)
  • 250g Feta cheese
  • 2 Eggs, beaten
  • 1½ Cups Self-raising flour
Instructions
  1. Measure out 250g of feta cheese, 250g of cream cheese , 250ml of cultured buttermilk, beat 2 eggs, and weigh 1½ cups of self raising flour.
  2. Place all of these in your food processor.
  3. Zap these until well blended and smooth, then allow the batter to stand for 15 minutes.
  4. Half fill your wok, or a large pan with oil and heat this to 170c or 340f.
  5. Spoon slightly heaped tablespoons of the batter into the oil.
  6. Allow these to fry for 3 minutes, turning halfway through.
  7. Use you tongs to lift the fritters from the oil and drain any excess oil on kitchen paper. Continue frying the remaining fritters.
  8. Serve these light and crispy snacks as is and enjoy.


Deep-Fried Super-Cheesy Bites – A Creamy, Crunchy, Sweet & Savory Taste of Heaven!!!

deep-fried cheese bites, crispy deep-fried mini chese pies, crispy fried cheese parcels, sweet gow gee, deep-fried cheese fold-overs, deep-fried cheesy pocket pies, super chessy pocket pies, blue cheese and preserve deep-fried dessert pies, how to make super cheesy dessert pies, crispy fried cheese fold-overs, golden fried cheese and preserve pies, how to make the best dessert, best dessert recipe, unique dessert recipe,


Deep-Fried Super-Cheesy Bites - A Creamy, Crunchy, Sweet & Savory Taste of Heaven!!!
Author: 
Recipe type: Dessert
Prep time: 
Cook time: 
Total time: 
Serves: 16
 
These deep-fried super-cheesy bites are insanely good. Strong blue cheese and fruit jam enclosed in American cheese slices then crumbed a deep-fried results in the most amazing sweet savory flavor and texture combination.
Ingredients
  • 16 Slices American processed cheese
  • 3 Heaping tablespoons fruit preserve / jam
  • 80g Creamy blue cheese
  • 250ml Fine bread crumbs
  • 250ml All-purpose flour
  • 2 Eggs, beaten
  • Oil for deep-frying
Instructions
  1. You will need 16 slices of American cheese. For those not in North America, this the processed cheese slices that come individually wrapped in plastic sheets.
  2. In addition, measure out 3 heaping tablespoon of a good quality fruit preserve and open a block of creamy blue cheese.
  3. You will also need an 8cm, or just more than 3 inch gow gee press. These are readily available on eBay and Amazon for next to nothing.
  4. To start assembling, open a cheese slice and keeping the plastic wrapper in place, use the back of the press to cut out the circle then position the circle over the press.
  5. Place ⅔ of a teaspoon of the preserve in the center of the cheese, followed by a small piece of blue cheese.
  6. Grab the handles of the press and close this just firmly enough to seal the edges of the cheese. If you press to hard, the cheese will split.
  7. Continue until all of the cheesy bites are formed.
  8. To coat the bites, measure out a cup of all-purpose flour, a cup of fine bread crumbs, and whisk 2 eggs.
  9. Sprinkle a layer of breadcrumbs over a large platter. This is where the coated cheesy bites will set, and the crumbs prevent the coating from sticking to the platter and getting damaged.
  10. Working with cheesy bite at a time, dredge the bite in the flour.
  11. Transfer this to the egg to wet all of the flour.
  12. Then it's into the bread crumbs to get a good solid coating all over.
  13. Transfer this to the platter to set, and continue with the remaining pockets.
  14. Allow the coating to set for 20 minutes.
  15. Half fill a large pan with oil and heat this to 180c or 350f.
  16. Carefully drop the cheesy bites into the oil and fry these for 3 minutes, turning over halfway through.
  17. As the first cheesy bites are ready, use a slotted spoon to remove them from oil, and drain any excess oil on kitchen paper.
  18. Serve the bites immediately accompanied with whipped cream and a good dessert wine.
  19. And there we have it, a crunchy, creamy, sweet and savory taste of heaven.


Bacon, Feta & Peppadew Kebabs – Absolute Kebab Perfection, Made in Heaven!

bacon, feta, peppadew, kebabs, bacon feta and peppadew kebabs, how to make bacon feta and peppadew kebabs, bacon feta and peppadew kebabs recipe, bacon feta and peppadew kebabs video recipe, bacon feta and peppadew kebabs youtube, best kebabs recipe, best kebabs recipe youtube, bacon feta and piquant peppers kebabs,


Bacon, Feta & Peppadew Kebabs - Absolute Kebab Perfection, Made in Heaven!
Author: 
Recipe type: Grill / Barbecue
Prep time: 
Cook time: 
Total time: 
Serves: 4
 
These bacon, peppadew and feta kebabs are out of this world. Slightly sweet, slightly hot and tangy, these kebabs will have your guests lining up for more.
Ingredients
For 4 Kebabs
  • 8 Rashers streaky bacon
  • 16 Peppadews (pickled piquant peppers)
  • 50g Feta cheese
  • 4 x 150mm / 6 inch skewers
  • 15ml Butter
Instructions
  1. Cut the bacon rashers through the center.
  2. Cut the feta cheese into cubes of about 1cm or just less than a half inch.
  3. Stuff a cube of feta into each peppadew until each one is filled to the brim.
  4. Place s strip of bacon across the opening of a peppadew and wrap it around the peppadew to enclose the feta cheese. Continue until all of the bundles are formed.
  5. To make up the kebabs, drill the skewers through the peppadew bundles using a twisting motion. If you try to push them through, you will end up squeezing the cheese out.
  6. Once you have four bundles on the skewer, straighten the bundles out to align the edges.
  7. Heat a large pan over medium high heat and add a tablespoon of butter.
  8. Add the kebabs to the pan with the bacon in contact with the pan.
  9. Fry this for 3 minutes, then turn the kebabs over to the other bacon side. Fry this for a further 3 minutes.
  10. Turn the kebabs onto one edge and fry this for 60 seconds.
  11. Turn them to the other edge and fry for another 60 seconds.
  12. Remove the kebabs from the oven and serve immediately with the accompaniments of your choice.
  13. These little gems can also be grilled quite successfully on your barbecue using a skillet or riffle pan.


Escargot Melba – Escargot with Garlic, Chilli & Sour Cream on Melba Toast

escargot,escargot recipe,making escargot at home,homemade escargot,best escargot recipe,snails,best snails recipe,making snails at home,homemade snails,escargot with melba,escargot with garlic,escargot with chilli,creammy escargot recipe,how to make melba toast,homemade melba toast,perfect melba toast


Escargot Melba - Escargot with Garlic, Chilli & Sour Cream on Melba Toast
Author: 
Recipe type: Starter / Appetizer
Cuisine: French
Prep time: 
Cook time: 
Total time: 
Serves: 4
 
One of my favorite ingredients are snails, however every restaurant seems to the same boring renditions over and over. This recipe gives a new flavor, texture and presentation to what has become an otherwise boring and mundane dish.
Ingredients
  • 24 Escargot
  • 30g Butter
  • 5ml Granulated garlic
  • 2.5ml Chilli flakes
  • 60ml Sour cream
  • Salt & Pepper to taste
  • 4 Slices square loaf white bread
Instructions
  1. To start, we need to make the curly melba triangles. For this you need regular square loaf white bread.
  2. Working with 2 slices at a time, toast the slices in your toaster until they are well browned, then slice of the edges. Keep the edges on one side.
  3. Use your bread knife to cut the 2 crispy sides apart. The center is very soft and the knife will literally slide through.
  4. Turn each piece over and rub the inside surface on the work surface. The moisture in the untoasted side will cause the excess bread to ball up and rub away onto the counter, leaving you with a beautifully thin wafer of toast.
  5. Cut the wafers from corner to corner to make the triangles.
  6. Repeat this until all of the slices are processed.
  7. Place the melba triangles with the untoasted side facing upward onto a large baking sheet.
  8. Toast the melba in a preheated oven at 200c or 400f for about 90 seconds until the triangles have browned slightly and curled up.
  9. Clear the baking sheet and place any remaining triangles on the sheet along with the toast edges.
  10. Pop the sheet back in the oven for 90 seconds.
  11. Remove this from the oven and put the melba and bread batons aside.
  12. Now onto the snails.... remove the snails from the can and drain them in colander. Rinse the snails thoroughly under running water for 5 full minutes. This removes the terrible rancid brine from the snails.
  13. Measure out the dried chilli flakes, garlic granules, cultured sour cream and butter.
  14. Heat a pan over medium heat and add the butter.
  15. Once the butter is bubbling pour in the snails. Fry the snails gently for 2 minutes.
  16. Add the garlic granules and chilli flakes and continue to fry for a further 60 seconds.
  17. Turn off the gas or remove the pan from the heat and stir in the sour cream.
  18. To serve the escargot, place 3 triangles of melba on each serving plate.
  19. Top each of these with 2 snails.
  20. Dress each triangle with 2 toast batons and serve immediately.


Scroll to top

Kitchen Conversions

Convert:
Masses
to:
Volumes
to:
Temperatures
to:
Lengths
to: