In today’s episode we’re going to make Russian Apple Cake, or Apple Sharlotka which reigns from the days of Tsar Alexander 1st of Russia. It is relatively simple to make and is absolutely delicious served with a powdering of icing sugar and copious amounts of whipped cream.
Ingredients
680g Apples
Juice of ½ lemon
3 Large eggs
220g Sugar
10ml Vanilla extract
130g All purpose / cake flour
2.5ml Salt
Icing sugar as needed
Whipped cream to serve
Instructions
To start, core and peel the apples and cut them into one inch or 25mm bits of around 4mm thick or a quarter inch. Toss them with the juice of a half lemon to prevent the apple from browning.
Rub butter all over the inside of a 9 inch or 220mm spring-form pan and line the pan with baking paper. Transfer the apple to the pan and put this aside. Start preheating your oven to 350f or 180c.
If you don't have a 9 inch spring-form pan, you can find one here - Springform Pans
Crack 3 large eggs into your mixer bowl and add 220g of sugar.
Place the bowl on your mixer with the whisk attached and whisk the mixture on medium high speed for 4 minutes.
Add 2 teaspoons or 10ml of vanilla extract and continue to whisk on medium high for another minute. Remove the bowl from the machine.
Sift 130g all-purpose flour or cake flour and a quarter teaspoon salt into another bowl.
Add half of this to the egg mixture and fold it into the mixture. Do this with a gentle folding motion. You do not want to knock all of the air out of the egg mixture.
Add the remaining flour to the bowl and continue folding until everything is just combined.
Pout the batter over the apples in the spring-form pan and lightly level the surface with your spatula.
Transfer the pan to your oven and bake for 45-55 minutes until lightly golden and crispy on top, and a skewer comes out clean when inserted into the cake.
Remove the cake from the oven and allow this to cool for at least an hour hour before serving.
To serve, sprinkle the top of the cake with icing sugar and add a generous helping of whipped cream, and you’re done.
In our previous episode I spoke about fake condensed milk that is flooding the markets around the world – if you missed it, the link is in the description below. Today I am going to show you how to make your own condensed milk at home using just milk and sugar.
Ingredients
2¼ Cups full cream milk
⅔ Cup White sugar + 1 Tbs
Instructions
Since most recipes call for condensed milk on can measurements, this recipe will make the exact equivalent of a single can of condensed milk. If you need 2 cans, simply double up the recipe and adjust the timings accordingly.
The added bonus of making your own condensed milk is that it works out at roughly half the price of store-bought condensed milk.
To start, measure out 2 and one quarter cups of full cream milk, and 2 thirds of a cup of sugar plus one tablespoon. You can use any white sugar, however I prefer to use caster sugar as it is highly refined and contains less impurities, resulting in less scum or slag that has to be skimmed from the top of the pot.
Place a heavy bottomed pot over medium heat and pour in the milk and sugar. Stir this until the sugar has dissolved. You will know when it is dissolved as the bottom of the pot will be smooth.
At this stage, remove the spatula from the pot and wait until the milk just comes to a gentle simmer around the edges.
Reduce the heat and allow this to simmer gently for 35-40 minutes. The exact timing will depend on what pot you use, your stove, and many other variables.
During this stage it is important not to disturb the milk in any way. Stirring or agitating the milk will knock sugar crystals that form on the edges of the pot back into the mixture, and this will result in a grainy condensed milk.
When the milk has reduced to half of it’s original volume, use a spoon dipped in a little water to skim off any slag or scum.
If the milk coats you spoon and drips off from the spoon like pouring cream, the process is complete.
Remove the pot from the heat and pour the condensed milk through a sieve to strain out any skin and slag that you may have missed with the spoon.
Allow the condensed milk to cool to room temperature before covering and refrigerating. The condensed milk will last for 6 months under refrigeration.
As the condensed milk cools it will thicken dramatically to the consistency of store-bought condensed milk.
And there we have it, silky-smooth creamy condensed milk made right here at home.
That’s it for today folks, please like, subscribe and share, and we’ll see you again real soon.
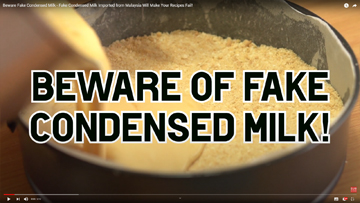
Beware Fake Condensed Milk - Fake Condensed Milk Imported from Malaysia Will Make Your Recipes Fail!
Author: Whats4Chow
Recipe type: Dessert
Cuisine: Universal
Fake Condensed Milk Hi and welcome to episode #648 with Whats4Chow.com Today’s episode is a public awareness episode. Over the festive season, my sister-in-law came to visit. While she was here, she prepared a creamy custard fridge tart. This is a tart that she can make in her sleep. It is super simple, and absolutely fail-proof…. until now that is.
Ingredients
Condensed Milk
Instructions
It seems that a company based in the far east has taken it upon them selves to make fake condensed milk. It can not be used for baking, or any purpose that requires condensed milk as the active ingredient. Fridge tarts will not set, and anything similar is bound to fail.
The product is packaged exactly the same as real condensed milk, however a quick look at the ingredients and all is exposed. The fake product contains sugar, milk powder, not full-cream milk, and refined palm oil. In addition to this it contains a soy based emulsifier, probably lecithin, to bind the water and the oil, and a stabilizer, probably zanthan gum to stop the precipitation of the milk powder in the mixture.
Real condensed milk contains sugar and milk. Here is one of the real brands. As you can see it only contains sugar and full cream milk. Lactose is added in varying quantities, as this varies in every batch of milk. Lactose is the sugar found naturally in milk. Lactose is added in the condensed milk for the purpose of consistency.
On opening a can of this rubbish, there is noticeable difference in color. It is much darker than real condensed milk. It is also noticeably thinner in consistency.
On tasting it, I must say that it is almost as creamy and smooth as condensed milk, however the dairy flavor is almost entirely absent.
If you buy condensed milk to sweeten your coffee or tea, then this might do the job, and it is certainly cheaper than condensed milk, however, if you’re planning any type of baking or candy making, then I would absolutely avoid this product. You will waste much more money on spoiled ingredients than you stand to save by buying it.
In my opinion, the FDA, and similar food control organisations around the world should be doing a better job of stemming the influx of these rubbish products into our countries. In the meantime, if you’re buying condensed milk, read the ingredients… there should be nothing other than full cream milk, sugar and lactose.
That’s it for today folks, please share this with your friends and family, and we’ll see you again real soon.
Check out Chef D's new Youtube Channel -- https://www.youtube.com/watch?v=OmiyL8XyNes
For over 600 episodes of amazing cooking videos, please visit http://whats4chow.com
Syrian Style Cheese Latkes - After Tasting These You'll Never Eat a Waffle Again!
Author: Whats4Chow
Recipe type: Dessert
Cuisine: Syrian
Prep time:
Cook time:
Total time:
Serves: 12
We will be making a batch of delectable Syrian-style cheese latkes. These latkes are crispy on the outside, and incredibly smooth and creamy on the inside. Rich and decadent, these treats will have your friends and family lining up for seconds. You can whip up a dozen of these tasty latkes in under 20 minutes.
Measure a cup or 160g of all-purpose flour into a large mixing bowl.
Add a pound or 450g of coarsely grated strong cheese. You can use mature cheddar, jack or anything similar.
Mix this into the flour. Doing this does make the final mixing much easier, and you will get a more even mix as well.
Add a half-cup, or 110g of caster sugar and a quarter teaspoon or 1.25ml of ground cinnamon. Mix this in until well combined.
Add 6 eggs to the bowl and mix these in thoroughly until there is no dry flour visible in the mixture.
Finally, add a teaspoon or 5ml of vanilla extract and mix this in thoroughly.
Heat a large pan over medium high heat and add enough butter to cover the base of the pan.
Spoon one-third of a cup, or 80ml of batter into the pan for each latke.
Fry these for 2-3 minutes before turning. Don’t be too concerned about them breaking when you turn them, the fried side is quite resilient and will hold them together.
Fry the second side until golden, then remove them from the pan and continue with the remaining latkes.
Serve the latkes with whipped cream or ice-cream and a generous dose of honey or maple syrup, and you’re ready go.
Molasses and Condensed Milk Fudge Recipe -Unique, Creamy and Smooth Fudge Recipe!
Author: Whats4Chow
Recipe type: Confectionery
Cuisine: Universal
Serves: 30
In today's episode, we will be making a batch of smooth, creamy fudge. This fudge is like no other fudge, it is flavored with black strap molasses, giving it a deep rich flavor and aroma, second to none!
Ingredients
1 380g Tin of sweetened condensed milk
100ml Full cream milk
400g Brown sugar
115g Butter
50g Blackstrap molasses
Instructions
To start, you will need a medium size pot, a wood spoon or spatula, a baking sheet, 2 pieces of baking parchment, a rolling pin, and a candy or infrared thermometer.
for the ingredients you will need a can of sweetened condensed milk, 400g of brown sugar, 115g of butter, 50g of black strap molasses and 100ml of full cream milk.
Place all of the ingredients in the pot over medium high heat and stir until the sugar has dissolved. Bring the pot to a boil, and continue stirring constantly until the ingredients reach a temperature of 113 - 115c or 235-239f. This will take 10-15 minutes.
At this point, remove the pot from the heat and allow it to cool for 5 minutes.
After 5 minutes, start beating the mixture with the wooden spoon. Continue beating for 5-10 minutes until the mixture has lost its shine, and it just starts to come away from the sides and bottom of the pot. If you carry beating any longer, the fudge will end up grainy and crumbly.
Pour the mixture into the lined baking sheet. Cover the mixture with the second piece of parchment, and use your rolling pin to roll the mixture into an even sheet, using the sides of the baking sheet as guides.
Leave this to cool to about 35c or 95f. Use a ruler and a thin blade knife to slice the fudge into neat squares. Allow to cool completely before serving and enjoying.
That's it for today folks, please like, subscribe and share, and we'll see again real soon.
Please subscribe to our channel to receive notifications and updates!
How to Make Yeast Donuts / Doughnuts - How to Make The Best Yeast Donuts Ever!
Author: Whats4Chow
Recipe type: Dessert
Cuisine: American
In my long search for the best doughnut recipe, I have tried dozens of different recipes, techniques and procedures. I can quite confidently say that this is the best doughnut recipe ever. Before we continue, to make the dough for this recipe, you will need a strong bowl mixer, like a Kenwood or Kitchenaid, as mixing the dough will test your machine.
Ingredients
500g Strong white bread flour
15g yeast
60g Sugar
Zest of ½ lemon
4 Eggs, lightly beaten
10ml Salt
150ml Water
125ml Softened unsalted butter
Oil for frying
Caster sugar for coating
Instructions
In my long search for the best doughnut recipe, I have tried dozens of different recipes, techniques and procedures. I can quite confidently say that this is the best doughnut recipe ever.
Before we continue, to make the dough for this recipe, you will need a strong bowl mixer, like a Kenwood or Kitchenaid, as mixing the dough will test your machine.
To start, measure 500g strong white bread flour into your mixer bowl.
Add 15g instant dry yeast, 60g sugar, 10ml fine salt, the zest of half a lemon, 4 eggs lightly beaten and 150ml water.
In addition, measure out 125g softened unsalted butter and put this aside.
Put the bowl on your mixer with the dough hook attached. Mix the dough on medium speed for about 8 minutes, and the dough comes away clean from the side of the bowl.
Scrape the dough down from the hook and add one fifth of the butter to the bowl. Mix this at medium high speed. Add another 25g of butter every minute and continue mixing until all of the butter is combined with the dough.
The dough will be glossy, smooth and very elastic.
Transfer the dough to a bowl, cover with clingfilm and allow this to rise until doubled in size.... about an hour.
Knock the dough back, recover the bowl and place this in your refrigerator overnight.
The following day remove the dough from the refrigerator and divide it into 20 x 50g portions. Roll each portion into a ball, flatten it into a disc and transfer it to a lightly floured baking sheet, leaving about an inch between each one. Once all of the donuts are formed, lightly cover the sheet with clingfilm.
Allow these to rise for 4 hours in a warm place.
If any of the donuts have stuck to one another, simply separate them using a knife.
Half fill a large pan with oil and heat this to 180c or 350f.
Fry the donuts in batches for 4 minutes, turning halfway through. Remove them from the oil using a slotted spoon and drain any excess oil on kitchen paper.
Toss the donuts in caster sugar and you're ready to sample the best donuts ever.
10 Minute Condensed Milk Tart - No Bake Condensed Milk Tart - Easy No Bake Tart @Whats4Chow
Author: Whats4Chow
Recipe type: Cake and Tart Recipes
Serves: 2
Today we're making a super-quick condensed milk tart. This delicious treat literally takes only 10 minutes to make, and absolutely no baking skills are required.
Ingredients
360g Tennis / Tea biscuits
200g Melted butter (plus 100g if mixture is too dry)
Today we're making a super-quick condensed milk tart. This delicious treat literally takes only 10 minutes to make, and absolutely no baking skills are required.
To start, open 2 packets, or 360g tennis biscuits or tea biscuits and melt and measure 200g of butter.
Break the biscuits into the bowl of your food processor and zap these until reasonably fine.
Drizzle the melted butter in through the feeder tube of the processor and run this until everything is well combined. Depending on what brand of biscuits you use, you may have to add an additional 100g of butter if the crumbly mixture doesn't hold together when compressed.
Divide the mixture between two 22cm tart foils.
Start compressing the pastry from the center outwards pressing it into the bottom corners and up the sides.
Work around the edges pressing the pastry as you go.
Use the back of a spoon to smooth of the base and define the bottom corner. This will help to achieve even thickness all the way through the base.
Repeat this exercise with the sides, leaving the top edge rustic and rough.
Continue with the second tart before transferring them both to the freezer while you continue with the filling.
Pour 770g of sweetened condensed milk into a large bowl.
Add 1 liter of double cream yogurt.
Use a spatula to mix this until thoroughly blended.
Remove the tart shells from the freezer and pour half of the filling into each shell.
Dust the tops of the tarts with cinnamon sugar.
Place each tart onto a heavy plate. Pop one of these into your microwave oven on maximum for 4 minutes, then repeat with the second tart.
They emerge from the microwave looking just like this.
Transfer the tarts to you refrigerator for at least 4 hours to set, preferably overnight.
Serve your tart the following day garnished with whipped cream, and enjoy.
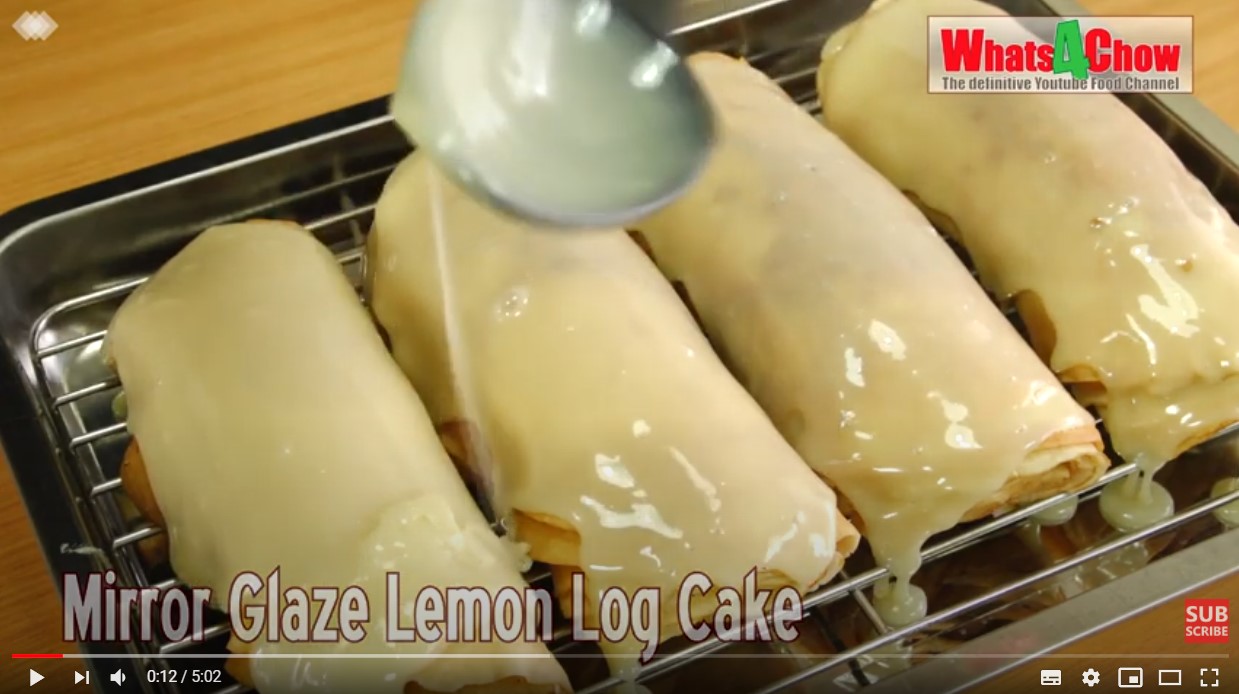
In today's episode we're making a really simple lemon log cake with mirror glaze. This recipe is so easy that you don't need any baking experience whatsoever, just follow the instructions.
In today's episode we're making a really simple lemon log cake with mirror glaze. This recipe is so easy that you don't need any baking experience whatsoever, just follow the instructions.
To start weigh 500g all-purpose flour into a large bowl.
Add 5ml salt, 15ml sugar, the zest of 1 large lemon, 60ml oil, 4 beaten eggs and 900ml full cream milk.
Whisk this together until smooth, then put this aside for 30 minutes to rest.
After 30 minutes, rub a little oil into a 20cm non-stick crepe pan.
Place the pan over medium-high heat.
When the pan is nice and hot, use a one third cup measure to pour batter into the pan. Swirl the pan to distribute the batter evenly and put it back on the flame.
Allow this to cook for about 60 seconds until the bottom is golden.
Flip the frepe over and continue to cook for a further 30 seconds.
Remove the crepe from the pan and continue with the remaing crepes. This quantity will yield 24 crepes.
For the flavoring, combine 125ml caster sugar with 5ml cinnamon and mix this until totally combined. Transfer this to a shaker bottle.
Top and tail 3 large lemons and cut each one into 8 wedges.
Place one crepe on your work surface and squeeze the juice of one lemon wedge evenly over the crepe.
Give the crepe a generous sprinkling of the cinnamon sugar mixture.
Place another crepe on top of this and repeat the process.
Continue until you have a stack of 6 crepes.
Pick up one side of the stack and roll it up into a log.
Transfer this to a platter and continue with the remaining 3 logs.
Cover the logs with clingwrap and place these in your refrigerator for at least 2 hours.
For the mirror glaze, measure 150g sugar and place it in a pot. Pour in 75ml water, followed by 100g sweetened condensed milk.
Measure 8g of unflavored gelatin into bowl and add 30ml water.
Chop 175g of good quality white chocolate into bits and put this aside.
Put the pot over medium high heat and bring this to a boil, stirring regularly.
Remove the pot from the heat and add the bloomed gelatin. Stir this until the gelatin dissolves completely.
Add the chocolate and stir this in until completely dissolved.
Allow the glaze to cool to 29c or 84f before continuing.
Remove the lemon crepe logs from the refrigerator and place the logs on a rack over a clean pan.
Spoon equal amount of the glaze over each log.
Return the logs to the refrigerator for 30 minutes for the glaze to set before serving.
Serve the lemony logs sliced in half at an angle, or in slices, accompanied with whipped cream and enjoy.
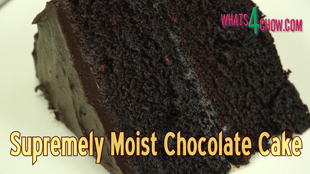
Moist Chocolate Cake Recipe - How to Make the Best Chocolate Cake!
Author: Whats4Chow
Recipe type: Baking, Cake
Cuisine: British
Serves: 8
Moist Chocolate Cake! Today we're going to look at a very special chocolate cake recipe. This chocolate cake is supremely moist and full of chocolaty flavor. It is quick and easy to make, and has a shelf life of 5 to 7 days.
Ingredients
225g Cake / all-purpose flour
350g Caster sugar
85g Cocoa powder
7.5ml Baking powder
7.5ml Bicarbonate of soda (baking soda)
2 Large eggs
250ml Full cream milk
125ml Sunflower oil
10ml Vanilla exctract
250ml Boiling water
For the Icing
200g Dark chocolate
175ml Cream
Instructions
To start, add 225g cake flour or all-purpose flour to your mixer bowl, along with 350g caster sugar, 85g good quality cocoa powder, 7.5ml baking powder and 7.5g bicarbonate of soda or baking soda, 2 large eggs, 250ml full cream milk, 125ml sunflower oil and 10ml vanilla extract.
Place the bowl on your mixer with the beater paddle attached and mix the batter until smooth.
Add 250ml boiling water a little at a time and continue mixing until well combined. The batter will be thin and glossy.
Butter two 20cm or 8 inch cake tins and line the bottoms of each tin with baking parchment. The butter effectively sticks the parchment to the tin and prevents batter from flowing underneath the parchment.
Pour half of the batter into each tin.
Bake the cakes in a preheated oven at 180c or 350f for 25 to 35 minutes or until skewer inserted into the center of the cakes comes out clean. Once baked, remove the cakes from the oven and allow them to cool completely in their tins.
While the cakes bake, measure out 200g of dark chocolate and cut it into bits.
You will also need 175ml of cream.
Melt the chocolate in your microwave in 20 second bursts, stirting between each cycle.
Pour in the cream and stir this in until combined. Don't panic if the chocolate seams to granulate. Simply pop this back into the microwave for 20 seconds, and will be as smooth as silk.
Set this aside to cool completely and set. If you are in a warm climate, you may need to refrigerate the mixture until it reaches a spreadable consistency.
Turn the cakes out of the tins and spread the icing onto the cakes evenly.
And there it is, an absolutely, supremely moist chocolate cake fit for Royalty.
3.5.3251
moist chocolate cake,moist chocolate cake recipe,chocolate cake,best chocolate cake,how to make chocolate cake,homemade,easy chocolate cake recipe,quick chocolate cake recipe,foolproof chocolate cake recipe,no flop chocolate cake,flop proof chocolate cake,beginners chocolate cake recipe,how to make moist chocolate cake,award winning chocolate cake recipe,how to make the best chocolate cake at home,chocolate,cake,recipe,dessert,chocolate frosting recipe
Caramel Popcorn - How to Make Caramel Popcorn with 3 Ingredients! Caramel Popcorn Recipe!
Author: Whats4Chow
Recipe type: Sweets / Snacks
Cuisine: American
Today we're going to make a batch of caramel popcorn with just a few simple ingredients. The recipe is quick and easy, and really tasty!
Ingredients
200g Sugar
135g Unpopped popcorn
30ml Oil
Salt (optional)
Instructions
To start, measure out 200g sugar and 135g of unpopped popcorn.
You will also need 30ml oil, and Himalayan rock salt, should you want your caramel popcorn salted.
Place the corn in a pan large enough for the seeds to lie in a single layer.
Add the oil to the pan and stir the pan briefly to coat the popcorn with the oil.
Flatten the seeds into a single layer and put the lid on the pan.
Light the gas and set it to medium high.
In about 2 minutes, the corn will start to pop.
Give the pan a gentle shake intermittently to achieve even cooking and avoid burning.
When the popping subsides, turn off the heat and remove the lid.
Transfer the popped corn to a large heatproof bowl, making sure leave any unpopped kernels behind.
Wipe out your pan and pour in the sugar.
Place this over medium high heat.
After 2 to 3 minutes the sugar will start to melt, and this is your cue to start stirring.
More and more of the sugar will melt until you have a golden mass of molten sugar.
Bring the molten sugar to a boil. As it starts to foam up, turn off the heat.
Give the molten caramelised sugar a final stir to knock down the foam, and pour it over the popcorn. Be very careful when working with molten sugar as spilling or splashing this on your body can cause horrific burns.
Give the popcorn a thorough stir, making sure to dig to the bottom of the bowl to lift the caramel that has run through.
Transfer the coated popcorn to alarge baking pan. Break the pieces apart and allow it cool for a few minutes before serving, or storing it in an airtight container.
If you want your caramel popcorn salted, grind your salt over the popcorn at this stage.
How to Make Panna Cotta - Quick & Easy Panna Cotta Recipe
Author: Whats4Chow
Recipe type: Dessert
Cuisine: Italian
Serves: 6
Panna Cotta is a legendary Italian dessert. This creamy molded sensation is super easy to make, and can be made up to three days ahead of time and stored in the refrigerator covered with cling wrap. This is how to make your own.
Ingredients
4 Tsp Powdered gelatin
90ml Water (room temp)
Half cup sugar
1 Liter heavy cream
2 Tsp Vanilla extract
Instructions
To start, pour 90ml of room temperature water into a large mixing bowl.
Pour in 4 teaspoons of powdered gelatin and put this aside to bloom.
Pour a half cup of sugar into a saucepan.
Add a litre of heavy cream to the pot.
Turn on the heat to medium and heat the cream to around 66c stirring regularly.
Turn off the heat, or remove the pot from the heat if your using an electric range.
Pour the hot cream over the gelatin and stir it thoroughly to combine.
Add 2 teaspoons vanilla extract and stir this in.
Ladle the creamy mixture into your ramikins. This will be sufficient for six 175ml ramikins if filled to brim, and seven if filled to the line.
Place the ramekins on a tray or in a pan and transfer these to your refrigerator for a minimum of 3 to 4 hours to set.
To turn the panna cotta out of the ramekins, run a thin blade around the edge of the bowl.
Dunk the ramekin in another bowl half filled with hot water.
Hold it in the water for 15 to 20 seconds.
Flip the ramekin over to turn it out onto the serving plate.
Serve the creamy treats immediately garnished with fruit and topped with a little extra pouring cream.
Thanks for joining us today, please subscribe, like and share and we'll see you again soon.