Sous Vide Pork Fillet – How to Make the Best Pork Fillet Ever – Best Pork Fillet Recipe!

sous vide pork fillet


Sous Vide Pork Fillet - How to Make the Best Pork Fillet Ever - Best Pork Fillet Recipe!
Author: 
Recipe type: Pork Fillet
Cuisine: Sous Vide
Serves: 4
 
Sous Vide Pork Fillet - How to Make the Best Pork Fillet Ever - Best Pork Fillet Recipe! Pork fillet gets pretty bad rap generally, as it tends to dry out and toughen when cooked using traditional methods. This sous vide recipe elevates the downtrodden pork fillet to new heights. It is supremely tender, juicy and tasty. Once you've tried this, there is no turning back.
Ingredients
  • 2 x 600g Pork Fillets
  • 100g Butter
  • 10ml Garlic powder
  • 10ml Fine salt
  • 10ml Caster sugar
  • 30ml Apple cider vinegar
  • 1.25ml Xanthan gum
Instructions
  1. Sous Vide Pork Fillet - How to Make the Best Pork Fillet Ever - Best Pork Fillet Recipe!
  2. Pork fillet gets pretty bad rap generally, as it tends to dry out and toughen when cooked using traditional methods. This sous vide recipe elevates the downtrodden pork fillet to new heights. It is supremely tender, juicy and tasty. Once you've tried this, therd is no turning back.
  3. You will need a meat syringe, a sous vide cooker, digital pot or regular pot on an induction range, a vacuum packing machine and a tiny bit of xanthan gum.
  4. To start, measure out 100g butter and melt this in your microwave, 30ml apple cider vinegar, 10ml garlic powder, 10ml fine salt, 10ml caster sugar and 1.25ml xanthan gum.
  5. Place all of these in a tall jug and use your stick blender to emulsify the mixture. The xanthan gum is bipolar and effectively bonds the water based liquid to the fat in the butter. This emulsion will never separate, even when remelted.
  6. Load half of the butter emulsion into your syringe. You need to do this using a narrow spoon. Unfortunately the emulsion will draw up through the needle.
  7. Insert the needle into ond end of the fillet and inject half of the emulsion into the meat, withrawing the needle progressively as you go.
  8. Repeat this on the other end of the fillet.
  9. Use butcher twine to tie off the ends of the meat, effectively trapping the emulsion inside.
  10. Continue with the second fillet.
  11. Vacuum pack both the fillets, making sure to double seal both ends of the bags.
  12. Zap these into your sous vide cooker or digital pot that has been preheated to 55c or 131f. Allow these to cook slowly for 1 to 4 hours. I normally let them cook for 2 to 2.5 hours, and they are perfect.
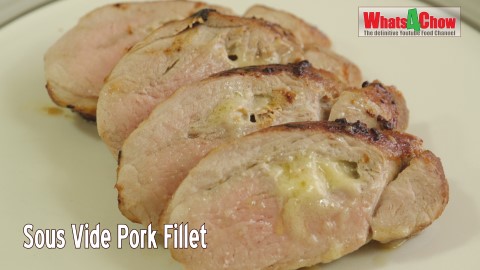
  13. To finish the pork fillets off, remove them from the bags and sear them in a large smoking hot pan with a little butter and oil.
  14. Slice the fillets at angles and serve with the accompaniments and garnishes of your choice.


How to Make Pouring Cream from Milk

how to make cream,how to make pouring cream,how to make cream from milk,how to make dessert cream,how to make cream from milk and butter,how to make cream replacement,how to make fake cream,how to make non-dairy cream,recipes,how to,homemade,cream,dairy cream,pouring cream,dessert cream


How to Make Pouring Cream from Milk
Author: 
Recipe type: Dairy / Dessert
 
Today we're going to look at a very neat trick that you can use to make pouring cream from milk. In reality nothing can replace real cream, however if you're bulk catering, this recipe can be a real lifesaver. In addition, only real connoisseurs will tell the difference between this and real cream.
Ingredients
  • 75g Butter, melted
  • 175ml Full cream milk
  • ⅛ - ¼ Tsp Xanthan gum
  • Caster sugar (to taste if desired)
Instructions
  1. To start, melt 75g of butter inyour microwave. Run the microwave until it is just melted, that means barely above room temperature, or mildly warm.
  2. Heat 175ml of full cream milk to around the same temperature of the butter.
  3. In addition, you will need xanthan gum. For this combined quantity of liquid, 250ml, you will need 1 eighth of a teaspoon for thin cream, or a quarter teaspoon for a thicker pouring cream.
  4. Pour the milk into a tall jug, followed by the melted butter.
  5. Add 1 eighth of teaspoon of xanthan gum to the jug.
  6. Use your stick blender to shear the xanthan gum into the liquid. You will see the liquid noticeably thicken to the consistency of thin cream.
  7. And here it is....
  8. To demonstrate the thicker version, I have poured the thin cream back into the tall jug.
  9. Add another 1 eighth of a teaspoon of xanthan gum to the liquid.
  10. Once again, use your stick blender to shear the xanthan gum into the liquid. Now you have a thicker version of the same cream. If you need to use the cream immediately, you can purge the bubbles by pouring the cream through a fine sieve.
  11. You can go even further with the thickening process, but not past a maximum of 2% xanthan gum per volume of liquid. Beyond this level, the liquid will become slimy and will not emulate cream at all.
  12. That's it for today, thanks for watching.... please subscribe, like and share, and we'll see you again tomorrow.


Baking Bread using Citric Acid and Soy Lecithin – using Dough Enhancers in Bread Baking

soy lecithin, citric acid, soy lecithin in bread dough, citric acid in bread dough, using dough enhancers to improve bread, using dough enhancers to improve bread texture, making bread using citric acid and soy lecithin, soft well textured bread dough, baking the best bread, how to bake perfect bread, making bread using dough enhancers,


Baking Bread using Citric Acid and Soy Lecithin - using Dough Enhancers in Bread Baking
Author: 
Recipe type: Bread
 
A few days back I featured some amazing giant burger buns using citric acid and soy lecithin as dough improvers. I was asked quite a few questions regarding this, so hopefully this video will cover all the answers.
Ingredients
Ingredients per Large Loaf
  • 625g Strong white bread flour
  • 45ml Milk powder
  • 20ml Caster sugar
  • 7.5ml Salt
  • 15ml Fast acting dried yeast
  • 45ml Oil
  • 400ml Water
If You Are Using Soy Lecithin and Citric Acid
  • 12g Soy lecithin
  • 1.5ml Citric acid
Instructions
  1. I am going to bake 2 very simple white loaves using identical ingredients and baking times. The one loaf will have the citric acid and lecithin added, and this will demonstrate the difference.
  2. I have added the flour, yeast, caster sugar, milk powder and salt to both mixing bowls. A brief stir combines these.
  3. For the one loaf, I have split the water in half, and measured the oil.
  4. For the standard loaf, the water is in a single jug, accompanied by the oil.
  5. For the first loaf, add the citric acid to one half of the water, and the lecithin to the other. Use your stick blender to sheer these in the water.
  6. Place a mixing bowl on your stand mixer with dough hook attached and add all of the ingredients for standard loaf.
  7. Close the mixer and allow this knead for 8 minutes. Remove the dough fro the bowl and put this aside covered with a damp towel.
  8. Return the bowl to the machine and add all of the ingredients for the second loaf, including the citric acid solution and the soy lecithin.
  9. Close the mixer and allow this to mix for 8 minutes.
  10. Remove this from the mixer.
  11. This is the only difference in process, where the plain dough has now had 8 minutes of extra rising time.
  12. Lightly flour your work surface and shape the 2 loaves, then place them in bread pans.
  13. To identify the enhanced loaf, I am going make a few slashes along the top of the loaf.
  14. Place the loaves in your oven at 40c or 104f for 45 minutes to prove.
  15. Remove from the oven and brush the tops of the loaves with beaten egg. You will notice how much further the enhanced dough has risen.
  16. Return these to the oven and adjust the temperature to 200c or 400f until well browned on top and they sound hollow when tapped.
  17. In the enhanced dough, the citric acid tenderizes the gluten while the soy lecithin gives this softer gluten more body and structure. This results in a much lighter, softer and airier texture of crumb.
  18. This can plainly seen when the enhanced loaf on the left, is compared to the loaf on the right.
  19. I hope this clears up any questions you may have had. I have included this recipe on the website for anyone wanting a simple white loaf.


Supreme Burger Buns – Best Burger Buns Recipe Ever! How to Make Burger Buns at Home!!

burger bun, burger bun recipe, sesame bun, sesame bun recipe, how to make burger buns, learn to make burger buns, best burger bun recipembest burger roll recipe, gourmet burger bun recipe, perfect burger bun recipe, easy burger bun recipe, how to make the best burger buns, Hamburger (Dish), best burger buns ever, homemade burger buns, soft light burger buns, burger buns light and soft, how to make burger buns at home, homemade sesame buns,


Supreme Burger Buns - Best Burger Buns Recipe Ever! How to Make Burger Buns at Home!!
Author: 
Recipe type: Bread / Dough
Serves: 12
 
Some time back I published a recipe for the best burger buns ever. You can check it out by clicking the onscreen link. Today we're going scientific and making the best best burger buns.
Ingredients
  • 950g Strong white bread flour
  • 60g Butter, grated
  • 15ml Sugar
  • 10ml Salt
  • 10g Instant yeast
  • 30ml Milk powder
  • 600ml Warm water
  • 20g Soy lecithin
  • 2.5ml Citric acid
  • 1 Egg, beaten
Instructions
  1. Place the flour and grated butter in your stand mixer bowl.
  2. Measure out the sugar, salt, instant yeast and milk powder.
  3. Measure out the warm water in two equal portions.
  4. Add the citric acid to one portion.
  5. Add the soy lecithin to the other portion.
  6. Use your stick blender to sheer the additives into the liquid.
  7. Place the mixer bowl on your mixer with the beater attached.
  8. Start the mixer and let it run for 2 minutes until the grated butter has been rubbed into the flour.
  9. Open the mixer and swap out out the mixer paddle for the dough hook.
  10. Pour in all of the other ingredients. (except the egg)
  11. Start the mixer and knead the dough for 8 minutes on medium low speed.
  12. Remove the bowl from the machine and cover with cling-wrap. Place the bowl in a warm place and allow the dough to rise for 60 minutes.
  13. During this time it will more than double in size.
  14. Turn the dough out onto a lightly floured work surface, flour the top of the dough and briefly knead it until it is knocked down.
  15. Weigh the dough and divide it into 12 equal portions.
  16. Working with one portion at a time, stretch the edges of the dough downward and fold it underneath the ball.
  17. Place the ball of dough on the work surface and use your fingers to complete the form by digging underneath the bundle and rotating the dough simultaneously.
  18. Transfer all of the formed buns to a baking sheet, leaving at least an inch and a half of space between the buns.
  19. Half fill a baking pan with boiling kettle water and place this on the bottom shelf of your oven.
  20. Place the buns in the center of your oven and set the temperature to 40c.
  21. Let the buns prove at this temperature for 60 minutes until more than doubled in size.
  22. After this time remove the buns from the oven and brush them with the egg. Brush carefully so as not to deflate the buns.
  23. Return the buns to the oven and reset the temperature to 200c or 390f until the buns are lightly golden on top.
  24. If the buns sound hollow when tapped they are ready to remove from the oven.
  25. Transfer the buns to a rack to cool.
  26. And there we have it, incredibly soft, springy and tasty burger buns ready for eating.


How to Make Margarine at Home -Quick and Easy Homemade Margarine.

margarine,how to,how to make margarine,how to make margarine at home,homemade margarine,making margarine at home,making margarine is quick and easy,margarine recipe,margarine video recipe,margarine recipe youtube,easy,home,recipe


How to Make Margarine at Home -Quick and Easy Homemade Margarine.
Author: 
Recipe type: Spreads
 
In today's episode we're looking at how to make margarine at home. Margarine has had a bad rap from the start with some uneducated people even saying that it is one step away from plastic. Nothing could be further from the truth.
Ingredients
  • 30g Coconut oil
  • 45ml Vegetable oil
  • 10ml Milk
  • 10ml Egg yolk
  • 2.5ml Lemon juice
  • 2.5ml Salt
Instructions
  1. Measure out the coconut oil, vegetable oil, egg yolk, milk, lemon juice and salt.
  2. Heat the coconut oil in your microwave until melted.
  3. Place the beaker on an ice pack or over a bowl of ice.
  4. Pour in the vegetable oil. You can use sunflower oil, olive oil or canola.
  5. Use your stick blender to sheer these together until well emulsified and milky.
  6. This will take about 60 seconds.
  7. Add the egg yolk, milk, salt and lemon juice and blend the mixture again.
  8. Transfer the margarine to a bowl and allow it to set in your refrigerator.
  9. And there we have it.... a bowl of homemade margarine. If you want your margarine as yellow as the commercial versions, you can add a drop of food coloring to the mixture before the second blending cycle.


Clear, Edible, Heat Sealable Film – How to Make Chef Ferran Adria’s Clear Film

chef ferran adrias clear edible film,how to make chef ferran adrias clear film,how to make edible clear film,how to make liquid filled ravioli,how to make edible heat-sealable film,how to make clear edible film,molecular gastronimics edible clear film,using edible clear film in your heat sealer,chef ferran adria edible clear film,molecularrecipes.com clear film


Clear, Edible, Heat Sealable Film - How to Make Chef Ferran Adria's Clear Film
Author: 
Recipe type: Molecular Gastronomy
 
A few weeks back we made edible candy wrappers. Today's episode is all about edible film. This was first presented by Chef Ferran Adria in 2009, and is an extremely versatile ingredient, especially considering that it can be heat sealed. This opens up a whole new range like liquid filled ravioli and flavored oil sachets that simply melt when placed in water based dishes like soups.
Ingredients
  • 20g Potato starch
  • 10ml Soy Lecithin
  • 2ml Glycerine
  • 400ml Water
Instructions
  1. Pour the water into a small saucepan.
  2. Add the potato starch and the soy lecithin. Soy lecithin is available from most health food stores.
  3. Add the glycerine and stir this in briefly.
  4. Use your stick blender to sheer the ingredients into the mixture. You cannot mix this by hand, and if you don't have a stick blender, you can use a regular blender before transferring the ingredients to the pot.
  5. Place the pan over medium heat, bring it to a boil, lower the heat and simmer the liquid for a minute or so until it has thickened.
  6. Pour the mixture through a filter. This will smooth the mixture and remove any bubbles.
  7. Pour enough of the mixture into a teflon pan to coat the base to a depth of 1mm. Continue coating pans until all of the liquid has been used.
  8. Place the pans on a level surface to dry naturally. Drying will take anything from 12 to 24 hours, depending on the ambient temperature and humidity.
  9. As it dries you will see the edges starting to lift. Once dried, gently peel the film from the pan.
  10. At this point, you can cut the film into any shape you like.
  11. To make the sachets, simply fold the film over and pop it into your sealer or vacuum packer. If you're using a vacuum packer, use the seal only function.
  12. Trim of the excess edges with your scissors.
  13. You can fill the sachets with any dry ingredients or any oil based ingredients.
  14. To demonstrate this, I am making a curry flavored butter by simply heating butter with curry spice blend and chilli flakes.
  15. Insert a small funnel into a sachet and fill it halfway with the flavored butter.
  16. Seal the open end with your heat sealer and voila, there it is.
  17. And here is a rectangular one....
  18. Visit the commercial product site to see a whole load of other ideas as well --- http://www.molecularrecipes.com/techniques/edible-film-create-amazing-see-through-recipes/


Frozen Reverse Spherification – Simple Molecular Gastronomy

frozen reverse spherification,reverse spherification,simple molecular gastronomy,using sodium alginate,how to do spherification,sodium alginate and calcium chloride,reverse spherification recipe,making liquid spheres,easy reverse spherification,molecular gastronomy at home,step by step spherification,simple spherification


Frozen Reverse Spherification - Simple Molecular Gastronomy
Author: 
Recipe type: Molecular Gastronomy
 
Today we're going to continue with our series on molecular gastronomy. A while back we made sherry pearls by thickening sherry with agar agar and dropping it into chilled oil. This resulted in tiny pearls of sherry in a jelly form. In this episode we're using sodium alginate and calcium chloride to create spheres of liquid sherry.
Ingredients
For the Sherry Solution
  • 200ml Sherry
  • 2.5ml Calcium Chloride
For the Alginate Bath
  • 400ml Water ((not mineral water)
  • 2.5ml Sodium alginate
To Rinse
  • Extra water
Instructions
  1. Sodium alginate is a natural extract of seaweed. You can find in kit form or bulk packs like this on eBay. The bulk packs are far more cost effective, and I have put the link below the video in the description. I have dispensed the bulk pack into a number of smaller airtight jars.
  2. Calcium chloride is available from any dairy supplier as it used in cheese making and dairy processing.
  3. In the process of reverse spherification, the calcium is added to the liquid (in this case, sherry).
  4. Use your stick blender to mix this in. Mixing by hand will not disperse the calcium sufficiently.
  5. Place a silicone mini muffin mold into a baking tray and fill the indentations with the liquid.
  6. Silicon is floppy and the roasting pan will make it far easier to transfer to the freezer.
  7. Allow this to freeze until absolutely solid. Liquids containing alcohol and sugar take longer, so overnight is a good idea.
  8. The following day pour the water into a mixing bowl. Add the sodium alginate.
  9. Use your stick blender to shear this into a solution. Once again, you can not do this by hand.
  10. Pour plain water into a second bowl.
  11. Remove the frozen sherry tray from the freezer.
  12. Pop one of the sherry discs from the mold and drop it into the alginate solution. Allow it to set for 3 minutes. Give it gentle nudge and flip it over halfway through this time.
  13. Use a slotted spoon to lift it from the alginate solution and drop it into the water to rinse.
  14. Rinse the sphere gently, then remove it from the water.
  15. And there it is... a perfect sphere filled with sherry. These can be made ahead of time but must kept moist by immersing them in the same liquid that is inside the sphere. These are filled with sherry, so I would store them in sherry.


Whats4Chow Channel Update August 2016

Whats4Chow channel update 2016

This episode serves as our periodic channel update bring you news and a quick look at whats coming in the near future.

First and foremost, I am going to be away for 2 weeks from the 12th of August and as a result, our next episode will be around the 28th of August.
We have just finished with the 2 simplest forms of distillation in our distilling course, and this will continue on my return. I will be demonstrating how to built a proper water cooled pot still for next to nothing, and a whole load more interesting stuff on distilling at home.
In addition to this, my short course on molecular gastronomy will continue as well, with more advanced forms of spherification, edible dissolving films and many other interesting things.
It goes without saying that while the distilling and molecular course unfold, our regular food programming will continue as normal.
That’s me for now, and I’ll look forward to seeing you all again towards the end of the month.

How to Make Sherry Pearls – Simple Molecular Gastronomy – Sherry Caviar

simple molecular gastronomy,simple spherification,making caviar,making sherry caviar,making sherry pearls,how to do simple spherification,spherification using agar agar,making caviar using agar agar,modernist cuisine techniques,molecule-r techniues,simple spherification at home,homemade sherry caviar


How to Make Sherry Pearls - Simple Molecular Gastronomy - Sherry Caviar
Author: 
Recipe type: Modernist Cuisine - Molecular Gastronomy
 
Just a few episodes back we used agar agar to make a wonderful garnish of cilantro spaghetti. Today we're going to use sherry and agar agar to make sherry pearls, or sherry caviar. Before we start, you will need a large syringe, and you will also need to place about 500ml of cooking oil in your freezer for 30 minutes to get well chilled. This technique also falls into the category of molecular gastronomy, and is the simplest form of spherification.
Ingredients
  • 200ml Sherry
  • 2.5ml Agar Agar
  • 500ml Very cold oil for setting
Instructions
  1. Pour 200ml of your favorite sherry into a small saucepan.
  2. Add 2.5ml of agar agar to the sherry.
  3. Place the pan over medium heat and bring this to boil, stirring frequently.
  4. Lower the heat and simmer the mixture for 60 seconds.
  5. Remove the pot from the heat, and remove the chilled oil from the freezer.
  6. Use your syringe to suck up a load of the sherry mixture.
  7. Drizzle droplets of the sherry over the surface of the oil. You will see them set into tiny spheres almost immediately.
  8. Place a filter over a jug and pour the oil and sherry pearls into the filter.
  9. The oil will pass through leaving the pearls in the filter and you're done.
  10. (You can rinse the pearls briefly using cold water, but I have never found this necessary)


Cilantro Pesto Spaghetti – Simple Molecular Gastronomy – Perfect Garnishes using Agar Agar!!!

agar agar,molecular gastronomy,molecular gastronomy spaghetti,how to make spaghetti from liquids,agar agar spaghetti,how to use agar agar,simple molecular gastronomy,using agar agar to make spaghetti,fancy garnishes,fancy plate dressings,cilantro pesto spaghetti,molecular gastronomy at home,homemade molecular gastronomy pesto spaghetti


Cilantro Pesto Spaghetti - Simple Molecular Gastronomy - Perfect Garnishes using Agar Agar!!!
Author: 
Recipe type: Molecular Gastronomy
 
This molded spaghetti works brilliantly as garnish on steaks, chicken and salads. The process falls into the category of molecular gastronomy, however it is nowhere as complicated as it sounds. This process will work with any liquid, including liqueurs, wines, vinegars and syrups, provided you keep to the ratio of 200ml liquid to 2.5ml agar agar. Agar agar is a specialized thickener, and can be found at almost any health store.
Ingredients
  • 100ml Clear chicken stock
  • 70ml Mayonnaise
  • 30ml Worcestershire sauce
  • 2.5ml Cayenne pepper
  • Generous handful fresh cilantro / coriander
  • 2.5ml Agar Agar
Instructions
  1. Combine the chicken or vegetable stock, mayonnaise, Worcestershire sauce, agar agar, cayenne pepper and cilantro.
  2. Use your stick blender to zap this until fine.
  3. Transfer this to a small saucepan and bring it to a simmer for 60 seconds.
  4. Take a length of polyethylene piping and coil it up.
  5. Fill another container with very cold water.
  6. Place one end of the coiled pipe in the pesto and suck the pesto up the pipe. You can use your mouth or a suitably sized syringe to do this.
  7. Stop when you have sucked up half of the liquid.
  8. Plunge the coil into the cold water bath for 3 minutes, holding the ends out of the water.
  9. Remove the pipe from the water.
  10. Serve your main ingredient, be it steak or otherwise and spoon some of the leftover pesto over the steak.
  11. Hold one end of the pipe over the platter and start blowing on the other end.
  12. As the pesto spaghetti emerges from the pipe, direct the front end of the pipe to place the spaghetti where you want it.
  13. Finish the garnish with a little extra cilantro and you're done.
  14. And there we have a succulent steak topped with 3 totally different textures of cilantro pesto. This quantity of pesto will garnish 2 steaks.


How to Make Edible Candy Wrappers – Edible Cellophane – Making Edible Bioplastic

edible sweet wrappers,edible candy wrappers,edible plastic wrappers,edible cellophane,how to make edible plastic wrap,how to make edible sweet wrappers,how to make edible film,how to make edible cellophane,how to make edible candy wrappers,how to make edible bio-plastic,how to make edible bio-degradable plastic,how to make edible cellophane wrappers,how to make edible cellophane candy wrappers


How to Make Edible Candy Wrappers - Edible Cellophane - Making Edible Bioplastic
Author: 
Recipe type: Confectionry
Prep time: 
Cook time: 
Total time: 
Serves: 25
 
Imagine making your own cellophane sweet wrappers that are edible, and if you don't eat them will dissolve within days in the trash can. This is a foolproof way to make your own perfect edible candy wrappers.
Ingredients
  • 400ml Cold water
  • 10g Gelatin (powdered)
  • 2.5ml Glycerin
  • 25 x 10cm / 4 inch flat lids
Instructions
  1. To start, pour the water into a small saucepan. Sprinkle the gelatin over the surface of the water.
  2. Add the glycerin, in some countries called glycerol... make sure it's medical or food grade.
  3. The glycerin acts as a plasticizer and makes the gelatin flexible when it dries.
  4. Place the pot oven low heat and stir until the gelatin is totally dissolved. You can tell this when the liquid is absolutely clear and you can see the bottom of the pot clearly.
  5. Whatever you do, don't allow the mixture to boil.
  6. Remove the pot from the heat.
  7. Arrange your molds on the work surface. I am using 10cm takeaway lids, but you can use anything circular and flat with a slight ridge around the edge.
  8. Spoon 15mm of the gelatin mixture into each mold.
  9. Tilt the molds around to spread the gelatin mixture.
  10. This is where the patience comes in. The molds need to stand and dry until the edges of the film start to lift.
  11. This can take anything from 10 hours to 2 days depending on your weather, heat and humidity.
  12. Once you see the edges starting to lift, it's ready for the next step.
  13. Insert a toothpick or thin skewer under the edge of the thin film and run around the edge to lift it from the mold.
  14. And there it is, a perfect edible candy wrapper.
  15. Place the candy, in this case a block of nougat, a third into the wrapper, and wrap it up.
  16. Twist and crimp the ends using your fingernails to compress the twisted part closet to the candy.
  17. And there it is... perfect edible candy wrappers... and if not eaten 100% bio-degradable.


Scroll to top

Kitchen Conversions

Convert:
Masses
to:
Volumes
to:
Temperatures
to:
Lengths
to: