How to Make Flan – Classic Baked Flan Recipe – Easy Flan Recipe at Home!!!

flan,dessert,recipe,flan recipe,custard,how to make flan,how to make vanilla flan,easy flan,como hacer flan,creme caramel,leche flan,how to make easy flan,how to make a simple flan,flan de vainilla,receta de flan,how to make baked flan,crème caramel (food),leche flan recipe,como hacer un flan super facil,best caramel pudding,caramel custard,creme brulee,easy dessert recipes


How to Make Flan - Classic Baked Flan Recipe - Easy Flan Recipe at Home!!!
Author: 
Recipe type: Dessert
Prep time: 
Cook time: 
Total time: 
Serves: 6-8
 
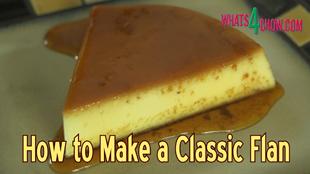
Flan or flan, whichever way you prefer to pronounce it, is an all-time favorite. This creamy baked custard dessert will have your guests lining up for more. This recipe is super-easy to make and by doubling or tripling the recipe is a great way to cater for larger numbers of guests.
Ingredients
  • 160ml White sugar
  • 1 Can condensed milk (385ml)
  • 500ml Heavy cream
  • 250ml Full cream milk
  • 5 Large eggs
  • 10ml Pure vanilla extract
Instructions
  1. Preheat your oven to 180c / 350f
  2. Heat a small pan over medium low heat and pour in the sugar.
  3. Heat this slowly giving the pan a gentle shake every so often.
  4. As the sugar starts to melt, lift the pan above the flame and tilt and rotate the pan to ensure even heating and melting.
  5. When all of the sugar is melted the liquid will be smooth and glossy.
  6. Pour the melted sugar into a 9 inch round baking dish, then put this aside on a heat-proof surface.
  7. Add the eggs, milk, cream, sweetened condensed milk and pure vanilla extract to your blender. You can also use you food processor, or mix this by hand.
  8. Blend the mixture thoroughly for 60 seconds. If you're mixing by hand, mix until everything is totally combined.
  9. Place the baking tin into a larger roasting tin and pour the flan mixture into the baking tin.
  10. Pour boiling kettle water into the roasting pan to a depth of 1 inch or 25mm.
  11. Transfer the flan to a preheated oven at 180c or 350f and let it bake for 50 to 60 minutes until set.
  12. Remove the flan from the oven and transfer it to a wire rack to cool completely.
  13. To serve, run a fine blade around the edge of the custard. Invert a platter over the flan, flip the whole lot over and voila, there's your masterpiece.
  14. Cut the flan into 6 or 8 portions and serve drizzled with the overrun sauce.


Caramelized Onion Bread – Beautifully Aromatic Homemade Caramelized Onion Bread.

caramelized onion bread,homemade onion bread,how to make caramelized onion bread,rustic caramelized onion bread,easy onion bread recipe,aromatic caramelized onion bread,homemade onion bread,how to make onion bread,onion bread recipe,caramelized onion bread recipe,homemade onion bread recipe,easy onion bread recipe


Caramelized Onion Bread - Beautifully Aromatic Homemade Caramelized Onion Bread.
Author: 
Recipe type: Bread
 
Sometimes a good white farm loaf just doesn't make the grade. By simply making a couple of changes you can end up with a beautifully rustic and aromatic bread like this caramelized onion bread.
Ingredients
  • 950g Strong white bread flour
  • 60g Vegetable shortening (Fat), grated
  • 15ml Sugar
  • 10ml Salt
  • 12.5ml Instant yeast
  • 30ml Milk powder
  • 600ml Warm Water
  • 2 Medium onions
Instructions
  1. Peel and chop the onions into quarter rounds.
  2. Heat 30ml of oil in a pan over medium heat and add the onion.
  3. Fry the onion for 8 to 10 minutes until well browned and caramelized. Remove from the heat and set this aside.
  4. Measure out the white bread flour, milk powder, salt, sugar, granulated garlic and yeast.
  5. Grate the vegetable shortening and add this to the flour.
  6. Place the bowl on your mixer and mix this on low speed until well incorporated.
  7. Add all of the dry ingredients to the bowl and mix this in briefly.
  8. Stir the caramelized onion into the warm water and pour this into the mixer bowl.
  9. Mix this just until all of the liquid has been absorbed by the flour.
  10. Swap out the beater paddle for the dough hook and proceed to knead the dough for 8 minutes on the second to lowest speed.
  11. Remove the bowl from the mixer, cover with cling-wrap and allow this to rise in a warm place for 60 minutes.
  12. After the first rise, turn the dough out onto a lightly floured work surface.
  13. Knead the dough briefly and form it into a log.
  14. Cut the log into 2 equal pieces, and form 2 logs from these.
  15. Transfer these to a parchment lined baking sheet, dust the tops of the loaves with flour and cover them loosely with cling-wrap.
  16. Allow the loaves to rise again for 30 minutes in a warm place.
  17. Bake the loaves in a pre-heated oven at 200c or 400f for 40 to 45 minutes until well browned.
  18. Remove the loaves from the oven and allow them to cool on racks before slicing and serving.
  19. And there we have it.... beautifully crusty, light and aromatic, caramelized onion bread.


Mother’s Day 2016 – Coconut Chocolate Madeleines – How to Make Chocolate Dipped Madeleines.

madeleines,madeleines recipe,how to make madeleines,how to make french butter cakes,french butter cakes,madeleines patisserie,madeleines pan,madeleines petite french cakes,madeleines recipe martha stewart,madeleines recette,chcocolate dipped madeleines,chocolate coconut dipped madeleines,mother's day recipe 2016,madeleines for mothers day,mother's day recipes,chocolate coated madeleines


Mother's Day 2016 - Coconut Chocolate Madeleines - How to Make Chocolate Dipped Madeleines.
Author: 
Recipe type: Baking / Patisierre
Cuisine: French
Prep time: 
Cook time: 
Total time: 
Serves: 24-30
 
After a week on the road, I'm back, and just in time for a delicious Mother's Day treat. Coconut chocolate dipped Madeleines are super-quick and easy to make. Traditionally baked in a scalloped Madeleine pan, you can also use mini muffin pan if you don't have the real thing.
Ingredients
  • 6 Eggs
  • 200g Caster sugar
  • 300g All-purpose flour
  • 200g Butter, melted
  • Zest of 1 lemon
  • Zest of 1 orange
Instructions
  1. This recipe goes very quickly so it's a good idea to have everything prepared before you start.
  2. Preheat your oven to 200c or 400f.
  3. Measure out the eggs, caster sugar, all-purpose flour, melted butter, lemon zest and orange zest.
  4. Place the eggs and sugar in a large mixing bowl.
  5. Whisk this vigorously for 3 to 4 minutes until all of the sugar has dissolved and the mixture is silky smooth.
  6. Pour in the flour and use a spatula to work this in until all of the flour is toally incorporated.
  7. Add the lemon and orange zest and fold this into the mixture.
  8. Pour in the melted butter and fold this until totally incorporated.
  9. For demonstration purposes I am going to do both the traditional and muffin shaped Madeleines.
  10. Spoon the mixture into the hollows of the pans leaving just enough space for rising.
  11. Bake the Madeleines for 12 minutes until crispy and golden on the outside.
  12. Remove the Madeleines from the oven and transfer them to cooling racks. Allow them to cool completely before continuing.
  13. Once cooled, melt the chocolate in double boiler or in your microwave by zapping it for 10 seconds at a time stirring after each heating.
  14. Lay out a non-stick sheet or a length of baking parchment on your work surface. Dip the wide end of the Madeleines into the chocolate, shake off any excess and place them on the parchment.
  15. Sprinkle each Madeleine immediately with desiccated coconut and allow the chocolate to set before serving.


Demerara Choc Chip Cookies – Delicious, Easy Chocolate Chip Cookie Recipe!!!

choc chip cookies,choc chip cookies nigella,choc chip cookies recipe easy,choc chip cookies recipes,choc chip cookies recipe south africa,chocolate chip cookies,choc chip cookies from scratch,best chocolate chip cookies,easy chocolate chip cookie recipe,perfect chocolate chip cookie recipe,how to make chocolate chip cookies,the best chocolate chip cookies,how to make cookies,chocolate chip cookie (dish)


Demerara Choc Chip Cookies - Delicious, Easy Chocolate Chip Cookie Recipe!!!
Author: 
Recipe type: Cookies / Baking
Cuisine: American
Prep time: 
Cook time: 
Total time: 
 
Choc chip cookies are an all-time favorite. These Demerara choc chip cookies are dark and rich with an insanely amazing flavor that is quite frankly second to none!!!
Ingredients
  • 500ml All purpose flour
  • 2.5ml Baking soda
  • 2.5ml Salt
  • 250ml Brown sugar
  • 125ml Demerara sugar (or treacle sugar)
  • 180g Melted butter
  • 1 Egg
  • 1 Egg yolk
  • 15ml Vanilla extract
Instructions
  1. Place the brown sugar and Demerara sugar in your mixer bowl.
  2. Pour in the melted butter, place the bowl on your mixer and get it mixing on medium speed until well creamed.
  3. In the meantime, place the all-purpose flour, baking soda and salt in another bowl.
  4. Crack 1 egg into another bowl along with another single egg yolk, and measure out the vanilla extract.
  5. In addition, weigh out the chocolate chips.
  6. Once the base is well mixed, add the vanilla and eggs and mix this in thoroughly.
  7. Add the flour, salt and baking soda and mix until everything is combined.
  8. Add the chocolate chips and mix these in.
  9. Remove the bowl from the mixer, cover with cling-wrap and refrigerate for 20 minutes to firm up the mixture.
  10. Use a 60ml scoop to scoop up portions of dough, flip them out into your hand and roll them into balls.
  11. Place the balls on a lined baking sheet leaving about 3 inches of space between each cookie.
  12. Bake the cookies in a preheated oven 180c or 350f for 15 minutes.
  13. Remove the cookies from the oven an transfer them to a rack to cool.
  14. The cookies are beautifully crisp on the outside with an amazing chewy inside.


Plaited Swedish Easter Bread – Best Easter Bread Recipe!!! Easter Special 2016

easter bread,easter bread recipe,sweet easter bread recipe,swedish easter bread recipe,scandinavian easter bread recipe,home made easter bread,make easter bread at home,hot cross bun easter bread,better than hot cross buns,how to make easter bread,how to make easter bread at home,easy easter bread recipe,making easter bread at gome,best easter bread recipe


Plaited Swedish Easter Bread - Best Easter Bread Recipe!!! Easter Special 2016
Author: 
Recipe type: Bread
Cuisine: Swedish
 
This Easter bread is outstanding with an amazing soft texture, insanely magical aroma and spectacular flavor. This bead is every bit as good as the best hot cross buns you have ever tasted.
Ingredients
  • 12.5ml Active dry yeast
  • 60ml Warm water
  • 240ml Milk
  • 125g Butter
  • 125ml White sugar
  • 2.5ml Salt
  • 2.5ml Ground cinnamon
  • 1.25ml Ground nutmeg
  • 1 Egg
  • 2 Cups all-purpose flour
  • 2 Cups Strong white bread flour
For the Egg Wash
  • 1 Egg whisked with 25ml milk
For the Glaze
  • 15g Softened butter
  • ¾ Cup icing sugar
  • 2.5ml Vanilla extract
  • 20ml Milk
Instructions
  1. Add the instant yeast to your stand mixer bowl. Pour in the warm water and give it a brief stir.
  2. Place the butter and milk in a jug and warm this in your microwave and heat it just enough to melt the butter. Pour this into the yeast mixture.
  3. Add the sugar, salt, ground cinnamon, ground nutmeg and one egg.
  4. Place the bowl on your mixer with the beater attached and mix this together for 60 seconds.
  5. Add the flour to the bowl and mix this briefly, just until all of the flour is incorporated into the liquid.
  6. Swap out the beater for your dough hook and knead the dough for 7 minutes on medium low speed.
  7. Remove the bowl from the mixer, cover the bowl with cling-wrap and let this rise in a warm place for 60 minutes.
  8. After rising, turn the dough out onto a lightly floured work surface. Knead the dough briefly then roll it out into a log.
  9. Cut the dough into 2 equal pieces.
  10. Roll each of these into a log and divide these into 3 pieces each.
  11. Roll each of the pieces into a long strand of about 50cm or 20 inches.
  12. Group three of the strands in a parallel formation and crimp the one end together. Proceed with a simple plait along the length of the loaf.
  13. Crimp the other end together to finish, then repeat this with the second loaf.
  14. Transfer the loaves to a baking sheet wrapped in parchment, cover the loaves loosely with cling-wrap and allow this to rise again for 45 minutes.
  15. After rising, brush the loaves with the egg wash and bake them in a preheated oven at 180c or 350f for 30 minutes.
  16. While the loaves bake, prepare the glaze by mixing the soft butter, icing sugar and milk together until smooth.
  17. Remove the loaves from the oven, transfer them to a cooling rack and drizzle the glaze over the bread.
  18. Allow the loaves to cool for at least 20 minutes before tearing apart and serving with butter.


Quick Chocolate Mousse Cups – Easter Special 2016

chocolate mousse cups,quick chocolate mousse recipe,quick chocolate mousse cups recipe,how to make quick chocolate mousse at home,how to make chocolate porcupine quills,how to make chocolate quills,homemade chocolate quills,how to make mousse in chocolate cups,cheats chocolate mousse,simple chocolate mousse in chocolate cups,molding chocolate at home,simple chocolate mousse,making chocolate mousse at home


Quick Chocolate Mousse Cups - Easter Special 2016
Author: 
Recipe type: Dessert
Serves: 6
 
This simple dessert is the perfect end to a great meal. Quick chocolate mousse cups can be a life saver.... the chocolate cups and quills can be made in advance, and the quick chocolate mousse is just that.... quick.
Ingredients
For The Quills
  • White compound chocolate
  • Dark compound chocolate
For the Mousse
  • 75ml Cream
  • 225ml Cream
  • 50g Dark compound chocolate
Instructions
  1. To make the chocolate porcupine quills, melt the white and dark chocolates. Tear off 6 rectangles of baking parchment from the roll and fold these in half length-ways.
  2. Spread 2 inches of dark chocolate down the center-line of the parchment, followed by 2 equally spaced dollops.
  3. Fill in the spaces with the white chocolate followed by a 1.5 inch spread at the end.
  4. Fold the parchment over and use your dough scraper or any other straight edged tool to shape the quill. Transfer this to your refrigerator to set and continue with the remaining quills.
  5. To make the quick mousse, measure out the chocolate chips and the 2 batches of cream. Pour the 75ml batch of cream into the chocolate and melt this in your microwave 15 seconds at a time, stirring thoroughly between heatings. Set this aside to cool.
  6. Place the remaining cream in you mixer bowl and whip this until the whisk just begins to leave trails.
  7. Add the chocolate cream mixture and continue to beat this until the whisk leaves a definite trail in the mixture.
  8. Unmold the chocolate cups and the quills, and transfer the quick mousse to a piping bag.
  9. Pipe the mousse into the chocolate cups. Adjust the lengths of the quills by snapping off a bit of the base, and stand these up in the mousse. Garnish the plate with fresh mint and serve immediately.


Irish Guinness Bread – St Patrick’s Day Special Recipe!!!

irish guinness bread,how to make irish guinness bread,irish guinness bread recipe,easy guinness bread recipe,fool-proof guinness bread recipe,homemade guinnes bread recipe,st patricks day guinness bread recipe,how to make irish bread,irish bread recipe,st patrick's day recipe,beer bread recipe,easiest bread recipe,quick and easy guinness bread,irish recipes,guinness bread video recipe,guinness bread recipe youtube


Irish Guinness Bread - St Patrick's Day Special Recipe!!!
Author: 
Recipe type: Bread
Cuisine: Irish
Prep time: 
Cook time: 
Total time: 
 
Irish Guinness bread is without a doubt one of the nicest breads I have ever tasted. In addition, it is also one of the simplest breads to make. In fact, even if you have never boiled an egg, you will be able to make Guinness bread.
Ingredients
Dry Ingredients
  • 250ml Rolled oats
  • 500ml Whole wheat flour
  • 125ml Brown sugar
  • 10ml Baking soda (bicarb)
  • 5ml Baking powder
  • 2.5ml Salt
Wet Ingredients
  • 60ml Melted butter
  • 10ml Vanilla extract
  • 250ml Cultured butter milk
  • 360ml Guinness Draught
Instructions
  1. In a large mixing bowl, combine the rolled oats, whole wheat flour, brown sugar, baking soda, baking powder and salt. Stir these together until well combined.
  2. In a second mixing bowl, combine the melted butter, vanilla extract, cultured buttermilk and Guinness draught beer.
  3. Use a ball whisk to mix this until well combined, then add the dry ingredients. Mix this together until you have a batter that resembles porridge.
  4. Pour the batter into an 8 inch square non-stick pan. If your pan is not non-stick, give it a good rub-down with butter.
  5. Bake the bread in a preheated oven at 220c or 425f for 30 minutes. Reduce the heat to 200c or 400f and continue yo bake for a further 30 minutes.
  6. Let the loaf cool in the oven for 30 minutes before turning it out onto a cooling rack.
  7. And there we have it, Irish Guinness bread... with a super-crispy and caramelized crust and a soft airy crumb.
  8. This bread is best served warm with a generous dose of butter and honey.


Gourmet Garlic Bread – Crispy, Crusty Garlic Bread with Pancetta & Blue Cheese!!!

garlic bread recipe,homemade garlic bread,how to make garlic bread,garlic bread ideas,garlic bread in oven,garlic bread rolls recipe,garlic bread from scratch,garlic bread with cheese,garlic bread recipe from scratch,how to make homemade garlic bread,baked garlic bread,easy garlic bread,restaurant garlic bread,gourmet garlic bread,garlic bread recipe youtube,garlic bread recipe video


Gourmet Garlic Bread - Crispy, Crusty Garlic Bread with Pancetta & Blue Cheese!!!
Author: 
Recipe type: Bread / Baked / Barbecue
Cuisine: French
 
Yesterday we made amazing crusty white farm bread. Today we're going to use one of these loaves to make awesome gourmet garlic bread turbo-charged with creamy melted blue cheese and pancetta.
Ingredients
  • 1 x 36cm / 15 inch Baguette-style farm loaf
  • 60g Butter
  • 5 Cloves garlic, finely chopped
  • 60g Blue cheese
  • 50g Pancetta (Italian bacon) finely chopped
Instructions
  1. Measure out the softened butter and blue cheese, and finely chop the fresh garlic and pancetta.
  2. Add the pancetta and garlic to the butter and blue cheese and mash this in thoroughly until everything is totally combined.
  3. Slice through the loaf of bread at an angle leaving the bottom crust of the loaf intact until the entire loaf is sliced with a space of 15mm or just more than a half inch between slices.
  4. Start filling the slices with the garlic butter mixture. This quantity of mixture is sufficient for one loaf.
  5. Place the loaf on a rectangle of foil and roll the log edge of the foil to enclose the loaf. Twist the ends to secure the foil. Don't twist the ends too tightly as you need to unwrap the loaf while it is hot, and if it is too tightly bound this will be very difficult and possibly dangerous.
  6. Bake the loaf in a preheated oven at 180c or 350f for 20 minutes.
  7. Immediately after baking, unwrap the loaf and serve hot and steaming.
  8. You can also bake the garlic bread in your closed barbecue following the same time and temperature. (indirect heat)


Crusty White Farm Bread – How to Make Rustic, Flavorful Bread at Home!!!

crusty farm bread recipe,how to make farm bread,homemade farm bread,easy bread recipe,easy white bread recipe,rustic farm bread recipe,how to make bread with a thick crust,how to make bread with a crispy crust,homemade farm bread recipe,easy homemade bread recipe,farmhouse loaf bread,easy white farmhouse bread,make bread step by step,easy white breat youtube,easy white bread step-by-step,simple white bread recipe


Crusty White Farm Bread - How to Make Rustic, Flavorful Bread at Home!!!
Author: 
Recipe type: Bread & Dough
 
This rustic farmhouse bread is amazing. It can be free-formed, rolled and baked in the shape of a baguette, or baked in a bread pan. Most amazing though, is the amazing crust.... thick and chewy, with a flavor from heaven.
Ingredients
  • 950g Strong white bread flour
  • 60g Butter, grated
  • 15ml Sugar
  • 10ml Salt
  • 12.5ml Instant yeast
  • 30ml Milk powder
  • 600ml Warm Water
Instructions
  1. Measure out the flour, grate the butter and measure the salt, sugar, milk powder, instant yeast and warm water.
  2. Place the mixer bowl on your stand mixer and add the grated butter. Attach the beater paddle to the mixer for this stage.
  3. Run the mixer on low speed for 60 seconds until the butter has been rubbed into the flour.
  4. Add all of the remaining dry ingredients and mix these in until well combined.
  5. Pour in the warm water and run the mixer on low speed to form the dough. When all of the water has been absorbed, and there is no loose flour at the bottom of the bowl, stop the mixer and exchange the beater for the dough hook.
  6. Allow the dough hook to knead the dough on medium-low speed for 8 to 10 minutes until it is smooth and elastic.
  7. Remove the bowl from the mixer, scrape the dough down from the sides of the bowl, cover the bowl with cling-wrap and allow the dough to rise for 45 minutes in a warm place.
  8. After rising, the dough will be at least doubled. Punch it down and turn it out onto a floured work surface. Flour the top of the dough as well, then knead the dough briefly, adding a little extra flour every time it becomes too sticky. Using a dough scraper also helps tremendously.
  9. Roll the dough into a large log and divide it into 4 equal pieces for baguette-style rolls, 2 pieces for 2 large 900g loaves, or leave it in one piece for extra-large loaf.
  10. I am doing baguette-style rolls which will be featured in another recipe tomorrow when I make gourmet pancetta, blue cheese, garlic and butter rolls.
  11. Knead the dough briefly and shape it into loaves, or in this case, roll it into lengths to fit your baguette pan or baking sheet.
  12. Transfer the rolls to the pan and cover them lightly with cling-wrap. Allow to rise again for 30 minutes. While they rise, preheat your oven to 200c or 400f.
  13. After 30 minutes the loaves will have doubled in size. Dust the tops of the loaves with flour then slash the loaves with a sharp blade. Spray your oven with a mist of water and bake the loaves for 30 minutes. Spray more water into the bottom of the oven halfway through.
  14. Bake 35 minutes for a 2 large loaves and 40-45 minutes for the extra large loaf.
  15. Test for doneness by flicking the loaves --- if it sounds hollow it is done.
  16. Once baked and golden, remove them from the oven. If you're using a perforated baguette pan, allow them to cool on the pan, otherwise transfer the loaves to wire racks to cool.
  17. All that remains is to savour these wonderful breads.


How to Make Meringues – Perfect Meringues – Crispy Outside, Soft Inside!!!

meringue (food),meringues,meringue recipe,how to make meringues easy,how to make meringues chewy,how to make meringues with normal sugar,how to make meringues nests,how to make meringues youtube,how to make chewy meringues,caster sugar,homemade meringues,perfect meringues,merang,merrang,merangue


How to Make Meringues - Perfect Meringues - Crispy Outside, Soft Inside!!!
Author: 
Recipe type: Sweets / Candy / Dessert
 
A good meringue is hard to find.... crispy on the outside and soft and squishy on the inside. This recipe takes the mystery out of how to make perfect meringues.
Ingredients
  • 6 Large egg whites
  • 350g Caster sugar
  • 2.5ml Salt
Instructions
  1. Place the egg whites and salt in your mixer bowl. Fit the whisk to your machine and whisk on low speed for 60 seconds.
  2. Increase the speed to medium-high and whisk until the egg holds a peak.
  3. Turn the machine speed to high and gradually add the caster sugar one tablespoonful at a time.
  4. Once all of the caster sugar is added allow the machine to continue whisking until the mixture is thick and glossy. This process can take anything from 5 to 10 minutes, depending on how efficient your mixer is.
  5. Line 2 baking sheets with baking parchment and load the meringue mixture into a piping bag. Pipe the meringue rounds onto the parchment, leaving a little space between each.
  6. To make dessert cups or baskets, pipe the base of the basket to a diameter of 90mm, or 3.5 inches, then continue piping over the outside ring to build a wall.
  7. Bake the meringues in a preheated oven at 140c or 284f for 30 to 40 minutes and the color has darkened slightly.
  8. Allow the meringues to cool in the oven with door slightly open.
  9. Store the meringues in an air-tight container as they will soften due to humidity.


Silicone Molded Chocolate Cups – How to Mold Chocolate Cups in Silicone Muffin Molds

molded chocolate cups,silicone molded chocolate cups,chocolate cups molded in muffin cups,how to mold chocolate cups,making molded chocolate cups at home,homemade chocolate molded cups,how to mold chocolate cups,making chocolate cups,fancy chocolate cups,molding chocolate cups


Silicone Molded Chocolate Cups - How to Mold Chocolate Cups in Silicone Muffin Molds
Author: 
Recipe type: Dessert / Chocolate
 
Over Valentine's we showed you how to make elegant balloon molded chocolate cups. Today we're looking at how to make a similar cup using silicone muffin molds.
Ingredients
  • Compound / Cooking chocolate
Instructions
  1. I am using compound or cooking chocolate. It is ideal for these types of projects as it has a higher melting point and does not require tempering.
  2. Melt the chocolate in your melting pot, or in s double boiler or even in your microwave 15 seconds at a time, stirring after each heating.
  3. Pour enough chocolate into the first silicone muffin cup to fill it 2 thirds. Lift the cup and pour the chocolate into the second cup.
  4. Continue with this process until all of the cups are coated. As you go the quantity of chocolate will be depleted and you will need to swirl the last few cups around to get the same coating level. After each pouring, scrape the edges of the muffin cups clean using the back of a knife.
  5. Transfer the cups to your refrigerator for 10 minutes to set.
  6. Remove the cups from the fridge and repeat the coating process again.
  7. Return the cups to the fridge to set once more.
  8. After 10 minutes the chocolate will be set. Loosen the edge of the silicone muffin cup from the raised edge of the chocolate. Start turning the entire silicone mold inside out out to free the chocolate cup.
  9. And there it is, perfectly molded chocolate cups with a raised edge that acts as a handle. You can fill these with anything fom chocolate mousse to brandy soaked fruit and cream.


Valentines Day Pancetta, Camembert and Preserved Fig Pizza – The Pizza of Love!!!

valentine's day recipe,savoury and sweet pizza recipe,pizza with pancetta recipe,pizza of love,sweet and savory pizza,pizza with pancetta and figs,pizza with pancetta and camembert,valentine's day pizza,how to make pizza,valentine's day pizza recipe,quick and easy gourmet pizza,special pizza recipe,sweet & sour pizza recipe,pancetta pizza recipe


Valentines Day Pancetta, Camembert and Preserved Fig Pizza - The Pizza of Love!!!
Author: 
Recipe type: Pizza
Cuisine: Italian
Prep time: 
Cook time: 
Total time: 
Serves: 2
 
What life or love be without a little sweet and a little savoury? This pizza gives you both in one. The strongly flavored Pancetta is offset by the sweetness of the preserved figs, and this all melted together with creamy Camembert and mozzarella.
Ingredients
For 2 Large (35cm) Pizzas
  • 1 Batch of Instant Pizza Dough
  • 400g Grated mozzarella cheese
  • 1 Round of Camembert cheese
  • 8 Slices of rolled pancetta
  • 2 Preserved figs
  • Salt & pepper to taste
Instructions
  1. For the toppings, cut a round of camembert into 8 wedges. Turn the on their side and cut them through the center giving you 16 pieces.
  2. Cut the preserved figs into slices, then cut 8 slices of pancetta.
  3. In addition, grate 400g of mozzarella cheese.
  4. Divide the pizza dough in 2. This is the instant pizza dough we featured a few weeks back and you can see this by clicking the onscreen link.
  5. Press each half into a large disc. Lightly flour the work surface and roll this out to 35cm in diameter, or 14 inches.
  6. Transfer the bases to baking sheets. Dock the bases using the tines of a fork to stop the dough from bubbling up during baking.
  7. Sprinkle a little less than half of the mozzarella onto each base. Arrange 8 wedges of the camembert on each each base, followed by 4 rounds of pancetta and the sliced preserved fig.
  8. Finish it off by sprinkling half of the remaining mozzarella over each one.
  9. Bake the pizza in a preheated oven at 250c or 480f for 15 to 20 minutes until the edges are crispy and golden.
  10. Remove the pizzas from the oven, slice into wedges and serve immediately.


Scroll to top

Kitchen Conversions

Convert:
Masses
to:
Volumes
to:
Temperatures
to:
Lengths
to: