Tuna Terrine Cucumbers – Cucumber Wedges Filled with Gelatin Tuna Terrine!!!

tuna terrine cucumbers,tuna terrine stuffed cucumbers,tuna terrine filled cucumbers,stuffed cucumbers,filled cucumbers,set tuna terrine in cucumbers,how to make tuna terrine,how to mix gelatin,how to set tuna in gelatin,fish in gelatin recipe,how to mold gelatin,how to mold gelatin in cucumbers,how to make gelatin terrine,how to set gelatin terrine


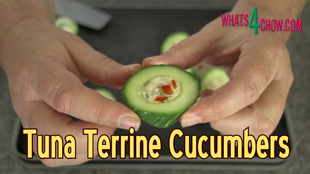
Tuna Terrine Cucumbers - Cucumber Wedges Filled with Gelatin Tuna Terrine!!!
Author: 
Recipe type: Fish / Seafood
Cuisine: French
Prep time: 
Total time: 
Serves: 36-40
 
Hollowed cucumbers filled with tuna terrine make amazing finger snacks, starters or accompaniments to your main meal.
Ingredients
  • ¼ Red pepper, finely chopped
  • 4 Tbs Chopped garlic chives
  • Zest of 1 lemon
  • 100g Mayonnaise
  • 200g Canned shredded tuna, drained (can also use salmon)
  • 18-20 x 5cm (2 inch) pieces of English cucumber
  • Salt and cracked black pepper to taste
For the Gelatin
  • 25ml Powdered gelatin
  • 225ml Hot water
  • 275ml Cold water
Instructions
  1. Finely chop the red pepper and garlic chives. Grate the rind of one lemon and measure out the mayonnaise. Cut 18 to 20 x 5cm or 2 inch lengths of cucumber and use a apple corer to remove the centers from these.
  2. Place the tuna in a jug and add the lemon zest, peppers, chives and mayonnaise.
  3. To mix the gelatin, pour 225ml of hot water into a small jug and add the powdered gelatin. Stir this for a minute or 2 until it is totally dissolved. Pour this into a larger jug and top it up with cold water to a total of 500ml.
  4. Stir to combine, then pour this into the jug containing the main ingredients. Stir this until everything is combined and the mayonnaise has totally dissolved then put this aside.
  5. Use the back of a spoon to put a coating of butter onto a baking sheet or pan. Press the cucumbers into the butter.
  6. Place the baking sheet or pan on top of an ice block or over another large pan filled with ice. This sets the butter hard and totally seals the bases of the cucumbers. Allow this to set for 5 minutes.
  7. Fill the cucumbers with the terrine mixture. Don't be too concerned with spillage as this will simply wipe away once the gelatin has set. Place these in your refrigerator.
  8. Any leftover filling can be molded in ramekins.
  9. After an hour or so the terrine will have set. This timing depends largely on the temperature of your refrigerator. Remove them from the fridge and pull the cucumbers free from the butter. Wipe off any spillage from the edges.
  10. Use a razor sharp knife to slice wafer thin slices from each end of the cucumber pieces to neaten up the ends. Slice the cucumber pieces at an angle and you're done.
  11. To unmold the ramekins simply run a thin blade round the edge of the ramekins and pop them out onto the plate.


Pasta with Anchovies, Capers, Garlic & Parmesan. Brilliantly Simple Pasta!!!

Quick pasta recipe,simple pasta recipe,pasta with anchovies recipe,pasta with anchovies & capers recipe,quick pasta with anchovies,super-easy pasta recipe,best seafood pasta recipe,best anchovy pasta recipe,anchovy & caper pasta,best linguine recipe,best taglietelle recipe,best spaghetti recipe


Pasta with Anchovies, Capers, Garlic & Parmesan. Brilliantly Simple Pasta!!!
Author: 
Recipe type: Pasta / Seafood
Cuisine: Italian
Prep time: 
Cook time: 
Total time: 
Serves: 2
 
This pasta dish is pure brilliance in its absolute simplicity, and has the most amazing aromas and flavors. You can create this masterpiece with just a handful of ingredients!!!
Ingredients
  • 2 Portions Linguine, Taglietelle or spaghetti (cooked to package instructions)
  • 50g Butter
  • 15ml Olive oil
  • 4 Cloves garlic, roughly chopped
  • 6-8 Anchovy fillets, roughly chopped
  • 15 Capers, roughly chopped
  • 2.5ml Chilli flakes
  • 30ml Chopped parsley
  • Shredded Parmesan
  • Salt & cracked black pepper to taste
Instructions
  1. To start you will need Linguine, Taglietelle or even spaghetti. Cook this according to the package instructions.
  2. Measure out the chilli flakes, grate the parmesan cheese, chop the parsely, weigh out the butter, roughly chop the anchovy fillets, capers and garlic. In addition, you will need 15ml of olive oil.
  3. Heat your pan over medium high heat, add the butter and garlic. Fry this for 2 minutes until it just starts to take on some color.
  4. Add the chilli flakes, anchovies and capers and fry this for 60 seconds.
  5. Add the chopped parsley to the pan and stir this in. Remove the pan from the heat and stir in the olive oil.
  6. Pour this all over the cooked pasta and toss it thoroughly until everything is coated.
  7. Serve the pasta immediately dressed with a generous topping of shredded Parmesan cheese.


Product Review – Sushi Making Kit – Manual Sushi Machine – Make Sushi at Home!!!

sushi making kit,sushi making machine,sushi mould,sushi maker,homemade sushi,homemade sushi kit,make sushi at home,easy sushi machine,quick sushi machine,shrimp sushi recipe,how to make shrimp sushi,easy shrimp sushi,shrimp sushi with sushi machine,sushi maker machine


Product Review - Sushi Making Kit - Manual Sushi Machine - Make Sushi at Home!!!
Author: 
Recipe type: Sushi
Cuisine: Japanese
 
In this episode we're doing a quick product review of a manual sushi making kit. While do the review, I am also making a very simple, super tasty shrimp sushi.
Ingredients
  • 2 Batches sushi rice
  • 4 Spring onions
  • ¼ Red pepper (or red chilli / or pepperdew)
  • 250g Shrimp meat
Instructions
  1. For the filling, finely chop the spring onions and peppers and mix these together. Flash fry the shrimp over extreme heat and roughly chop these into bits.
  2. You will also need 2 batches of the sushi rice we prepared in the previous episode.
  3. Now for the machine. Made from a reasonably good quality high density plastic, the kit comes with 4 different moulds.
  4. One for round suchi, one for small square sushi, one for triangular sushi and finally one to make heart shaped sushi.
  5. The set includes the groover, tamper, spoon and spatula.
  6. The process for making the sushi is identical for all of the shapes. Press a sheet of nori into the mould. Fill the mould to halfway with the rice. Use the groover to press a furrow into the rice.
  7. Fill the furrow with shrimp and the vegetable mix. Fill the remaining space with more rice. Tamp the rice down with the tamper.
  8. Fold one side of the nori over the rice. Wet your fingers and wet the folded nori. Fold the othe half of the nori over this. Tamp this down with the tamper, or in this case the top mould.
  9. Cut the sushi into perfect rounds using a razor sharp knife through the grooves in the mould. Thats the round mould.
  10. And now quickly with the triangular mould....
  11. Place the nori in the mould and fill it halfway with rice. Use the groover to press a forrow into the rice and fill this with shrimp and the vegetable mix. Fill the remaining space with more rice.
  12. Fold one half of the nori over the rice and wet this with your fingers. Fold the other side of nori over this and tamp it down with the tamper.
  13. Cut the sushi into perfect triangles using a sharp knife through the measured grooves.
  14. You can get your manual sushi machine through the onscreen link. We do make a small commission on sales and this goes towards developing the channel and bringing you more great content.


Gourmet Cold-Smoked Baby Sole – How to Make Cold-Smoked Sole with Smoke Daddy Cold Smoke Generator.

how to smoke sole,cold smoked sole,cold smoking sole,cold-smoking baby sole,cold-smoke sole with smoke daddy cold smoke generator,cold-smoking fish using smoke daddy cold smoke generator,how to smoke fish,smoked sole recipe,smoked fish recipe,smoked sole using apple wood,the smoke daddy cold smoke generator how to use,making smoked fish,cold smoked fish,cold smoking fish,smoke daddy smoke generator recipes,cold-smoked sole


Gourmet Cold-Smoked Baby Sole - How to Make Cold-Smoked Sole with Smoke Daddy Cold Smoke Generator.
Author: 
Recipe type: Seafood / Fish / Smoking
Prep time: 
Cook time: 
Total time: 
Serves: 2
 
In today's episode we're going to use the Smoke Daddy cold smoke generator to flavor a batch of baby sole. The fish is first cold smoked, then pan-fried to perfection resulting in a truly gourmet fish dish subtly infused with apple wood smoke.
Ingredients
  • 4 Baby sole (approx 130g each)
  • 60g Butter
  • 5ml Herbs provence herb mix
  • 2.5ml Garlic powder
  • 30g Butter for frying
  • Apple wood chips
Instructions
  1. To start, place the butter, garlic powder and dried herbs in a heatproof bowl. Pop this in your microwave oven and melt the butter.
  2. Pat the sole dry with kitchen paper.
  3. Place a rack at an angle across the corners of a roasting pan, and transfer the sole to the rack. Brush both sides of the sole with the butter mixture.
  4. Fire up your cold smoke generator and place the fish in the barbecue. Allow this to smoke for 45 minutes.
  5. After 45 minutes remove the sole from the barbecue. Heat a pan over medium high heat and add 30g of butter. Fry the sole for 2 to 3 minutes per side.
  6. Season to taste with salt and pepper.
  7. Transfer the sole sole to serving platters and top with a little of the pan butter and lemon or lime wedges before serving with accompaniments of your choice.


Cape Malay Pickled Fish – Traditional Cape Town Kerrievis, a Delicious Summer Meal!!!

pickled,fish,pickled fish,pickled fish recipe,cape malay pickled fish,cape malay pickled fish recipe,pickled fich recipe south africa,how to make pickled fish,kerrievis,kerrie vis recipe,how to make kerrie vis,kerrievis recipe south africa, pickled fish ingredients, pickled fish recipes vinegar, pickled fish cape malay recipe, white vinegar pickling


Cape Malay Pickled Fish - Traditional Cape Town Kerrievis, a Delicious Summer Meal!!!
Author: 
Recipe type: Seafood / Fish / Pickling
Cuisine: South African
Prep time: 
Cook time: 
Total time: 
Serves: 4
 
Cape Malay Pickled Fish, or Kerrievis, is a traditional South African Malay dish. Served well-chilled, this pickled fish makes and amazing summer meal or starter course.
Ingredients
  • 400g Firm white fish fillet
For the seasoned flour
  • 1 Cup all-purpose flour
  • 10ml Salt
  • 10ml Ground white pepper
For the Pickling Sauce
  • 3 Bay leaves
  • 2 Onions
  • 200ml Brown vinegar
  • 125ml Water
  • 90ml Sugar
  • 7.5ml Turmeric
  • 25ml Curry powder (your personal choice - mild or spicy)
  • 2.5ml Salt
  • 4 Whole black peppercorns
  • 2 Whole allspice
To thicken
  • 20ml Cornflour dissolved in a little water
Instructions
  1. Combine the all purpose flour, salt, and ground white pepper.
  2. Cut the fish fillets into large blocks then dredge them in the seasoned flour.
  3. Heat a large pan over medium high heat and add 30g of butter. Fry the fish for 3 to 4 minutes, turning halfway. The fish should be crispy and well bronzed.
  4. To make the pickling sauce, cut your onions in half length-ways and slice them into thin half rounds.
  5. Combine the brown vinegar with the water and measure out the bay leaves, sugar, turmeric, curry powder, salt, black pepper corns and whole allspice.
  6. In addition, dissolve the cornflour in a little water to make slurry.
  7. Add the onions, all of the spices and vinegar solution to the pan over medium heat. Bring the pan to a boil, lower the heat and allow this to simmer for 10 minutes.
  8. Pour in the cornflour slurry and continue to simmer for a minute or 2 until the sauce has thickened.
  9. Place the fried fish in a non-reactive pan and pour the pickling sauce over the fish. Allow the pan to cool, cover the pan with cling-wrap and let the fish mature in the refrigerator for one to 2 days before serving.
  10. The pickled fish will last for a few weeks under refrigeration if you can resist the temptation to eat it first. This allows you to process much bigger batches without the risk of spoilage by simply multiplying this recipe out.


Crispy Fried Fish in Beer Batter. How to Make Delicious Beer Battered Fish.

beer batter, fried fish, beer battered fish, how to make a fish beer batter, simple beer batter, how to make a beer batter, fish beer batter, fish and chips (dish), battered fish, fried fish in beer batter, frying fish in beer batter, pan fried fish in beer batter, deep frying fish in beer batter, calories in beer battered fried fish, british food, english fish and chips, beer battered fish recipe


Crispy Fried Fish in Beer Batter. How to Make Delicious Beer Battered Fish.
Author: 
Recipe type: Seafood / Fish
Cuisine: British
Prep time: 
Cook time: 
Total time: 
Serves: 4
 
In today's episode we're going to make really simple deep fried fish in a light crispy beer batter.
Ingredients
  • 330ml Beer
  • 180g Self-raising flour
  • 150g All-purpose flour
  • 800g Fish fillets of your choice (Hake is fine)
  • Salt and cracked black pepper
Instructions
  1. Place the self raising flour, a generous pinch of salt, and very generous grind of black pepper in a large mixing bowl.
  2. Pour in the beer and stir this until you have a smooth batter. Put this aside for 30 minutes.
  3. Cut the fish fillets across the grain into strips of around and inch (25mm) in thickness.
  4. Half fill your wok or pan with oil and heat this to 160c or 320f.
  5. Dredge the fish pieces in the all purpose flour. This dries the surface of the fish and gives the batter something to hold onto.
  6. Dip the fish pieces in the batter one by one and carefully drop them into the oil. Fry the fish for 3 to 4 minutes until crispy and golden.
  7. Remove the fish from the oil using a slotted spoon and drain any excess oil on kitchen paper.
  8. Serve the fish with crispy french fries, tartare sauce and lemon wedges.


Snack Platter Catering – Part 21 – Deep Fried Prawn Wontons

deep-fried wontons,deep-fried prawn wontons,how to make wontons,how to fold wontons,pork and prawn wontons,best wonton recipe,seafood wontons,dim sum recipes,chinese recipes,proper wonton fold,how to deep-fry wontons,pork and prawn deep-fried wontons,finger foods,snack food recipes,super bowl recipes,snack platter recipes


Snack Platter Catering - Part 21 - Deep Fried Prawn Wontons
Author: 
Recipe type: Dim Sum / Finger Foods / Snack Foods / Super Bowl Recipes
Cuisine: Chinese
Prep time: 
Total time: 
Serves: 80
 
These amazing crispy fried pork and prawn wontons are quick and easy. One the really cool things about this is that you can make the wontons way ahead of time and deep fry them from frozen as required.
Ingredients
  • 200g Prawn meat
  • 200g Bacon
  • 15ml Ginger, grated
  • 4 Spring onions
  • 2.5ml Salt
  • 5ml Sesame oil
  • 15ml Cornflour
  • 80 Wonton skins
Instructions
  1. Cut the bacon into thin strips across the grain, chop the spring onion into rounds, measure out the grated ginger, salt, roasted sesame oil and cornflour. In addition weigh out the prawn meat and unpack 80 wonton skins and keep them under a damp cloth.
  2. Place all of the ingredients with exception of the wonton skins into your food processor.
  3. Zap this all until it is quite finely chopped.
  4. Working with one wonton skin at a time, place a skin diagonally in front of you. Using a wet finger, wet the 2 upper edges of the wrapper.
  5. Place a teaspoonful of the filling onto the center of the wrapper.
  6. Fold the corner closest to you up and over the filling to meet the top corner. Press the edges of the wrapper together to seal, making sure to press out any air from inside the parcel.
  7. This will give you a very basic gowgee fold. Wet one of the sharp corners of the parcel. Pull the 2 sharp corners towards you until they overlap, then crimp them together.
  8. Repeat this until all of the wontons are formed.
  9. Half fill a large pan with oil and heat this to 190c or 375f. Fry the wontons in batches for 2 to 3 minutes, stirring gently halfway through.
  10. Use a slotted spoon to remove the wontons from the oil and drain them on kitchen paper. Repeat this until everything is fried.
  11. Transfer the wontons to serving platters and serve immediately.


Snack Platter Catering – Part 13 – Deep Fried Mussel Puffs. Crispy Deep-Fried Mussels!!!

deep-fried mussels,crispy deep-fried mussels,finger foods,snack foods,finger food recipes,snack food recipes,cocktail party snack recipes,how to make deep-fried mussels,make deep fried mussels at home,deep-fried mussels snack food,deep-fried mussels entre',deep-fried mussels party food,superbowl snack recipe,quick deep-fried mussels recipe,easy deep fried mussels recipe,how to deep-fry mussels,deep-fried mussels superbowl


Snack Platter Catering - Part 13 - Deep Fried Mussel Puffs. Crispy Deep-Fried Mussels!!!
Author: 
Recipe type: Finger Food / Snack Food / Superbowl Food / Seafood / Entre's
Prep time: 
Cook time: 
Total time: 
Serves: 40-50
 
Deep fried mussels in a light, crispy batter will have everyone lining up for more. This recipe is quick and easy and tastes like heaven.
Ingredients
  • 90-120 Mussels, shelled and cleaned
For the Batter
  • 150g All-purpose flour
  • 75ml Tapioca flour
  • 7.5ml Baking powder
  • 2.5ml Salt
  • 235ml Water
  • 30ml Oil
Instructions
  1. Place the all purpose flour, tapioca flour, baking powder and salt in a mixing bowl. Stir these briefly to combine, then pour in the oil and water. Whisk this until it is smooth. Set this aside to rest for 30 minutes.
  2. Pour the mussel meat out onto a dish towel and gently pat it dry. Thread the mussels onto toothpicks. The number of mussels on each skewer will vary depending on the size of the mussels. You want to fill just over half of each toothpick.
  3. Whisk the batter again briefly. Half fill a large pan with oil and heat it to 190c or 375f. Dip the mussel skewers in the batter to coat the mussel meat and carefully lower them into the oil.
  4. Allow the skewers to fry for 3 to 4 minutes until crisp and lightly golden. Use a slotted spoon to remove them from the oil and drain on kitchen paper.
  5. This quantity of batter will allow you to make 40 to 50 skewers.
  6. Transfer the mussel puffs to platters and serve immediately.


Snack Platter Catering Part 2 – Angels on Horseback (Bacon Wrapped Mussels / Oysters / Scallops)

angels on horseback,bacon wrapped mussels,bacon wrapped scallops,bacon wrapped oysters,snack platter recipes,cocktail party recipes,easy party recipes,quick superbowl recipes,easy superbowl recipes,recipes for the big game,quick and easy party recipes,seafood wrapped in bacon,crispy bacon wrapped mussels,crispy bacon wrapped oysters,crispy bacon wrapped scallops


Snack Platter Catering Part 2 - Angels on Horseback (Bacon Wrapped Mussels / Oysters / Scallops)
Author: 
Recipe type: Snacks / Cocktail Snacks / Finger Foods
Serves: 20-40
 
Angels on Horseback are absolutely delicious, and so easy to make that they lend themselves perfectly to catering for larger numbers of people.
Ingredients
For 40 Angels on Horseback
  • 20 Strips of streaky bacon
  • 40 Fresh mussels (or oysters / scallops)
  • 40 Toothpicks
Instructions
  1. Fry the bacon over medium heat until it is lightly browned but not crispy. Remove the bacon from the pan and allow it to coon for a few minutes, then cut it in half across the grain.
  2. Grab a half strip of bacon and one of the seafood pieces and wrap the bacon around the seafood. In this case I am using fresh mussels. Press a toothpick through the overlap of bacon to secure it in place. Continue until all of the skewers are done.
  3. Place the angels in a roasting tin and grill them on the second highest rack in you oven until well browned and crispy. Turn the skewers over and grill the other side until crispy.
  4. By grill, I mean using the top element of your oven on maximum temperature, which is normally 250c.
  5. The grilling is pretty quick, so be sure to keep a watchful eye on your creation so that it does not burn.
  6. Remove the angels from the oven, transfer to platters and serve hot or cold, although I must add that they are better on the hot side.


Smoked Fish Pizza!!! Something Totally Different From Regular Run-of-the-Mill Pizza!!!

smoked fish pizza,smoked fish pizza recipe,how to make smoked fish pizza,seafood pizza,seafood pizza recipe,smoked seafood pizza recipe,smoked fish pizza recipe video,unusual pizza recipe,unusual seafood pizza recipe,unusual smoked fish pizza recipe, smoked salmon pizza,gourmet pizza recipe,gourmet smoked fish pizza recipe,homemade fish pizza recipe,how to make seafood pizza at homade,homemade pizza,best pizza recipe


Smoked Fish Pizza!!! Something Totally Different From Regular Run-of-the-Mill Pizza!!!
Author: 
Recipe type: Pizza
Cuisine: Italian
Prep time: 
Cook time: 
Total time: 
Serves: 2-4
 
This smoked fish pizza gives a whole new take on pizza. You can use cooked smoked haddock, trout or salmon to make this extra tasty pizza delight!!!
Ingredients
  • 2 x 30cm / 12 inch Pizza bases
  • 50ml Tomato paste
  • 30ml Tomato sauce
  • 300g Cooked smoked fish
  • 100g Mature Cheddar cheese, grated
  • 200g Mozzarella cheese, cut into chunky blocks
  • 10-12 White mushrooms, cut in half
  • A drizzle of olive oil
  • Salt & freshly ground black pepper to season
  • Herbs to garnish
Instructions
  1. Cut the mozzarella into chunky blocks, grate the mature cheddar cheese and flake the cooked smoked fish. I am using smoked haddock, but you can use any smoked fish.
  2. Cut the mushrooms in half. Drizzle the mushrooms with olive oil and mix them around until coated all over.
  3. For the tomato base, mix 50ml of tomato paste with 30ml of good quality tomato sauce.
  4. Roll out your dough.
  5. Using the back of a spoon, spread the tomato base over each of the pizza bases.
  6. Sprinkle half of the cheddar over each of the pizzas, followed by half of the flaked smoked fish.
  7. Spread the blocks of mozzarella evenly over each pizza, then the mushrooms.
  8. Season the pizzas with salt and ground black pepper and bake them in a preheated oven at maximum temperature for 15 minutes until the bases are well browned on the edges.
  9. The tomato base may look a little burnt, but don't worry, it is simply very much more concentrated and baked, with an insanely delicious tangy flavor.
  10. Cut the pizza into wedges and serve immediately.


Deep-Fried Calamari / Squid Heads. How to Prepare, Coat and Deep-Fry Calamari Tentacles.

deep-fried squid heads,deep-fried calamari heads,deep-fried squid tentacles,deep-fried calamari tentacles,how to clean squid heads,how to cook squid heads,how to clean calamari heads,how to cook calamari tentacles,squid head recipe,calamari head recipe,calamari tentacles recipe,squid tentacles recipe,How to deep-fry calamari tentacles,how to deep-fry squid tentacles,crispy fried squid tentacles,crispy fried calamari tentacles


Deep-Fried Calamari / Squid Heads. How to Prepare, Coat and Deep-Fry Calamari Tentacles.
Author: 
Recipe type: Seafood / Calamari
Cuisine: Mediterranean
Prep time: 
Cook time: 
Total time: 
Serves: 2
 
Calamari heads / Tentacles are popular across the entire Mediterranean region. They are prepared in many ways from grilled to pickled. Here we're coating the heads in a light batter and frying them to golden perfection.
Ingredients
  • 250g Squid heads
  • 2 Eggs
  • 60g Tapioca flour
  • 2.5ml Salt
Instructions
  1. Inspect the calamari heads. In most cases, the beak will still be present. It is a hard piece of transparent material. Cut this away and discard it.
  2. In a jug, combine the tapioca flour, salt and eggs. Whisk this thoroughly until you have silky smooth batter.
  3. Place the squid heads in a bowl and pour the batter over. Mix the heads in until everything is well coated.
  4. Half fill your wok with oil and heat this to 190c or 375f.
  5. Carefully drop the heads into the oil one by one. Fry the squid for 3 minutes until crisp and lightly golden. Remove from the oil and drain on kitchen paper.
  6. Repeat this until all of the calamari is fried.
  7. Serve the calamari immediately with rice and lemon wedges and any other accompaniments of your choice.


Hunan-Style Sweet & Piquant Deep Fried Calamari. Chinese Sweet & Sour Calamari.

Hunan-Style Sweet & Piquant Deep Fried Calamari,chinese deep-fried calamari,sweet and sour deep-fried calamari,deep-fried squid,sweet and sour deep fried squid,chinese deep fried squid,sweet and sour deep fried squid,chinese deep fried calamari, fried calamari, fried squid, fried calamari recipe, crispy fried calamari, chinese deep fried calamari recipe, asian deep fried calamari, chinese style deep fried squid


Hunan-Style Sweet & Piquant Deep Fried Calamari. Chinese Sweet & Sour Calamari.
Author: 
Recipe type: Seafood / Calamari / Deep-fried
Cuisine: Chinese
Prep time: 
Cook time: 
Total time: 
Serves: 4
 
Hunan-style sweet & piquant deep-fried calamari is out of this world!!! Battered and deep-fried, the calamari is then tossed in a sweet and piquant Hunan style sauce to glaze. Served on a bed of shrimp fried rice, this is pure heaven.
Ingredients
For the Batter
  • 150g All-purpose flour
  • 75ml Tapioca flour (or Corn flour)
  • 7.5ml Baking powder
  • 235ml Water
  • 2.5ml Salt
  • 30ml Oil
For the Sauce / Glaze
  • 30ml Caster sugar
  • 20ml White wine vinegar
  • 15ml Light soy sauce
Other
  • ½ Red pepper cut into strips
  • ½ Yellow pepper cut into strips
  • 3 Tbs Snipped chives
Instructions
  1. Place the flour, tapioca flour, baking powder and salt in a large mixing bowl. Add the water and mix this to a thick batter. Allow this to stand for 20 minutes.
  2. While the batter stands, cut the calamari into rings of around 6mm or a quarter inch in width.
  3. Transfer the rings to a clean dish towel and pat them dry.
  4. Cut the peppers into strips, and snip 3 tablespoons of chives.
  5. Once the batter has rested, pour in the oil and mix this thoroughly until combined.
  6. Half fill a large pan with oil and heat this to 180c or 350f. Dip the calamari rings in the batter and carefully drop them into the oil. Continue until the surface of the oil is covered.
  7. Fry the calamari for 3 minutes per side until light golden and crispy. Use a slotted spoon to scoop these from the oil and drain the rings on kitchen paper.
  8. Repeat this until all of the rings are fried.
  9. Heat your wok over medium high heat, add a teaspoonful of oil and fry the peppers for 2 minutes. In a jug, combine the caster sugar, white wine vinegar and light soy sauce.
  10. Stir this until the sugar has dissolved, and add this to the wok.
  11. Allow this to boil for 90 seconds, then add the calamari to the wok. Toss the calamari in the sauce until everything is well coated.
  12. Remove the wok from the heat and stir in the snipped chives.
  13. Arrange a bed of shrimp fried rice in each your serving bowls. Top this with the calamari and serve immediately.


Scroll to top

Kitchen Conversions

Convert:
Masses
to:
Volumes
to:
Temperatures
to:
Lengths
to: