Super-Crispy Deep-Fried Onion Rings. How to Make Perfect Fried Onion Rings!!!

crispy onion rings,how to make onion rings,deep fried onion rings,deep fried onion rings recipe,deep fried onion rings without batter,deep fried onion rings panko,deep fried onion rings calories,deep fried onion rings recipe with buttermilk,deep fried onion rings beer batter,deep fried onion rings recipes by paula deen,deep fried onion rings flour coating,how to make crispy fried onion rings,how to make homemade onion rings


Super-Crispy Deep-Fried Onion Rings. How to Make Perfect Fried Onion Rings!!!
Author: 
Recipe type: Vegetables / Deep-fried
 
Onion rings can be the best or worst accompaniment for burgers or grills. Unfortunately more often than not battered onion rings turn out as oil soaked UFO's that repeat on you for days afterwards. This recipe gives the foolproof solution, and the perfectly crispy, tasty and aromatic onion rings ever.... with much less oil residue.
Ingredients
  • 1 Large onion
  • 250ml Full-cream milk
  • 45ml Cornflour
  • Oil for frying
For the Coating
  • 250ml All purpose flour
  • 10ml Garlic powder
  • 5ml Hot smoked paprika
  • 5ml Salt
  • 2.5ml Hot English Mustard powder
  • 2.5ml Ground white pepper
Instructions
  1. Top and tail and peel the onions and slice them into half inch thick rings. Carefully remove the first three rings from each round. You can use the inner rings for salads or soups.
  2. For the coating, combine the all purpose flour, garlic powder, hot smoked paprika, salt, hot English mustard powder and ground white pepper.
  3. In a jug, whisk together the cornflour and milk and pour this into a dish.
  4. Dip each onion ring into the milk solution then dredge it in the flour mixture. Transfer the rings to a platter.
  5. Once the first coating is complete, sprinkle some of the flour mixture over a large platter. This is where the coated onions will set, and the layer of flour prevents the coating from sticking to the platter and getting damaged.
  6. Dip each ring in the milk solution again, then into the flour to get a good solid coating. Transfer the coated rings to the platter. Allow the coated onions to set for 20 minutes.
  7. Fill a large pan with oil to a depth of 1 inch and heat this to 180c or 350f.
  8. Carefully drop the rings into the oil and fry them for 5 to 6 minutes turning halfway through.
  9. Remove the rings from the oil with a slotted spoon and drain any excess oil on kitchen paper.
  10. Serve the onion rings immediately, or keep them warm in your oven at 70c or 158f until required.


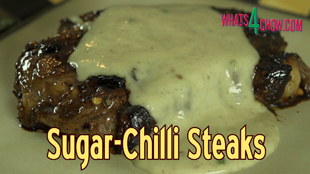
Sugar Chilli Steaks with Creamy Mushroom Sauce – How to Make Sugar Chilli Steaks at Home!!!

sugar chilli steak,how to make sugar chilli steak,homemade sugar chilli steaks,best grilled steak recipe,best steak recipe,best steak recipe youtube,best steak recipe video,the best steak ever,how to make the best steak ever,how to grill a steak,the best way to cook a steak,spicy grilled steak recipe,hot chilli steak recipe,sweet chilli steak recipe,mushroom sauce recipe,how to make mushroom sauce


Sugar Chilli Steaks with Creamy Mushroom Sauce - How to Make Sugar Chilli Steaks at Home!!!
Author: 
Recipe type: Steak / Beef
Prep time: 
Cook time: 
Total time: 
Serves: 4
 
Sugar chilli steak is flavor experience you will never forget. The caramelized sweet and spicy glaze offset by the creamy mushroom sauce is quite honestly one of the best combinations around.
Ingredients
For the Steaks
  • 4 x 250g Sirloin or Rump steaks
  • 60ml Demarara sugar (or treacle sugar)
  • 15ml Coarse ground black pepper
  • 15ml Chilli flakes
  • 10ml Salt
For the Mushroom Sauce
Instructions
  1. Combine the Demarara sugar, chilli flakes, coarsely cracked black pepper and salt.
  2. Press generous amounts of the mixture into the surface of both sides of the steaks.
  3. Stand the steaks up on their fatty edge and press 3 skewers through the steaks to secure them in this position.
  4. Flip the block over and give fatty strip a liberal dose of salt. Put these aside.
  5. To make the sauce you will need 300ml of the gourmet creamy mushroom soup we made yesterday..... click the link to see this video if you missed it.
  6. Pour the soup into a small saucepan. Dissolve the tapioca flour in a little water and stir this into the soup.
  7. Bring this to a simmer over medium heat and allow it to simmer for 90 seconds until thickened.
  8. Remove this from the heat and keep it warm.
  9. Heat a large frying pan over medium high heat and add 30g of butter.
  10. Place the steaks in the pan, fatty side down and allow this to fry for 6 minutes until the fat is well rendered.
  11. Remove the skewers from the steaks and drop them flat in the pan.
  12. Continue to grill these for 3 to 4 minutes per side until we glazed and caramelized.
  13. Remove the steaks from the heat and allow them to rest for a minute before serving topped with the creamy mushroom sauce.


How to Make Irish Pork Bangers from Scratch at Home – St Patrick’s Day Special!!!

how to make irish pork bangers from scratch,irish pork bangers recipe,how to make irish pork bangers at home,irish breakfast sausage,irish breakfast sausage recipe,irish bangers and mash recipe,sausage making - irish pork bangers,making sausage at home,home made sausage recipes,st patrick's day - irish pork bangers,how to make irish pork bangers easy,home made irish pork bangers,irish pork sausage recipe,easy irish sausage recipe,make pork bangers at home,breakfast sausage at home


How to Make Irish Pork Bangers from Scratch at Home - St Patrick's Day Special!!!
Author: 
Recipe type: Sausage
Cuisine: Irish
 
With St Patrick's Day on the 17th, here is the perfect recipe to celebrate with. Irish pork bangers are similar in texture to English bangers, but they have a flavor and aroma all their own.
Ingredients
  • 1.8kg Pork shoulder, deboned, skin off
  • 1 Egg white
  • 125ml Guinness draught beer
  • 70g Dry bread crumbs
  • 40g Fine non-iodated salt
  • 15ml Ground black pepper
  • 10ml Dried marjoram
  • 5ml Ground Nutmeg
  • 2.5ml Dried Thyme
  • 2.5ml Dried Rosemary
  • 100-125ml Iced water
Instructions
  1. Cut the pork shoulder into long strips, narrow enough to fit through the meat grinder's feeder tube.
  2. Transfer the strips to a large tray or platter in a single layer and place this in you freezer for 45 minutes.
  3. While the meat chills, beat the egg white with your stick blender until all of the albumen has broken down and the white is frothy.
  4. Pour in the Guinness draught beer, breadcrumbs, salt, black pepper, dried marjoram, ground nutmeg, dried thyme and dried rosemary. Process this to a paste.
  5. Remove the pork from the freezer and grind this through your 8mm or one third inch plate.
  6. Add the paste to the meat and massage this into the ground pork. The mixture will be pretty stiff and will need about 100ml of iced water to loosen it up. Massage this in, then return the pork to the freezer for 30 minutes.
  7. After 30 minutes, run the meat through the grinder once more, this time using a fine 3mm plate.
  8. Load the ground meat into the hopper of your sausage filler. Attach the funnel and feed the casing onto the funnel. I am using collagen casings as they are just so much easier and cleaner to work with.
  9. Twist the end of the casing and start filling the sausages. Take care not to fill them too tightly as this will cause them to split when cooking.
  10. It is easier to twist off the links as you go, twisting in the opposite direction for each link.
  11. Once all the links are formed, snip them apart with a sharp scissors and refrigerate the sausages overnight for the flavors to develop.
To Cook the Sausages
  1. Pour enough water into a frying pan to barely cover the base of the pan.
  2. Place the pan over medium-high heat and add the sausages. Simmer the sausages for 3 minutes per side.
  3. After simmering, most of the water will have evaporated, and the sausages will have started to release some of their fat. Add 30g butter to the pan and fry the sausages for 3 to 4 minutes per side until well browned and caramelized.
  4. Remove the sausages from the pan and serve immediately.


How to Smoke Peppers – How to Make Smoked Chilli Flakes at Home

how to smoke chilli peppers,how to smoke jalapeno peppers,how to make smoked chilli flakes,homemade smoked chilli flakes,how to smoke and dry chillis,how to smoke and dry peppers at home,making smoked chilli flakes,makiing smoked pepper flakes,using the smoke daddy vortex,smoked chilli recipe,smoked peppers recipe,how to smoke chillis video,how to smoke peppers video,how to smoke chillis youtube,how to smoke peppers youtube


How to Smoke Peppers - How to Make Smoked Chilli Flakes at Home
Author: 
Recipe type: Smoking / Drying
 
Smoked chilli flakes add a whole new flavor to your food while also adding the heat. I am using Jalapeños, but you can use and peppers of your choice. To Provide the smoke, I am using the Smoke Daddy Vortex.
Ingredients
  • Jalapeño peppers
  • 20ml Bicarbonate of soda
  • 1 lt Water
Instructions
  1. Dissolve 20ml of bicarbonate of soda in a liter of cold water. The chillis will be soaked in this solution the preserve their color. Green and red chillis will darken as they smoke and dry, but will retain their characteristic color instead of turning an unsightly black.
  2. To prepare the peppers, cut of the stems and quarter them length-ways. Transfer the peppers to the bicarb solution and allow them to soak for 5 minutes.
  3. Drain the chillis and transfer them to stainless steel mesh sieves or spatter screens.
  4. A while back, I unboxed and introduced the Vortex passive smoke generator. This is what we're using today.
  5. Place the peppers on the right hand side of your barbecue, and the Vortex smoker near the center. Use your blow torch or a heat gun to set the Vortex smoking. In addition ignite the left hand side burner.
  6. Aldo note the probe thermometer on the right hand side. This helps to monitor the target temperature of 67c or 153f.
  7. Let the peppers smoke for a total of 4 hours.
  8. Remove the peppers from the barbecue. You will notice that they have shriveled significantly, but are not totally dried.
  9. At this stage, you can store the chillis in oil, or continue with the drying process by placing the peppers in an oven at 67c or 153f until totally dried. This can take anything from 4 to 10 hours.
  10. Once totally desiccated, chop the chillis into flakes and store indefinitely in an airtight container.


How to Cure, Age and Smoke Bacon at Home – Best Homemade Bacon!!!

bacon,smoking,pork,curing,injecting,how to make bacon,how to cure and smoke bacon and ham,how to cure and smoke bacon,how to cure and smoke bacon at home,how to cure and smoke canadian bacon,how to cure and cold smoke bacon,cured and smoked back bacon,how to make cure and smoke homemade bacon,smoked bacon recipe,how to make bacon,how to cure bacon,wet cured bacon,how to cure pork,easy bacon recipe


How to Cure, Age and Smoke Bacon at Home - Best Homemade Bacon!!!
Author: 
Recipe type: Curing and Smoking / Charcuterie
Cuisine: Italian
 
Bacon is one of the real joys of life. Nothing beats the amazing aroma of bacon sizzling in the pan.... and home-cured bacon takes this to a whole new level. This video will show you how to cure the bacon and smoke the bacon.
Ingredients
  • 2kg Pork loin, bone in, skin on
  • 2lt + 2lt Water
  • 300g Salt
  • 140g Prague powder #2
  • 15ml Garlic Powder
  • 4 Bay Leaves crushed
  • 15g Black Pepper
Instructions
  1. Measure out the Prague powder, salt, garlic powder, black pepper corns and bay leaves.
  2. Place the black peppercorns into your spice grinder and tear the bay leaves into this.
  3. Process this until reasonably fine. Add this to a pot along with all of the other dry ingredients, excluding the Prague powder.
  4. Pour in 2 liters of hot water. Bring this to a boil, reduce the heat and allow this to simmer for 10 minutes. Quick chill the brine by floating the pot in a sink of cold water, then put this aside.
  5. To prepare the pork loin, we need to debone it and remove the skin. You can also use deboned and skinned pork belly if you prefer.
  6. To skin the pork stand it up on its end and pull the skin back from the top. Use a sharp knife the peel the skin back from the fatty layer, leaving as much fat behind as possible. You can use the skin to make crackling.
  7. To remove the bone, start at the top with your knife, running it down the rack of ribs, using them as a guide for the blade. These ribs still have some meat on them, so save them for the barbecue.
  8. Place the prepared pork loin in a large non-reactive container.
  9. Once the brine has cooled add 2 liters of cold water and the Prague powder and stir this in until completely dissolved.
  10. Pour the curing brine into the container. The pork will float in the brine and you will need to place a bowl or plate on top of it to keep it submerged.
  11. Place the lid on the container and allow this to cure in your refrigerator for 7 days.
  12. After curing, remove the pork from the brine and pat it dry. Place the bacon on a rack over a roasting tin and allow this to air-dry for 5 days in your refrigerator.
  13. After the drying time, this is what you have.... a lovely, rosy pink colored slab of green bacon. This can be consumed as you would any regular bacon, however smoking the bacon really does add the extra dimension to its taste and aroma.
  14. Lift the rack up and balance it across the corners of the pan.
  15. Fire up your smoker and ignite a single burner furthest from where you intend placing the pork. If you're fortunate enough to be using a Smoke Daddy smoke generator, then the smoke will be chugging out in no time, and you can place the pork in the barbecue.
  16. Smoke the bacon for 3 and a half hours until you reach the target internal temperature of 65c or 149f. You will need a probe thermometer to monitor this.
  17. And there we have it. A beautifully cured smoked pork loin just waiting to be sliced and fried to perfection.


Smoked Garlic Powder using Smoke Daddy’s Vortex Smoke Generator

how to smoke garlic,how to make smoked garlic powder,smoking garlic using the smoke daddy vortex,hot-smoked garlic,smoking and drying garlic,making smoked garlic in your smoker,using the vortex to smoke garlic,smoke daddy vortex smoker making smoked garlic,using the smoke daddy vortex smoker to make smoked garlic powder,smoked garlic powder recipe,smoked garlic powder video recipe,smoked garlic powder youtube,homemade smoked garlic powder,easy smoked garlic powder


Smoked Garlic Powder using Smoke Daddy's Vortex Smoke Generator
Author: 
Recipe type: Smoking
Prep time: 
Cook time: 
Total time: 
 
Okay, we've just had a look at the Smoke Daddy Vortex coming out of the box, now let's give it a test run. To do this, I am going smoke some garlic. Using a bit of heat from the barbecue, I am also going to dry the garlic out, then grind it to a powder.
Ingredients
  • Garlic (at least 2 full heads to make it worth your while)
Instructions
  1. To start, separate the heads of garlic. There are easier ways to this, but you actually want to remove the skins exactly like this for this procedure.
  2. To skin the cloves, cut the stem end off. Place the clove on the board and crush it by banging the knife blade down on the clove. Grab the pointed end of skin and the entire skin will simply slip off. Transfer the crushed clove to a mesh strainer or a splatter screen.
  3. Place the Vortex near the center of the barbecue. The burner to the left of the Vortex will be the only burner running. Notice my probe thermometer on the right. This will help me monitor my target temperature of 67c or 168f.
  4. Using a blow torch or heat gun ignite the one side of the circle on the Vortex. Swing the unit around 180 degrees and ignite the other side to get the double burn. Depending on your wood pellets, you may have to repeat this a couple of times.place the mesh basket of garlic near the thermometer, ignite the left-hand burner, close the lid, and you're on your way.
  5. Set a timer for 4 hours to time the process.
  6. After 4 hours, remove the garlic from the barbecue. It will be lovely and golden, with an aroma from heaven. Most of the garlic will be pretty dry by this stage, however, some of the thicker bit might still be a bit spongy. Pop this into your oven at 67c or 168f with the door slightly open and continue to desiccate the garlic until completely dry.
  7. Run the dried garlic bits in your spice grinder for a few seconds to reduce it to a powder.
  8. And here is all that is left of the pellets in the Vortex.... just a little clean ash. Simply empty this out, give the unit a rinse, and it's as good as new.


Product Review – The Smoke Daddy Vortex Smoke Generator – New Passive Smoke Generator from Smoke Daddy!!!

smoke daddy,smoke daddy vortex,smoke daddy cold smoke generator,smoke daddy vortex smoker,smoke daddy vortex cold smoker,cold smoking with smoke daddy vortex,product review smoke daddy vortex,smoke daddy vortex unboxing,how to use the smoke daddy vortex,using the smoke daddy vortex,review of smoke daddy vortex cold smoker,smoke daddy products,smoke generator from smoke daddy,cold smoking with smoke daddy,hot smoking with smoke daddy,passive smoke generator

6 months ago I introduced an incredible product from Smoke Daddy, the cold smoke generator. They have now come up with a passive smoker unit called the Vortex. Mine has just arrived, so let’s have a look.

Before we continue, you can get more details on the Vortex by clicking the onscreen link.

The unit comes in a sturdy full color printed box, ensuring it will arrive undamaged. It sates clearly on the top that unit can be used for hot and cold smoking, and that it can be used with any existing closed barbecue grill. Very importantly, like all of their other equipment, it is 100% made in the USA.

Opening the box reveals the Vortex. But before we get onto that, all of the instructions are included in detail inside the lid.

The instructions explain clearly how to set the unit up to prove smoke for anything from 2 hours to 10 hours of smoke. In addition, how to ignite the unit to get it smoking.

Looking at the Vortex, it is manufactured from a really heavy gauge stainless steel mesh with a solid stainless steel surround and just from the feel of it, you know the Vortex means business.

On one side, there is a large indented circle for longer smoking times, and on the reverse side a smaller indented circle for shorter smoking times. These circles are filled with wood pellets which are then ignited. The flame-less burn proves the smoke required, while not affecting the temperature in the smoking enclosure. This makes the Vortex ideal for hot or cold smoking.

In the second part of this un-boxing video, I will be making smoked garlic powder to demonstrate the capabilities of the Vortex. I need 4 hours of smoke so I am filling the large circle with pellets. To get just 4 hours, I am going to ignite both sides of the circle and ignition points will burn towards one another. This will actually give me about 6 hours of smoke, but there is bit of breeze today, so I am playing it safe. If I only lit one side, I would get up to 10 hours of smoke. Using the smaller circle on the reverse side, I would get 2 hours from a double ignition, or 4 hours from a single ignition.

These are regular wood pellets from local supplier, however you can get wood pellets directly from Smoke Daddy as well. The original Smoke Daddy pellets contain a little charcoal as well aiding the burn, and giving a better smoke ring. I will also be testing the Vortex with fine wood chips to see if these will work.

Stay tuned for the next episode when we fire this baby up.


Gourmet Garlic Bread – Crispy, Crusty Garlic Bread with Pancetta & Blue Cheese!!!

garlic bread recipe,homemade garlic bread,how to make garlic bread,garlic bread ideas,garlic bread in oven,garlic bread rolls recipe,garlic bread from scratch,garlic bread with cheese,garlic bread recipe from scratch,how to make homemade garlic bread,baked garlic bread,easy garlic bread,restaurant garlic bread,gourmet garlic bread,garlic bread recipe youtube,garlic bread recipe video


Gourmet Garlic Bread - Crispy, Crusty Garlic Bread with Pancetta & Blue Cheese!!!
Author: 
Recipe type: Bread / Baked / Barbecue
Cuisine: French
 
Yesterday we made amazing crusty white farm bread. Today we're going to use one of these loaves to make awesome gourmet garlic bread turbo-charged with creamy melted blue cheese and pancetta.
Ingredients
  • 1 x 36cm / 15 inch Baguette-style farm loaf
  • 60g Butter
  • 5 Cloves garlic, finely chopped
  • 60g Blue cheese
  • 50g Pancetta (Italian bacon) finely chopped
Instructions
  1. Measure out the softened butter and blue cheese, and finely chop the fresh garlic and pancetta.
  2. Add the pancetta and garlic to the butter and blue cheese and mash this in thoroughly until everything is totally combined.
  3. Slice through the loaf of bread at an angle leaving the bottom crust of the loaf intact until the entire loaf is sliced with a space of 15mm or just more than a half inch between slices.
  4. Start filling the slices with the garlic butter mixture. This quantity of mixture is sufficient for one loaf.
  5. Place the loaf on a rectangle of foil and roll the log edge of the foil to enclose the loaf. Twist the ends to secure the foil. Don't twist the ends too tightly as you need to unwrap the loaf while it is hot, and if it is too tightly bound this will be very difficult and possibly dangerous.
  6. Bake the loaf in a preheated oven at 180c or 350f for 20 minutes.
  7. Immediately after baking, unwrap the loaf and serve hot and steaming.
  8. You can also bake the garlic bread in your closed barbecue following the same time and temperature. (indirect heat)


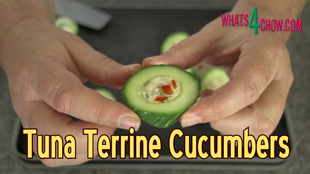
Tuna Terrine Cucumbers – Cucumber Wedges Filled with Gelatin Tuna Terrine!!!

tuna terrine cucumbers,tuna terrine stuffed cucumbers,tuna terrine filled cucumbers,stuffed cucumbers,filled cucumbers,set tuna terrine in cucumbers,how to make tuna terrine,how to mix gelatin,how to set tuna in gelatin,fish in gelatin recipe,how to mold gelatin,how to mold gelatin in cucumbers,how to make gelatin terrine,how to set gelatin terrine


Tuna Terrine Cucumbers - Cucumber Wedges Filled with Gelatin Tuna Terrine!!!
Author: 
Recipe type: Fish / Seafood
Cuisine: French
Prep time: 
Total time: 
Serves: 36-40
 
Hollowed cucumbers filled with tuna terrine make amazing finger snacks, starters or accompaniments to your main meal.
Ingredients
  • ¼ Red pepper, finely chopped
  • 4 Tbs Chopped garlic chives
  • Zest of 1 lemon
  • 100g Mayonnaise
  • 200g Canned shredded tuna, drained (can also use salmon)
  • 18-20 x 5cm (2 inch) pieces of English cucumber
  • Salt and cracked black pepper to taste
For the Gelatin
  • 25ml Powdered gelatin
  • 225ml Hot water
  • 275ml Cold water
Instructions
  1. Finely chop the red pepper and garlic chives. Grate the rind of one lemon and measure out the mayonnaise. Cut 18 to 20 x 5cm or 2 inch lengths of cucumber and use a apple corer to remove the centers from these.
  2. Place the tuna in a jug and add the lemon zest, peppers, chives and mayonnaise.
  3. To mix the gelatin, pour 225ml of hot water into a small jug and add the powdered gelatin. Stir this for a minute or 2 until it is totally dissolved. Pour this into a larger jug and top it up with cold water to a total of 500ml.
  4. Stir to combine, then pour this into the jug containing the main ingredients. Stir this until everything is combined and the mayonnaise has totally dissolved then put this aside.
  5. Use the back of a spoon to put a coating of butter onto a baking sheet or pan. Press the cucumbers into the butter.
  6. Place the baking sheet or pan on top of an ice block or over another large pan filled with ice. This sets the butter hard and totally seals the bases of the cucumbers. Allow this to set for 5 minutes.
  7. Fill the cucumbers with the terrine mixture. Don't be too concerned with spillage as this will simply wipe away once the gelatin has set. Place these in your refrigerator.
  8. Any leftover filling can be molded in ramekins.
  9. After an hour or so the terrine will have set. This timing depends largely on the temperature of your refrigerator. Remove them from the fridge and pull the cucumbers free from the butter. Wipe off any spillage from the edges.
  10. Use a razor sharp knife to slice wafer thin slices from each end of the cucumber pieces to neaten up the ends. Slice the cucumber pieces at an angle and you're done.
  11. To unmold the ramekins simply run a thin blade round the edge of the ramekins and pop them out onto the plate.


How to Make Awesome Burger Buns without an Oven!!! Amazing Soft & Tasty Pan Grilled Burger Buns!!!

How to Make Awesome Burger Buns without an Oven,how to pan grill burger buns,super quick and easy burger buns,how to burger buns recipe,soft and delicious burger buns,burger buns without euipment,burger buns when camping,best burger buns recipe,gourmet burger buns recipe,how to make burger buns at home,homemade burger buns recipe,making burger buns without an oven,soft and tasty burger buns recipe,how to bake burger buns in a pan,pan grilled burger buns


How to Make Awesome Burger Buns without an Oven!!! Amazing Soft & Tasty Pan Grilled Burger Buns!!!
Author: 
Recipe type: Burgers / Bread
Cuisine: American
Prep time: 
Cook time: 
Total time: 
Serves: 6 - 12
 
In this episode we're making burger buns without an oven - these buns are superb and will rival the best buns you have ever tasted!!!
Ingredients
Group 1 Ingredients
  • 30ml Instant dried yeast
  • 280ml Warm water
  • 80ml Oil
  • 60ml Sugar
Group 2 Ingredients
  • 1 Egg
  • 5ml Salt
  • 480g Strong white bread flour
  • 6 Tbs extra strong white bread flour
Instructions
  1. Place the yeast, sugar, warm water and oil in your mixer bowl. Mix this briefly, then allow it to stand for 10 minutes until very frothy.
  2. Add the egg and the salt and mix briefly again.
  3. Add half of the flour and mix this for 3 minutes until combined, then allow this to stand for 10 minutes. This standing time allows the flour to autolyse. This means than the flour becomes absolutely saturated with water resulting in a softer and better textured bread.
  4. (if you're mixing by hand, use a wooden paddle to mix until combined)
  5. Add the second half of the flour and mixt again for 7 minutes. During this time, gradually add the extra 6 tablespoons of flour.
  6. (if you're mixing by hand, mix the dough with the paddle until it comes together and comes away from the sides of the bowl, then turn it out and knead by hand for 7 minutes, adding the additional flour while kneading)
  7. After the kneading time, the dough will be soft and elastic and only very slightly sticky.
  8. Turn the dough out onto a lightly floured work surface and roll it into a log. Divide the dough into 6 for jumbo buns, 9 for regular buns and 12 for cocktail size.
  9. (if by hand, roll into a log and divide)
  10. Each piece will be in the shape of a small cylinder. Place the cylinders on their end and flatten them into discs.
  11. Allow these to stand for 10 minutes to relax the gluten. After 10 minutes, you can place these on a tray covered loosely with cling-wrap and store them in your refrigerator should you not wish to bake them immediately.
  12. Otherwise heat a pan over medium low heat and drop 2 or 3 buns into the pan. Allow these to cook for 6 to 7 minutes before flipping them over. If you are cooking refrigerated buns, give these an extra 2 minutes per side. Flip the buns over and cook for a further 6 to 7 minutes. Remove the buns from the pan and transfer them to a wire rack to cool. Continue with the remaining buns.
  13. Surprisingly, these buns cut very well even before cooling, as I am doing here. Inside you see a beautifully soft, well textured crumb with an aroma from heaven, and tons of flavor.
  14. Toast the sliced buns face down in a pan in butter, then make up your burgers, or whatever you have planned for them.
  15. For cocktail buns adjust the cooking time to 4 to 5 minutes per side, and for regular size buns, 5 to 6 minutes per side.


Super Bowl Snacks – Crispy Deep Fried Baby Potato Skins – Best Potato Skins Ever!!!

super bowl recipes,deep-fried potato skins,deep-fried baby potato skins,how to make potato skins,baby potato skins recipe,Super Bowl Snacks - Crispy Deep Fried Baby Potato Skins - Best Potato Skins Ever!!!,crispy deep-fried potato skins,crispy deep-fried baby potato skins,stuffed potato skins,filled potato skins,crispy filled potato skins,crispy deep-fried stuffed potato skins,homemade potato skins recipe,best potato skins recipe


Super Bowl Snacks - Crispy Deep Fried Baby Potato Skins - Best Potato Skins Ever!!!
Author: 
Recipe type: Potatoes
Prep time: 
Cook time: 
Total time: 
 
Crispy deep-fried baby potato skins are amazing. You can fill them with anything from chilli beef to seafood, or you can use them to scoop up creamy dips.
Ingredients
  • Baby potatoes
  • Oil for frying
  • The fillings and dips of your choice
Instructions
  1. Place the baby potatoes in a pot and cover them with boiling kettle water. Bring them to a boil over high heat and continue to boil for 10 minutes.
  2. Drain the potatoes and cool them under cold running water.
  3. Cut the potatoes in half length-ways. Use a paring knife to remove the bulk of the flesh from the centers of the potatoes. Keep the centers to fry as baby potato crisps.
  4. Half-fill a large pan with oil and heat this to 180c or 350f. Carefully drop the potato skins into the oil, followed by the potato chips.
  5. Fry the potatoes until crisp and golden then remove them from the oil using a pair of tongs. Drain the excess oil on kitchen paper.
  6. Use a slotted spoon to remove the baby potato crisps.
  7. Transfer the baby potato skins to platters and serve with a dipping sauce, or fill the potatoes with fillings of your choice.


Superbowl Snacks – Little Smokey Frankfurters in Tomato, Onion & Beer Gravy

superbowl snacks,super bowl snacks,cocktail sauasages in thick gravy,cocktail sausages in tomato,onion & beer,simmered cocktail frankfurters,smoked cocktail frankfurters in tomato gravy,super bowl recipes,how to cook cocktail sausages,recipes for the big game,tomato,onion,beer,tomato onion & beer gravy,tomato onion beer salsa,food for the super bowl


Superbowl Snacks - Little Smokey Frankfurters in Tomato, Onion & Beer Gravy
Author: 
Recipe type: Sausages / Super Bowl
 
The Superbowl is here! This is an awesome dish of cocktail frankfurters lovingly simmered in tomato, onion and beer gravy. The gravy is thick and rich and delicious.
Ingredients
  • 600g Cocktail frankfurter sausages
  • 500ml Cocktail tomatoes
  • 250ml Beer
  • 60ml Soft brown sugar
  • 45ml Worcestershire sauce
  • 15ml Balsamic vinegar
  • 15ml Paprika
  • 15ml Cornstarch
  • 5ml Ground black pepper
  • 5ml Salt
  • Half an onion
  • 3 Cloves garlic
Instructions
  1. Place the cocktail tomatoes, onion and garlic in your processor bowl. I am using a combination of fresh tomatoes and canned, however you can use all fresh or all canned.
  2. Place the lid on the bowl and process this until reasonably fine.
  3. Add the sugar, paprika, ground black pepper and salt. Add the balsamic vinegar, Worcestershire sauce and beer. Dissolve the cornflour in a little water and pour this in.
  4. Put the lid back in place and process for a further 30 seconds to dissolve the sugar and salt.
  5. Pour the mixture into your slow cooker or a digital pot and bring this to a very slow simmer. Allow this to continue for 60 minutes, stirring every 20 minutes.
  6. By this stage the gravy will have started to thicken nicely and it's time to add the cocktail frankfurters. Give it a brief stir yo make sure everything is submerged, then continue to slow simmer the pot for a further 60 minutes, stirring gently every 20 minutes.
  7. Transfer the franks to serving bowls, drizzle generously with the gravy and serve immediately. You can also make these ahead of time as they reheat perfectly. If your guests don't like getting down and dirty, serve accompanied with skewers.


Scroll to top

Kitchen Conversions

Convert:
Masses
to:
Volumes
to:
Temperatures
to:
Lengths
to: