Escargot Melba – Escargot with Garlic, Chilli & Sour Cream on Melba Toast

escargot,escargot recipe,making escargot at home,homemade escargot,best escargot recipe,snails,best snails recipe,making snails at home,homemade snails,escargot with melba,escargot with garlic,escargot with chilli,creammy escargot recipe,how to make melba toast,homemade melba toast,perfect melba toast


Escargot Melba - Escargot with Garlic, Chilli & Sour Cream on Melba Toast
Author: 
Recipe type: Starter / Appetizer
Cuisine: French
Prep time: 
Cook time: 
Total time: 
Serves: 4
 
One of my favorite ingredients are snails, however every restaurant seems to the same boring renditions over and over. This recipe gives a new flavor, texture and presentation to what has become an otherwise boring and mundane dish.
Ingredients
  • 24 Escargot
  • 30g Butter
  • 5ml Granulated garlic
  • 2.5ml Chilli flakes
  • 60ml Sour cream
  • Salt & Pepper to taste
  • 4 Slices square loaf white bread
Instructions
  1. To start, we need to make the curly melba triangles. For this you need regular square loaf white bread.
  2. Working with 2 slices at a time, toast the slices in your toaster until they are well browned, then slice of the edges. Keep the edges on one side.
  3. Use your bread knife to cut the 2 crispy sides apart. The center is very soft and the knife will literally slide through.
  4. Turn each piece over and rub the inside surface on the work surface. The moisture in the untoasted side will cause the excess bread to ball up and rub away onto the counter, leaving you with a beautifully thin wafer of toast.
  5. Cut the wafers from corner to corner to make the triangles.
  6. Repeat this until all of the slices are processed.
  7. Place the melba triangles with the untoasted side facing upward onto a large baking sheet.
  8. Toast the melba in a preheated oven at 200c or 400f for about 90 seconds until the triangles have browned slightly and curled up.
  9. Clear the baking sheet and place any remaining triangles on the sheet along with the toast edges.
  10. Pop the sheet back in the oven for 90 seconds.
  11. Remove this from the oven and put the melba and bread batons aside.
  12. Now onto the snails.... remove the snails from the can and drain them in colander. Rinse the snails thoroughly under running water for 5 full minutes. This removes the terrible rancid brine from the snails.
  13. Measure out the dried chilli flakes, garlic granules, cultured sour cream and butter.
  14. Heat a pan over medium heat and add the butter.
  15. Once the butter is bubbling pour in the snails. Fry the snails gently for 2 minutes.
  16. Add the garlic granules and chilli flakes and continue to fry for a further 60 seconds.
  17. Turn off the gas or remove the pan from the heat and stir in the sour cream.
  18. To serve the escargot, place 3 triangles of melba on each serving plate.
  19. Top each of these with 2 snails.
  20. Dress each triangle with 2 toast batons and serve immediately.


Mexican Deep Fried Chicken Wings – Crispy Deep Fried Wings with Mexican Spice

deep-fried chicken wings,crispy deep-fried chicken wings,mexican style deep-fried chicken wings,mexican chicken wings,chicken wings with mexican spice,mexican spice blend recipe,how to make mexican spice,how to make deep-fried mexican chicken wings,mexican deep-fried chicken wings recipe,spicy deep-fried chicken wings recipe,crispy mexican chicken wings,hot and spicy wings recipe,how to make spicy chicken wings,how to deep-fry chicken wings


Mexican Deep Fried Chicken Wings - Crispy Deep Fried Wings with Mexican Spice
Author: 
Recipe type: Chicken
Cuisine: Mexican
 
These deep-fried Mexican spiced chicken wings are out of this world. By adjusting the quantity of cayenne you can make this dish as hot or mild as you like.
Ingredients
  • 12-16 Chicken wings
  • 15ml Cumin seeds
  • 15ml Dried coriander leaves
  • 15ml Paprika
  • 5ml Dried oregano
  • 5ml Cayenne pepper (mild) / 15ml (medium) / 25ml (hot)
  • 5ml Garlic granules
  • 10ml Salt
  • 2 Cups all-purpose flour
  • 4 Eggs
Instructions
  1. Starting with the Mexican spice blend, place the cumin seeds, dried coriander leaves, paprika, dried oregano, cayenne pepper a dried garlic granules and salt in your spice grinder.
  2. Putting the powdered spices into the grinder along with the ingredients that require grinding helps the grinder achieve a finer result.
  3. Unpack the chicken wings. Cut away the wing tips and discard them, then slice through the center joint of each wing.
  4. Sprinkle some of the spice blend over the base of a container and pack in a single layer of the wings.
  5. Sprinkle more of the spice followed by another layer of wings.
  6. Continue with this until all of the wings are packed in.
  7. Sprinkle any remaining spice over the top, put the lid on and give it all a good shake-up.
  8. Put the wings aside for 30 minutes to marinate.
  9. Place the all-purpose flour into a bowl, and 4 well whisked eggs into another.
  10. Sprinkle a little of the flour over a platter. This is where the coated wings will set, and the layer of flour prevents the coating from sticking to the plate and getting damaged.
  11. Dredge the wings in the flour to coat them all over.
  12. Dunk the wings in the egg to wet all of the flour.
  13. Then it's back to the flour to get a good solid coating all over.
  14. Transfer the wings to the platter and allow the coating to set for 20 minutes.
  15. Half-fill a large pan with oil and heat this to 180c or 350f.
  16. Carefully drop the wings into the oil and fry them for 6 minutes, turning once halfway through.
  17. Use a slotted spoon to lift the wings from the oil and drain any excess oil on kitchen paper.
  18. Serve the wings immediately with the accompaniments of your choice.


How to Make Transparent Wraps – a Novel Way to Present Food While Adding Flavor.

how to make transparent wraps,how to make agar agar wraps,cooking with agar agar,see through wraps recipe,make transparent agar agar wraps,fancy chicken salad recipe,gluten free wraps recipe,wheat free wraps recipe,transparent chicken wraps,working with agar agar,homemade transparent chicken wraps,fancy garnishing,how to make wraps from chicken stock,gluten free recipes,wheat free recipes,chicken recipes


How to Make Transparent Wraps - a Novel Way to Present Food While Adding Flavor.
Author: 
Recipe type: Molecular Gastronomy
Prep time: 
Total time: 
Serves: 4-6
 
In today's episode we're doing some thing a little different. Transparent wraps are novel way to decorate a dish while adding loads of extra flavor. The active ingredient used to make the wraps is a thickener called agar agar, and you can find this at any health store or online.
Ingredients
  • 200ml Clear chicken stock
  • 2.5ml Agar agar
For the Filling
  • Shredded roast chicken tossed in light soy sauce (cooled to room temp)
  • Sliced assorted peppers
  • Snipped garlic chives
Instructions
  1. Pour the clear chicken stock into a small sauce pan.
  2. Add the agar agar and stir this in.
  3. Bring the pot to a boil, lower the heat and allow it to simmer for 60 seconds.
  4. Pour enough of the liquid onto your platters to coat the entire base of each platter.
  5. Transfer the platters to your refrigerator to set for 15 minutes.
  6. Remove the platters from the refrigerator and trim away the edges so that you end up with a square.
  7. Arrange your filling diagonally across the wrap. I am using cold roast chicken with assorted strip of peppers and snipped chives. I have tossed the shredded chicken in light soy sauce beforehand.
  8. Lift the edge of the wrap with your blade and flap it over the filling.
  9. Garnish the wrap with more snipped chives.
  10. And there it is.... a novel and tasty way to present a cold chicken salad.


Carrot & Ginger Soup – The Perfect Soup for Winter or Summer.

carrot soup,carrot and ginger soup,carrot and ginger soup vegan,carrot and ginger soup rachel allen,carrot and ginger soup calories,carrot and ginger soup paleo,carrot and ginger soup jamie oliver,carrot and ginger soup test kitchen,carrot and ginger soup recipe,healthy carrot ginger soup,vegetable soup recipes,carrot soup recipe,carrot and ginger soup spicy,carrot and ginger soup with coconut milk


Carrot & Ginger Soup - The Perfect Soup for Winter or Summer.
Author: 
Recipe type: Soup
Prep time: 
Cook time: 
Total time: 
Serves: 4-6
 
This soup is smooth, creamy and thick and can be served hot or cold. This makes it perfect for warming winter nights or cooling summer days.
Ingredients
  • 30g Coconut oil
  • 1 Large onion finely chopped
  • 10cm (4 inches) Ginger peeled and thinly sliced
  • 3 Cloves garlic, peeled and thinly sliced
  • 1kg Carrots, roughly chopped
  • 1lt (4 cups) Chicken stock (or vegetable stock if you're vegetarian or vegan)
  • 500ml (2 cups) Water
  • Sour cream and fresh dill to garnish
Instructions
  1. Finely chop the onion and thinly slice the garlic and fresh ginger.
  2. Roughly chop the carrots and measure out the chicken stock and coconut oil.
  3. Melt the coconut oil over medium high heat and add the onion, garlic and ginger. Reduce the heat to medium low and sauté the vegetables for 8 to 10 minutes until the onion is absolutely tender.
  4. Add the carrots, stock and 2 cups of water to the wok.
  5. Increase the heat to bring this to a boil, reduce the heat and simmer the mixture for 35 to 40 minutes until the carrot is absolutely tender.
  6. Turn off the gas, or remove the wok from the heat.
  7. Use your stick blender to machine the soup until it is very smooth. You can also do this in a stand blender, however you will need to cool the mixture substantially before doing this, and then reheat it after blending.
  8. Serve the soup hot or chilled topped with sour cream and sprigs of fresh dill.


Gourmet Creamy Mushroom Soup – The Best Homemade Creamy Mushroom Soup

creamy mushroom soup,gourmet creamy mushroom soup,best creamy mushroom soup recipe,how to make creamy mushroom soup,homemade creamy mushroom soup,best creamy mushroom soup recipe,creamy mushroom soup youtube,creamy mushroom soup recipe video,creamy mushroom soup video,easy creamy mushroom soup recipe,cream of mushroom soup,cream of mushroom soup recipe,how to make the best mushroom soup,making the best mushroom soup


Gourmet Creamy Mushroom Soup - The Best Homemade Creamy Mushroom Soup
Author: 
Recipe type: Soup
Prep time: 
Cook time: 
Total time: 
Serves: 6-8
 
This creamy mushroom soup is unforgettable. It is super-easy to make, and will become legend with your friends and family.
Ingredients
  • 500g Mushrooms
  • 1500ml Chicken stock
  • 10ml Garlic powder
  • 375ml Cultured sour cream
  • 60ml Tapioca flour
  • 30ml Medium cream, or sweet sherry
  • 60ml Chives, finely chopped
  • Extra chives for garnish
Instructions
  1. Place the mushrooms in a pot along with the chicken stock and garlic powder. Your can use white button mushrooms, brown mushrooms, or any mushroom of your choice.
  2. Bring the pot to a boil over medium-high heat, reduce the heat and allow the mushrooms to simmer for 45 minutes.
  3. Remove the pot from the heat. Add the sherry and cultured sour cream and stir this in thoroughly.
  4. Dissolve the tapioca flour in a little water and stir this into the soup.
  5. Use your stick blender to process this until very fine.
  6. Return the pot to the heat and bring it to a simmer. Allow the soup to simmer for 5 minutes until thick and creamy.
  7. Remove the soup from the heat and stir in the chopped chives before serving garnished with more chives with crusty farm loaf.


Gourmet Garlic Bread – Crispy, Crusty Garlic Bread with Pancetta & Blue Cheese!!!

garlic bread recipe,homemade garlic bread,how to make garlic bread,garlic bread ideas,garlic bread in oven,garlic bread rolls recipe,garlic bread from scratch,garlic bread with cheese,garlic bread recipe from scratch,how to make homemade garlic bread,baked garlic bread,easy garlic bread,restaurant garlic bread,gourmet garlic bread,garlic bread recipe youtube,garlic bread recipe video


Gourmet Garlic Bread - Crispy, Crusty Garlic Bread with Pancetta & Blue Cheese!!!
Author: 
Recipe type: Bread / Baked / Barbecue
Cuisine: French
 
Yesterday we made amazing crusty white farm bread. Today we're going to use one of these loaves to make awesome gourmet garlic bread turbo-charged with creamy melted blue cheese and pancetta.
Ingredients
  • 1 x 36cm / 15 inch Baguette-style farm loaf
  • 60g Butter
  • 5 Cloves garlic, finely chopped
  • 60g Blue cheese
  • 50g Pancetta (Italian bacon) finely chopped
Instructions
  1. Measure out the softened butter and blue cheese, and finely chop the fresh garlic and pancetta.
  2. Add the pancetta and garlic to the butter and blue cheese and mash this in thoroughly until everything is totally combined.
  3. Slice through the loaf of bread at an angle leaving the bottom crust of the loaf intact until the entire loaf is sliced with a space of 15mm or just more than a half inch between slices.
  4. Start filling the slices with the garlic butter mixture. This quantity of mixture is sufficient for one loaf.
  5. Place the loaf on a rectangle of foil and roll the log edge of the foil to enclose the loaf. Twist the ends to secure the foil. Don't twist the ends too tightly as you need to unwrap the loaf while it is hot, and if it is too tightly bound this will be very difficult and possibly dangerous.
  6. Bake the loaf in a preheated oven at 180c or 350f for 20 minutes.
  7. Immediately after baking, unwrap the loaf and serve hot and steaming.
  8. You can also bake the garlic bread in your closed barbecue following the same time and temperature. (indirect heat)


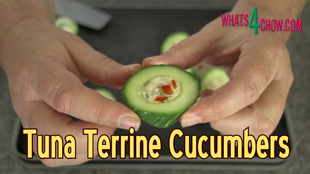
Tuna Terrine Cucumbers – Cucumber Wedges Filled with Gelatin Tuna Terrine!!!

tuna terrine cucumbers,tuna terrine stuffed cucumbers,tuna terrine filled cucumbers,stuffed cucumbers,filled cucumbers,set tuna terrine in cucumbers,how to make tuna terrine,how to mix gelatin,how to set tuna in gelatin,fish in gelatin recipe,how to mold gelatin,how to mold gelatin in cucumbers,how to make gelatin terrine,how to set gelatin terrine


Tuna Terrine Cucumbers - Cucumber Wedges Filled with Gelatin Tuna Terrine!!!
Author: 
Recipe type: Fish / Seafood
Cuisine: French
Prep time: 
Total time: 
Serves: 36-40
 
Hollowed cucumbers filled with tuna terrine make amazing finger snacks, starters or accompaniments to your main meal.
Ingredients
  • ¼ Red pepper, finely chopped
  • 4 Tbs Chopped garlic chives
  • Zest of 1 lemon
  • 100g Mayonnaise
  • 200g Canned shredded tuna, drained (can also use salmon)
  • 18-20 x 5cm (2 inch) pieces of English cucumber
  • Salt and cracked black pepper to taste
For the Gelatin
  • 25ml Powdered gelatin
  • 225ml Hot water
  • 275ml Cold water
Instructions
  1. Finely chop the red pepper and garlic chives. Grate the rind of one lemon and measure out the mayonnaise. Cut 18 to 20 x 5cm or 2 inch lengths of cucumber and use a apple corer to remove the centers from these.
  2. Place the tuna in a jug and add the lemon zest, peppers, chives and mayonnaise.
  3. To mix the gelatin, pour 225ml of hot water into a small jug and add the powdered gelatin. Stir this for a minute or 2 until it is totally dissolved. Pour this into a larger jug and top it up with cold water to a total of 500ml.
  4. Stir to combine, then pour this into the jug containing the main ingredients. Stir this until everything is combined and the mayonnaise has totally dissolved then put this aside.
  5. Use the back of a spoon to put a coating of butter onto a baking sheet or pan. Press the cucumbers into the butter.
  6. Place the baking sheet or pan on top of an ice block or over another large pan filled with ice. This sets the butter hard and totally seals the bases of the cucumbers. Allow this to set for 5 minutes.
  7. Fill the cucumbers with the terrine mixture. Don't be too concerned with spillage as this will simply wipe away once the gelatin has set. Place these in your refrigerator.
  8. Any leftover filling can be molded in ramekins.
  9. After an hour or so the terrine will have set. This timing depends largely on the temperature of your refrigerator. Remove them from the fridge and pull the cucumbers free from the butter. Wipe off any spillage from the edges.
  10. Use a razor sharp knife to slice wafer thin slices from each end of the cucumber pieces to neaten up the ends. Slice the cucumber pieces at an angle and you're done.
  11. To unmold the ramekins simply run a thin blade round the edge of the ramekins and pop them out onto the plate.


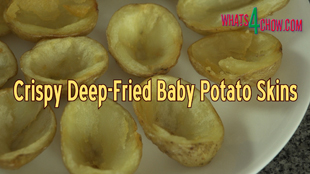
Super Bowl Snacks – Crispy Deep Fried Baby Potato Skins – Best Potato Skins Ever!!!

super bowl recipes,deep-fried potato skins,deep-fried baby potato skins,how to make potato skins,baby potato skins recipe,Super Bowl Snacks - Crispy Deep Fried Baby Potato Skins - Best Potato Skins Ever!!!,crispy deep-fried potato skins,crispy deep-fried baby potato skins,stuffed potato skins,filled potato skins,crispy filled potato skins,crispy deep-fried stuffed potato skins,homemade potato skins recipe,best potato skins recipe


Super Bowl Snacks - Crispy Deep Fried Baby Potato Skins - Best Potato Skins Ever!!!
Author: 
Recipe type: Potatoes
Prep time: 
Cook time: 
Total time: 
 
Crispy deep-fried baby potato skins are amazing. You can fill them with anything from chilli beef to seafood, or you can use them to scoop up creamy dips.
Ingredients
  • Baby potatoes
  • Oil for frying
  • The fillings and dips of your choice
Instructions
  1. Place the baby potatoes in a pot and cover them with boiling kettle water. Bring them to a boil over high heat and continue to boil for 10 minutes.
  2. Drain the potatoes and cool them under cold running water.
  3. Cut the potatoes in half length-ways. Use a paring knife to remove the bulk of the flesh from the centers of the potatoes. Keep the centers to fry as baby potato crisps.
  4. Half-fill a large pan with oil and heat this to 180c or 350f. Carefully drop the potato skins into the oil, followed by the potato chips.
  5. Fry the potatoes until crisp and golden then remove them from the oil using a pair of tongs. Drain the excess oil on kitchen paper.
  6. Use a slotted spoon to remove the baby potato crisps.
  7. Transfer the baby potato skins to platters and serve with a dipping sauce, or fill the potatoes with fillings of your choice.


Super Bowl Snacks – Cheese & Pancetta Melts – Quick, Easy & Yummy!!!

super bowl snacks,recipe for super bowl,easy super bowl food,camembert and pancetta melts,quick super bowl recipes,super bowl cheese and bacon melts,toasted camembert and pancetta super bowl snacks,super bowl grilled cheese and pancetta melts,quick and easy super bowl food,super bowl party food,super bowl grilled cheese,grilled cheese and bacon bites


Super Bowl Snacks - Cheese & Pancetta Melts - Quick, Easy & Yummy!!!
Author: 
Recipe type: Finger Foods
Cuisine: Mediterannean
Prep time: 
Cook time: 
Total time: 
Serves: 16
 
With the Super Bowl just days away, here is a super-quick and super easy way to add some yummy to the occasion. I am using the Vietnamese Baguettes we baked in the previous episode, but you can use store bought as well.
Ingredients
For 16 Snacks
  • 3 Vietnamese baguettes cut into 16 angled slices
  • 1 Round Camembert cheese
  • Paprika to garnish
  • 16 Very thin slices of Pancetta
Instructions
  1. Cut the baguettes at an angle into long ovals. Take a round of Camembert cheese and cut it into 8 wedges. Cut each wedge through the center longitudinally, giving you 16 pieces in all.
  2. Place the wedges of cheese cheesy-side up on the ovals of baguette. Transfer these to a lightly greased baking sheet. The sheet must be greased as this inhibits and spill-over cheese from sticking to the sheet. In addition, you need 16 very thin slices of Pancetta.
  3. Heat the grill in your oven to maximum and melt the cheese over the baguette ovals. Remove theses from the oven and transfer them to serving platters.
  4. Sprinkle the tops with a little paprika. Fold each slice of pancetta into a zig-zag and stand a slice on top of each snack.
  5. Serve these snacks hot or cold and wait for the cheers and applause.


Baked Marrow Bones. Marrow Bones Baked with Thick Gravy in Osso Bucco Style!!!

baked marrow bone recipe,how to bake marrow bone,baked lamb marrow bone recipe,osso bucco style baked marrow bone,homemade marrow bone recipe,make marrow bone at home,how to bake marrow bone,marrow bone delicacy,how to cook marrow bones,how to prepare marrow bones,easy marrow bone recipe,simple marrow bone recipe,how to make marrow bones,marrow bones with thick gravy


Baked Marrow Bones. Marrow Bones Baked with Thick Gravy in Osso Bucco Style!!!
Author: 
Recipe type: Lamb / Mutton
Cuisine: Greek / Mediterranean
Prep time: 
Cook time: 
Total time: 
Serves: 2-4
 
Baked marrow bone is so addictive it should be scheduled as a controlled substance. This dish is suitable as a starter or accompaniment to your main course, and can be prepared ahead of time and reheated.
Ingredients
  • 1kg / 2.2lb Lamb leg bones, cut into 50mm / 2 inch pieces
  • Oil for coating
  • 60ml Oil for frying
  • 80ml Chopped onion
  • 125ml White wine
  • 125ml Chopped cherry tomatoes
  • 500ml Vegetable stock
For the Seasoned Flour
  • 1 Cup All-purpose flour
  • 5ml Salt
  • 1.25ml Fine black pepper
  • 1.25ml Ground nutmeg
For the Gremolata
  • 30ml Finely chopped parsley
  • 1 Clove garlic, finely chopped
  • 15ml Grated lemon rind
Instructions
  1. Combine the salt, ground black pepper and nutmeg with all-purpose flour.
  2. I am using lamb leg bones that have been cut into 50mm or 2 inch lengths, but you can use any marrow bones of your choice.
  3. Place the bones in a mixing bowl, pour in a little oil and toss the bones until they are all coated.
  4. Dredge the bones in the seasoned flour to coat them all over.
  5. In addition you need to chop the cocktail tomatoes and onion, and measure out the white wine and vegetable stock.
  6. Heat a large wok or pan over medium heat and add 60ml of oil. Add the marrow bones to the pan and fry the bones slowly for 15 minutes until browned, stirring intermittently to ensure even coloring.
  7. Remove the bones from the pan and place them in a small roasting tin.
  8. Add the onions to the pan and fry them for 8 minutes until they start to brown on the edges. Pour the onions and the roux from the pan over the marrow bones.
  9. Add the stock, wine and tomatoes to the pan and heat the mixture until almost boiling. Pour this over the marrow bones.
  10. Cover the roasting pan with foil and bake in a preheated oven at 150c or 300f for 60 minutes.
  11. While the bones bake, make up the gremolata by combining the finely chopped parsley, garlic and lemon rind.
  12. Remove the bones from the oven and serve them to platters. Pour some of the gravy from the pan over the marrow bones, sprinkle with the gremolata and serve immediately.


Deep-Fried Stuffed Mushrooms. Crispy Deep-Fried Mushrooms Stuffed with Pork!!!

deep-fried mushrooms,deep-fried stuffed mushrooms,deep-fried pork stuffed mushrooms,how to stuff and deep-fry mushrooms,homemade deep-fried mushrooms,best deep-fried mushrooms recipe,easy deep-fried mushrooms,deep-fried mushrooms stuffed with pork,spicy deep-fried mushrooms,how to coat mushrooms for deep frying,quick deep fried mushrooms recipe,crispy deep-fried mushrooms,deep-fried mushroom starter,mushroom recipes


Deep-Fried Stuffed Mushrooms. Crispy Deep-Fried Mushrooms Stuffed with Pork!!!
Author: 
Recipe type: Deep-fried / Starter
Prep time: 
Cook time: 
Total time: 
Serves: 2-4
 
These deep-fried mushrooms stuffed with pork banger meat are absolutely amazing!
Ingredients
  • 8-12 Medium size white mushrooms
  • 1 Large pork banger
  • 250ml All-purpose flour
  • 2 Eggs
For the flour seasoning
  • 5ml Cayenne pepper
  • 1.25ml Dried sage
  • 1.25ml Garlic powder
  • 1.25ml Dried oregano
  • 1.25ml Cracked black pepper
  • 1.25ml Dried basil
  • 1.25ml Dried marjoram
  • 1.25ml Gorund coriander seed
Instructions
  1. Snap the stems from the mushrooms. You can keep the stems to add to soups, salads or stir-fries.
  2. Take the pork banger and cut through the skin length-ways. Squeeze the pork filling from the sausage. This filling has more than enough seasoning and flavor, so you don't have to do anything more to it.
  3. Pick up a bit of the sausage meat and press it into one of the mushroom caps. You need enough meat to turn the mushroom into a totally rounded object. Smooth off the meat and continue with the remaining mushrooms.
  4. Combine the seasoning and the all-purpose flour and scatter some of this across a platter. This is where the coated mushrooms will set, and this layer of flour will prevent the coated mushrooms from sticking to the platter.
  5. In another bowl, crack 2 eggs and whisk them briefly. The mushrooms need to be double coated. To do this dunk a mushroom in the egg, then roll it in the flour to coat all over.
  6. Return it to the egg to wet all of the flour. Finally back into the flour once more, making sure to get a good solid coating. Transfer this to the platter and continue with the remaining mushrooms.
  7. Allow the coating on the mushrooms to set for 20 minutes before proceeding.
  8. Fill a large pan with oil to a depth of 25mm or 1 inch and heat this to 180c or 350f. Carefully drop the mushrooms into the oil and fry them for 3 to 4 minutes. Gently roll the mushrooms around the pan while they fry in order to get even coloring and crisping.
  9. Remove the mushrooms from the pan using a slotted spoon and drain the excess oil on kitchen paper.
  10. Transfer the mushrooms to platters and serve immediately with any mayonnaise based dipping sauce of your choice.


Barbecue Bourbon Sticky Chicken Wings – BBQ Chicken Wings with Sticky Bourbon Basting!!!

sticky chicken wings,bbq sticky chicken wings,barbecue sticky chicken wings,bourbon sticky chicken wings,barbecue bourbon sticky chicken wings,marinated bourbon chicken wings recipe,sticky chicken wings video recipe,how to make sticky chicken wings,homemade sticky chicken wings,how to make bourbon chicken wings,homemade bourbon chicken wings,sticky chicken wings on the barbecue, sticky chicken wings recipe oven


Barbecue Bourbon Sticky Chicken Wings - BBQ Chicken Wings with Sticky Bourbon Basting!!!
Author: 
Recipe type: Chicken / Poultry / Barbecue
Cuisine: American
 
Bourbon chicken wings can be done on the barbecue or in the oven.... no matter which way, these bourbon sticky chicken wings are outstanding and will have your friends and family lining up for more.
Ingredients
  • 18 - 24 Full chicken wings
  • 2 Onions chopped
  • 3 Cloves garlic chopped
  • 250ml Bourbon
  • 500ml Tomato puree
  • 80ml Cider vinegar
  • 80ml Worcestershire sauce
  • 125ml Sticky brown sugar (Demarara or treacle)
  • 5ml Tabasco sauce
  • 10ml Coarse salt
  • 10ml Cracked black pepper
Instructions
  1. Starting with the marinade, saute the onions and garlic in a pan over medium heat for 5 minutes until they are tender and translucent.
  2. Pour in the bourbon and continue to fry for a further 2 minutes.
  3. Add the Tabasco, cider vinegar, Worcestershire sauce, brown sugar, salt, cracked black pepper and tomato puree.
  4. Mix this all together thoroughly and continue to simmer the sauce for a further 2 to 3 minutes. Remove the pan from the heat and set it aside to cool while you continue with the wings.
  5. Cut the the wingtips from the wings and transfer the wings to a large non-reactive pan. Pour the bourbon sauce over the wings evenly so that everything is covered.
  6. Place the wings in the refrigerator to marinate for at least 8 hours, preferably overnight.
  7. Barbecue the wings over high heat for 16 minutes, turning every 4 minutes and basting at every turn with the remaining sauce.
  8. If you prefer to use your oven, place the pan in your preheated oven at 180c or 350f for 30 to 40 minutes.
  9. Serve the wings to platters with the accompaniments of your choice and serve immediately.


Scroll to top

Kitchen Conversions

Convert:
Masses
to:
Volumes
to:
Temperatures
to:
Lengths
to: