Baked Marrow Bones. Marrow Bones Baked with Thick Gravy in Osso Bucco Style!!!

baked marrow bone recipe,how to bake marrow bone,baked lamb marrow bone recipe,osso bucco style baked marrow bone,homemade marrow bone recipe,make marrow bone at home,how to bake marrow bone,marrow bone delicacy,how to cook marrow bones,how to prepare marrow bones,easy marrow bone recipe,simple marrow bone recipe,how to make marrow bones,marrow bones with thick gravy


Baked Marrow Bones. Marrow Bones Baked with Thick Gravy in Osso Bucco Style!!!
Author: 
Recipe type: Lamb / Mutton
Cuisine: Greek / Mediterranean
Prep time: 
Cook time: 
Total time: 
Serves: 2-4
 
Baked marrow bone is so addictive it should be scheduled as a controlled substance. This dish is suitable as a starter or accompaniment to your main course, and can be prepared ahead of time and reheated.
Ingredients
  • 1kg / 2.2lb Lamb leg bones, cut into 50mm / 2 inch pieces
  • Oil for coating
  • 60ml Oil for frying
  • 80ml Chopped onion
  • 125ml White wine
  • 125ml Chopped cherry tomatoes
  • 500ml Vegetable stock
For the Seasoned Flour
  • 1 Cup All-purpose flour
  • 5ml Salt
  • 1.25ml Fine black pepper
  • 1.25ml Ground nutmeg
For the Gremolata
  • 30ml Finely chopped parsley
  • 1 Clove garlic, finely chopped
  • 15ml Grated lemon rind
Instructions
  1. Combine the salt, ground black pepper and nutmeg with all-purpose flour.
  2. I am using lamb leg bones that have been cut into 50mm or 2 inch lengths, but you can use any marrow bones of your choice.
  3. Place the bones in a mixing bowl, pour in a little oil and toss the bones until they are all coated.
  4. Dredge the bones in the seasoned flour to coat them all over.
  5. In addition you need to chop the cocktail tomatoes and onion, and measure out the white wine and vegetable stock.
  6. Heat a large wok or pan over medium heat and add 60ml of oil. Add the marrow bones to the pan and fry the bones slowly for 15 minutes until browned, stirring intermittently to ensure even coloring.
  7. Remove the bones from the pan and place them in a small roasting tin.
  8. Add the onions to the pan and fry them for 8 minutes until they start to brown on the edges. Pour the onions and the roux from the pan over the marrow bones.
  9. Add the stock, wine and tomatoes to the pan and heat the mixture until almost boiling. Pour this over the marrow bones.
  10. Cover the roasting pan with foil and bake in a preheated oven at 150c or 300f for 60 minutes.
  11. While the bones bake, make up the gremolata by combining the finely chopped parsley, garlic and lemon rind.
  12. Remove the bones from the oven and serve them to platters. Pour some of the gravy from the pan over the marrow bones, sprinkle with the gremolata and serve immediately.


Pasta with Anchovies, Capers, Garlic & Parmesan. Brilliantly Simple Pasta!!!

Quick pasta recipe,simple pasta recipe,pasta with anchovies recipe,pasta with anchovies & capers recipe,quick pasta with anchovies,super-easy pasta recipe,best seafood pasta recipe,best anchovy pasta recipe,anchovy & caper pasta,best linguine recipe,best taglietelle recipe,best spaghetti recipe


Pasta with Anchovies, Capers, Garlic & Parmesan. Brilliantly Simple Pasta!!!
Author: 
Recipe type: Pasta / Seafood
Cuisine: Italian
Prep time: 
Cook time: 
Total time: 
Serves: 2
 
This pasta dish is pure brilliance in its absolute simplicity, and has the most amazing aromas and flavors. You can create this masterpiece with just a handful of ingredients!!!
Ingredients
  • 2 Portions Linguine, Taglietelle or spaghetti (cooked to package instructions)
  • 50g Butter
  • 15ml Olive oil
  • 4 Cloves garlic, roughly chopped
  • 6-8 Anchovy fillets, roughly chopped
  • 15 Capers, roughly chopped
  • 2.5ml Chilli flakes
  • 30ml Chopped parsley
  • Shredded Parmesan
  • Salt & cracked black pepper to taste
Instructions
  1. To start you will need Linguine, Taglietelle or even spaghetti. Cook this according to the package instructions.
  2. Measure out the chilli flakes, grate the parmesan cheese, chop the parsely, weigh out the butter, roughly chop the anchovy fillets, capers and garlic. In addition, you will need 15ml of olive oil.
  3. Heat your pan over medium high heat, add the butter and garlic. Fry this for 2 minutes until it just starts to take on some color.
  4. Add the chilli flakes, anchovies and capers and fry this for 60 seconds.
  5. Add the chopped parsley to the pan and stir this in. Remove the pan from the heat and stir in the olive oil.
  6. Pour this all over the cooked pasta and toss it thoroughly until everything is coated.
  7. Serve the pasta immediately dressed with a generous topping of shredded Parmesan cheese.


Instant Pizza Dough – Quick Matzah Bread Style Pizza Bases – No Rising Time!!!

instant pizza bases,instant pizza dough,quick pizza dough,no-rise pizza dough,no-knead pizza dough,matzah-style pizza dough,crispy,thin,pizza base,how to make thin crispy pizza bases,homemade thin base pizza,super thin crispy pizza bases,cream cracker style pizza bases,cracker pizza bases,quick pizza base recipe,quick pizza dough recipe,how to make matzah style pizza bases


Instant Pizza Dough - Quick Matzah Bread Style Pizza Bases - No Rising Time!!!
Author: 
Recipe type: Pizza
Cuisine: Italian
Prep time: 
Cook time: 
Total time: 
 
These super thin, crispy pizza bases are really easy to make. More like crispy matzah bread, this dough can be used to make mini and regular sized pizzas. There is no rising time, and the added bonus is that the dough can be rolled through a pasta roller.
Ingredients
  • 500g Self-raising flour
  • 250ml Milk
  • 2.5ml Salt
Instructions
  1. Place the self-raising flour, salt and milk in your food processor. Put the lid on and start mixing at maximum speed.
  2. Mix the dough for about 2 minutes, scrape the bowl down, and continue mixing for another 2 to 3 minutes. The dough will be crumbly, but will hold together well when compressed.
  3. Turn the dough out onto a lightly floured work surface and compress it into a ball. If you're not going to use the dough immediately wrap it in cling-wrap and store it in your refrigerator.
  4. Divide the dough into 4 pieces and proceed to roll each piece out to a thickness of 3 mm. This can be done by hand or machine.
  5. I am making mini pizzas for a wine tasting, but you can cut your bases to any size you require. Dock the bases.... this is fancy term for pricking holes in the dough. The docking prevents the bases from blowing up into large pillows while baking.
  6. Top the bases with toppings of your choice and bake them in a preheated oven at 250c or 480f for 10 to 12 minutes.
  7. Remove the pizzas from the oven and serve immediately.
  8. This recipe will make 4 regular bases, or up to 120 mini pizzetti.


The Mega Toasted Pizza Sandwich!!! Super-Stacker Double Thick Toasted Sandwich – Pan Grilled.

grilled sandwich,toasted sandwich,grill sandwich recipe,toasted sandwich recipe,the best toasted sandwich recipe,the best way to toast a sandwich,how to toast a sandwich,how to make the best toasted sandwich,double size toasted sandwich,toasted sandwich ideas,toasted sandwich fillings,toasted sandwich in pan,ainsley harriott toasted sandwich,jamie oliver toasted sandwich,chef toasted sandwich


The Mega Toasted Pizza Sandwich!!! Super-Stacker Double Thick Toasted Sandwich - Pan Grilled.
Author: 
Recipe type: Toasted Sandwiches / Pizza
Cuisine: Italian
Prep time: 
Cook time: 
Total time: 
Serves: 2
 
Following yesterdays super stacker toasted sandwich, here's another super stacker, this time with all the flavor of real Italian pizza.
Ingredients
  • 4 Slices hickory ham
  • 8 Slices strong mini-Salami
  • 6 Calamata Olives, pitted and sliced
  • 24 x 1 inch Squares of mozzarella cut ⅛th inch thick (3mm)
  • 5ml Italian herb mix
  • 75ml Tomato sauce or tomato puree
  • 6 Slices square loaf bread
  • Butter
Instructions
  1. Chop the smoked hickory ham and strong aged salami, and pit the olives and cut them into rounds.
  2. Add the Italian herb mix and tomato sauce and mix this all together thoroughly.
  3. In addition cut 24 squares of mozzarella cheese to a thickness of around 3mm or ⅛th of an inch.
  4. Take 6 slices of square loaf bread and cut the centers from 2 of the slices.
  5. Butter the remaining 4 slices and place them in 2 pairs with the butter inwards.
  6. Working with on pair, arrange cheese around the edge of the bread. Top this with one of the hollow slices. While cooking the cheese will melt and glue the sandwich closed.
  7. Fill the hollow slice with half of the filling. Don't fill past the level of the crust.
  8. Arrange more cheese around the edges.
  9. Lift the filled half of the sandwich and place the underneath slice on top to close. Both outer surfaces will be buttered surfaces.
  10. Repeat this with the second sandwich.
  11. Heat your pan over a low flame. The pan must not be too hot as you want the cheese inside the sandwich to melt before the bread over-browns.
  12. Toast the sandwiches on the first side until you visibly see the underneath layer of cheese melting. Turn the sandwich over and repeat.
  13. To cut the sandwiches use the tip of your knife to get a clean cut, and avoid crushing the sandwich.
  14. Transfer the quarters to platters and serve immediately.


Spicy Roasted Chickpea Nuts. Crunchy, Tasty Treats for Anytime of the Day!!!

chickpea nuts,roasted chickpea nuts,oven baked chickpea nuts,spicy roasted chickpea nuts,spicy chickpea nuts,crunchy chickpea nuts,how to make chickpea nut,homemade chickpea nuts,roasted chickpea nuts recipe, baked chickpeas, healthy snacks, healthy recipes, gluten free snacks, chickpea beer nuts, spiced chickpea nuts food and wine, roasted chickpea, seasoned chickpea, toasted chickpea, garbanzo bean recipes, roasted chickpea recipe


Spicy Roasted Chickpea Nuts. Crunchy, Tasty Treats for Anytime of the Day!!!
Author: 
Recipe type: Snack / Health Food
Cuisine: Middle Eastern / Mediterranean
Prep time: 
Cook time: 
Total time: 
Serves: 2-4
 
Spicy roasted chickpea nuts are really easy to make and make a great snack for everyday as well as at the big game.
Ingredients
  • 450g Drained can of chickpeas (15oz)
  • 15ml Olive oil
  • 10ml Ground cumin
  • 5ml Dried marjoram
  • 1.25ml Ground allspice
  • 1.25ml Salt
Instructions
  1. Measure out the ground cumin, dried marjoram, ground allspice and salt. We need to reduce the salt and dried marjoram to a powder of the same consistency as the allspice and cumin.
  2. To do this place everything in your spice mill and pulse it 4 or 5 times. We put everything in the mill as spice mills work much more efficiently with larger quantities, even although the allspice and cumin are already powdered.
  3. Open the can of chickpeas, rinse them and drain them. Pour them out onto a clean dish towel and pat them dry.
  4. Transfer the chickpeas to a jug or bowl and pour in the oil. Stir this well until everything is coated with oil.
  5. Pour the spice blend in bit by bit, mixing every time to make sure everything gets an even dose.
  6. Pour the coated chickpeas out into a medium size roasting tin and spread them out evenly across the pan.
  7. Roast the chickpeas on the second highest shelf in your oven at 230c or 450f for 30 minutes. Remove the pan from the oven every 10 minutes and stir the chickpeas around to ensure even roasting.
  8. Remove the pan from the oven and allow the spicy roasted chickpea nuts to cool for 15 minutes before serving.


Soft Cheese & Garlic Dinner Rolls – How to Make Soft Cheesy Garlic Dinner Snail Rolls – Quick & Easy!!!

soft dinner rolls,Soft Cheese & Garlic Dinner Rolls,how to make snail dinner rolls, how to make snail rolls,cheese and garlic snail rolls,soft bread rolls,quick dinner rolls,soft white bread rolls,soft white burger buns,cheese and garlic burger buns, cheese garlic dinner rolls, dinner roll recipe, homemade dinner rolls, how to make dinner rolls, garlic knots, stuffed garlic bread domino's recipe, cheese garlic bread, garlic and cheese roll


Soft Cheese & Garlic Dinner Rolls - How to Make Soft Cheesy Garlic Dinner Snail Rolls - Quick & Easy!!!
Author: 
Recipe type: Bread
Cuisine: Mediterranean
Prep time: 
Cook time: 
Total time: 
Serves: 8
 
Soft Cheese & Garlic Dinner Rolls. These soft rolls are amazing. Depending on what size you decide to make them, you can use them as dinner rolls, or if larger, as burger buns. Superbly soft and tasty, and super quick to make, these rolls are a winner every time.
Ingredients
  • 30ml Instant dried yeast
  • 280ml Warm water
  • 60ml Sugar
  • 80ml Oil
  • 1 Egg, lightly beaten
  • 5ml Salt
  • 500g All-purpose flour
  • 30ml Garlic, finely chopped
  • 100g Parmesan, finely shredded
Instructions
  1. Mix the instant yeast and sugar together in a large mixing bowl. Pour in the warm water and mix this until the yeast has totally dissolved.
  2. Pour in the oil and mix this in briefly, then set the bowl aside for ten minutes until the yeast if frothy.
  3. Add the salt, egg, flour, garlic and finely shredded cheese.
  4. Using a wooden paddle, stir the mixture until a dough comes together, and the mixture comes away from the side of the bowl.
  5. Turn the sticky dough out onto a well floured work surface. Sprinkle flour over the top of the dough as well and start to knead.
  6. Knead the dough for 5 minutes sprinkling a little more flour every time it becomes too sticky. Knead until the dough is smooth and elastic.
  7. Roll the dough into a sausage and divide it into 4 pieces. Roll each of these out and divide in half to get 8 pieces in total.
  8. Roll each piece out into a sausage then turn the piece at 90 degrees and roll it up like a snail shell. Transfer the rolls to an oiled baking sheet and stand them up on their widest edge.
  9. Press them down gently to flatten them slightly if they don't want to stand up.
  10. Brush the rolls with egg wash and give them a good grind of cracked black pepper.
  11. Bake the rolls in a preheated oven att 220c or 425f for 8 to 12 minutes until golden.
  12. Remove the rolls from the oven and transfer them to a rack to cool for at least 30 minutes before serving.


Snack Platter Catering – Part 17 – Creamy Garlic Snails on Skewers – Garlic Snails as Finger Food!!!

garlic snails,creamy garlic snails,how to make garlic snails,homemade garlic snails,escargot in garlic sauce,escartgot garlic butter,garlic snails on skewers, snails, escargot, garlic, french snails, garlic snails french, escargot recipe,garlic snails recipe,snails in garlic butter recipe,creamy garlic snails recipe,best recipe garlic snails,making garlic snails,finger foods garlic snails,fancy finger foods,fancy snack platter foods


Snack Platter Catering - Part 17 - Creamy Garlic Snails on Skewers - Garlic Snails as Finger Food!!!
Author: 
Recipe type: Finger Foods, Cocktail Snacks, Superbowl Snacks
Cuisine: French
Serves: 12
 
In our previous episode we cooked deep fried bacon wrapped snails. Today we're going a little more traditional with creamy garlic snails, served on skewers to make them finger food friendly.
Ingredients
  • 36 Medium snails
  • 50g Butter
  • 15ml Crushed garlic
  • 60ml Cream
  • 2.5ml Cornflour dissolved in a little water
Instructions
  1. Drain the snails in a colander and rinse them thoroughly under running water.
  2. Transfer the snails to a dish towel and pat them dry.
  3. To continue, measure out the butter and chopped garlic, along with the cream. Dissolve the cornflour in a little water.
  4. Cut the bread fingers from a loaf of farm style, or light rye bread.
  5. Heat your pan over medium high heat and add the butter. When the butter is bubbling, add the snails. Fry the snails for 5 minutes.
  6. Add the garlic to the snails and continue to fry for a further 60 seconds.
  7. Pour in the cream and stir this until totally combined. Add the corn flour to the pan and stir this in.
  8. Allow the pan to simmer for 60 seconds before removing it from the heat.
  9. Using a pair of tongs, thread 2 to 3 snails onto each toothpick.
  10. Transfer the skewers to single serving bowls along with the bread fingers. Top each skewer with a little of the creamy garlic sauce and serve immediately.


Snack Platter Catering – Part 15 – Creamed Feta & Salami Crackers

finger foods,finger food recipes,snack foods,snack food recipes,cocktail party recipes,cocktail food recipes,superbowl recipes,creamed feta crackers,creamed feta and salami crackers,snack platter catering recipes,bisuit snack recipes


Snack Platter Catering - Part 15 - Creamed Feta & Salami Crackers
Author: 
Recipe type: Finger Foods, Snack Foods, Cocktail Party Recipes
Cuisine: Mediterranean
Serves: 60
 
As mentioned in yesterday's episode, it is always good to have a few lifesaver recipes on hand when snack platter catering. These are recipes that can be prepared with absolute ease ahead of time. This simple recipe of creamed feta with salami on crackers is one of these life savers.
Ingredients
  • 120g Quality feta cheese
  • 45g Calamata olives
  • 30ml Cream
  • 2.5ml Dried Italian herb mix
Instructions
  1. Crumble the feta into a tall jug. Add the pitted Calamata olives and the dried Italian herb mix.
  2. Pour in the cream and puree everything to a smooth paste using your stick blender. Load the paste into your piping gun.
  3. To assemble the crackers, give each cracker a generous smear of butter. This will cement the salami in place.
  4. Top each of the crackers with a slice of salami.
  5. Using your piping gun, top the salami with a decorative squeeze of the creamed feta.
  6. Continue until all of the crackers are complete. This amount of creamed feta is sufficient to make 60 to 70 crackers.
  7. Garnish each cracker with a single pickled green peppercorn, transfer the crackers to platters and serve.
  8. If you are not serving the crackers immediately, cover the crackers with a dome and refrigerate until serving time.


Snack Platter Catering – Part 12 – Gourmet Cocktail Pizzetti – Simple, Quick Mini Pizza!!!

pizzetti,mini pizza,finger foods,snack platter foods,cocktail pizza,cocktail pizza recipe,gourmet mini pizza,quick mini pizza,quick pizzetti,easy mini pizza,easy pizzetti recipe,finger food recipes,cocktail party food recipes,snack food recipes,superbowl recipes,snack platter catering recipes,how to make pizzetti,how to make mini pizza,homemade mini pizza recipe,homemade pizzetti recipe


Snack Platter Catering - Part 12 - Gourmet Cocktail Pizzetti - Simple, Quick Mini Pizza!!!
Author: 
Recipe type: Finger Foods / Snack Foods / Pizza
Cuisine: Italian
Serves: 24
 
These rustic pizzetti will grace any snack platter occasion. Home made no knead sour dough bases topped with well aged salami, cocktail tomatoes, mozzarella and mature cheddar cheese all adds up to a supper tasty treat.
Ingredients
For the Dough
  • 500g All purpose flour
  • ¼ Tsp Dry yeast
  • 2 Tsp Salt
  • 1½ Cups Water
For the Topping
  • 120g Mozzarella, grated
  • 120g Mature cheddar, grated
  • 48 Slices of cocktail tomato
  • 150g Salami, finely cubed
  • Salt & pepper to taste
  • Dried Italian herb mix (optional)
Instructions
  1. Pour the flour into a large mixing bowl and add the yeast and salt. Pour in the water and mix this until the water is totally combined. Cover the bowl with clingwrap and allow this to stand at room temperature overnight, or 18 hours.
  2. The following day, grate your cheeses, slice the tomatoes and dice the salami.
  3. Uncover the dough. You will notice that is well risen and has developed an amazing amount of gluten.
  4. Cover a 2 baking sheets with foil and give them a light coating of oil.
  5. Drop 12 heaped tablespoons of dough onto each sheet.
  6. Rub your hands with oil and press down and shape the pizzetti bases. Don't be too concerned about the shapes that materialize, you want them to look rustic and hand made.
  7. Spread a small handful of the mixed cheese onto each base.
  8. Sprinkle the bases with dried Italian herb mix (optional)
  9. Follow this 2 slices of tomato on each pizzetti. Divide the diced salami amongst all of the bases, and follow this with another sprinkling of cheese.
  10. Finish this off with a good grinding of cracked black pepper and salt to taste.
  11. Bake this in a preheated oven at 250c or 480f until golden, and the dough is crispy on the edges.
  12. Remove the pizzetti from the oven, transfer to platters and serve immediately.


Smoked Fish Pizza!!! Something Totally Different From Regular Run-of-the-Mill Pizza!!!

smoked fish pizza,smoked fish pizza recipe,how to make smoked fish pizza,seafood pizza,seafood pizza recipe,smoked seafood pizza recipe,smoked fish pizza recipe video,unusual pizza recipe,unusual seafood pizza recipe,unusual smoked fish pizza recipe, smoked salmon pizza,gourmet pizza recipe,gourmet smoked fish pizza recipe,homemade fish pizza recipe,how to make seafood pizza at homade,homemade pizza,best pizza recipe


Smoked Fish Pizza!!! Something Totally Different From Regular Run-of-the-Mill Pizza!!!
Author: 
Recipe type: Pizza
Cuisine: Italian
Prep time: 
Cook time: 
Total time: 
Serves: 2-4
 
This smoked fish pizza gives a whole new take on pizza. You can use cooked smoked haddock, trout or salmon to make this extra tasty pizza delight!!!
Ingredients
  • 2 x 30cm / 12 inch Pizza bases
  • 50ml Tomato paste
  • 30ml Tomato sauce
  • 300g Cooked smoked fish
  • 100g Mature Cheddar cheese, grated
  • 200g Mozzarella cheese, cut into chunky blocks
  • 10-12 White mushrooms, cut in half
  • A drizzle of olive oil
  • Salt & freshly ground black pepper to season
  • Herbs to garnish
Instructions
  1. Cut the mozzarella into chunky blocks, grate the mature cheddar cheese and flake the cooked smoked fish. I am using smoked haddock, but you can use any smoked fish.
  2. Cut the mushrooms in half. Drizzle the mushrooms with olive oil and mix them around until coated all over.
  3. For the tomato base, mix 50ml of tomato paste with 30ml of good quality tomato sauce.
  4. Roll out your dough.
  5. Using the back of a spoon, spread the tomato base over each of the pizza bases.
  6. Sprinkle half of the cheddar over each of the pizzas, followed by half of the flaked smoked fish.
  7. Spread the blocks of mozzarella evenly over each pizza, then the mushrooms.
  8. Season the pizzas with salt and ground black pepper and bake them in a preheated oven at maximum temperature for 15 minutes until the bases are well browned on the edges.
  9. The tomato base may look a little burnt, but don't worry, it is simply very much more concentrated and baked, with an insanely delicious tangy flavor.
  10. Cut the pizza into wedges and serve immediately.


Deep-Fried Calamari / Squid Heads. How to Prepare, Coat and Deep-Fry Calamari Tentacles.

deep-fried squid heads,deep-fried calamari heads,deep-fried squid tentacles,deep-fried calamari tentacles,how to clean squid heads,how to cook squid heads,how to clean calamari heads,how to cook calamari tentacles,squid head recipe,calamari head recipe,calamari tentacles recipe,squid tentacles recipe,How to deep-fry calamari tentacles,how to deep-fry squid tentacles,crispy fried squid tentacles,crispy fried calamari tentacles


Deep-Fried Calamari / Squid Heads. How to Prepare, Coat and Deep-Fry Calamari Tentacles.
Author: 
Recipe type: Seafood / Calamari
Cuisine: Mediterranean
Prep time: 
Cook time: 
Total time: 
Serves: 2
 
Calamari heads / Tentacles are popular across the entire Mediterranean region. They are prepared in many ways from grilled to pickled. Here we're coating the heads in a light batter and frying them to golden perfection.
Ingredients
  • 250g Squid heads
  • 2 Eggs
  • 60g Tapioca flour
  • 2.5ml Salt
Instructions
  1. Inspect the calamari heads. In most cases, the beak will still be present. It is a hard piece of transparent material. Cut this away and discard it.
  2. In a jug, combine the tapioca flour, salt and eggs. Whisk this thoroughly until you have silky smooth batter.
  3. Place the squid heads in a bowl and pour the batter over. Mix the heads in until everything is well coated.
  4. Half fill your wok with oil and heat this to 190c or 375f.
  5. Carefully drop the heads into the oil one by one. Fry the squid for 3 minutes until crisp and lightly golden. Remove from the oil and drain on kitchen paper.
  6. Repeat this until all of the calamari is fried.
  7. Serve the calamari immediately with rice and lemon wedges and any other accompaniments of your choice.


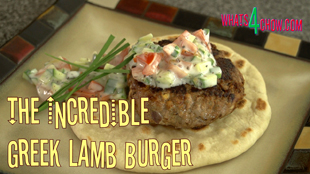
Incredible Greek Lamb Burger – Succulent Greek Lamb Burger Patty Served on Pitta with Tzatziki.

greek lamb burger,greek-style lamb burger,greek lamb burger on pitta bread,greek lamb burger with tzatziki,how to make lamb burger patties,how to make a lamb burger,mediterranean style lamb burger,lamb burger with pitta and tzatziki,greek lamb burger recipe,lamb burger patty recipe, burger recipes, lamb burger recipes, barbecue lamb burger, Gyro Burger Recipe, Greek Gyro Burger Recipe, greek lamb burgers rachael ray, greek lamb burgers feta


Incredible Greek Lamb Burger - Succulent Greek Lamb Burger Patty Served on Pitta with Tzatziki.
Author: 
Recipe type: Burgers
Cuisine: Greek / Lamb
Prep time: 
Cook time: 
Total time: 
Serves: 4
 
This one is a real winner!!! Succulent Greek Lamb Burger Patty served on a pitta bread and topped with a cascade of tzatziki. This burger really has all the tastes and flavors of the Mediterranean!!!
Ingredients
  • 600g Lamb mince
  • 2 Cloves garlic, crushed
  • ½ Onion, finely chopped
  • 1 Tbs Tomato sauce
  • 1 Egg, lightly beaten
  • 30g Fresh bread crumbs
  • 2 Tbs Finely chopped Calamata olives
  • 60g Feta cheese, crumbled
  • ½ Tsp Ground cumin
  • ½ Tsp Ground coriander
  • 1 Tsp Dried oregano
  • Salt & pepper to taste
For the Tzatziki
  • 1 Tomato, finely chopped
  • An equal amount of finely chopped Israeli cucumber
  • ½ Tsp Dried mint
  • 150ml Greek yoghurt
Instructions
  1. In a large mixing bowl, combine the lamb mince, crushed garlic, finely chopped onion, tomato sauce, egg, fresh bread crumbs, chopped Calamata olives, ground cumin, ground coriander, dried oregano and crumbled feta cheese.
  2. Season with salt and pepper and mix this thoroughly until everything is evenly distributed.
  3. Weigh the mixture and divide it into 4 equal portions of around 220g.
  4. Shape the potions into patties of about 20mm or ¾ inch thick.
  5. Place the patties on a platter and refrigerate them for 30 to 60 minutes.
  6. While the patties set, finely chop 1 tomato, and a matching amount of Israeli cucumber. Place these in a bowl and add 150ml of Greek yogurt, along with the dried mint. Mix this thoroughly and put it aside.
  7. Heat a heavy pan over medium high heat and add 30g of butter. Fry the patties for 8 minutes, turning every minute.
  8. The patties should well charred, but not burnt.
  9. Place a pitta bread on each serving platter and top each one with a patty. Arrange a cascade of tzatziki on top of each patty, garnish with snipped chives or fennel sprigs and serve immediately.


Scroll to top

Kitchen Conversions

Convert:
Masses
to:
Volumes
to:
Temperatures
to:
Lengths
to: