Snack Platter Catering – Part 18 – Chinese Sausage Steamed Buns – Chinese Steamed Buns Finger Foods

steamed buns,chinese steamed buns,chinese sausage steamed buns,how to make steamed buns,steamed buns with chinese sausage, how to make chinese steamed buns, steamed pork bun, chinese steamed buns filling, chinese steamed buns recipe, steamed bao, chinese steamed pork bun recipe, chinese steamed buns with pork filling, chinese steamed buns without yeast, homemake chinese steamed meat buns


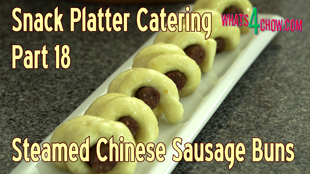
Snack Platter Catering - Part 18 - Chinese Sausage Steamed Buns - Chinese Steamed Buns Finger Foods
Author: 
Recipe type: Finger Foods / Snack Foods / Cocktail Snack Foods / Dimsum
Cuisine: Chinese
Serves: 16
 
These Chinese sausage steamed buns are awesome. Rich sausage wrapped in a tender soft pastry and steamed to juicy perfection are what memories are made of.
Ingredients
  • 1 Cup Self-raising flour
  • 10ml Baking powder
  • 10ml Caster sugar
  • 15g Softened butter
  • 75ml Warm milk
  • 64cm of Chinese sausage
  • Roasted sesame oil
Instructions
  1. Place the self raising flour, baking powder and caster sugar in a mixing bowl.
  2. Add the softened butter and rub this into the flour thoroughly until the flour resembles bread crumbs.
  3. Pour in the warm milk and mix this using a wooden paddle until all of the milk has been absorbed into the flour.
  4. Get in there with your hands and start compressing the dough until you have a complete ball of dough and all of the loose bits are incorporated.
  5. Turn the dough out and knead it on your work surface for 2 minutes.
  6. Wrap the dough in cling wrap and let it rest for 30 minutes.
  7. In the meantime, cut the sausage into 4cm lengths, or just less than 2 inches. If you can't find Chinese sausage, you can substitute this with a cured Italian sausage like Cabanossi.
  8. In addition cut 16 squares of baking parchment.
  9. Unwrap the dough and roll it into a sausage shape. Cut the dough into 16 equal pieces. Roll each piece into a snake of about 12 cm long, or 5 inches.
  10. Roll each snake of dough in a spiral around each piece of sausage. Place each one on a piece of parchment and transfer them to your steamer. You will need to use both tiers of your steamer, or steam 2 batches.
  11. Place the steamer over a wok of rapidly boiling water and steam the buns for 15 minutes.
  12. Remove the steamer from the heat and transfer the buns to serving platters. Brush the buns with roasted sesame oil and serve immediately.


Easter Special – Marshmallow Easter Egg Muffins – Simply the Best Yummy Ever!!!

Easter Special - Marshmallow Easter Egg Muffins - Simply the Best Yummy Ever!!!,easter eggs in muffins,marshmallow muffins,best easter sweet recipe,marshmallow easter egg muffins,chocolate muffins rescipe,best easter muffin recipe,best hot-cross bun substitute, Easter Dessert Special, easter cupcakes, fruit cake recipes, hot cross buns recipe


Easter Special - Marshmallow Easter Egg Muffins - Simply the Best Yummy Ever!!!
Author: 
Recipe type: Easter Recipes, Hot Cross Bun, Muffin Recipe
Cuisine: Easter Recipes
Prep time: 
Cook time: 
Total time: 
Serves: 4
 
Marshmallow Easter Egg inside a Muffin!!! Simply Insane Yummy!!! A volcano of Smore over a delectable Muffin!!!
Ingredients
  • 240g Self-Raising flour
  • 3ml Salt
  • 10ml Baking powder
  • 50g Sugar
  • 100ml Dried Cranberries
  • 2ml Vanilla extract
  • 1 Egg
  • 225ml Milk
  • 50g Melted butter
Instructions
  1. Add the flour, salt, baking powder, sugar and dried cranberries to a large mixing bowl.
  2. Whisk the egg into the milk and pour this into the flour along with the melted butter.
  3. Mix this until the batter is just combined. You are not looking for an absolutely smooth batter, and over-mixing will result in dense, heavy muffins.
  4. Use a rectangle of baking paper to line a mini loaf tin. Don't be too concerned that it doesn't stay in place. The weight of the batter will hold it down.
  5. Spoon 2 large tablespoons of batter into the bottom of the lined tin. Place a marshmallow Easter egg into the tin and press it down until the batter rises around the edges of the egg.
  6. Spoon another 2 large tablespoons of the batter on top the egg to totally encase it.
  7. Repeat this with the other 3 mini loaf tins.
  8. Place the loaf tins onto a baking sheet and bake in a preheated oven at 180c or 350f for 25 minutes.
  9. Unfortunately you cannot test for doneness with old skewer trick, as the marshmallow egg is in the center. Just trust the timing, and if you have any doubts about the accuracy of your oven, use an oven thermometer.
  10. Remove the muffins from the oven and marvel at the amazing lava flow of molten marshmallow and chocolate on top of the muffins.
  11. These muffins are best served hot with whipped cream, or transfer them to a wire rack to cool.


How to Make Pie Pastry. Make Your Own Amazing Flaky Shortcrust Pastry at Home!!!

how to make pie pastry,pie pastry recipe,homemade pie pastry,easy pie pastry,quick pie pastry,how to make shortcrust pastry,how to make flaky pastry,how to make flaky shortcrust pastry, how to make pie crust, pie crust recipe, pie dough, pie pastry recipe easy, pie pastry recipe south africa, pie pastry ingredients, pie pastry recipe savoury, how to make beef pie pastry,chicken pie pastry,savory pie pastry


How to Make Pie Pastry. Make Your Own Amazing Flaky Shortcrust Pastry at Home!!!
Author: 
Recipe type: Pastry
Cuisine: English / British
Prep time: 
Total time: 
 
Pie pastry is quick and easy to make!!! I just a few minutes you can make amazing flaky shortcrust pastry that costs a fraction of the store-bought stuff, and tastes much better too.
Ingredients
  • 600g All-purpose flour
  • 300g Butter, frozen, then grated
  • 5ml Salt
  • 250ml Cold water
Instructions
  1. Place the flour, grated butter and salt in a large mixing bowl. Using your hands, rub the butter into the flour. You can control the flakiness of the pastry by how thoroughly you rub the butter in. If you leave the butter reasonably coarse, the pastry will be quite flaky. If you rub it in until the flour resemble breadcrumbs, the pastry will be flaky, but more on the side of shortcrust.
  2. Once the butter is nicely incorporated, pour in the iced water.
  3. Using 2 forks, mix the water in until it is absorbed by the flour. Using your hands, start compressing the dough together. Don't knead the dough or it will toughen, simply compress it into a single mass until it all comes together, and all of the loose bits are incorporated.
  4. Wrap the dough in clingwrap and refrigerate for 30 minutes before rolling out.
  5. At this stage, you can store the dough in your fridge for up to 30 days, or in the freezer for up to 6 weeks.


How to Make the Best Yorkshire Pudding!!! Simply the Best Yorkshire Pudding Recipe to go with Your Roast!!!

yorkshire pudding,yorkshire pudding recipe,how to make yorkshire pudding,yorkshire pudding batter recipe, Yorkshire Pudding (Dish), yorkshire pudding recipe easy, yorkshire pudding recipe jamie oliver, roast beef with yorkshire puddings and gravy recipe, yorkshire pudding nigel slater, yorkshire pudding james martin, yorkshire pudding delia, yorkshire pudding gordon ramsay, yorkshire pudding alton brown


How to Make the Best Yorkshire Pudding!!! Simply the Best Yorkshire Pudding Recipe to go with Your Roast!!!
Author: 
Recipe type: Accompaniments
Cuisine: English / British
Prep time: 
Cook time: 
Total time: 
Serves: 6-12
 
Yorkshire pudding is an all-time favorite accompaniment to any roast meal. In Yorkshire it is even served on its own as a starter with a thick gravy.
Ingredients
  • 200g All-purpose flour
  • 4 Eggs
  • 200ml Full cream milk
  • 2.5ml Salt
Instructions
  1. Sift the flour into a large mixing bowl. In a jug, lightly whisk 4 eggs and add this to the flour along with 200ml of milk and a pinch of salt. Whisk this thoroughly until you have a smooth, silky batter.
  2. Fill the end hollows of your muffin pan with oil and tip the pan up so that oil runs down to the lower hollows. When the bottom hollows fill at an angle, level the pan, and all of the hollows will have exactly the same amount of oil.
  3. Place the muffin pan into a roasting tin. This catch any spillage while the puddings bake. Place this in an oven at 200c or 400f for 15 to 20 minutes and the oil is really hot.
  4. Remove the pan from the oven and pour batter into each hollow. For regular sized puddings, fill them up halfway. For giant sized puddings fill them almost all the way.
  5. Return the pan to the oven for 20 to 25 minutes until the puddings are well risen and browned. Do not open the oven while the puddings are baking. This will cause them to drop back and you will have a flop.
  6. Remove the pan from the oven and marvel at the beautifully golden and crispy, puffed up and hollow Yorkshire puddings.
  7. Transfer these to platters and serve with the roast of your choice and a rich gravy.


Super-Quick Burger Buns!!! Make Your Own Burger Buns in Just over 30 Minutes!!!

easy burger buns,easy burger buns recipe,quick burger buns,quick burger buns recipe,super-quick burger bun recipe,40 minute burger buns,30 minute burger buns,how to make burger buns recipe,burger buns video recipe, Hamburger Buns, step-by-step, burger buns light and soft, how to make burger buns at home,how to make mini burger buns, mini burger buns, best burger buns, Homemade Burger Bun Recipe, Homemade Hamburger Buns Recipe


Super-Quick Burger Buns!!! Make Your Own Burger Buns in Just over 30 Minutes!!!
Author: 
Recipe type: Bread / Burger
Cuisine: American
Prep time: 
Cook time: 
Total time: 
Serves: 6-12
 
Sometimes you just don't have the time or energy to wait 2 hours for dough to rise. This recipe will make life much easier - make your burger buns is just over 30 minutes!!!
Ingredients
  • 30ml Instant yeast
  • 280ml Warm water
  • 80ml Oil
  • 60ml Sugar
  • 1 Egg
  • 1 Tsp Salt
  • 3½ Cups All-purpose flour
Instructions
  1. Pour the instant yeast into a large mixing bowl and pour in the warm water. Mix this briefly to dissolve the yeast, then pour in the sugar and oil. Mix again briefly, then let this stand for for 5 minutes.
  2. After 5 minutes the mixture will be very frothy. Add the salt and egg, and pour in the flour.
  3. Using a wooden paddle, mix this all until a soft dough comes together and it comes away from the sides of the bowl.
  4. Turn the dough out onto a floured work surface, sprinkle more flour over the top and knead the dough for 3 minutes until smooth and elastic. Sprinkle a little more flour every time it becomes too sticky.
  5. Roll the dough into a sausage and divide it into 6 for large buns, 9 for medium buns and 12 for cocktail burgers.
  6. Working with one piece of dough at a time, cup your hand over the dough and using a circular motion roll the dough into perfect balls. Transfer the balls to a greased baking sheet leaving about 5cm or 2 inches of space between each bun.
  7. Cover the buns lightly with a damp kitchen towel and allow them to rest for 10 minutes.
  8. Bake the buns in a preheated oven at 220c or 425f for 8 to 12 minutes until well browned and risen.
  9. Remove the buns from the oven and allow them to cool on a wire rack.


Traditional Greek Pitta Bread. Make Your Own Flavorful, Chewy Greek Pitta Bread at Home!!!

pita bread, tzatziki, Greek Food (Dish),traditional greek pitta bread,how to make pitta bread,how to make traditional greek pitta bread, homemade greek pitta bread,pitta bread recipe,, how it's made pita bread, Greek Cuisine (Cuisine), chicken souvlaki pita bread, flat bread making, producing greek pita,how to make greek pitta bread,prefect homemade pitta bread,pitta bread for souvlaki,real greek pitta bread recipe


Traditional Greek Pitta Bread. Make Your Own Flavorful, Chewy Greek Pitta Bread at Home!!!
Author: 
Recipe type: Bread / Dough
Cuisine: Greek
Prep time: 
Cook time: 
Total time: 
Serves: 8
 
Traditional Greek Pitta Bread is absolutely out of this world! Slightly salty, with its trademark chewy texture, pitta bread is a must-have with any Greek meal.
Ingredients
  • 500g Strong white flour
  • 300ml Warm water
  • 12.5ml Instant yeast
  • 15ml Salt
  • 15ml Olive oil
Instructions
  1. Place the flour, dried yeast, salt and oil in your mixing bowl. Mix this to combine, and pour in the water.
  2. Mix this with a wooden paddle until a dough comes together and comes away from the sides of the bowl.
  3. Turn the dough out onto your work surface and knead it for 3 minutes until reasonably smooth.
  4. Place the dough back in the bowl, cover the bowl with cling wrap and allow the dough to rise for 60 minutes in a warm place.
  5. After an hour, turn the dough back out onto your work surface and knead it for 10 minutes until it is smooth and elastic.
  6. Place the dough back in the bowl, cover with cling wrap and allow this to rise again for 60 minutes.
  7. Turn the dough out again, roll it into a cylinder shape and divide it into 8 equal pieces.
  8. Flatten each piece into a disc and roll the discs out into circles of 20cm or 8 inches in diameter.
  9. Heat a heavy pan over medium high heat and give it a light rubbing of oil.
  10. Working with one pitta at a time, fry the pitta for 30 seconds and bubbles start popping up on the top surface.
  11. Turn the pitta over and fry for a further 60 seconds. Turn the pitta over and fry for a further minute. One final turn and a further 90 seconds frying before transferring the pitta to a platter.
  12. Continue with the remaining pitta breads.


How to Make Cream Crackers – Delicious, Crispy Cream Crackers Made with Real Cream!!!

how to make cream crackers,cream crackers recipe,homemade cream crackers,make cream crackers at home,cream crackers recipe with real cream,real cream crackers recipe,saltine crackers, graham crackers, homemade graham crackers, how to make cream crackers from scratch, how to make english cream crackers,water biscuits,how to make water biscuits,cream cracker recipe with real cream,best cream cracker recipe


How to Make Cream Crackers - Delicious, Crispy Cream Crackers Made with Real Cream!!!
Author: 
Recipe type: Crackers / Biscuits / Baking
Prep time: 
Cook time: 
Total time: 
 
These cream crackers are quick and easy to make. Made with real cream, they are absolutely delicious as a snack, or as on platters for entertaining. The cream crackers can be topped with anything from simple to fancy, and will have your guests lining up for more!!!
Ingredients
  • 2 Cups all-purpose flour
  • 1 Tsp Salt
  • 1½ Tsp Sugar
  • 1 Tsp Baking powder
  • 160ml Cream
Instructions
  1. Place the flour, salt, sugar and baking powder in your mixing bowl. Mix this to combine and pour in the cream.
  2. Using a wooden paddle, mix until all of the cream has been absorbed.
  3. Using your hands, compress the dough in the bowl, turning and squeezing continuously. Avoid any kneading motion as you don't want any over-development of gluten.
  4. Turn the dough out onto your work surface and continue compressing the dough until all of the loose bits are incorporated into a single mass.
  5. Wrap the dough in cling wrap and allow this to rest for 30 minutes.
  6. After 30 minutes, unwrap the dough and cut it into 4 pieces. Working with 1 piece, pass it through your pasta roller on the thickest setting. Fold the sheet of dough in half and pass it through again. Continue doing this until the dough is smooth.
  7. Reduce the setting by 1 step and pass it through again. Continue reducing until the dough reaches a thickness of 3mm or 1 eight of an inch. Put this sheet aside and continue rolling the remaining 3 sheets.
  8. Cut the sheets length-ways down the center, then cut these strips into squares.
  9. Transfer the squares to un-greased baking sheets and poke 2 sets of holes into each square using a fork.
  10. Bake the squares in a preheated oven at 180c or 350f for about 8 minutes on each side until lightly browned and risen.
  11. Serve with the toppings of your choice. Simple or fancy, these go down a real treat.


Petit Breakfast Rolls (Petit Pains) – Beautiful Soft, Sweet and Flavorful Homemade Breakfast Rolls

breakfast rolls,soft breakfast rolls,how to make breakfast roll,homemade breakfast rolls,petit pains,how to make petit pains,petit pains breakfast rolls,petit pains breakfast rolls homemade,soft breakfast rolls,soft breakfast rolls homemade,soft and sweet breakfast rolls recipe,how to make soft sweet breakfast rolls at home, recette pain, recette petits pain, petit pains recipe, petit pains au lait, dinner rolls


Petit Breakfast Rolls (Petit Pains) - Beautiful Soft, Sweet and Flavorful Homemade Breakfast Rolls
Author: 
Recipe type: Bread rolls / Breakfast rolls
Cuisine: French
Prep time: 
Cook time: 
Total time: 
Serves: 12
 
These amazingly soft and slightly sweet breakfast rolls (Petit Pains) are really easy to make and despite the slightly longer than usual rising times, are well worth the effort.
Ingredients
  • 1 Tsp Dried yeast
  • 280ml Warm milk
  • 450g Strong white flour
  • 10ml Salt
  • 15ml Caster sugar
  • 50g Softened butter
Instructions
  1. Add the yeast to the warm milk and whisk this thoroughly. Put this aside for 10 minutes to mature.
  2. In a large mixing bowl, combine the flour, salt and caster sugar.
  3. Add the softened butter and rub this into the flour mixture until it resembles fine bread crumbs.
  4. Make well in the center of the flour and pour in the milky yeast.
  5. Using a wooden paddle, mix this until a dough comes together, and it comes away from the sides of the bowl.
  6. Turn the dough out onto a lightly floured work surface and knead the dough for 5 minutes until it is smooth and elastic.
  7. Dust the dough with a little flour every time it becomes too sticky.
  8. Place the dough back in the mixing bowl, cover the bowl with cling-wrap and allow the dough to rise for 60 minutes in a warm place.
  9. After 60 minutes, knock the dough back and remove it from the bowl.
  10. Using your scale, divide the dough into 12 equal portions.
  11. Working with a piece at a time, briefly knead the dough. Pull the edges of the dough up to the center of the ball.
  12. Turn the ball over. Cup your hand over the ball and rotate to make the ball perfectly round. Using one hand, roll the ball into an elongated oval shape.
  13. Transfer the roll to a lightly greased baking sheet and continue with the remaining rolls. Leave about an inch or 25mm of space between each roll.
  14. Cover the rolls with an upturned roasting tin and allow this to rise for a further 60 minutes in a warm place.
  15. After 60 minutes, the rolls will be well risen and will just be touching. As they bake they will support one another and rise upwards instead of sideways.
  16. Using a sharp knife, slash 3 cuts into the top of each roll and brush the rolls with milk.
  17. Bake the rolls in a preheated oven at 180c or 350f for 12 to 15 minutes until lightly browned.
  18. Remove the rolls from the oven, separate them and allow them to cool on a wire rack.


How to Make Lavash. Crispy Middle Eastern Flat-Bread. Homemade Lavash Recipe.

lavash,lavash recipe,how to make lavash,homemade lavash,middle eastern flat bread,flat bread recipe,spicy lavash recipe,recipe for lavash flat bread,Lavash (Dish), lavash crackers, lavash bread, lavash bread recipe, Lebanese Bread, Middle Eastern Bread, Crispbread, FlatBread Recipe, Turkish thin pastry, turkish flatbread, thin flatbread recipe, how to make flatbread, easy lavash, recipe for lavash


How to Make Lavash. Crispy Middle Eastern Flat-Bread. Homemade Lavash Recipe.
Author: 
Recipe type: Flat Bread / Crackers
Cuisine: Middle Eastern
Prep time: 
Cook time: 
Total time: 
 
Lavash is a middle eastern flat bread that has become quite popular in the west on snack platters served with a variety of dips.
Ingredients
  • 1 Tsp Dried yeast
  • 1 Tsp Honey
  • 125ml Warm water
  • 185g All-purpose flour
  • 2 Tsp Salt
  • ¼ Tsp Ground hot paprika
  • ¼ Tsp Cayenne pepper
  • 1 Egg white, lightly beaten
  • 2 Tbs seeds (poppy, sesame, caraway)
Instructions
  1. Combine the yeast, warm water and honey in a jug. Allow this to stand for 15 minutes until frothy.
  2. While the yeast matures, combine the flour, salt, ground hot paprika and cayenne pepper in a mixing bowl.
  3. Add the frothy yeast to the bowl. Using a wooden paddle stir this into the dry ingredients until a dough comes together.
  4. Turn the dough out onto a lightly floured work surface and knead it for 2 minutes until smooth. Wrap the dough in cling wrap and place it in your refrigerator for 45 minutes to firm up.
  5. Remove the dough from the refrigerator and divide it in half. Flatten one half and flour the outside if it is sticky. Pass it through your pasta roller on the widest setting. Fold it in half and pass it through again. Repeat this until the dough is silky smooth. Rub a little flour into the surface every time it becomes sticky.
  6. Reduce the thickness of the rollers by one step, pass the dough through, then another step and so on, until you reach number 5 on the machine.
  7. Dust both sides of the pastry with flour and put this aside while you roll out the second strip of pastry.
  8. Cut the pastry into triangles across the width of the pastry.
  9. Transfer the triangles to a lightly greased baking sheet and brush them with the egg white. Sprinkle the seeds of your choice onto the lavash.
  10. Using a fork prick holes into the pastry triangles. The closer you make the holes, the crispier and flatter the breads will be. If you make the holes further apart, the lavash will be lighter and airier, with bigger rising bubbles. The choice is yours.
  11. Bake the lavash in a preheated oven at 180c or 350f for 10 minutes until crisp and golden.
  12. Remove from the oven and serve hot or cold with the dipping sauces of your choice. In our serving we have uses our creamy lambs liver pate.


Homemade Phyllo Pastry. How to Make Perfect Filo / Fillo / Phyllo Pastry the Easy Way!!!

homemade phyllo pastry,, filo, phyllo, pastry, phyllo dough, filo dough, from scratch, greek filo pastry, homemade filo pastry, classic filo dough, homemade filo dough recipe, filo dough recipe, traditional filo dough, how to make filo dough, PhylloCups, homemade phyllo cups, how to make phyllo cups, how to make phyllo shells, athens phyllo, phyllo cups at home, chicken salad phyllo cups, easy phyllo cups


Homemade Phyllo Pastry. How to Make Perfect Filo / Fillo / Phyllo Pastry the Easy Way!!!
Author: 
Recipe type: Pastry / Dough
Cuisine: Greek
 
In this episode we make a batch of perfect phyllo / filo pastry at home. This pastry is very versatile and has as many uses as it has spellings and pronunciations.
Ingredients
  • 4 Cups all-purpose flour
  • 1 Tsp White vinegar
  • 1 Tsp Olive oil
  • 15ml Lemon Juice
  • 300ml Hot water (70c)
  • Flour for dusting
Instructions
  1. Place the four in your food processor. With the machine running on medium speed, drizzle the white wine vinegar, olive oil, and lemon juice into the flour.
  2. Allow this to run for 60 seconds until the liquid is very well distributed in the flour.
  3. Increase the speed of the machine to maximum an slowly pour in the hot water. Allow this to run for 60 seconds until the flour looks like a fine crumbly mass.
  4. Turn the the mixture out into a large mixing bowl. Using your hands, compress the mixture together into a single mass of dough.
  5. Turn the dough out onto your work surface and kneed it for 10 minutes. The dough is stiff and dry and you have to use bot hands to knead.
  6. At the 10 minute point the dough will still break apart, but don't be too concerned about this, your pasta roller will finish the kneading for you.
  7. Wrap the dough tightly in cling-wrap and allow it to rest in your refrigerator for at least 2 hours.
  8. Remove the dough and divide it into 10 pieces, using your scale.
  9. Working with one piece at a time, slightly flatten the dough and pass it through the pasta roller on its widest setting. Fold the dough in half and pass it through again. Repeat this another 4 or 5 times until the dough is silky smooth.
  10. Reduce the width of the roller to number 2, pass it through again. Then number 3, and so on.
  11. By the time you reach number 5 or 6, the dough will begin to feel damp. Lie it on the work surface and rub a little flour into both sides of the dough.
  12. Continue rolling, decreasing the thickness by one step each time, until you reach the thinnest setting, or number nine.
  13. By this stage you will have a long, paper-thin length of dough.
  14. Spread the dough over your work surface and lightly rub a little more flour into both sides of the pastry. Trim the ends square and cut the length in half. Stack the pastry, cover it with a damp tea towel and continue processing the remaining dough.
  15. If you're not using the pastry immediately, fold the it into quarters, wrap it loosely in cling-wrap and store in in your refrigerator for up to 10 days, or in your freezer for up to 3 months.


Turkey Fold-Over. How to use Turkey Left-Overs – Delicious Baked Turkey Buns.

how to use turkey left-overs,thanksgiving left-overs,christmas left-overs,turkey fold-overs,turkey turnovers,, Turkey Leftover Ideas, Turkey Leftover Recipe, Leftover Turkey, Leftover Turkey Recipe, leftover roast turkey meat, thanksgiving leftover recipes, turkey leftover recipes, thanksgiving leftovers recipes, what to do with leftovers, turkey club sandwich, thanksgiving turkey leftover idea, turkey sandwich


Turkey Fold-Over. How to use Turkey Left-Overs - Delicious Baked Turkey Buns.
Author: 
Recipe type: Left-Overs Recipe Ideas
Cuisine: American
Prep time: 
Cook time: 
Total time: 
Serves: 4
 
How to use Turkey Left-Overs. Baked turkey turn-overs are agreat way to use any left-over turkey meat. In fact you can even use any of the left-over meat in combinations, or on their own, mixed with the other ingredients.
Ingredients
For the Dough
  • 500g Strong White flour
  • 10g Instant yeast
  • 10g Salt
  • 10g Sugar
  • 300ml Lukewarm water
For the Filling
  • 250g Cooked Turkey or other left-over meat
  • 3 Tbs finely chopped pickled jalapeno
  • 200ml Sour cream
  • 80g Feta cheese
  • 6 Tbs Chopped sun-dried tomato
Instructions
  1. To make the dough, place the flour, yeast, salt and sugar in a large mixing bowl. Stir these together briefly, then pour in the warm water.
  2. Using a wooden paddle, stir this until a dough starts to come together, then using your hands in the bowl, compress the dough together to pick up and loose bits.
  3. Turn the dough out onto a lightly floured work surface and knead it for 5 minutes until it is smooth and elastic.
  4. Place the dough back in the mixing bowl, cover the bowl with cling-wrap and allow the dough to rise for 40 minutes in a warm place.
  5. While the dough rises, finely chop your cooked meat. Place this in a bowl and add the finely chopped pickled jalapeños, sour cream, feta cheese and chopped sun-dried tomato. Mix this until totally combined.
  6. Cover a wire rack with foil and give it a light coating of oil. Turn the dough out and knead it briefly.
  7. Flatten the dough into a large disc and cut it into quarters. Roll each quarter into a ball, flatten the ball, then roll into a circle of 20cm or 8 inches in diameter.
  8. Spoon a quarter of the filling across the center of the dough. Pick up the far side of the dough and pull it of the filling. Use your finger tips to tamp the edges down.
  9. This will not seal the edges, it simply thins them out, and prevents them from flying up while cooking. The edge will open during cooking, but only enough to reveal the filling.
  10. Place the completed crescents on the rack, cover the rack with and upturned roasting pan and allow this to rise for 20 minutes in a warm place.
  11. Bake the fold-overs in a preheated oven or gas barbecue at 180c or 350f for 25 minutes until lightly golden.
  12. Remove from the heat and serve immediately with the accompaniments of your choice.


Gourmet Russian Hotdogs. Footlong Russian Sausage Baked in Soft Flavored Dough.

gourmet hotdogs,gourmet russian hotdogs,hot dog recipe,how to make a russian hotdog, gourmet hot dog, gourmet hot dogs recipe, gourmet hot dogs london, gourmet hot dogs denver, gourmet hot dogs toronto, gourmet hot dogs nyc, gourmet hot dogs manly, gourmet hot dogs perth, gourmet hot dogs chicago,gourmet hotdog buns,gourmet hotdog buns recipe,soft hotdog buns,how to make the best hotdog buns,gourmet hotdog rolls


Gourmet Russian Hotdogs. Footlong Russian Sausage Baked in Soft Flavored Dough.
Author: 
Recipe type: Fast Food
Cuisine: American
Prep time: 
Cook time: 
Total time: 
Serves: 2-4
 
These gourmet hotdogs are huge! A footlong Russian sausage is wrapped in a soft bun dough flavored with sun-dried tomato and parmesan cheese, then baked to golden perfection!
Ingredients
  • 2 Footlong Russian sausages
  • 2 Cups All-purpose flour
  • 10g Instant yeast
  • 7.5ml Salt
  • 15ml Sugar
  • 250ml Warm water
  • 60ml Sun-dried tomato, finely chopped
  • 30g Parmesan cheese, shredded
  • ⅓ Cup All-purpose flour (to work the dough)
Instructions
  1. Place the flour, yeast, salt and sugar in a large mixing bowl. Mix them together briefly, then pour in the water. Mix this to a very soft and sticky dough.
  2. Add the chopped sun-dried tomato, shredded parmesan cheese and the oil.
  3. Mix this until totally combined, cover the bowl with cling-wrap and allow the dough to rise for 40 minutes in a warm place.
  4. After 40 minutes, the dough will be well risen and the gluten clearly visible. From the second batch of flour, lightly flour the work surface and turn the dough out.
  5. Sprinkle the top of the dough with flour and start to work the flour into the dough. Continue sprinkling extra flour until all of the flour has been worked into the dough. The dough will be soft, smooth, and elastic.
  6. Divide the dough in half and roll each half into a sausage of 10 inches long. Flatten the dough out until it is about 3 inches wide by 12 inches long, and oval in shape.
  7. Place a Russian sausage on the dough, lift the far edge of the dough over the sausage and stretch it down the other side.
  8. Lift the near side of the dough up and stretch over to enclose the sausage. The ends of the sausage will still protrude from the dough.
  9. Grease a piece of foil and transfer the dogs to the foil. Place the foil on top of a wire rack and using a sharp knife slash through the tops of the dogs at an angle, making sure to cut the dough and the sausage.
  10. Cover this with an upturned roasting pan and allow the dogs to rise for a further 20 minutes.
  11. Heat you gas barbecue or your oven to 180c / 350f and bake the dogs for 25 minutes and the rolls are lightly golden and sound hollow when tapped on the side.
  12. Remove from the barbecue or oven and serve immediately with the accompaniments of your choice.


Scroll to top

Kitchen Conversions

Convert:
Masses
to:
Volumes
to:
Temperatures
to:
Lengths
to: