Traditional Greek Pitta Bread. Make Your Own Flavorful, Chewy Greek Pitta Bread at Home!!!

pita bread, tzatziki, Greek Food (Dish),traditional greek pitta bread,how to make pitta bread,how to make traditional greek pitta bread, homemade greek pitta bread,pitta bread recipe,, how it's made pita bread, Greek Cuisine (Cuisine), chicken souvlaki pita bread, flat bread making, producing greek pita,how to make greek pitta bread,prefect homemade pitta bread,pitta bread for souvlaki,real greek pitta bread recipe


Traditional Greek Pitta Bread. Make Your Own Flavorful, Chewy Greek Pitta Bread at Home!!!
Author: 
Recipe type: Bread / Dough
Cuisine: Greek
Prep time: 
Cook time: 
Total time: 
Serves: 8
 
Traditional Greek Pitta Bread is absolutely out of this world! Slightly salty, with its trademark chewy texture, pitta bread is a must-have with any Greek meal.
Ingredients
  • 500g Strong white flour
  • 300ml Warm water
  • 12.5ml Instant yeast
  • 15ml Salt
  • 15ml Olive oil
Instructions
  1. Place the flour, dried yeast, salt and oil in your mixing bowl. Mix this to combine, and pour in the water.
  2. Mix this with a wooden paddle until a dough comes together and comes away from the sides of the bowl.
  3. Turn the dough out onto your work surface and knead it for 3 minutes until reasonably smooth.
  4. Place the dough back in the bowl, cover the bowl with cling wrap and allow the dough to rise for 60 minutes in a warm place.
  5. After an hour, turn the dough back out onto your work surface and knead it for 10 minutes until it is smooth and elastic.
  6. Place the dough back in the bowl, cover with cling wrap and allow this to rise again for 60 minutes.
  7. Turn the dough out again, roll it into a cylinder shape and divide it into 8 equal pieces.
  8. Flatten each piece into a disc and roll the discs out into circles of 20cm or 8 inches in diameter.
  9. Heat a heavy pan over medium high heat and give it a light rubbing of oil.
  10. Working with one pitta at a time, fry the pitta for 30 seconds and bubbles start popping up on the top surface.
  11. Turn the pitta over and fry for a further 60 seconds. Turn the pitta over and fry for a further minute. One final turn and a further 90 seconds frying before transferring the pitta to a platter.
  12. Continue with the remaining pitta breads.


How to Make Lavash. Crispy Middle Eastern Flat-Bread. Homemade Lavash Recipe.

lavash,lavash recipe,how to make lavash,homemade lavash,middle eastern flat bread,flat bread recipe,spicy lavash recipe,recipe for lavash flat bread,Lavash (Dish), lavash crackers, lavash bread, lavash bread recipe, Lebanese Bread, Middle Eastern Bread, Crispbread, FlatBread Recipe, Turkish thin pastry, turkish flatbread, thin flatbread recipe, how to make flatbread, easy lavash, recipe for lavash


How to Make Lavash. Crispy Middle Eastern Flat-Bread. Homemade Lavash Recipe.
Author: 
Recipe type: Flat Bread / Crackers
Cuisine: Middle Eastern
Prep time: 
Cook time: 
Total time: 
 
Lavash is a middle eastern flat bread that has become quite popular in the west on snack platters served with a variety of dips.
Ingredients
  • 1 Tsp Dried yeast
  • 1 Tsp Honey
  • 125ml Warm water
  • 185g All-purpose flour
  • 2 Tsp Salt
  • ¼ Tsp Ground hot paprika
  • ¼ Tsp Cayenne pepper
  • 1 Egg white, lightly beaten
  • 2 Tbs seeds (poppy, sesame, caraway)
Instructions
  1. Combine the yeast, warm water and honey in a jug. Allow this to stand for 15 minutes until frothy.
  2. While the yeast matures, combine the flour, salt, ground hot paprika and cayenne pepper in a mixing bowl.
  3. Add the frothy yeast to the bowl. Using a wooden paddle stir this into the dry ingredients until a dough comes together.
  4. Turn the dough out onto a lightly floured work surface and knead it for 2 minutes until smooth. Wrap the dough in cling wrap and place it in your refrigerator for 45 minutes to firm up.
  5. Remove the dough from the refrigerator and divide it in half. Flatten one half and flour the outside if it is sticky. Pass it through your pasta roller on the widest setting. Fold it in half and pass it through again. Repeat this until the dough is silky smooth. Rub a little flour into the surface every time it becomes sticky.
  6. Reduce the thickness of the rollers by one step, pass the dough through, then another step and so on, until you reach number 5 on the machine.
  7. Dust both sides of the pastry with flour and put this aside while you roll out the second strip of pastry.
  8. Cut the pastry into triangles across the width of the pastry.
  9. Transfer the triangles to a lightly greased baking sheet and brush them with the egg white. Sprinkle the seeds of your choice onto the lavash.
  10. Using a fork prick holes into the pastry triangles. The closer you make the holes, the crispier and flatter the breads will be. If you make the holes further apart, the lavash will be lighter and airier, with bigger rising bubbles. The choice is yours.
  11. Bake the lavash in a preheated oven at 180c or 350f for 10 minutes until crisp and golden.
  12. Remove from the oven and serve hot or cold with the dipping sauces of your choice. In our serving we have uses our creamy lambs liver pate.


Homemade Phyllo Pastry. How to Make Perfect Filo / Fillo / Phyllo Pastry the Easy Way!!!

homemade phyllo pastry,, filo, phyllo, pastry, phyllo dough, filo dough, from scratch, greek filo pastry, homemade filo pastry, classic filo dough, homemade filo dough recipe, filo dough recipe, traditional filo dough, how to make filo dough, PhylloCups, homemade phyllo cups, how to make phyllo cups, how to make phyllo shells, athens phyllo, phyllo cups at home, chicken salad phyllo cups, easy phyllo cups


Homemade Phyllo Pastry. How to Make Perfect Filo / Fillo / Phyllo Pastry the Easy Way!!!
Author: 
Recipe type: Pastry / Dough
Cuisine: Greek
 
In this episode we make a batch of perfect phyllo / filo pastry at home. This pastry is very versatile and has as many uses as it has spellings and pronunciations.
Ingredients
  • 4 Cups all-purpose flour
  • 1 Tsp White vinegar
  • 1 Tsp Olive oil
  • 15ml Lemon Juice
  • 300ml Hot water (70c)
  • Flour for dusting
Instructions
  1. Place the four in your food processor. With the machine running on medium speed, drizzle the white wine vinegar, olive oil, and lemon juice into the flour.
  2. Allow this to run for 60 seconds until the liquid is very well distributed in the flour.
  3. Increase the speed of the machine to maximum an slowly pour in the hot water. Allow this to run for 60 seconds until the flour looks like a fine crumbly mass.
  4. Turn the the mixture out into a large mixing bowl. Using your hands, compress the mixture together into a single mass of dough.
  5. Turn the dough out onto your work surface and kneed it for 10 minutes. The dough is stiff and dry and you have to use bot hands to knead.
  6. At the 10 minute point the dough will still break apart, but don't be too concerned about this, your pasta roller will finish the kneading for you.
  7. Wrap the dough tightly in cling-wrap and allow it to rest in your refrigerator for at least 2 hours.
  8. Remove the dough and divide it into 10 pieces, using your scale.
  9. Working with one piece at a time, slightly flatten the dough and pass it through the pasta roller on its widest setting. Fold the dough in half and pass it through again. Repeat this another 4 or 5 times until the dough is silky smooth.
  10. Reduce the width of the roller to number 2, pass it through again. Then number 3, and so on.
  11. By the time you reach number 5 or 6, the dough will begin to feel damp. Lie it on the work surface and rub a little flour into both sides of the dough.
  12. Continue rolling, decreasing the thickness by one step each time, until you reach the thinnest setting, or number nine.
  13. By this stage you will have a long, paper-thin length of dough.
  14. Spread the dough over your work surface and lightly rub a little more flour into both sides of the pastry. Trim the ends square and cut the length in half. Stack the pastry, cover it with a damp tea towel and continue processing the remaining dough.
  15. If you're not using the pastry immediately, fold the it into quarters, wrap it loosely in cling-wrap and store in in your refrigerator for up to 10 days, or in your freezer for up to 3 months.


Barbecue Mutton Ribs – Mediterranean-Style Marinated Mutton Ribs Barbecued to Perfection!

barbecue mutton ribs,mediterranean barbecue mutton ribs,marinated mutton ribs,tender marinated mutton ribs,how to barbecue mutton ribs,how to marinate mutton ribs,how to barbecue mutton ribs,barbecue lamb ribs,mediterranean barbecue lamb ribs,marinated lamb ribs,tender marinated lamb ribs, barbecue lamb ribs, barbecue lamb ribs recipe, bbq mutton ribs recipe, barbecue lamb ribs oven, mutton ribs barbecue


Barbecue Mutton Ribs - Mediterranean-Style Marinated Mutton Ribs Barbecued to Perfection!
Author: 
Recipe type: Mutton / Lamb / Barbecue
Cuisine: Mediterranean / Greek
Prep time: 
Cook time: 
Total time: 
Serves: 2-4
 
Mutton ribs are full of awesome flavor, however they do require an acidic oil marinade and an extended cooking time to tenderise. These Mediterranean-style mutton ribs will have the crowds cheering!!!
Ingredients
  • 1.5kg Mutton or Lamb ribs (skin on)
For the Marinade
  • 30ml Lemon juice
  • 60ml Oil
  • 1½ Tsp Finely chopped garlic
  • 1 Tbs Finely chopped fresh marjoram
  • 1 Tbs Salt
  • 1 Tsp Sugar
Instructions
  1. To start you will need 2 racks of mutton ribs totaling about 1.5kg. Place them on your chopping board and score the skin into blocks of 1 inch or 25mm square. The skin contracts dramatically while grilling, and this scoring stops the racks from curling up and deforming during cooking.
  2. In a jug, combine the sugar, salt, finely chopped garlic, finely chopped fresh marjoram, oil and lemon juice. Whisk this vigorously until the salt and sugar have dissolved and the mixture has totally emulsified.
  3. Place the mutton in a large pan skin side up. Pour the marinade over the racks and brush it into the meat. Place the pan in your refrigerator and allow this to marinate for at least 4 hours, preferably overnight.
  4. Heat your barbecue to medium heat and grill the mutton ribs with the lid closed for 60 minutes turning every 15 minutes. The temperature should read around 150c. Use any remaining marinade to baste the mutton during the cooking process.
  5. Be aware that the ribs have a high fat content that can lead to flare-ups. If this happens, relocate the ribs to another part of the grill surface until the flames die. Turn the heat down slightly and return them to their original position.
  6. Remove the ribs from the grill and cut them apart before serving with the accompaniments of your choice.


How to Make Sundried Tomatoes in Your Oven. Perfectly Preserved Tomatoes with Brilliant Color.

sun dried tomato, dried tomatoes, Sundried tomatoes, how to make Sundried tomatoes, Sundried tomato recipe, dried tomatoes recipe, make sun dried tomato, Sun-dried Tomato, how to make sundried tomatoes in your oven, how to make your own sun dried tomatoes in the oven, Oven-Dried Tomatoes, easy oven dried tomatoes, homemade oven dried tomatoes, dried dehydrated tomatoes,sundried tomatoes in olive oil,hot to make sundried tomatoes in olive oil


How to Make Sundried Tomatoes in Your Oven. Perfectly Preserved Tomatoes with Brilliant Color.
Author: 
Recipe type: Vegetable / Preserving
Prep time: 
Total time: 
 
How to Make Sundried Tomatoes in Your Oven. This Episode shows you how to make perfectly preserved sundried tomatoes in your oven. Sundried tomatoes with perfect color and excellent shelf-life.
Ingredients
  • 12 Medium size tomatoes
  • ½ Tsp Bicarbonate of soda
  • ½ Tsp Saltpetre
  • 1 Tsp Salt
  • 1 Tsp Sugar
  • 250ml Water
Instructions
  1. Cut the tomatoes in half through the middle. If you prefer, you can skin the tomatoes first, and you can also scoop out the seeds. This is all entirely up to your personal preference. Removing the skin will temper a little of the acidity, but may result jn a less flavorful result. Removing the seeds has no effect on the flavor, but will certainly speed up the drying time.
  2. In a jug, combine the bicarbonate of soda, saltpeter, salt, sugar and water. Stir this until everything has dissolved.
  3. The bicarb preserves the amazing color of the tomatoes, while the saltpeter inhibits the growth of bacteria. Salt adds and enhances flavor, while the sugar combats the toughening effect salt has.
  4. Arrange the halved tomatoes on a rack in a large roasting tin. Brush the tomatoes liberally with the solution.
  5. Place the pan in your oven set to a temperature of 50c. Leave the door of the oven slightly open to allow moisture to escape.
  6. The drying time will be anything between 18 and 36 hours depending on the moisture content of the tomatoes, whether the tomatoes have been de-seeded, and whether they have been skinned.
  7. There is no formula and correct or incorrect procedure for the timing. I prefer my dried tomatoes leathery, but still soft and pliable. If you prefer yours totally dry and on the brittle side, then dry for longer.
  8. At this stage, you need to decide how you're going to store your dried tomatoes. The first way is to pack them in an airtight container, or to vacuum pack them in small quantities.
  9. I prefer mine in oil. To do this, pack them into a sterilized bottle and top the bottle up with oil until the tomatoes are covered. You can add raw garlic cloves and basil or marjoram leaves at this stage to further flavor the tomatoes. I prefer not to do this as it does limit your recipe choices if the tomatoes are already flavored.


Rustic Gourmet Artisan Pizza. How to Make aGourmet Artisan Pizza From Start to End.

no-knead pizza,artisan pizza,rustic artisan pizza,how to make artisan pizza from start to end,best pizza recipe,how to make no-knead pizza base,sour-dough pizza,sour-dough pizza base,sour dough pizza recipe,how to make sour dough pizza,easy sour dough pizza recipe,vegetarian sour dough pizza,vegan sour dough pizza,best sour dough pizza recipe,quick sour dough pizza recipe,Rustic Gourmet Artisan Pizza


Rustic Gourmet Artisan Pizza. How to Make aGourmet Artisan Pizza From Start to End.
Author: 
Recipe type: Pizza
Cuisine: Italian
Serves: 2
 
This pizza is absolutely delicious, with a super-crispy no-knead sour-dough crust topped with marinated mushrooms, sundried tomatoes, peppers, mature cheddar and mozzarella - then garnished with crispy deep-fried shoe-string onions, fresh basil and Parmesan shavings.
Ingredients
For the Dough
  • 500g Strong white flour
  • ¼ Tsp Yeast
  • 2 Tsp Salt
  • 375ml Water
For the Topping
  • 1 Portion marinated mushrooms
  • ¼ Green pepper, thinly sliced
  • ¼ Red pepper, thinly sliced
  • ¼ Yellow pepper, thinly sliced
  • 2 Tbs Sun-dried tomato, thinly sliced
  • 1 Handful fresh basil leaves
  • 60g Mature cheddar, shredded
  • 100g Mozzarella, cut into blocks
For the Garnish
Instructions
  1. Combine the strong white flour, yeast and salt in a large container. Make well in the center and pour in the water.
  2. Mix this until a dough comes together and it comes away from the sides of the container.
  3. Put the lid on the container and let this stand overnight at room temperature.
  4. For the toppings, slice the peppers into thin strips and cut the sun-dried tomato into strips.
  5. Open up your dough container. You will see that it doubled in size, and the gluten will be very well developed.
  6. Lightly oil a 30cm pan and press half of the dough out over the surface of the pan evenly. It helps to oil your hands when doing this.
  7. Transfer the pan to a preheated range set to medium high. Cook the base until the dough is well risen and the underside is well charred. Remove the pan from the heat and transfer the pizza to a baking sheet.
  8. Cool the pan under cold running water for a minute before continuing with the second base.
  9. To make up the pizzas, spread half of the shredded cheddar across each base.
  10. Spread half the mushrooms across each base, followed by the mixed peppers and sun-dried tomatoes.
  11. Scatter the cubed mozzarella across each base along with some of the fresh basil leaves.
  12. Heat your oven to maximum...
  13. Slide the pizzas from the baking sheets directly onto the rack in your oven. Bake the pizzas until the upper crust of the pizza is golden and the cheese is well melted.
  14. Remove them from the oven, garnish with shoe-string onions, more fresh basil and shavings of Parmesan.


How to Make Garlic Bread. Make the Most Delicious Garlic Bread Using Baguettes.

how to make garlic bread,how to make garlic bread with baguettes,how to make garlic french bread,, garlic bread recipe, Garlic Bread (Dish), how to make, homemade, homemade garlic bread recipe, healthy garlic bread, cheesy garlic bread recipe, how to make garlic bread from scratch, how to make garlic bread in oven, how to make garlic bread at home, how to make garlic bread from scratch


How to Make Garlic Bread. Make the Most Delicious Garlic Bread Using Baguettes.
Author: 
Recipe type: Bread
Cuisine: French
Prep time: 
Cook time: 
Total time: 
Serves: 4-8
 
In our previous video we baked two stunning traditional French Baguettes. This video show you how to make Garlic Bread using these 2 loaves.
Ingredients
  • 2 x 14 inch Baguettes
  • 100g Butter
  • 30g Minced garlic
  • ½ Tsp Salt (optional)
Instructions
  1. Mix 30g of minced garlic into 100g of softened butter and the salt.
  2. Working with one loaf at a time, slice the loaves leaving the bases intact.
  3. Open up the slices and spread a generous dose of garlic butter between each slice.
  4. Place each loaf on a sheet of foil and spread any remaining butter over the top of the baguettes.
  5. Fold the foil over the top and twist the ends.
  6. Bake the loaves in a preheated oven at 180c or 350f for 20 minutes.
  7. Remove the loaves from the oven, unwrap them and serve immediately.


Deep-Fried Camembert / Brie. Crispy Fried Camembert or Brie Served with Preserved Figs.

Deep-Fried Camembert / Brie,deep fried camembet,deep fried brie,how to deep-fry camembert or brie cheese,crispy deep-fried camembert,crispy deep-fried brie cheese,the secret to deepfrying camembert,how to make deep-fried camembert or brie,deep--fried camembert or brie with preserved figs, Brie (Cheese), camembert,deep-fried, recipe, how to make, brie recipes, brie appetizers, brie desserts, Camembert (Cheese), camembert cheese recipes, receta con queso brie, breaded brie cheese recipe


Deep-Fried Camembert / Brie. Crispy Fried Camembert or Brie Served with Preserved Figs.
Author: 
Recipe type: Cheese / Starter / Dessert
Cuisine: French
Prep time: 
Cook time: 
Total time: 
Serves: 2
 
Deep-Fried Camembert / Brie. Deep-fried camembert or brie is absolutely amazing - soft and runny on the inside and crisp and crunchy on the outside. The trick to getting this right is in the coating - check out the video to find out more!
Ingredients
  • 125g Camembert or Brie cheese
For the Coating
  • ½ Cup finely crushed cornflakes mixed with ½ cup all purpose flour
  • ½ Cup tapioca flour or cornflour
  • 2 Eggs lightly beaten
For the Garnish
  • 6 Preserved green figs & a little fig syrup
  • Cashew nuts
Instructions
  1. Cut the cheese into 4 wedges.
  2. Before you coat the cheese, sprinkle a layer of the cornflake crumb mix over a platter. This stops the coating on the cheese from sticking to the platter while the coating sets.
  3. To coat the cheese, dip it in the egg wetting it all over.
  4. Dredge it in the tapioca or corn flour.
  5. Then dip it in the egg again making sure to wet all of the cornflour.
  6. Then it's into the cornflake mixture making sure to get a good solid coating all over.
  7. Then back into the egg making sure to wet all of the cornflake mixture.
  8. And finally another good solid coating of the cornflake mixture.
  9. This may seem like overkill, but the cheese melts very quickly and this good coating inhibits it leaking into the oil while frying.
  10. Transfer the coated cheese to the platter and allow the coating to set for 20 minutes.
  11. Fill a saucepan with oil to a depth of 50mm or 2 inches and heat this to 170c or 325f.
  12. Deep fry the cheese for 3 minutes turning halfway through.
  13. Remove the cheese from the oil and drain on kitchen paper.
  14. Transfer the cheese wedges to platters. Serve with lightly crushed preserved figs, some of the fig syrup and salted cashew nuts.


Black Olive, Feta & Spinach Muffins. Savory Muffins Recipe with a Taste of the Mediterranean.

savory muffins recipe,savoury muffins recipe,how to make savory muffins,how to make savoury muffins,Black Olive Feta & Spinach Muffins,muffins using olives and feta,muffins using spinach and feta,muffins using black olives and feta,mediterranean style muffins,muffins with feta cheese,muffins in baking paper,make muffins using baking paper,savory muffin recipe vegetarian, savory muffins recipe easy, savory muffin recipes healthy, savory muffin recipe breakfast


Black Olive, Feta & Spinach Muffins. Savory Muffins Recipe with a Taste of the Mediterranean.
Author: 
Recipe type: Baking / Muffins / Breakfast
Prep time: 
Cook time: 
Total time: 
Serves: 12
 
These olive, feta and spinach muffins are dead-easy and quick to make. The flavor is outstanding, and this is simply the best savory muffins recipe around.
Ingredients
  • 240g Self-raising flour
  • 3ml Salt
  • 10ml Baking powder
  • 60g Baby spinach, finely chopped
  • 200g Feta cheese
  • 200g Balck olives, pitted and cut into rounds
  • 1 Egg
  • 300ml Milk
  • 50ml Melted butter
Instructions
  1. Sift the flour, salt and baking powder into a large mixing bowl.
  2. Add the finely chopped baby spinach and the black olive rounds and mix them into the flour, then crumble in the feta cheese.
  3. In a jug, whisk together the milk, egg and melted butter, and pour this into the mixing bowl.
  4. Using a wooden paddle, mix the batter until all of the ingredients are just wet. Over-mixing the batter will result in tough muffins.
  5. Press a square of baking paper into one of the muffin pan holes then fill this with batter. The weight of the batter will hold the paper in place. Continue this until all 12 holes are filled with equal amounts of batter.
  6. Bake the muffins in a preheated oven at 180c or 350f for 30 minutes. Test for doneness by pressing a toothpick or skewer into one of the muffins. If it comes out clean, the muffins are ready, if not, return them to the oven for another 5 minutes.
  7. Remove the muffins from the oven and allow them to cool for 20 minutes on a wire rack before serving.


Greek Style Whole Stuffed Fish. Whole baked fish, stuffed with feta, olives, lemon zest and chives.

whole baked fish,whole fish stuffed and baked,how to stuff a fish,greek style whole fish,fish stuffed with feta and olives,mediterranean stuffed fish,how to bake whole fish,feta and olive stuffed fish,whole stuffed fish,stuffed whole fish, stuffed whole fish recipe, stuffed baked fish, stuffed baked fish recipes easy, stuffed roasted fish, stuffed baked whole fish recipes, grilled stuffed whole fish, herb stuffed whole fish, stuffed fish recipes


Greek Style Whole Stuffed Fish. Whole baked fish, stuffed with feta, olives, lemon zest and chives.
Author: 
Recipe type: Seafood / Fish
Cuisine: Mediterranean / Greek
Prep time: 
Cook time: 
Total time: 
Serves: 2
 
Greek / Mediterranean style baked fish stuffed with feta, olives, chives and lemon zest is really easy to do and will have your guests applauding. Succulent whole fish infused with the flavors of Greece.
Ingredients
  • 1 x 500g Red Snapper, Red Roman or any tall body fish
  • 8 Calamata olives, pitted and cut into rounds
  • 70g Feta cheese
  • 3 Tbs Chives finely chopped
  • 3 Tbs Lemon zest
  • 1 Tbs Olive oil
  • Melted butter to baste
Instructions
  1. Have your fishmonger gut, scale and defin the fish, then butterfly the fish, including the head.
  2. Place the feta in a bowl and pour the olive oil over the cheese. Using a fork, mash the feta until the oil has been absorbed.
  3. Add the olives, chives and zest and mix this in.
  4. Open the fish and spoon the feta mixture into the fish keeping everything closer to the dorsal side.
  5. Close the fish and press it firmly down to compress the filling.
  6. Using butchers twine, tie the fish closed, taking care not to tie too tightly as this will cause the fish to tear while cooking.
  7. Brush the fish liberally with melted butter.
  8. Bake the fish in a preheated oven at 180c / 350f for 20 minutes. Remove the fish and baste again with the butter in the pan.
  9. Return the fish to the oven and bake for a further 15 minute.
  10. Remove the fish from the oven, cut and remove the twine, and serve immediately.


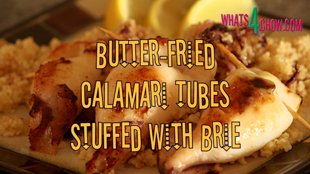
Butter fried Calamari / Squid Stuffed with Brie Served with Lemon Butter Couscous.

butter-fried calamari,pan-fried calamari,butter-fried stuffed calamari,pan-fried stuffed calamari,butter-fried squid,pan-fried squid,butter-fried stuffed squid,pan-fried stuffed squid,calamari stuffed with brie cheese,squid stuffed with brie cheese,stuffed calamari recipe,stuffed squid recipe,how to stuff calamari,how to stuff squid, stuffed calamari in a pan, grilled calamari stuffed with feta and herbs, stuffed calamari tubes recipes, stuffed squid recipe,episode 105 What4Chow.com


Butter fried Calamari / Squid Stuffed with Brie Served with Lemon Butter Couscous.
Author: 
Recipe type: Seafood
Prep time: 
Cook time: 
Total time: 
Serves: 2
 
This recipe for butter-fried calamari stuffed with brie, is quick and simple. The recipe will make 2 starter portions, but can be scaled up to any quantity required. The calamri tubes are stuffed with brie cheese, then pan-fried in butter, served on a bed of lemon-butter couscous.
Ingredients
  • 6 Young calamari tubes
  • 6 Young calamari tentacles (optional)
  • 100g Brie cheese
  • 50g Butter
  • 1½ Cups cooked couscous (see recipe here)
  • 1 Medium lemon
Instructions
  1. Cut the brie cheese into batons.
  2. Press 2 cheese batons into each calamari tube, then secure the ends of the tubes with toothpicks.
  3. Heat your pan over medium high heat and add the butter.
  4. When the butter is bubbling, add the calamari tubes.
  5. Fry the tubes for 3 minutes per side, then remove from the pan.
  6. If you have the tentacles, add them to the pan now and fry for 60 seconds.
  7. Add the couscous to the pan and stir this to heat it through, and to absorb all of the butter.
  8. Squeeze the juice of the 2 lemon halves over the couscous, stir it in, and remove the pan from the heat.
  9. Divide the couscous between 2 starter size platters, top each with 3 of the calamari tubes and serve with lemon wedges.


Crispy Deep fried Calamari Stuffed with Parmesan Lemon Rice. Crisp fried squid tubes stuffed with parmesan-lemon rice.

stuffed calamari,stuffed squid,deep-fried stuffed calamari,deep-fried stuffed squid,stuffed calamari recipe,stuffed squid recipe,crispy fried stuffed calamari,cripy fried stuffed squid recipe, stuffed calamari tubes recipes, stuffed calamari tubes with rice, stuffed calamari greek style, stuffed calamari sicilian style, how to make stuffed calamari,calamari recipe,squid recipe,how to cook calamari tubes,how to cook squid tubes


Crispy Deep fried Calamari Stuffed with Parmesan Lemon Rice. Crisp fried squid tubes stuffed with parmesan-lemon rice.
Author: 
Recipe type: Seafood
Cuisine: Mediterranean
Prep time: 
Cook time: 
Total time: 
 
Tender young calamari tubes stuffed with parmesan-lemon rice, crumbed and deep-fried to crispy, golden perfection. There are hundreds of stuffed calamari / squid recipes, so here is something a bit different to the rest.
Ingredients
For the filling
  • 120g / 12 Tbs Cooked long-grain rice
  • 20g Finely grated parmesan
  • 3 Tbs Lemon zest
  • ½ Tsp Salt
  • ½ Tsp Lemon pepper
  • ½ Tsp Garlic powder
To marinate the tentacles
  • Juice of half a lemon
  • Pinch of lemon pepper
  • Pinch of salt
For the coating
  • ½ Cup finely crushed cornfalkes mixed with ½ cup all-purpose flour
  • ½ Cup Tapioca flour
  • 2 Eggs lightly beaten
Other
  • 8 Young whole calamari including tentacles
  • Oil for frying
Instructions
  1. Combine all of the stuffing ingredients.
  2. Place the tentacles on a plate, squeeze the lemon juice over the tentacles, season with lemon pepper and salt.
  3. Using a narrow spoon, fill each calamari tube with 1½ Tbs of the rice mixture, then secure the ends of the tubes with toothpicks.
  4. To coat the tube, dredge the tubes in the tapioca flour, then the egg, followed by a good coating of the cornflake mixture.
  5. Transfer the tubes to a platter and allow the coating to set for 20 minutes.
  6. Half-fill your pan with oil, heat this to 180c / 350f.
  7. Carefully slide the tubes into the oil and fry for 90 seconds per side, then remove and drain on kitchen paper.
  8. Add the tentacles to the pan -- stand back when you do this, the oil will react quite violently to this.
  9. Fry the tentacles until the oil calms - about 45 seconds.
  10. Remove the tentacles from the oil and drain on kitchen paper.
  11. Arrange the tubes and tentacles on a platter and serve immediately with lemon wedges.


Scroll to top

Kitchen Conversions

Convert:
Masses
to:
Volumes
to:
Temperatures
to:
Lengths
to: