Recipes & Videos

How to Make Long Eggs – Long Cylindrical Eggs Made Easy!!!

long eggs, cylinder eggs, how to, how to make, how to make long eggs, homemade long eggs, easy long eggs, simple long eggs, making long eggs at home, make long eggs for slicing, long eggs for salads, best way to make long eggs, eggs, long, cooking, recipes, food, recipe, make long eggs without special equipment, making cylinder eggs, eggs in a cylinder, how to stretch eggs, uniform egg slices for salads,


How to Make Long Eggs - Long Cylindrical Eggs Made Easy!!!
Author: 
Recipe type: Eggs / Breakfast / Salads
 
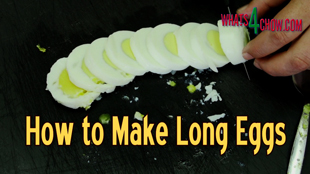
Long eggs allow you to slice uniform cooked egg slices to dress salads, garnish breakfast, and simply confuse your guests. After visiting a long egg factory, I decided to see whether it was possible, and practical to make these at home without all the fancy equipment.
Ingredients
  • 4 x Large eggs
Equipment Required
  • 1 x Elastic band (long, or more joined)
  • 1 x 100ml Measuring cylinder
  • 1 x 250ml Hi-ball tumbler
  • 1 x Digital pot or pot on induction range
Instructions
  1. To start, separate the egg yolks from the whites and whisk both thoroughly.
  2. Loop the elastic over one handle of your pot, stretch it across the pot and loop it over the other handle.
  3. Place the high-ball tumbler in the center of the pot.
  4. Invert the measuring cylinder and position this in the center of the tumbler.
  5. Lift the elastic band and position this across the center of the measuring cylinder. This will prevent the the tumbler and cylinder from floating when the pot is filled with water.
  6. Pour the egg white into the space between the cylinder and the tumbler.
  7. Fill the pot with hot water until the water level is about a half inch above the level of the egg white.
  8. When I say hot water, the water must be around 60c or 120f. If it is too hot, the tumbler could crack. This heat also prepares the tumbler for the heat to come.
  9. Set the temperature of your pot or induction cooker to 85c.
  10. Place a thermometer into the pot to monitor the temperature. When the temp hits 80c,start your timer. 30 minutes after this point, the egg white will be sufficiently set.
  11. Remove the elastic band. Carefully remove the measuring cylinder from the egg white leaving the set egg white with a gaping tunnel all the way through it.
  12. It helps the jiggle the cylinder back and forth to allow a little air down the side of the cylinder to break the vacuum below.
  13. Place a funnel into the center of the egg white and pour in the egg yolk until it is level with the top of the white.
  14. By this stage the temperature of the water will be at your target of 85c.
  15. Allow this to cook for a further 35 to 40 minutes.
  16. Towards the end of this time, you can test the egg yellow with a skewer. When it comes out of the yellow dry, the yolk has set properly.
  17. Remove the tumbler from the water.
  18. Using the handle of a dessert spoon press the handle carefully down the side of the egg. Work your way all the way around the edge of the egg.
  19. This will allow air into the glass and the egg will slide out much easier.
  20. All that remains is to slice your cylinder egg slices....


Serious Distilling with Brewcraft, Still Spirits and Grainfather – How to Make Flavoring Essences

flavoring spirits, home brewing, home distilling, how to, how to make, homemade, making essences, essence for flavoring spirits, making liqueur, homemade liqueuer, still spirits t500, still spirits distilling, still spirits home distilling, making flavorings for homemade liqueur, how to make kahlua coffe liqueur, homemade kahlua coffe liqueur, how to make coffee liqueur, how to make liqueurs, mixing liqueur flavorings, homemade liqueur flavoring,


Serious Distilling with Brewcraft, Still Spirits and Grainfather - How to Make Flavoring Essences
Author: 
Recipe type: Home Distilling
 
In our previous distilling episode we looked at the range of Still Spirits essences used to create commercial grade liquor products. Today we're going to get creative and look at how to make these essences from scratch, and flavor the high quality alcohol batch from the Still Spirits T500 reflux distiller. This technique can be used to extract essence from any liquid, including fruit juices, herb infusions, coffee, tea and spice infusions. Today we're going to use coffee to make an amazing coffee essence.
Ingredients
  • 800ml Strong espresso
  • 20g Gelatin
  • 5ml Vanilla extract
To Make "Kahlua" Coffee liqueur
  • 250g Corn syrup
Instructions
  1. To start, we need to brew 4 double shots of really strong espresso.
  2. Pour these into a large heat proof jug.... the total volume will bee 800ml.
  3. Pour the gelatin into the hot espresso and stir it thoroughly until dissolved. You can use either bovine or plant based gelatin.
  4. Add the vanilla extract and stir this in.
  5. Allow the mixture to cool and transfer it to your freezer for a full 24 hours.
  6. The following day, place a colander over a large bowl. Line the colander with cheese cloth, or use a new kitchen wipe as I am doing.
  7. Remove the frozen coffee mixture from the freezer. Dip the bottom of the jug in a sink of hot water and turn the frozen block out into the colander.
  8. Allow this to stand and drip for a few hours. Once the block is soft and spongy, lift the edges of the cloth and squeeze out any remaining liquid trapped in the gelatin.
  9. The yield from 800ml of espresso will be 500ml.
  10. This is the essence. From this point you can reduce and sweeten the essence, or use it as is.
To Use it As Is
  1. Dilute 375ml alcohol to 40% ABV.
  2. Mix 375ml of the coffee essence with the alcohol.
  3. Bottle the alcohol in suitable bottles and you're done.
To Make Kahlua-Style Coffee Liqueur
  1. Dilute 250ml of alcohol to 60% ABV.
  2. Place 500ml essence in a small saucepan, bring it to a simmer and allow to continue until it has reduced by 50%
  3. Combine the alcohol and reduced essence with 250g of corn syrup. Mix thoroughly to combine.
  4. Bottle the liqueur in suitable bottles and you're done!!!


How to Make Egg Rolls – Egg Rolls au Gratin – Superbly Tasty Egg Rolls

egg rolls recipe, cooking, breakfast, cocktail snacks, finger snacks, finger foods, how to, how to make, homemade, egg rolls, japanese omelette recipe, sliced egg rolls, easy egg roll recipe, egg roll recipe youtube, egg roll recipe video, rolls, egg, recipe, food, egg recipes, best egg roll recipe, omelette recipe, best omelette recipe, cheesy egg roll, 2 cheese egg roll, salami and cheese egg roll, breakfast recipes, cocktail party recipes, snack platter recipes, best recipes,


How to Make Egg Rolls - Egg Rolls au Gratin - Superbly Tasty Egg Rolls
Author: 
Recipe type: Eggs / Breakfast
 
Egg rolls are an all-time favorite. These eggs rolls reign supreme in the realm of egg rolls, and whether you serve them as finger snacks or as an accompaniment to breakfast, you will never be disappointed.
Ingredients
  • 4 Large eggs
  • 1 Tomato
  • 50g Good quality aged salami
  • 50g Finely shredded Parmesan cheese
  • 100g finely shredded mature cheddar cheese
  • 45ml Snipped garlic chives
  • 15ml Butter for frying
  • Salt and cracked black pepper to taste
  • Cayenne pepper for garnishing
Instructions
  1. To start, slice the tomato into thin slices.
  2. Slice the cured, aged salami into 1mm slices.
  3. Finely shred the Parmesan cheese.
  4. Whisk the eggs thoroughly... there must be no albumen visible in the egg.
  5. Finely shred the mature cheddar cheese, and snip about 3 tablespoons of fresh garlic chives.
  6. Add a tablespoon of butter to a 32cm pan. When the butter is sizzling, spread it around to coat the base of the pan.
  7. Pour in the egg and swirl it around to spread it evenly across the pan.
  8. Sprinkle 2 thirds of the chopped chives over the egg, followed by half of the shredded Parmesan cheese.
  9. Spread the thinly sliced salami across the egg, followed by the second half of the Parmesan cheese.
  10. Arrange the thinly sliced tomato around the edge of the pan with any leftover slices in the center.
  11. Season the whole lot with salt and cracked black pepper and remove the pan from the heat.
  12. Slide the egg from the pan onto a large chopping board.
  13. Sprinkle half of the mature cheddar cheese over the egg.
  14. For this part, you need teflon fingers.... starting on one side, roll the egg up as tightly as you can. If you don't have heat-proof fingers, allow the egg to cool for a few minutes first.
  15. Trim off the ends of the roll. This step is the most important of all.... put the ends in your mouth and enjoy the first taste.
  16. Cut the remaining roll into slices of 15mm or 3 quarter inch thick.
  17. These can be served just the way they are, but going the extra mile makes them extra special....
  18. Transfer the rolls to a baking sheet and sprinkle the second half of the cheddar cheese over the rolls.
  19. Place the pan in the center of your oven with just the grilling element on full blast for 5 minutes.
  20. Serve the egg rolls au gratin sprinkled with dusting of cayenne pepper and garnished with the remaining snipped chives.


How to Make Square Burger Patties – Perfect Burger Patty Production with No Specialized Equipment!!!

burgers, patties, burger patty, burger patties, how to, how to make, burger patty recipe, burger patty mixture, burger patty recipe youtube, how to make burger patties, square burger patties, how to make square burger patties, cooking, food, barbecue, recipes, unusual burger patty, unusaul burger patties, homemade burger patties, make burger patties at home, burger, recipe, best burger patty recipe, gourmet burger patty recipe, gourmet burgers, make gourmet burgers at home,


How to Make Square Burger Patties - Perfect Burger Patty Production with No Specialized Equipment!!!
Author: 
Recipe type: Burgers
 
Making square burger patties takes a whole load of hassle out of making patties for large crowds of people. No specialized equipment is required and the whole process is foolproof.
Ingredients
  • 75ml Onion flakes
  • 15ml Salt
  • 7.5ml White pepper
  • 1.4kg Good quality ground beef
  • 10% Weight of meat in liquid - Worcestershire sauce / Light soy sauce / Beef stock / Water
Instructions
  1. Place the dried onion flakes, salt and white pepper into your spice grinder.
  2. Zap these until you have a fine powder.
  3. Place the ground beef in the bowl of your stand mixer and add the seasoning.
  4. You also need to add 10% of the weight of the meat in liquid. I am using Worcestershire sauce, however you can use light soy sauce, stock, or even plain water.
  5. Attach the dough hook, close the mixer and switch it on. Start slow and gradually increase the speed to medium. The meat must mix for 8 minutes. It will try to climb the sides of the bowl while mixing. Use something to help it back down to the bottom of the bowl.
  6. During the mixing process, the salt reacts with the protein in the meat causing it emulsify. This is what keeps the patties together when they are formed.
  7. Line a 10 inch by 14 inch baking sheet with cling-wrap.
  8. Tip the meat mixture into the pan and flatten it out.
  9. Pull another length of cling-wrap over the top of the pan.
  10. Use your rolling pin to roll and compress the ground beef into the tray until it is level with the edges. Any excess meat will simply squeeze out from the edges and can be cleared in the next step.
  11. Place the pan in your freezer for 30 minutes to firm up.
  12. Turn the slab of beef out onto a large chopping board.
  13. Trim away any excess meat.
  14. Keeping the cling-wrap in place, cut the slab into 12 equal squares for 100g patties or 6 pieces for giant 200g patties, as I am doing here.
  15. At this point, these can be wrapped and frozen, or grilled.
  16. Using a heavy pan or skillet over medium high heat, add 20g of butter.
  17. When the butter is sizzling, add the patties and grill them for 5 to 6 minutes per side until nicely charred and caramelized both sides.
  18. And there it is... the easiest way to make perfectly uniform, tasty patties with an amazing texture that will not fall apart, even on the barbecue.


Super Extra Crispy Deep Fried Chicken Wings – These Chicken Wings are Unbelievably Crispy and Yummy!

chicken wings, crispy, extra crispy, deep fried, how to make, how to, homemade, recipe, cooking, chicken recipes, how to make super crispy chicken wings, how to make extra crispy chicken wings, how to deep-fry chicken wings, crispy coating for chicken wings, very crispy chicken wings, crispy deep-fried chicken wings, make chicken wings at home, buffalo wings, buffalo wings recipe, crispy buffalo wings, extra crispy buffalo wings recipe, how to make extra crisp buffalo wings,


Super Extra Crispy Deep Fried Chicken Wings - These Chicken Wings are Unbelievably Crispy and Yummy!
Author: 
Recipe type: Chicken
 
Just a week or so ago we published the super-crispy pigs wings. The video was met with much interest, and quite a few of our viewers asked me to do the same super-crispy coating using chicken wings..... and here it is.
Ingredients
  • 8-12 Full chicken wings (16-24 winglets)
  • Oil for frying
  • 120ml Chicken seasoning of your choice
  • 500ml All purpose flour
  • 30ml Salt
  • 60ml Cornstarch
  • 140ml Chicken stock
  • 2 Eggs
Instructions
  1. To start, trim of the wing tips and cut through the center joint of each wing.
  2. Place the wings in a large pan in a single layer. Sprinkle half of the seasoning of your choice evenly over the wings making sure to coat both sides.
  3. Transfer the wings to a large vacuum bag in a single layer and vacuum seal the bag. It is always a good idea to double seal both ends of the bag.
  4. Place the bag in your dishwasher on the high setting, or 70c, and let this wash for 60 minutes. Alternatively place the bag in a digital pot with temperature control at 70c and let it cook for 60 minutes.
  5. While the wings cook, add the other half of the seasoning to the flour and cornstarch and mix this until combined.
  6. Pour chicken stock into the seasoned flour a little at a time, using a whisk to mix it into the flour. If the whisk gets clogged, simply clear it and continue until all of the stock is added.
  7. Put this aside to dry a little while the chicken completes its cycle in the dishwasher or pot.
  8. Once the cycle completes, get into the coating with your hands and break down any bits that are too big.
  9. Remove the wings from the bag. Notice that there is almost no weight loss.
  10. Whisk the eggs in a large bowl. Working with one wing at a time, dip the wing in the egg to wet it all over.
  11. Drop the chicken into the coating and dredge it to get a good solid coating all over.
  12. Transfer the coated wing to a platter to set while you continue with the rest of the wings.
  13. Allow the coating to set for 20 minutes before continuing.
  14. Half fill your wok or large pan with oil and heat this to 160c or 320f.
  15. Fry the wings for 4 to 6 minutes until super-crispy and golden.
  16. Remove them from the oil and drain any excess oil on kitchen paper.
  17. Serve the wings immediately and savor the incredibly crispy and tasty treats.


Serious Distilling with Brewcraft, Still Spirits & Grainfather – Blending Still Spirits’ Essences

home brewing, making liquor at home, home distilling, distilling at home, making alcohol at home, homemade alcohol, booze making at home, still, distilling, spirits, home distilling, still pirits t500, still spirits reflux still, still spirits flavor sachets, blending still spirits flavor sachets, still spirits flavor packs, how to, how to blend, still spirits alcohol sachets flavorings, how to use still spirits flavorings, using still spirits flavorings, brewcraft,

Hi and welcome to episode 540 with Whats4Chow.com and the next episode of Serious Distilling with Brewcraft, Still Spirits and Grainfather.
Over our 2 previous distilling episodes we distilled a batch of wash through the Still Spirits Turbo 500 reflux distiller, then filtered the product through the Still Spirits Carbon Filter System.
Today we’re going to look at some important points regarding using the Still Spirits essences or flavor packs.
The essences come packaged in sachets and all of the blending instructions are clearly printed on each pack.
This makes it really simple to blend your favorite drinks, however there are a few points to look out for.
The first point is that not all of the packs make the same quantity of product. so you do need to read the instructions and yield quantities really carefully otherwise you may end up with an end product that is either too strong or too weak… be this in alcohol terms or flavor.
The second and most important point to keep in mind is the alcohol content of the drink you are making. For instance, if you are blending a whiskey, then the target alcohol ABV is 43%. This is easy enough, however, some spirits like spiced golden rum is only 37%. If you inadvertently mix it to 43%, it will be far stronger than it should be in alcohol terms. You can find the target alcohol contents on the labels of the original drinks you are emulating, or simply Google the respective drinks to find this information.
This point becomes particularly relevant when blending the liqueurs and cream based liqueurs. These can have an alcohol content spanning anything from 13% to 33% ABV. So as you can see, it is good to do your homework before mixing.
That said, Still Spirits make dozens of different flavoring essences, and you see these on the Brewcraft website… Brewcraft.co.za
Now you ask, “Just how good are the Still Spirits Essences?”
I mixed up a range of these including the Spiced Golden Rum, the Bourbon, a Single Malt Whiskey and a range of the liqueurs. I bottled these up and I was ready for the big test.
We live on a golf range, and the clubhouse is literally 500m from my front door. I dropped the load off with the owner, Frans Hartshorn, and asked him to conduct a blind taste test with a dozen of his high-end customers. Note that I gave them to him…. selling the stuff is illegal, unless you have the license to produce for resale.
After a few days, I checked back with him. No-one could distinguish the difference between the single malt whiskey and the corresponding famous commercial brand, and the same result came back for every single spirit and liqueur.
In summary, these essences are absolutely outstanding.
Some distillers who are more into alembic distilling, blending and aging do comment that this takes all of the art and fun out of distilling, however if you want to make super-high quality spirits and liqueurs comparably to high-end commercial brands, with no frustration and no aging time, this is a sure winner. For those wanting to get a little more creative, our next distilling episode will cover making a homemade essence and blending it with a T500 alcohol batch.
Thanks for joining us today, please give us a thumbs up, subscribe to our channel if you haven’t already done so, share this with your family and friends, and we’ll see you again tomorrow.

Bacon, Mushroom and Chive Dipping Sauce – Simply the Best Dip Recipe EVER!!!

dip recipe, party dip recipe, superbowl dip recipe, dipping sauce recipe, best dip ever, best dip recipe ever, best dipping sauce recipe, how to make a good party dip, easy party dip recipe, cocktail snack recipe, cocktail party recipe, homemade party dip recipe, how to, how to make, how to make the best dipping sauce, how to make a great dipping suace, party and cocktail dip recipes, cocktail party recipes, finger food recipes, catering recipes, cooking, culinary, be a chef,


Bacon, Mushroom and Chive Dipping Sauce - Simply the Best Dip Recipe EVER!!!
Author: 
Recipe type: Cocktail Snacks / Party Snacks
 
Today we're going to make the most amazing dip I have ever tasted. This bacon, mushroom and chive dip works equally well as a spread, as a filling for baked potatoes and even as a topping over steaks.
Ingredients
  • 400g White mushrooms (you can also use Portabellini or Porcini)
  • 200g Good quality oak or hickory smoked streaky bacon
  • 30g + 30g Butter
  • 250ml Cultured sour cream
  • 250g Cream cheese (Chive flavored)
  • (add 30ml of finely chopped fresh chives if you cannot find flavored cream cheese)
  • Crostini to serve
Instructions
  1. Chop the mushrooms into thin slices and put these aside.
  2. Cut the streaky bacon across the grain into thin slices. Try to use properly smoked bacon as this adds a tremendous depth to the flavor of the dip.
  3. Heat a large pan over medium high heat and add the bacon.
  4. Stirfry the bacon for 5 to 6 minutes until it starts to caramelize on the edges.
  5. Add the mushrooms along with 30g of butter. Continue to stirfry this for 2 minutes.
  6. Add a further 30g of butter. Continue to stirfry the mixture until deep golden and caramelized. This will take 6 to 8 minutes.
  7. Transfer the bacon mushroom mixture to a tall jug.
  8. Add the sour cream and chive flavored cream cheese to the jug. If you cannot find flavored cream cheese, simply add 30ml of finely chopped fresh chives to the mixture.
  9. Use your stick blender to zap this all until fine.
  10. To serve, slice a few French rolls into slices and toast them lightly under the grill in your oven until lightly golden.
  11. Arrange the slices around a platter accompanied with the best dip ever.


How to Make Chicken Paprikash – Traditional Hungarian Chicken Paprikash Recipe Made Easy!!!


How to Make Chicken Paprikash - Traditional Hungarian Chicken Paprikash Recipe Made Easy!!!
Author: 
Recipe type: Chicken
Cuisine: Hungarian
Serves: 4-6
 
Chicken Paprikash is a traditional Hungarian dish. Flavored primarily with hot, smoked paprika, it is uniquely aromatic and tasty.
Ingredients
  • 6 Chicken drumsticks
  • 6 Chicken thighs
  • 15ml Hungarian hot, smoked paprika
  • 5ml Salt
  • 5ml Cracked black pepper
  • 2 Red bell peppers
  • 2 Tomatoes
  • 1 Liter chicken stock
  • 20ml Crushed garlic
  • 20ml Olive oil
  • 2 Onions
  • 30ml Chopped parsley
  • Salt and pepper to taste
  • 75ml Cornstarch mixed with a little water
  • Spatzle, Mash or Pasta to serve
Instructions
  1. To start, measure out the hot, smoked paprika, salt and cracked black pepper. Place these in a bowl and mix to combine.
  2. Transfer the paprika mixture to a sprinkle bottle.
  3. Place the chicken in a large pan skin-side up and sprinkle all of the paprika mixture evenly over the chicken.
  4. Use a carving fork to poke holes through the chicken pieces then put this aside.
  5. Cut the red peppers into chunks, dice the tomatoes and crush the garlic. Place this all in a tall jug and use your stick blender to puree the whole lot until fine. You can also do this in a stand blender or food processor.
  6. Slice the onions into half rounds, and measure out the olive oil.
  7. Heat a large pan over medium heat and add the oil. Add the onions and sauté this for 8 to 10 minutes until they are browning nicely on the edges.
  8. Add the chicken pieces to the pan with the seasoned side facing downwards. Allow this to fry for 5 minutes.
  9. At the 5 minute mark, turn the chicken pieces over and fry them for a further 5 minutes.
  10. After the second 5 minutes add the pureed vegetables to the pan.
  11. Pour in enough chicken stock to almost cover the chicken.
  12. Bring this to a boil, lower the heat and allow this to simmer, for 30 minutes.
  13. At the 30 minute mark, turn the chicken pieces over and continue simmering for a further 30 minutes.
  14. After the second 30 minute cycle, remove the chicken pieces from the pan.
  15. Mix the cornstarch with a little water and add this to the sauce.
  16. Bring the sauce back to a boil and allow this to cook for a minute or two, stirring continuously until it has thickened. Season the sauce with salt and pepper to taste.
  17. Serve the chicken immediately smothered in the rich sauce. Traditionally paprikash is served with spatzels, however you can use mashed potatoes or even pasta.


The Still Spirits Carbon Filter System for Reflux Distilled Alcohol

still spirits, carbon filter, filtering alcohol, still spirits carbon filter system, how to filter alcohol, turbo 500, still spirits turbo 500, home brewing, home distilling, making alcohol at home, homemade alcohol, distilling at home, distilling alcohol, making booze at home, reflux distilling, reflux distilling at home, alembic distilling, alembic distilling at home, spirits, alcohol, still, filter, carbon, how to, how to make, cooking, recipe,

Unboxing and Assembling the Still Spirits Carbon Filter System

Hi and welcome to episode 537 with Whats4Chow.com and another episode in our short series Serious Distilling with Brewcraft, Still Spirits and Grainfather.
Today we’re going to look at the Still Spirits Carbon Filtering system which has been specially designed for filtering the spirits distilled using the Still Spirits Turbo 500 reflux distiller.
When reflux distilling, you can expect an alcohol purity of between 94 and 97%. The 3 to 6 percent disparity is comprised mostly of water, however sometimes a few volatiles can sneak through along with this and adversely affect the flavor of your product. Using a carbon filter will remove these troublesome elements and give you a superior product.
An important note before we start…. this filter should not be used with wines, ciders or alembic distilled product. The filter will remove most of the color and flavor from these drinks. The filter is only for processing reflux distilled product.
Let’s have a look in the box.
The set comes with an upper an lower bucket. The upper bucket has a hole in the bottom where the filter is fitted, while the lower bucket has a hole in the side to receive a tap fitting.
There is a good quality lid for the upper bucket, and a receiver ring which will join the 2 containers together.
In addition there is a decent quality tap fitting, the disposable carbon filter, two seals, a central bolt and a sturdy plastic nut.
To fit the tap, remove the nut and one of the silicon washers from the thread.
Insert the thread into the hole on the side of the container. Replace the silicon washer and screw the nut on firmly.
To install the filter, insert the bolt through the hole in the container, from the inside.
Place a foam seal onto the bolt, followed the carbon candle, followed by the second seal, and finally the nut making sure that spacer ridge on the nut is facing inwards.
Tighten this up firmly.
For final assembly, place the receiver ring onto the lower container. Press the upper container into the receiver ring and you’re ready to go.
Dilute your reflux distilled alcohol to below 50% ABV and pour this into the upper container.
Within a few minutes, the batch will have run through the filter and your spirits are ready for blending with the Still Spirits flavorings. This process will be covered in the distilling episode.
Thanks for joining us today, please give us a thumbs up, subscribe to our channel, and share this with your friends and family, and we’ll see you again tomorrow.


Super-Crispy Deep-Fried Pig’s Wings. Succulent Pork Skewers in the Crispiest Coating Ever!!!

deep-fried pork, crispy pig's wings, super-crispy coating, deep fried pork skewers, how to, how to make, crispy deep-fried pork, how to make a crispy fried coating, recipes, cooking, pig's wings, superbowl recipes, best superbowl recipes, easy superbowl recipes, pork recipes, best pork recipes, deep-fried recipes, fried recipes, kfc chicken recipe, recipe,


Super-Crispy Deep-Fried Pig's Wings. Succulent Pork Skewers in the Crispiest Coating Ever!!!
Author: 
Recipe type: Pork / Superbowl
Serves: 12
 
Today we're going to make a batch of Superbowl super-crispy pig's wings. These skewers are super-crispy, and I mean super crispy, and the secret to this is in the way the pork is coated before frying.
Ingredients
  • 2 x Thick-cut pork neck steaks (450g)
For the Coating
  • 125ml All purpose flour
  • 125ml Cornstarch
  • 2.5ml Baking powder
  • 2.5ml Salt
  • 75ml Chicken stock
  • 3 Eggs
For the Sauce
  • 45ml White wine vinegar
  • 30ml Light soy sauce
  • 2.5ml Cornstarch
  • 60ml Caster sugar
Instructions
  1. Starting with the secret coating...measure out the all-purpose flour, the cornstarch, baking powder, salt and chicken stock.
  2. Place all the dry ingredients in a mixing bowl and use a whisk to stir these until combined.
  3. Add the chicken stock, a little at a time, whisking it into the dry mixture to form a rough crumbly mixture. Put this aside.
  4. For the sauce, combine the light soy sauce and white wine vinegar. Add the cornstarch and whisk this until dissolved.
  5. Pour the mixture into a small saucepan and add the caster sugar.
  6. Heat the pan over medium high heat and bring it to a boil. As soon as the sauce starts to bubble up, turn the heat off and put the sauce aside.
  7. Unpack the deboned pork neck steaks and cut them into strips of 6mm or a quarter inch thick. Save any off-cuts or odd bits for stir-fries or other dishes.
  8. Thread the pork strips onto 15cm or 6 inch bamboo skewers.
  9. Whisk the eggs in a tall jug.
  10. By this time, the crumbing mixture will have dried a little. Use your hands to sift through the mixture and break down any lumps that are too large.
  11. Hold the jug containing the eggs at an angle and dip a skewer into the egg to wet it all over.
  12. Transfer the skewer to the coating mixture and dredge it to get a good solid coating all over.
  13. Transfer this to a platter to set and continue with the remaining skewers.
  14. Half fill a wok or large pan with oil and heat this to 180c or 350f. Carefully lower the skewers into the oil.
  15. Allow the skewers to fry for 3 to 4 minutes until super-crispy and golden.
  16. Remove these from the oil and drain any excess oil on kitchen paper. Continue frying the next batch of skewers.
  17. Transfer the pig's wings to serving platters and spoon the sauce over the skewers before serving.
  18. Thanks for joining us today, please give us a thumbs up, subscribe to our channel if you haven't done so already, and share this with your family and friends, and we'll see you again tomorrow.


Superbowl 2017 Special Recipes – Mac ‘n’ Cheese Bites – the Ultimate Mac ‘n’ Cheese Snack

mac 'n' cheese, recipe, how to, how to make, mac n cheese bites, mac n cheese snacks, how to make mac n cheese, how to make mac n cheese snacks, cheese, mac, snack, macaroni and cheese, super bowl, superbowl recipe, superbowl snacks, quick mac n cheese recipe, easy mac n cheese recipe, homemade mac n cheese, simple mac n cheese recipe, mac n cheese snack for superbowl, snacks for superbowl, superbowl 2017 recipes, catering for the superbowl,


Superbowl 2017 Special Recipes - Mac 'n' Cheese Bites - the Ultimate Mac 'n' Cheese Snack
Author: 
Recipe type: Superbowl / Pasta
Cuisine: Italian American
Serves: 12
 
With Superbowl just a few days away, here is a quick, easy and delicious recipe to feed the crowds. These mac 'n cheese bites are simply outstanding... crispy on the outside and sumptuous on the inside.
Ingredients
  • 60g Butter
  • 60ml All-purpose flour
  • 400ml Milk (full cream)
  • Salt and pepper to taste
  • 175g Grated mature cheddar cheese
  • 240g Elbow macaroni
  • 12 Rashers streaky bacon
  • 2 Eggs
  • Finely shredded Parmesan cheese
Instructions
  1. To start, measure out the butter, all-purpose flour and milk, and boil the elbow macaroni according to the package instructions while reducing the cooking time by 2 minutes so that it is not quite cooked.
  2. Shred the mature cheddar cheese and beat the eggs.
  3. Heat a pan over medium high heat and add the butter. When the butter is melted and bubbling, add the flour. Stir this into the flour to get a smooth paste and allow this to cook for 60 seconds.
  4. Pour in the milk bit by bit, stirring continuously until all of the milk is added.
  5. Use a whisk to beat this to smooth sauce while it continues to cook.
  6. Once the sauce is smooth, turn off the heat and add the cheddar cheese and continue to stir until all of the cheese has melted into the sauce.
  7. Add the par-cooked macaroni and stir this in until everything is evenly coated.
  8. Add the egg and stir this in until completely combined.
  9. Season with salt and pepper and put this aside.
  10. Lightly oil a muffin pan and line the holes of the pan with streaky bacon.
  11. Divide the macaroni mixture equally among the 12 holes.
  12. Top each mac 'n cheese bite with finely shredded Parmesan cheese and bake the bites in a pre-heated oven at 180c or 350f for 20 minutes until crispy and golden on top.
  13. And there we have it.... an amazingly easy, quick and super-tasty Superbowl snack.
  14. Click the onscreen link to see dozens of other fantastic Superbowl recipes.
  15. Thanks for joining us today, please give us a thumbs-up, subscribe if you haven't done so already, and share this with your friends and family, and we'll see you again tomorrow.


Serious Distilling with Brewcraft, Still Spirits & Grainfather – Still Spirits Water Flow Regulator

brewcraft, home brewing, home distilling, still spirits, homemade alcohol, water flow regulator, water flow controller, t500, t500 reflux still, still spirits t500, making alcohol at home, how to make alcohol at home, brewing alcohol at home, distilling alcohol at home, still spirits water flow regulator, still spirits water flow controller, controlling water flow with the still spirits t500 reflux distiller, brewcraft suppliers of brewing and distilling equipment,

Serious Distilling with Brewcraft, Still Spirits & Grainfather – Still Spirits Water Flow Regulator

Hi and welcome to episode 534 with Whats4Chow.com and the next  in our series serious distilling with Brewcraft, Still Spirits and Grainfather.
In our previous distilling episode we ran a batch of sugar wash through the Still Spirits T500 reflux distiller. As promised, today we are going to have a good look at the Still Spirits flow controller, what it does, and why you need it.
The distilling setup is comprised of 2 parts, the muscle and the brain. The boiler and the condenser are the muscle, while the thermometer and the flow controller are the brain. Anyone who’s been on earth long enough knows that muscle does not work too well without brain.
In previous versions of the T500, the flow controller was a simple micro tap that fitted to your tap. This has evolved into the most ingenious piece of equipment that we’re looking at today.
Before we continue, why do you need a flow controller? Why couldn’t they just make a preset valve at the optimum flow rate?
The answer is quite straight forward. Tap water from different taps, and in different geographical locations is not at the same temperature. The guidline of 500ml per minute given in the instruction manual is just that…. a baseline starting point. Once the still has heated up and the thermometer approaches the target temperature, you need to make small adjustments to the flow rate to achieve the optimum temperature of 60c.
If the temperature fails to reach 60c, the flow rate is too high. If the temperature overshoots 60c, the flow rate is too low and must be increased.
So you ask, “what was wrong with the previous flow controller?”
Unfortunately, just like temperatures vary from tap to tap, so do water pressures…. and water pressure can vary on a single tap from one minute to the next. This makes the optimum range very difficult to achieve when there are so many variables.
Let’s have a look at what comes in the box. First out is the power supply unit with mains cable.
Then comes the unit. All the necessary pipes and tap connections are supplied, including good quality hose clamps.
On the main unit the power plugs into the black cable on the side.
Inside the unit is a variable submersible pump and a float valve which controls the inflow of water from the tap.
Water enters the chamber from the tap through the white connector on the side of the unit. Once the chamber is full the float valve closes and will not allow any more water though until the pump has depleted enough water to open the float valve again.
The water is pumper out at constant flow rate through the silver outlet to the inlet of the distilling column.
The flow rate is controlled by adjusting the silver dial on the lid of the unit.
In conclusion, even if you’re not using the Still Spirits T500, any reflux distilling setup will benefit immensely by adding this incredibly simple and reliable unit to the arsenal.
Please take some time to check out the Brewcraft website by clicking the link in the description below the video.
Thanks for joining us today, please give us a thumbs up, subscribe to our channel if you haven’t already done so, and share this with your friends and family, and we’ll see you again tomorrow.
Scroll to top

Kitchen Conversions

Convert:
Masses
to:
Volumes
to:
Temperatures
to:
Lengths
to: