Chicken Galantine / Ballotine – Part 1 & 2 – How to debone, stuff & roll a whole chicken for roasting.

chicken galantine,chicken galantine recipe,chicken galantine ballotine,chicken ballotine,how to debone a whole chicken,quickest way to debone a whole chicken,debone a whole chicken for galantine,debone a whole chicken for ballotine,chicken galntine stuffing recipe,chicken ballotine stuffing recipe,how to debon stuf and roll a chicken,rolled stuffed chicken recipe,chicken gallantine recipe


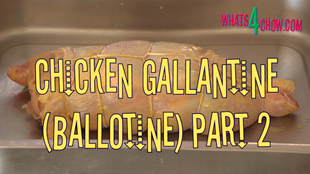
Chicken Galantine / Ballotine - How to debone, stuff & roll a whole chicken for roasting.
Author: 
Recipe type: Chicken / Poultry
Cuisine: French
Prep time: 
Cook time: 
Total time: 
Serves: 4
 
This 2 Part demonstration will show you how to debone a whole chicen, make the stuffing, roll it and tie it, and finally roast it. Chicken Galantine or Ballotine is a classic recipe, and can be stuffed with anything, but I have included a stuffing / filling that is a sure winner.
Ingredients
  • 1 x 1.6kg Chicken
  • 250g Streaky Bacon
  • 300g English spinach
  • 70g Feta Cheese
  • Butter for brushing
  • Butchers Twine
Instructions
Part 1
  1. Remove the wings at the elbow joint.
  2. With the chicken breast side up, pull the neck skin back and slice either side of the wishbone. Reach into the incision and pull the wishbone free.
  3. Roll the chicken onto its side and slice through the skin all the way down the spine.
  4. Move the wing up and down, feeling for the articulation. place your knife here and slice through the joint. Repeat with the other wing.
  5. Stand the chicken upright. Hold the carcass with one hand. With other hand grab the whole wing and pull this downward and away from the carcass until the oyster is exposed. Repeat this with other wing.
  6. Swivel the chicken around the chicken around, hold the carcass firmly with one hand. Place the index finger and middle finger of the other hand on either side of the breast bone or sternum and pull both breasts downward. The fillets will be left behind on either side of the sternum. We will rescue those later.
  7. Turn the chicken onto its breast. Using a pointed sharp knife, cut the oysters free.
  8. Grab one leg, move it sideways and upward, then pull it straight downward, cracking the joint open. Slice through the joint. Repeat this with the other leg.
  9. Grab the carcass firmly and pull this free from the chicken.
  10. To rescue the fillets from the carcass, simply slide your thumbnail under the fillets on either side of the sternum. Put these aside.
  11. To debone the leg, cut around the leg joint to loosen the flesh. Holding the joint with one hand, scrape the flesh down the bone with the edge of your blade until you reach the drumstick joint.
  12. Cut around the joint to free the flesh, then scrape the flesh down the bone to the end of the drumstick.
  13. Push the bone back into the skin. Using the back of your cleaver, break the bone at the end of the drumstick and pull the whole leg bone free. Repeat this with the other leg.
  14. To remove the bone from the wings, cut around the joint, scrape the flesh from the bone all the way down, then pull the bone free. Repeat this with the other wing.
  15. Open the chicken out flat. To level the meat out, fill the empty spots between the legs and breast with the fillets, then slice at an angle through either side of the breast and flap these forward.
Part 2
  1. Cut the bacon across the grain into thin strips then roughly chop the spinach.
  2. Heat your wok or pan over high heat and fry the bacon for 3 to 5 minutes until it takes on color and is nice and crispy.
  3. Add the spinach and fry this until it is well wilted..... about 3 minutes.
  4. Remove the pan from the heat and crumble the feta into the pan.
  5. Allow this to cool for about 15 minutes.
  6. To stuff the galantine, press some of the filling into each leg, then spread the remaining filling evenly across the chicken being careful not to get too close to the top and bottom.
  7. Fold one half of the chicken over across the center line, then fold the other half over this.
  8. Using butchers twine, tie the legs together. Using half hitch loops tie the rest of the chicken closed.
  9. Roll the chicken over and loop the twine through the cross twines then tie it up at the beginning.
  10. Place the chicken in roasting pan, brush it liberally with melted butter then roast in a preheated oven for 45 minutes plus 15 minutes extra for each pound or 450g of chicken.
  11. Remove the galantine from the oven, allow it to rest for 5 minutes before carving and serving.


Dim Sum. Wok-Fried Money Bags. Crispy deep fried parcels of aromatic chicken.

dim sum recipes,deep fried dim sum recipe,chinese dim sum recipes,fried dim sum,fried wonton wrapper dim sum,how to make dim sum,learn to make dim sum at home,easy dim sum recipe,quick dim sum recipe,chinese snack recipes,deep fried chicken dumplings,fried chicken dumplings,crispy fried chicken dumplings,make chicken dim sum at home,homemade dim sum,authentic chinese dim sum recipe,, chinese dumplings, chinese dupling recipe, best dumpling recipe ever, dim sum wrapper recipe


Dim Sum. Wok-Fried Money Bags. Crispy deep fried parcels of aromatic chicken.
Author: 
Recipe type: Dim Sum, Chinese snacks
Cuisine: Chinese
Prep time: 
Cook time: 
Total time: 
 
Dim Sum come in all forms - Wok-fried money bags are one of the classics. Aromatic chicken wrapped up in wonton wrappers and then deep-fried to crispy golden perfection. These are quick and easy to make, and the recipe can be scaled up infinitely without any hassle.
Ingredients
  • 250g Chicken breast, roughly chopped
  • 6 Spring onions, roughly chopped
  • 10 Slices fresh ginger
  • 1 Tsp Salt
  • 1 Tsp Sugar
  • 1 Tsp Light soy sauce
  • 1 Tsp Roasted sesame oil
  • 1 Tbs Oyster sauce
  • 1½ Tbs Cornflour or Tapioca flour
  • 16-20 Wonton wrappers
Instructions
  1. place the chicken, spring onion, ginger, salt, soy sauce, roasted sesame oil, oyster sauce and cornflour in your food processor.
  2. Using the pulse action, pulse this for 3 or 4 short bursts until the ingredients are finely chopped, but not mush.
  3. Lay out the wonton skins and using a wet finger, wet the edges of one of the skins. Place a tablespoonful of the filling in the center of the skin. Gather up the corners of the skin and crimp them together above the filling. Repeat with remaining skins and filling. This recipe will yield 16 to 20 moneybags.
  4. Fill your wok with oil to a depth of 25mm or 1 inch and heat this to 190c or 375f.
  5. Fry the dumplings in 2 batches for 3 minutes, turning over halfway through. Remove these from the oil and drain any excess oil from the dumplings on kitchen paper.
  6. Transfer the dumplings to platters and serve with the dipping sauces of your choice.


Feaux Oxtail Stew using Ostrich Neck. A rich, thick stew with tons of flavor – better than the real thing!

oxtail stew,oxtail stew recipe,oxtail stew using ostrich neck,feaux oxtail stew,rich beef stew,oxtail stew recipe,how to make oxtail stew,how to make oxtail stew using ostrich neck,ostrich neck stew,rich ostrich neck stew,ostrich recipes,ostrich stew recipes,fake oxtail stew recipe,low fat oxtail stew recipe,best oxtail stew recipe, how to cook oxtails, oxtail stew south africa, oxtail stew slow cooker, oxtail stew with red wine, oxtail stew south african recipe


Feaux Oxtail Stew using Ostrich Neck. A rich, thick stew with tons of flavor - better than the real thing!
Author: 
Recipe type: Stews
Cuisine: South Africa
Prep time: 
Cook time: 
Total time: 
Serves: 8-10
 
This feaux oxtail stew made with ostrich neck is actually better than the real thing! Using your Dutch oven, you can have this ready to serve in under 4 hours. I have included slow cooker instructions in the full printable recipe
Ingredients
  • 2kg Ostrich neck
  • 200g Streaky bacon, cut into bits
  • 60g Butter
  • ½ Cup all purpose flour, mixed with 1 Tsp salt and 1 Tsp Black pepper
  • 6 Baby onions, halved
  • 4 Medium Carrots, roughly chopped
  • 3 Celery sticks, sliced
  • 2 Leeks, sliced
  • 1 Tbs Chilli sauce
  • 1 Tbs Honey
  • 2 Tbs Cornflour
  • 2 Tbs Chicken or Beef stock powder
  • 2 x 440g tins whole peeled tomatoes
  • 2 Bay leaves
  • 2 Fresh thyme sprigs
  • 2 Fresh rosemary sprigs
  • 250ml Red wine
  • salt and pepper to season
  • 3 Tbs tapioca or cornfour mixed with a little water
Instructions
Dutch Oven Instructions (much quicker)
  1. To start you will need 2 kg of ostrich neck. You will notice that ostrich has very little fat, so we're going to add fat in the form of streaky bacon and butter.
  2. Add the salt and cracked black pepper to the flour and dredge the ostrich meat in this.
  3. Heat your dutch oven over medium high heat, add the butter and fry the bacon for 5 minutes until it is starting to brown and the fat is well rendered.
  4. Add the ostrich meat and fry this for 15 to 20 minutes until well browned, stirring the meat every minute.
  5. Add the baby onions, carrots, celery, leeks and garlic and stir this in.
  6. In a jug combine the chilli sauce, honey, corn flour, stock powder, tinned whole peeled tomatoes, bay leaves, thyme and rosemary. Pour this into the pot.
  7. Pour in the red wine and place the lid on the pot.
  8. Transfer the dutch oven to a preheated oven at 140c or 275f and allow this to cook for 3 hours undisturbed.
  9. Remove the dutch oven from the oven. Dissolve 3 tbs of cornflour in a little water and add this to the pot. Stir this in well and return the dutch oven to the oven for a final 30 minutes.
  10. After the final 30 minutes, transfer the stew to serving platters and serve with the accompaniments of your choice.
Slow Cooker Instructions
  1. Brown the ostrich meat using a large frying pan instead of the dutch oven. You will have to do this in batches.
  2. Add the ostrich and bacon to the slow cooker along with all of the other ingredients except the cornflour / tapioca flour mixed with water.
  3. Slow cook for 7 hours on high setting or 10 hours on low setting.
  4. Open the slow cooker and stir in the cornflour / tapioca slurry, bring this back to a boil for a few minutes.
  5. Serve with the accompaniments of your choice.


Chinese Steamed Buns Filled with Aromatic Chicken. Delicious & Tender Chinese Steamed Chicken Buns.

steamed buns,chinese steamed buns,chinese steamed chicken buns,chinese steamed buns with aromatic chicken,steamed buns filled with chicken,easy chinese steamed buns,quick chinese steamed buns,steamed buns with chicken spring onions and oyster sauce,best steamed buns recipe,chinese steamed buns recipe,chinese steamed buns video recipe,Chinese Bread Buns, chinese steamed buns filling, chinese steamed buns youtube, how to make chinese steamed buns,homemade chinese steamed buns


Chinese Steamed Buns Filled with Aromatic Chicken. Delicious & Tender Chinese Steamed Chicken Buns.
Author: 
Recipe type: Steamed Buns
Cuisine: Chinese
Prep time: 
Cook time: 
Total time: 
Serves: 4-8
 
These delicious Chinese steamed buns are well worth the effort. With soft and tender pastry and an aromatic and flavorful filling of chicken, these are definite winners.
Ingredients
For the Dough / Pastry
  • 300g All purpose flour
  • 1 Tbs Baking powder
  • 110g Caster sugar
  • 125ml Milk
  • 80ml Water
  • 60ml Oil
For the Filling
  • 4 Dried Chinese mushrooms
  • Small handful of dried wood-ear fungus
  • 2 Tbs Fresh ginger, finely chopped
  • 250g Minced chicken
  • 6 Spring onions, finely chopped
  • 1 Tbs Oyster sauce
  • 1 Tsp Light soy sauce
  • 1 Tsp Roasted sesame oil
  • ¼ Tsp Salt
  • 2 Tsp Cornflour or Tapioca flour, dissolved in 2 Tbs chicken stock
Instructions
  1. Starting with the pastry, place the flour, baking powder and caster sugar in a mixing bowl.
  2. In a jug, combine the milk water and oil, then pour this into the flour. Mix this all to a soft dough.
  3. Turn the dough out onto a well floured work surface and start to knead. The dough will be soft and sticky and you will sprinkle flour onto the dough continuously while kneading to make it manageable.
  4. Knead the dough for 2 minutes, then dust it with flour, wrap it in cling wrap and refrigerate for 60 minutes.
  5. While the dough matures and chills, reconstitute the Chinese mushrooms and wood ear fungus in boiling water. Allow them to soak for 15 minutes, then drain and squeeze out any excess water.
  6. Chop the mushrooms and fungus until fine.
  7. Mince the chicken until fine.
  8. Chop the spring onion until fine.
  9. Chop the ginger until until fine.
  10. For the aromatic flavoring sauce, combine the oyster sauce, light soy sauce, the sesame oil and salt.
  11. Mix the cornflour or tapioca with 30ml of chicken stock and add this to the sauce.
  12. Heat your wok over medium high heat, add 30ml of oil and stirfry the ginger for a few seconds until aromatic.
  13. Add the chicken to the wok and stirfry this for 3 minutes until all the chicken has changed color.
  14. Add the mushrooms, fungus and spring onions and stirfry this until everything is mixed, then pour in the sauce.
  15. Stirfry this for 60 seconds until the sauce has thickened and coated everything, then remove from the heat.
  16. Transfer the filling to a mixing bowl and quick chill this by floating it in a sink of cold water.
  17. Remove the dough from the refrigerator, unwrap it and roll it into a sausage. Divide the sausage into 4 pieces.
  18. Roll each of these into a sausage and divide these into 4 pieces.
  19. Working with one piece, roll this into a ball, flatten the ball into a disk.
  20. Place a tablespoon of the filling in the center of the disk, stretch the edges of the disk upwards and over the filling. Give it twist to seal.
  21. Repeat this until all of the buns are completed.
  22. Cut 16 squares of baking paper and start packing the buns into your steamer. You will need to use both tiers of your steamer, or cook 2 batches.
  23. Half fill your wok with water and bring this to a rapid boil. Place the steamer on the wok and steam the buns for 20 minutes. (the water must not touch the steamer)
  24. Remove the steamer from the heat, transfer the buns to platters and serve with the dipping sauces of your choice.


Chicken & Bacon Kefta Kebabs. Delicious Kefta / Kofta Kebabs using Chicken and Pork.

kefta kebabs,kofta kebabs,kafta kebabs,kefta kebabs recipe,how to make kefta kebabs,how to make kofta kebabs,how to make kafta kebabs,chicken and pork kefta kebabs,chicken and bacon kefta kebabs,, moroccan kefta kebabs, turkey kofta kebabs, resep kefta kebabs, kefta zucchini kebabs,chicken and bacon sausage on a skewer,moroccan kebabs recipe,easy kefta kebabs recipe,easy kofta kebabs recipe


Chicken & Bacon Kefta Kebabs. Delicious Kefta / Kofta Kebabs using Chicken and Pork.
Author: 
Recipe type: Chicken / Poultry / Pork
Cuisine: Moroccan
Prep time: 
Cook time: 
Total time: 
Serves: 5-10
 
Traditionally kefta / kofta kebabs are made with lamb. This recipe gives a slightly different spin using chicken, bacon and pork sausage meat. The pork sausage meat along with a little tapioca or cornflour binds the mixture into delicious kefta kebabs.
Ingredients
  • 500g Chicken breast meat
  • 150g Pork sausage meat
  • 200g Streaky bacon
  • 2 Tsp Salt
  • 2 Tbs Tapioca or cornflour
Instructions
  1. Chop the bacon into thin slices across the grain, then do the same with the chicken. Squeeze the meat from the pork sausages.
  2. Place this all in your food processor along with 2 tsp salt and 2 tbs of tapioca or cornflour.
  3. Process this until quite fine.
  4. Wet your hand and grab a large handful of the mixture, then proceed to mold it onto a 15cm or 6 inch skewer. Continue this process until all of the kefta kebabs are formed.
  5. To make the sesame kefta, roll them in the tapioca or cornflour.
  6. Roll them in the egg, making sure to wet all of the flour, then roll them in the sesame seed to get a good solid coating.
  7. Transfer these to a platter and allow the sesame coating to set for 20 minutes.
  8. Fill your pan with oil to a depth of 25mm or 1 inch and heat this to 170c or 325f.
  9. Carefully lower the plain kefta into the oil, and fry these for 3 minutes per side. Remove these from the pan and drain them on kitchen paper.
  10. Carefully add the sesame coated kefta to the pan and fry these for 3 minutes per side as well. Remove these and drain on kitchen paper.
  11. Transfer the kefta kebabs to platters and serve immediately with the accompaniments of your choice.


Deep-Fried Chicken Lollipops. Crispy, Golden & Delicious Cocktail Snack Chicken Wings.

fried chicken, Chicken Lollipop, how to make chicken lollipops, Chicken Lollipops, chicken wings, buffalo wings, finger food recipe, deep fried chicken lollipops, deep fried chicken lollipop recipe, alternatives to chicken wings, how to make popcorn chicken, spicy chicken lollipop, how to cook chicken wings, fried chicken wings, spicy chicken wings, southern fried chicken,chicken cocktail snack recipes,cocktail party recipes,finger snack recipes chicken,Deep-Fried Chicken Lollipops


Deep-Fried Chicken Lollipops. Crispy, Golden & Delicious Cocktail Snack Chicken Wings.
Author: 
Recipe type: Chicken / Poultry
Prep time: 
Cook time: 
Total time: 
 
Deep-Fried Chicken Lollipops. Chicken wings are notoriously messy to eat, especially at a cocktail party. Making the wings into lollipops and chicken V's takes all the mess and hassle away.
Ingredients
  • 12 Chicken Wings
  • ½ Cup Tapioca flour (or corn flour)
  • 3 Eggs, lightly beaten
  • ½ Cup finely crushed corn flakes mixed with ½ cup all-purpose flour
  • Light soy sauce to season
  • Garlic powder to season
Instructions
  1. Cut off and discard the wing tips, then slice through the center joint of each wing.
  2. To make the lollipops, take the buffalo wing, that's the piece with a single bone, and using a kitchen towel, pull the skin down off the knuckle.
  3. Holding the knuckle with one hand and using your blade, scrape the skin and flesh downward from the bone to create the lollipop.
  4. To make the V's, place the wing forearm, the piece with 2 bones on the chopping board with the inside of the wing facing upwards.
  5. Using a sharp knife cut through the wing length-ways between the bones, leaving the elbow joint in tact.
  6. Place all of the wing pieces in a tray, drizzle liberally with light soy sauce, then season liberally with garlic powder. Allow these to stand for 15 minutes.
  7. To coat the wing, dredge the pieces in the tapioca flour, or you can substitute corn flour.
  8. Dip the pieces in the egg making sure to wet all of the flour, then dredge the pieces in the cornflake mixture to get a good solid coating.
  9. Transfer all of the coated chicken to a platter and allow the coating to set for 20 minutes.
  10. Half fill your pan with oil and heat this to 170c or 325f.
  11. Carefully drop the pieces into the oil and fry them for 3 minutes per side until crispy and golden. Remove the wings from the oil and drain on paper towel. Repeat this with any remaining wings.
  12. Transfer the wings to platters and serve immediately with dipping sauce of your choice.


Chinese Sweet & Piquant Chicken. Hunan-Style Fried Chicken with a Piquant Glaze.

hunan stir-fried chicken,hunan deep-fried chicken,sweet and sour chicken,crispy fried chicken,chinese crispy fried chicken,Chinese Sweet & Piquant Chicken,chinese shallow fried chicken,chinese chicken recipes,chinese chicken breast recipes,how to shallow fry chicken breast,crispy chicken breast recipes,chinese chicken strips,crispy chinese chicken strips, chinese fried chicken breast, chinese fried chicken sauce, chinese fried chicken strips, how to cook chinese fried chicken,5]


Chinese Sweet & Piquant Chicken. Hunan-Style Fried Chicken with a Piquant Glaze.
Author: 
Recipe type: Chicken / Poultry
Cuisine: Chinese
Prep time: 
Cook time: 
Total time: 
Serves: 2
 
Hunan-Style Fried Chicken with a Piquant Glaze. This recipe is really simple and has very few ingredients, yet it is one of the tastiest dishes around. Thinly sliced chicken breast is shallow-fried until crispy and golden, then glazed with and beautifully glossy and tasty Hunan-style sauce.
Ingredients
  • 2 Chicken Breasts, skin off, deboned
  • 1 Egg lightly beaten
  • 30ml Tapioca flour (can substitute corn flour)
  • 2.5ml Salt
For the Sauce
  • 30ml Caster sugar
  • 20ml Rice wine vinegar or regular white wine vinegar
  • 15ml Soy sauce
Other
  • ½ Red pepper, cut into strips
  • ½ Yellow pepper cut into strips
Instructions
  1. Slice the chicken breasts across the grain into slices 3mm / ⅛ inch thick. Place them in a mixing bowl.
  2. Whisk the egg, salt and tapioca flour together until smooth then mix it into the chicken.
  3. In a jug jug, whisk together the caster sugar, vinegar and soy sauce until all of the sugar is dissolved.
  4. Slice the peppers into strips.
  5. Pour oil into your wok to a depth of 1 inch / 25mm, and heat it over high heat.
  6. Add the peppers and fry for 3-4 minutes until they start to brown on the edges. Remove them with a slotted spoon.
  7. Add half of the chicken and fry this for 3 minutes until crisp and golden. remove this with a slotted spoon and repeat with the balance of the chicken.
  8. Drain the wok, return it to the heat and return the chicken and the peppers to the wok. Mix briefly to combine, then pour in the sauce.
  9. Stir this for 0 seconds until the sauce has thickened and glazed everything.
  10. Serve immediately with the accompaniments of your choice.


How to Make Peking Duck. Perfect Chinese Roast Peking Duck with Hoisin Sauce and Honey.

peking duck,roasted beijing duck,chinese roast duck,how to make peking duck,peking duck recipe,peking duck recipe video,roast beijing duck recipe,, peking duck pancake recipe, peking duck beijing, peking duck farm, chinese duck, cantonese duck, Most popular Chinese dishes, Chinese style roast duck, how to cook Chinese foods, chinese cooking, Chinese Food (Cuisine), Martin Yan's China Travels


How Make Peking Duck. Perfect Chinese Roast Peking Duck with Hoisin Sauce and Honey.
Author: 
Recipe type: Duck / Poultry
Cuisine: Chinese
Prep time: 
Cook time: 
Total time: 
Serves: 4
 
Although Peking duck is an overnight recipe, it is really simple to make and certainly worth the wait. Peking duck is a classic of Chinese cuisine.
Ingredients
  • 1 x 2kg Duck
  • 30ml Honey or maltose dissolved in 30ml water
  • 125ml Hoisin sauce or plum sauce
Accompaniments
  • Mandarin pancakes
  • Shredded spring onions
  • Cucumber batons or ribbons
Instructions
  1. Remove the excess fat and skin from the neck and rear of the duck. Cut of the parsons nose and the wing tips.
  2. Half fill your wok with water and bring it to a rapid boil.
  3. Plunge the duck into the water for 3 minutes, turn the duck over to blanche the other side for 3 minutes.
  4. Remove the duck from the water, pat dry with paper towel then brush liberally with the sauce.
  5. Place the duck breast side up on a rack in a roasting pan and allow it to air-dry in your refrigerator overnight.
  6. Roast the duck at 180c or 350f for 0 minutes undisturbed.
  7. Carve the meat and skin into thin slices and serve immediately with the accompaniments.
Click here to get the [url:1]Mandarin Pancake recipe[/url]


Crumbed Chicken & Bacon Steak. Crumbed Chicken Fillet Laminated with Bacon, Crumbed & Deep-Fried.

crumbed chicken breast,crumbed chicken and bacon,crispy fried chicken and bacon,crumbed chicken fillet,how to crumb chicken fillet,crumbed chicken and bacon steak,crumbed chicken recipes,crumbed chicken fillet recipe,chicken schnitzel recipe,chicken and bacon schnitzel recipe,deep-fried chicken recipe,deep fried chicken schnitzel recipe,deep fried chicken bacon schnitzel, crumbed chicken fillet strips, crumbed chicken fillet meals, crumbed chicken breast recipe, crumbed chicken fillet burger recipe


Crumbed Chicken & Bacon Steak. Crumbed Chicken Fillet Laminated with Bacon, Crumbed & Deep-Fried.
Author: 
Recipe type: Chicken / Poultry
Prep time: 
Cook time: 
Total time: 
Serves: 2
 
These are truly crumbed chicken fillet with a difference. Take schnitzeled chicken breast, laminate it with bacon, coat this all in crumbs, then deepfry to crispy perfection. You will need a contact grill to bond the chicken and bacon.
Ingredients
  • 2 x Chicken breasts, skinless, deboned
  • 6 x Rashers streaky bacon
  • ⅓ Cup Tapioca flour
  • ⅓ Cup finely crushed corn flakes mixed with ⅓ cup all-purpose flour
  • 2 Eggs lightly beaten
  • Oil for frying
Instructions
  1. Measure 40cm / 16 inches cling wrap.
  2. Place a breast in the center or the plastic and fold the cling wrap over.
  3. Using your meat mallet, tap the breast down until it is 6mm / ¼ inch thick. Repeat with the second breast.
  4. Heat your contact grill to maximum heat and place the chicken on the grill with the smooth side down.
  5. Top each breast with 3 strips of bacon, close the grill for 30 seconds.
  6. Open the grill and remove the chicken. The bacon will now be perfectly laminated to the chicken.
  7. Dredge the chicken in the tapioca flour to get a good coating all over.
  8. Drag the chicken through the egg making sure to wet all of the tapioca flour.
  9. Dredge the chicken in the cornflake mixture to get a good solid coating all over.
  10. Half-fill your pan with oil and heat this to 180c / 350f.
  11. Carefully slide the chicken into the oil and fry for 3 minutes per side until crisp and golden.
  12. Remove from the oil and drain on paper towel.
  13. Serve immediately drizzled with a little tangy mayonnaise and a little fruit chutney.


Deep Fried Tobasco Chicken Wings. Crispy Deep Fried Chicken Wings Infused with Tobasco.

crisp fried chicken wings,deep fried chicken wings,crispy deep fried chicken wings,crisp fried buffalo wings, crispy deep fried buffalo wings,deep fried tobasco chicken wings,tobasco chicken wings, tobasco buffalo wings,crispy deep fried tobasco buffalo wings,crisp deep fried chicken recipe, crisp deep fried chicken wings recipe,how to make crisp deep-fried chicken,how to make cripy deep fried buffalo wings, battered chicken wings, Buffalo Wild Wings, crispiest chicken wings, crunchiest wings


Deep Fried Tobasco Chicken Wings. Crispy Deep Fried Chicken Wings Infused with Tobasco.
Author: 
Recipe type: Chicken / Poultry
Prep time: 
Cook time: 
Total time: 
 
The flavor of Tobasco is legendary. This recipe infuses this flavor into a batch of crisp deep fried chicken wings. Ths sugar in the recipe tempers the burn, so if you like your wings a little hotter, omit the sugar from the recipe.
Ingredients
  • 12 Chicken wings
For the Tapioca Flour Mix - mix together
  • 2 Tbs Fine salt
  • 1 Tbs Caster sugar
  • ⅔ Cup Tapioca flour
For the Cornflake Mix - mix together
  • ½ Cup finely crushed cornflakes
  • ½ Cup all-purpose flour
For the Egg Mix - mix together
  • 3 Eggs lightly beaten
  • 30ml Tobasco sauce
Other
  • Oil for deepfrying
Instructions
  1. Cut off and discard the wing tips, then cut through the center joint of each wing.
  2. Dredge the wings in the tapioca flour mix.
  3. Dip the wings in the egg making sure all of the tapioca mix is wet.
  4. Dredge the eggs in the cornflake mix.
  5. Transfer the wings to a platter and allow the coating to set for 20 minutes.
  6. Half fill your pan with oil and heat to 170c or 325f.
  7. Carefully add the wings to the pan and fry for 3 minutes per side.
  8. Remove and drain on paper towel. Serve immediately.


Duck A L’Orange. Roasted Duck with Orange Sauce. Traditional French Duck Recipe.

duck a l'orange,roasted duck with orange sauce,roasted duck recipe,french duck recipe,how to roast a duck,roast duck recipes,grilled duck,duck with orange sauce and grand marnier,french roast duck recipe,how to roast duck with orange sauce,how to cook duck,roasted duck recipe video,french a l'orange sauce,duck with citrus sauce,grilled duck with orange sauce,easy duck a l'orange,easy roast duck recipe


Duck A L'Orange. Roasted Duck with Orange Sauce. Traditional French Duck Recipe.
Author: 
Recipe type: Duck / Poultry
Cuisine: French
Prep time: 
Cook time: 
Total time: 
Serves: 2
 
Duck A L'Orange is one of the best known and loved dishes of French classic cuisine. Infused with the flavor of citrus and lovingly roasted to perfection, Duck A L'Orange is truly memorable.
Ingredients
  • 1.8kg Duck
  • 4 Oranges
  • 95g Light brown sugar
  • 125ml Cider vinegar
  • 80ml Grand Marnier
  • 30g Butter
Instructions
  1. Cut an orange in half and put it to one side.
  2. Cut away any excess skin and fat from the neck and tail of the duck.
  3. Cut through the skin along the breast bone, then using your shears cut through the breast bone. Open up the duck and press down on the pelvis firmly to flatten it.
  4. Pat the duck dry, then rub the skin thoroughly with the orange halves.
  5. Place the duck on a rack in a roasting pan and using a carving fork, prick skin all over to allow the fat to render out.
  6. Roast the duck in a preheated oven at 150c or 300f and roast for 45 minutes.
  7. While the duck roasts, heat a pan over medium low heat and melt the sugar, tipping the pan or stirring the sugar to ensure even browning.
  8. Pour in the vinegar, standing back from the pan, as it will spatter. The sudden temperature change will make the melted sugar turn to toffee.... this is normal.
  9. Keep stirring, bring the solution to a boil, and boil for 3 to 4 minutes. By this stage the toffee will have mostly dissolved, then add the orange juice and grand marnier.
  10. Bring this back to a boil and boil for 2 minutes, then remove the pan from the heat.
  11. After the initial 45 minutes of roasting, remove the duck from the oven and drain any fat from the pan. Raise the temperature of the oven to 180c or 350f, spoon some of the orange sauce over the duck and return it to the oven for a further 45 minutes.
  12. Remove the duck from the oven every 10 minutes and spoon a bit more of the sauce over the bird.
  13. After 45 minutes, remove the pan from the oven and transfer the duck to a platter and cover it with foil.
  14. Skim any excess fat from the pan then strain the juices through a sieve back into the frying pan, and add the orange zest and butter. Reheat this over medium heat until it just comes to a boil.
  15. Cut the duck in half up the spine, transfer the halves to platters and spoon the orange sauce over the duck before serving.


Mayo Batter Deep Fried Chicken Wings. Crispy Deep-fried chicken wings with a unique mayo batter.

mayo-batter deep-fried chicken wings,deep-fried chicken wings recipe,famous brand deep fried chicken wings,deep-fried wings in batter,crisp deep-fried wings,deep-fried wings batter recipe,how to deep-fry chicken wings,best buffalo wings recipe,super bowl recipes chicken wings,, deep fried chicken wings batter, deep fried chicken wings time, deep fried chicken wings calories, deep fried chicken wings recipe food network, deep fried chicken wings temperature, deep fried chicken wings recipe easy, deep fried chicken wings no flour


Mayo Batter Deep Fried Chicken Wings. Crispy Deep-fried chicken wings with a unique mayo batter.
Author: 
Recipe type: Chicken / Poultry
 
Crispy deep-fried chicken wings with the most unique flavor and texture. The combination of spices, mayonnaise and crispy coating make this a sure winner.
Ingredients
  • 12 Chicken wings, tips discarded, cut through middle joint into buffalo wings
For the batter
  • ½ Cup Tangy mayonnaise
  • 3 Tbs Chicken spice
  • 3 Tbs Tapioca flour (can substitute cornflour)
To coat
  • ½ Cup finely crushed corn flakes mixed with ½ cup all-purpose flour
Instructions
  1. Cut the wing-tips from the wings and discard.
  2. Cut through the center joint of the wings.
  3. Mix the chicken spice and the tapioca flour together.
  4. Place the mayonnaise in a large mixing bowl and add the spice-flour mixture. Mix this together until you have a thick, smooth paste.
  5. Add the chicken wings to the bowl and stir until all the wings are well coated with the batter.
  6. Dredge the wings in the cornflake mixture to get a good solid coating.
  7. Transfer the wings to a platter and allow them to marinate and set in your refrigerator for at least 4 hours - preferably over night.
  8. Half-fill your pan with oil. Heat the oil to 170c / 325f.
  9. Carefully drop the wings into the oil and fry them for 3 minutes per side. Depending on the size of your pan, you may have to a few batches.
  10. Remove the wings from the oil and drain on kitchen paper before serving.


Scroll to top

Kitchen Conversions

Convert:
Masses
to:
Volumes
to:
Temperatures
to:
Lengths
to: