Simple Sous Vide Eggs. Sous Vide Simpson Eggs - a Fun and Tasty Treat!!!
Author: Whats4Chow
Recipe type: Eggs / Breakfast
Prep time:
Cook time:
Total time:
Simple Sous Vide Eggs. If you want to get technical, this should be cooked in a circulation sou vide bath, but this is the quick and easy version, requiring no special equipment, with very similar results to the real thing. I call them Simpson Eggs as a result of the spiky tops resembling Bart Simpson's hair.
Ingredients
Eggs
Butter
Cling-wrap
Instructions
Take a piece of cling-wrap and a small dish. Rub a little butter in the dish, and then in the center of the plastic.
Press the plastic into the dish and crack an egg into the indentation in the plastic.
Lift the corners of the cling-wrap up together to enclose the egg. Repeat this until all of your eggs are wrapped.
Half fill a pot with boiling water and put this over medium low heat. You don't want the water to boil, but merely keep the heat. The temperature should be between 70 & 80 Celcius.
Using a double boiler makes this simpler, but this is not absolutely necessary.
Hang the eggs over the edge of the pot so that the entire egg is in the hot water.
Allow this to stand for 10 minutes, then lift the eggs from the water, unwrap them carefully and serve immediately.
How to Make Perfect French Fries. Crispy and Lightly Golden with a Creamy Inside!!!
Author: Whats4Chow
Recipe type: Vegetable / Accompaniment
Cuisine: French / American
Prep time:
Cook time:
Total time:
Making perfect French Fries takes a little long than just frying up some cut potato, but it is well worth the effort.
Ingredients
Potatoes
Boiling kettle water
Oil for frying
Instructions
Peel and cut the potatoes into fries of anything from 4mm matchstick fries to 12mm fries.
Place the fries in a heatproof bowl and pour boiling water over the potatoes. Allow this to stand for 15 minutes.
Drain the fries and pat them dry thoroughly.
Heat your oil to 160c or 310f and fry the potato for 2 minutes. Use a slotted spoon to remove the fries from the oil and transfer them to a large platter to cool. Allow them to cool for 5 minutes.
At this stage you can freeze the fries or refrigerate the fries for processing later.
Once the fries have cooled, reheat your oil to 190c or 375f and fry the chips for a further 3 minutes until crisp.
Due to the blanching process in the beginning the fries will not turn the muddy brown color so often seen. Instead they will maintain a beautiful creamy golden color.
Rustic Gourmet Artisan Pizza. How to Make aGourmet Artisan Pizza From Start to End.
Author: Whats4Chow
Recipe type: Pizza
Cuisine: Italian
Serves: 2
This pizza is absolutely delicious, with a super-crispy no-knead sour-dough crust topped with marinated mushrooms, sundried tomatoes, peppers, mature cheddar and mozzarella - then garnished with crispy deep-fried shoe-string onions, fresh basil and Parmesan shavings.
Combine the strong white flour, yeast and salt in a large container. Make well in the center and pour in the water.
Mix this until a dough comes together and it comes away from the sides of the container.
Put the lid on the container and let this stand overnight at room temperature.
For the toppings, slice the peppers into thin strips and cut the sun-dried tomato into strips.
Open up your dough container. You will see that it doubled in size, and the gluten will be very well developed.
Lightly oil a 30cm pan and press half of the dough out over the surface of the pan evenly. It helps to oil your hands when doing this.
Transfer the pan to a preheated range set to medium high. Cook the base until the dough is well risen and the underside is well charred. Remove the pan from the heat and transfer the pizza to a baking sheet.
Cool the pan under cold running water for a minute before continuing with the second base.
To make up the pizzas, spread half of the shredded cheddar across each base.
Spread half the mushrooms across each base, followed by the mixed peppers and sun-dried tomatoes.
Scatter the cubed mozzarella across each base along with some of the fresh basil leaves.
Heat your oven to maximum...
Slide the pizzas from the baking sheets directly onto the rack in your oven. Bake the pizzas until the upper crust of the pizza is golden and the cheese is well melted.
Remove them from the oven, garnish with shoe-string onions, more fresh basil and shavings of Parmesan.
How to Make Spring Roll Wrappers. Quick and Easy Homemade Spring Roll Wrappers / Skins.
Author: Whats4Chow
Recipe type: Pastry / Batter
Cuisine: Chinese
Prep time:
Cook time:
Total time:
Serves: 12
How to Make Spring Roll Wrappers / Skins. Making your own spring roll wrappers is quick and easy. Check out this quick demonstration to how to make your own homemade spring roll skins. The recipe is easily scaleable up to any quantity required.
Ingredients
½ Cup All purpose flour
¼ Cup Cornflour
¼ Tsp salt
150ml Water
Instructions
Place the all purpose flour, cornflour and salt in a mixing bowl.
Pour in the water and whisk this until you have a thin smooth batter.
Heat your range over medium heat. Don't place the pan on the range until you're ready to start. Place the pan on the heat and using a brand new camel hair brush, paint the batter onto the surface of the pan. Paint until the entire surface has a thin, but even coating all over. (by brand new I mean it must be absolutely clean, and it must have natural bristles that will not melt or impart plastic chemicals to the food)
The coating sets very quickly, and the pan gets hotter and hotter, the skin will start to peel away from the edges of the pan.
Gently peel the skin from the pan and transfer to a platter. Cover it with a damp tea towel.
To continue, cool the pan down by running under your cold water tap for 10 seconds, then drying it off. Continue with the next wrapper, then cool the pan, and so on until all of the wrappers are done.
This quantity of batter will make 12 8 inch or 20cm wrappers. Simply multiply it out to the quantity you require.
KFC Chicken Burger - Original Recipe - The Real Secret to KFC Fried Chicken 1st by Whats4Chow.com
Author: Whats4Chow
Recipe type: KFC Fried Chicken / Poultry
Cuisine: American
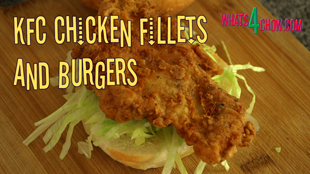
KFC Chicken Burger Video Recipe This is Part 2 of a 3 Part series on how to make KFC Fried Chicken. Part 2 is all about fried chicken breast fillets and in particular, KFC Chicken Fillet Burgers. If you missed Part 1 you will need to view this first in order to understand the process used. You can find Part 1 HERE WHATS4CHOW.COM IS THE FIRST TO PUBLISH THIS METHOD - I AM SURE THAT THIS VIDEO WILL BE COPIED BY NUMEROUS WEBSITES AND VIDEO CHANNELS WITHIN A VERY SHORT SPACE OF TIME - TO THE FREELOADERS WHO INEVITABLY WILL STEAL MY HARD WORK, PLEASE AT LEAST HAVE THE DECENCY TO GIVE OUR CHANNEL AND WEBSITE THE CREDIT IT DESERVES FOR DECODING THE MYSTERY OF KFC'S INSANELY GOOD TASTE, AROMA AND TEXTURE.
Ingredients
The Chicken
8-12 Chicken breast fillets (100g - 125g each)
For the Spice Blend
3 Tsp Paprika
2 Tsp Onion salt
1 Tsp Dried sage
1 Tsp Garlic powder
1 Tsp Oregano
1 Tsp Cayenne pepper
1 Tsp Cracked black pepper
1 Tsp Dried basil
1 Tsp Dried marjoram
1 Tsp Dried coriander
For the Curing Brine
100g Dairy or Kosher salt (any non-iodated salt is fine)
1 Tsp Whole black peppercorns
1 Corn of whole allspice
12.5g Saltpetre
1 Tsp Ginger
50g Sugar
15g Bicarbonate of soda
Other
2 Cups all purpose flour
4-6 eggs lightly beaten
Instructions
Mix the curing brine discussed in episode 1, bring it to a boil stirring frequently, lower the heat and simmer for 5 minutes.
Remove the brine from the heat and allow it to cool completely.
Take 8 to 12 chicken breasts of 100 to 125g each and place them in a large sterilized container.
Pour the curing brine over the breasts, put the lid on the container and allow the breasts to cure in your refrigerator for 12 hours. The reason for time being half that of the chicken pieces is that there is no skin, and the surface area of the breast is far bigger, and the meat is thinner.
After 12 hours, combine the second half of the spice mix with 2 cups of all purpose flour and lightly beat the eggs.
Sprinkle a solid layer of the spice mix over the surface of a large platter.
Remove the chicken from the brine and tap the breasts down to an even thickness of 10mm or just under half an inch using your meat mallet.
To coat the fillets, dredge them in the seasoned flour then dip them in the egg making sure to wet all of the flour.
Dredge them in the flour again making sure to get a good solid coating.
Transfer the coated chicken to the floured platter and allow the coating to set for 20 minutes.
Fill your pan with oil to a depth of 25mm or 1 inch and heat this to 150c or 300f.
Carefully lower a few breasts into the pan and fry them for 20 minutes, turning halfway through.
Remove the fillets from the oil and keep warm in a low oven until the remaining breasts are fried.
To serve, butter the buns, top the lower half with shredded lettuce, then top each of these with chicken.
Top the chicken with tangy mayonnaise, followed by the top of the bun then serve immediately.
KFC Fried Chicken Secret Recipe Kfc fried chicken is legendary, and there must be hundreds of websites and videos claiming to have cracked the secret recipe of 11 herbs and spices. Others get into deep discussions about how the chicken is pressure fried. Over time I have tried many of these copycat recipes and can only say that it was one disappointment after the next. None of them even came close to the real thing. Today I will reveal to you the actual secret behind the legendary taste, aroma and texture of this iconic chicken. Before I continue, I would just like make a point. Whats4Chow.com is the FIRST TO PUBLISH THIS, and I am sure that there will be a load of other channels copying my video within a very short time of this being published. Unfortunately there is nothing I can do to prevent this, but to those free loaders out there that will inevitably copy my work, please have the decency to give our channel and website the credit it deserves for finally decoding the mystery of the world's finest chicken brand. Let's get started by saying that it is not the secret blend of 11 herbs and spices, and it is not the use of pressurized deep fryers, or the type of oil or shortening used to do this. The secret to the insanely good flavor, texture and aroma is in the preparation of the chicken before it even coated. In fact, using this method the chicken tastes very close to the real thing even without the 11 herbs and spices!
Ingredients
The Chicken
8-12 Chicken thighs and drumsticks
For the Spice Blend
3 Tsp Paprika
2 Tsp Onion salt
1 Tsp Dried sage
1 Tsp Garlic powder
1 Tsp Oregano
1 Tsp Cayenne pepper
1 Tsp Cracked black pepper
1 Tsp Dried basil
1 Tsp Dried marjoram
1 Tsp Dried coriander
For the Curing Brine
70g Dairy or Kosher salt (any non-iodated salt is fine)
1 Tsp Whole black peppercorns
1 Corn of whole allspice
12.5g Saltpetre
1 Tsp Ginger
50g Sugar
15g Bicarbonate of soda
Other
2 Cups all purpose flour
4-6 eggs lightly beaten
Instructions
Combine the paprika, onion salt, sage, garlic powder, oregano, chilli powder, black pepper, basil, marjoram and coriander in a bowl and mix it together, then divide this in half.
Pour 2.5lt of filtered water into a pot and add half of the spice mix along with all of the curing brine ingredients.
Bring the pot to a boil, stirring frequently. Reduce the heat and allow the pot to simmer for 5 minutes.
Remove the pot from the heat and allow the brine to cool completely.
Using a carving fork or similar tool, poke holes through the skin of the chicken pieces, then place them in a large sterilized container.
Pour the cooled brine over the chicken pieces, put the lid on and let this cure in your refrigerator for a full 24 hours.
Before I continue, for this recipe to succeed, you cannot omit anything, especially the saltpetre and bicarb. The proper curing process is where the taste, texture and juiciness comes from.
After 24 hours, remove the chicken from the brine.
Combine 2 cups of all purpose flour with the other half of the spices, and lightly beat 4 eggs.
Dredge the chicken in the flour mixture, then dip it in the egg making sure to wet all of the flour. Dredge the chicken in the flour again making sure to get a good solid coating.
Sprinkle a layer of the flour mixture onto a platter, transfer the coated chicken pieces to the platter and allow the coating to set for 20 minutes.
Half fill your wok or pot with oil. Heat the oil to 160c or 325f. Fry the chicken pieces for 20 minutes, turning over halfway.
Remove the chicken from the oil, drain on kitchen paper and serve.
Just a few more notes before we go....
The chicken must fry for at least 20 minutes. If you fry hotter and shorter, the coating will have a chalky texture.
The chicken is cured, and as a result it can stand in a low oven for extended periods of time with no health risks, just as it does in the store. This makes it possible to make a mountain of chicken before your guests arrive.
Smaller cuts like the KFC wings and chicken burgers will be covered in the next few days. Please subscribe for notifications and updates.
Chicken Galantine / Ballotine - How to debone, stuff & roll a whole chicken for roasting.
Author: Whats4Chow
Recipe type: Chicken / Poultry
Cuisine: French
Prep time:
Cook time:
Total time:
Serves: 4
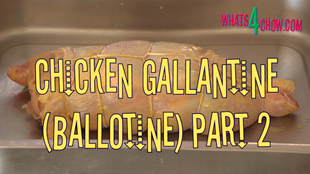
This 2 Part demonstration will show you how to debone a whole chicen, make the stuffing, roll it and tie it, and finally roast it. Chicken Galantine or Ballotine is a classic recipe, and can be stuffed with anything, but I have included a stuffing / filling that is a sure winner.
Ingredients
1 x 1.6kg Chicken
250g Streaky Bacon
300g English spinach
70g Feta Cheese
Butter for brushing
Butchers Twine
Instructions
Part 1
Remove the wings at the elbow joint.
With the chicken breast side up, pull the neck skin back and slice either side of the wishbone. Reach into the incision and pull the wishbone free.
Roll the chicken onto its side and slice through the skin all the way down the spine.
Move the wing up and down, feeling for the articulation. place your knife here and slice through the joint. Repeat with the other wing.
Stand the chicken upright. Hold the carcass with one hand. With other hand grab the whole wing and pull this downward and away from the carcass until the oyster is exposed. Repeat this with other wing.
Swivel the chicken around the chicken around, hold the carcass firmly with one hand. Place the index finger and middle finger of the other hand on either side of the breast bone or sternum and pull both breasts downward. The fillets will be left behind on either side of the sternum. We will rescue those later.
Turn the chicken onto its breast. Using a pointed sharp knife, cut the oysters free.
Grab one leg, move it sideways and upward, then pull it straight downward, cracking the joint open. Slice through the joint. Repeat this with the other leg.
Grab the carcass firmly and pull this free from the chicken.
To rescue the fillets from the carcass, simply slide your thumbnail under the fillets on either side of the sternum. Put these aside.
To debone the leg, cut around the leg joint to loosen the flesh. Holding the joint with one hand, scrape the flesh down the bone with the edge of your blade until you reach the drumstick joint.
Cut around the joint to free the flesh, then scrape the flesh down the bone to the end of the drumstick.
Push the bone back into the skin. Using the back of your cleaver, break the bone at the end of the drumstick and pull the whole leg bone free. Repeat this with the other leg.
To remove the bone from the wings, cut around the joint, scrape the flesh from the bone all the way down, then pull the bone free. Repeat this with the other wing.
Open the chicken out flat. To level the meat out, fill the empty spots between the legs and breast with the fillets, then slice at an angle through either side of the breast and flap these forward.
Part 2
Cut the bacon across the grain into thin strips then roughly chop the spinach.
Heat your wok or pan over high heat and fry the bacon for 3 to 5 minutes until it takes on color and is nice and crispy.
Add the spinach and fry this until it is well wilted..... about 3 minutes.
Remove the pan from the heat and crumble the feta into the pan.
Allow this to cool for about 15 minutes.
To stuff the galantine, press some of the filling into each leg, then spread the remaining filling evenly across the chicken being careful not to get too close to the top and bottom.
Fold one half of the chicken over across the center line, then fold the other half over this.
Using butchers twine, tie the legs together. Using half hitch loops tie the rest of the chicken closed.
Roll the chicken over and loop the twine through the cross twines then tie it up at the beginning.
Place the chicken in roasting pan, brush it liberally with melted butter then roast in a preheated oven for 45 minutes plus 15 minutes extra for each pound or 450g of chicken.
Remove the galantine from the oven, allow it to rest for 5 minutes before carving and serving.
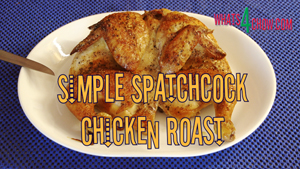
This quick demonstration will show you the correct way to spatchcock a chicken. Included in the demonstration is how to cut the chicken for serving once it has been roasted. A spatchcocked chicken cooks more evenly, browns more evenly and cooks quicker than a whole chicken.