Turkey Fold-Over. How to use Turkey Left-Overs – Delicious Baked Turkey Buns.

how to use turkey left-overs,thanksgiving left-overs,christmas left-overs,turkey fold-overs,turkey turnovers,, Turkey Leftover Ideas, Turkey Leftover Recipe, Leftover Turkey, Leftover Turkey Recipe, leftover roast turkey meat, thanksgiving leftover recipes, turkey leftover recipes, thanksgiving leftovers recipes, what to do with leftovers, turkey club sandwich, thanksgiving turkey leftover idea, turkey sandwich


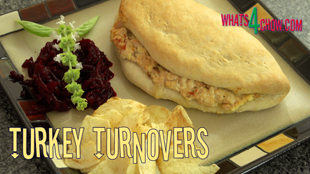
Turkey Fold-Over. How to use Turkey Left-Overs - Delicious Baked Turkey Buns.
Author: 
Recipe type: Left-Overs Recipe Ideas
Cuisine: American
Prep time: 
Cook time: 
Total time: 
Serves: 4
 
How to use Turkey Left-Overs. Baked turkey turn-overs are agreat way to use any left-over turkey meat. In fact you can even use any of the left-over meat in combinations, or on their own, mixed with the other ingredients.
Ingredients
For the Dough
  • 500g Strong White flour
  • 10g Instant yeast
  • 10g Salt
  • 10g Sugar
  • 300ml Lukewarm water
For the Filling
  • 250g Cooked Turkey or other left-over meat
  • 3 Tbs finely chopped pickled jalapeno
  • 200ml Sour cream
  • 80g Feta cheese
  • 6 Tbs Chopped sun-dried tomato
Instructions
  1. To make the dough, place the flour, yeast, salt and sugar in a large mixing bowl. Stir these together briefly, then pour in the warm water.
  2. Using a wooden paddle, stir this until a dough starts to come together, then using your hands in the bowl, compress the dough together to pick up and loose bits.
  3. Turn the dough out onto a lightly floured work surface and knead it for 5 minutes until it is smooth and elastic.
  4. Place the dough back in the mixing bowl, cover the bowl with cling-wrap and allow the dough to rise for 40 minutes in a warm place.
  5. While the dough rises, finely chop your cooked meat. Place this in a bowl and add the finely chopped pickled jalapeños, sour cream, feta cheese and chopped sun-dried tomato. Mix this until totally combined.
  6. Cover a wire rack with foil and give it a light coating of oil. Turn the dough out and knead it briefly.
  7. Flatten the dough into a large disc and cut it into quarters. Roll each quarter into a ball, flatten the ball, then roll into a circle of 20cm or 8 inches in diameter.
  8. Spoon a quarter of the filling across the center of the dough. Pick up the far side of the dough and pull it of the filling. Use your finger tips to tamp the edges down.
  9. This will not seal the edges, it simply thins them out, and prevents them from flying up while cooking. The edge will open during cooking, but only enough to reveal the filling.
  10. Place the completed crescents on the rack, cover the rack with and upturned roasting pan and allow this to rise for 20 minutes in a warm place.
  11. Bake the fold-overs in a preheated oven or gas barbecue at 180c or 350f for 25 minutes until lightly golden.
  12. Remove from the heat and serve immediately with the accompaniments of your choice.


Gourmet Russian Hotdogs. Footlong Russian Sausage Baked in Soft Flavored Dough.

gourmet hotdogs,gourmet russian hotdogs,hot dog recipe,how to make a russian hotdog, gourmet hot dog, gourmet hot dogs recipe, gourmet hot dogs london, gourmet hot dogs denver, gourmet hot dogs toronto, gourmet hot dogs nyc, gourmet hot dogs manly, gourmet hot dogs perth, gourmet hot dogs chicago,gourmet hotdog buns,gourmet hotdog buns recipe,soft hotdog buns,how to make the best hotdog buns,gourmet hotdog rolls


Gourmet Russian Hotdogs. Footlong Russian Sausage Baked in Soft Flavored Dough.
Author: 
Recipe type: Fast Food
Cuisine: American
Prep time: 
Cook time: 
Total time: 
Serves: 2-4
 
These gourmet hotdogs are huge! A footlong Russian sausage is wrapped in a soft bun dough flavored with sun-dried tomato and parmesan cheese, then baked to golden perfection!
Ingredients
  • 2 Footlong Russian sausages
  • 2 Cups All-purpose flour
  • 10g Instant yeast
  • 7.5ml Salt
  • 15ml Sugar
  • 250ml Warm water
  • 60ml Sun-dried tomato, finely chopped
  • 30g Parmesan cheese, shredded
  • ⅓ Cup All-purpose flour (to work the dough)
Instructions
  1. Place the flour, yeast, salt and sugar in a large mixing bowl. Mix them together briefly, then pour in the water. Mix this to a very soft and sticky dough.
  2. Add the chopped sun-dried tomato, shredded parmesan cheese and the oil.
  3. Mix this until totally combined, cover the bowl with cling-wrap and allow the dough to rise for 40 minutes in a warm place.
  4. After 40 minutes, the dough will be well risen and the gluten clearly visible. From the second batch of flour, lightly flour the work surface and turn the dough out.
  5. Sprinkle the top of the dough with flour and start to work the flour into the dough. Continue sprinkling extra flour until all of the flour has been worked into the dough. The dough will be soft, smooth, and elastic.
  6. Divide the dough in half and roll each half into a sausage of 10 inches long. Flatten the dough out until it is about 3 inches wide by 12 inches long, and oval in shape.
  7. Place a Russian sausage on the dough, lift the far edge of the dough over the sausage and stretch it down the other side.
  8. Lift the near side of the dough up and stretch over to enclose the sausage. The ends of the sausage will still protrude from the dough.
  9. Grease a piece of foil and transfer the dogs to the foil. Place the foil on top of a wire rack and using a sharp knife slash through the tops of the dogs at an angle, making sure to cut the dough and the sausage.
  10. Cover this with an upturned roasting pan and allow the dogs to rise for a further 20 minutes.
  11. Heat you gas barbecue or your oven to 180c / 350f and bake the dogs for 25 minutes and the rolls are lightly golden and sound hollow when tapped on the side.
  12. Remove from the barbecue or oven and serve immediately with the accompaniments of your choice.


Deep-Fried Burger Buns – South African Vetkoek, Crispy on the Outside, Soft on the Inside!!!

south african vetkoek recipe,how to make vetkoek,deep-fried burger buns,crispy fried burger buns,how to make deep-fried burger buns, deep fried burger buns, deep fried hamburger buns, Burgers, Best Burger recipe ever, deep fried hamburger, Homemade Hamburger Buns, deep-fried Honey Bun, Hamburger (Dish), Best Burger Recipes, Burger Lab


Deep-Fried Burger Buns - South African Vetkoek, Crispy on the Outside, Soft on the Inside!!!
Author: 
Recipe type: Bread, Burger Buns, Deep-fried
Cuisine: South African
Prep time: 
Cook time: 
Total time: 
 
Deep-Fried Burger Buns!!! In South Africa these crispy golden buns are called Vetkoek, and are filled with any number of tasty fillings. These buns also make fantastic burger buns with their crispy golden outside and soft moist inside.
Ingredients
  • 500g Strong white flour
  • 10g Instant yeast
  • 10g Salt
  • 10g White sugar
  • 300ml Warm water
  • Oil for deep-frying
Instructions
  1. Add the flour, yeast, salt and sugar to a large mixing bowl. Stir these to combine and pour in the warm water.
  2. Using a wooden paddle, mix this until a dough comes together and it comes away from the sides of the bowl.
  3. Turn the dough out onto a lightly floured work surface and knead the dough for 5 minutes until it is smooth and elastic.
  4. Return the dough to the bowl, cover the bowl with cling-wrap and allow this to rise for 60 minutes in a warm place.
  5. After rising, punch the dough down and divide it in half for giant buns, quarters for large, eights for regular buns and sixteens for cocktail buns. In this demonstration I am making a mix of large, standard and cocktail sizes.
  6. Knead the pieces briefly and shape them into flattened balls. Transfer the buns to a greased baking sheet, cover with a damp tea towel and allow them to rise again for 20 minutes.
  7. Heat your oil to 180c or 350f and fry the buns in batches for 3 to 4 minutes per side and they are crispy and golden.
  8. Remove the buns from the oil and drain any excess oil on kitchen paper. Allow them to cool for at least 15 minutes before cutting.
  9. To cut the buns, it is easier to punch a hole in the edge, then snip the crispy outside along the edge with your scissors to reveal the beautifully soft and moist inside.


Perfect Hotdog Rolls. Soft and Flavorful Hotdog Buns – Easy Recipe by Whats4Chow.com

hotdog rolls,hotdog buns,perfect hotdog rolls,how to make perfect hotdog rolls,how to make perfect hotdog buns,hotdog rolls recipe,hotdog buns recipe,soft hotdog rolls recipe,soft hotdog buns recipe,how to make soft hotdog rolls,how to make soft hotdog buns, hot dog buns, hot dog roll, Hot Dog (Dish), hot dog rolls ingredients, hot dog rolls recipe uk,hotdog rolls at home,homemade hotdog rolls,homemade hotdog buns


Perfect Hotdog Rolls. Soft and Flavorful Hotdog Buns - Easy Recipe by Whats4Chow.com
Author: 
Recipe type: Fast Food / Bread
Cuisine: American
Prep time: 
Cook time: 
Total time: 
Serves: 8
 
Perfect Hotdog rolls / buns are really easy to make, and despite the long rising times are well worth the effort.
Ingredients
  • 450g Strong white flour
  • 200ml Warm water
  • 25g Melted butter
  • 50g Sugar
  • 2 Eggs
  • 1 Tsp Salt
  • 2 Tsp Yeast
Instructions
  1. Add the sugar and yeast to the warm water and stir until the sugar has dissolved. Allow this to rest for 10 minutes.
  2. In a separate bowl, beat 1 egg and 1 additional egg yolk. Place the white of the second egg in a tumbler, add 4 tablespoons of water and whisk this together. Put this aside until later.
  3. In another bowl, melt the butter in your microwave.
  4. Place the flour in a large mixing bowl, add the egg and egg yolk, salt, melted butter and the yeast mixture.
  5. Using a wooden paddle, mix this until a dough comes together and it all comes away from the side of the bowl.
  6. Turn the dough out onto a lightly floured work surface and knead it well for 10 minutes until it is very smooth and elastic. Sprinkle lightly with a little extra flour every time the dough becomes too sticky to handle.
  7. Return the dough to the mixing bowl, cover the bowl with clingwrap and allow the dough to rise for 60 minutes in a warm place.
  8. Once risen, turn the dough out and using your scale divide the dough into 8 equal pieces.
  9. Lightly flour your work surface and press each piece out 3 inch by 5 inch rectangles.
  10. Fold the long side of the rectangle over the centerline, then the other log side over this. Turn the roll over and transfer it to a greased baking sheet. Repeat this until all of the rolls are formed.
  11. Place the rolls on the sheet with about half an inch or 12mm between them. Like this, as they rise they will support one another and rise upwards instead of sideways.
  12. Dust the tops of the rolls with flour, cover loosely with a damp tea towel and allow the rolls to rise again for 60 minutes.
  13. Heat your oven to 190c or 375f. Brush the rolls with the egg white mixture, then bake the rolls for 15 minutes until golden brown.
  14. Remove the rolls from the oven and transfer them to a wire rack to cool.


How to Make Garlic Bread. Make the Most Delicious Garlic Bread Using Baguettes.

how to make garlic bread,how to make garlic bread with baguettes,how to make garlic french bread,, garlic bread recipe, Garlic Bread (Dish), how to make, homemade, homemade garlic bread recipe, healthy garlic bread, cheesy garlic bread recipe, how to make garlic bread from scratch, how to make garlic bread in oven, how to make garlic bread at home, how to make garlic bread from scratch


How to Make Garlic Bread. Make the Most Delicious Garlic Bread Using Baguettes.
Author: 
Recipe type: Bread
Cuisine: French
Prep time: 
Cook time: 
Total time: 
Serves: 4-8
 
In our previous video we baked two stunning traditional French Baguettes. This video show you how to make Garlic Bread using these 2 loaves.
Ingredients
  • 2 x 14 inch Baguettes
  • 100g Butter
  • 30g Minced garlic
  • ½ Tsp Salt (optional)
Instructions
  1. Mix 30g of minced garlic into 100g of softened butter and the salt.
  2. Working with one loaf at a time, slice the loaves leaving the bases intact.
  3. Open up the slices and spread a generous dose of garlic butter between each slice.
  4. Place each loaf on a sheet of foil and spread any remaining butter over the top of the baguettes.
  5. Fold the foil over the top and twist the ends.
  6. Bake the loaves in a preheated oven at 180c or 350f for 20 minutes.
  7. Remove the loaves from the oven, unwrap them and serve immediately.


French Baguette – How to Make Baguettes at Home – Traditional French Bread Recipe

french baguettes,how to make french baguettes at home,easy french baguettes recipe,traditional french baguettes recipe,homemeade french baguettes recipe,french bread recipe,how to make french bread,homemade french bread recipe, cold-fermented baguette recipe, how to shape a baguette, how to make french baguette by hand, how to make french baguette without bread machine, how to make french baguette bread video


French Baguette - How to Make Baguettes at Home - Traditional French Bread Recipe
Author: 
Recipe type: Bread / Dough
Cuisine: Dough
Prep time: 
Cook time: 
Total time: 
 
Despite the long rising times, French Baguettes are really easy to make. This demonstration will show you how to make French Baguettes at home.
Ingredients
For the Sponge
  • 100g Strong white flour
  • 5g Yeast
  • 300ml Warm water
To finish the dough
  • 300g Strong white flour
  • 10g Yeast
  • 1 Tsp Salt
Instructions
  1. Place 100g of the strong white bread flour and 5 grams of the yeast in a mixing bowl. Stir them to combine, then pour in the warm water.
  2. Mix this well until everything is totally combined. Cover the bowl with clingwrap and allow this to stand for 60 minutes.
  3. After 60 minutes, the yeast will have developed extensively and you will have bubbling mass.
  4. Add the remaining flour, yest and salt and mix this in.
  5. Mix this until a dough starts to come together, then use your hands to work the dough in the bowl until all of the loose flour has been incorporated into the dough ball.
  6. Turn the dough out onto a lightly floured work surface and knead this for 5 minutes until it is smooth and elastic. Sprinkle the dough with a little flour every time it becomes too sticky.
  7. Sprinkle dough into the bottom of the mixing bowl.
  8. Roll the dough into a smooth ball and return it to the bowl. Cover the bowl with clingwrap and allow this to rise for 30 to 40 minutes until it has doubled in size.
  9. Once risen, don't knock the dough down. You want to leave as much air in the dough as possible.
  10. Dump the dough out onto the work surface and using a large knife, cut it into 2 pieces.
  11. Working as gently as possible, roll each half into a long loaf.
  12. Transfer the loaves to a baking sheet and sprinkle lightly with flour before covering loosely with a damp kitchen towel.
  13. Allow the baguettes to rise for another 60 minutes.
  14. Remove the towel and sift a light layer of flour over the top of the loaves.
  15. Using a sharp thin blade knife, slash the surface of the loaves every 20mm at an angle.
  16. Bake the baguettes in a preheated oven at 220c for 20 minutes.
  17. Remove the loaves from the oven and transfer them to a wire rack to cool.


How to Make Spring Roll Wrappers. Quick and Easy Homemade Spring Roll Wrappers / Skins.

spring roll wrappers,spring roll skins,how to make spring roll wrappers,homemade spring roll wrappers,how to make spring roll wrappers at home,easy springroll wrapper recipe,how to make spring roll skins,spring roll wrappers recipe video,lumpia wrappers,popiah skin recipe,how to make spring roll wrappers,how to make spring roll wrappers with wheat flour,how to make spring roll wrappers at home video,how to make spring roll wrappers without egg at home,how to make spring roll wrappers from scratch


How to Make Spring Roll Wrappers. Quick and Easy Homemade Spring Roll Wrappers / Skins.
Author: 
Recipe type: Pastry / Batter
Cuisine: Chinese
Prep time: 
Cook time: 
Total time: 
Serves: 12
 
How to Make Spring Roll Wrappers / Skins. Making your own spring roll wrappers is quick and easy. Check out this quick demonstration to how to make your own homemade spring roll skins. The recipe is easily scaleable up to any quantity required.
Ingredients
  • ½ Cup All purpose flour
  • ¼ Cup Cornflour
  • ¼ Tsp salt
  • 150ml Water
Instructions
  1. Place the all purpose flour, cornflour and salt in a mixing bowl.
  2. Pour in the water and whisk this until you have a thin smooth batter.
  3. Heat your range over medium heat. Don't place the pan on the range until you're ready to start. Place the pan on the heat and using a brand new camel hair brush, paint the batter onto the surface of the pan. Paint until the entire surface has a thin, but even coating all over. (by brand new I mean it must be absolutely clean, and it must have natural bristles that will not melt or impart plastic chemicals to the food)
  4. The coating sets very quickly, and the pan gets hotter and hotter, the skin will start to peel away from the edges of the pan.
  5. Gently peel the skin from the pan and transfer to a platter. Cover it with a damp tea towel.
  6. To continue, cool the pan down by running under your cold water tap for 10 seconds, then drying it off. Continue with the next wrapper, then cool the pan, and so on until all of the wrappers are done.
  7. This quantity of batter will make 12 8 inch or 20cm wrappers. Simply multiply it out to the quantity you require.


How to Make Traditional German Pretzels. The Real Recipe with Rye, Parboiled then Baked!!!

traditional german pretzels,how to make pretzels,homemade pretzels recipe,how to make pretzels with rye,real pretzel recipe,best pretzels recipe,pretzels for beer drinking recipe,, how to make soft pretzels, pretzels healthy, pretzels are making me thirsty, homemade soft baked pretzels, superbowl snacks, gourmet pretzels,how to make real german pretzels,healthy rye flour pretzels,make pretzels at home,bar snacks pretzels,pretzels for drinking beer


How to Make Traditional German Pretzels. The Real Recipe with Rye, Parboiled then Baked!!!
Author: 
Recipe type: Breads / Dough / Baking
Cuisine: German
Prep time: 
Cook time: 
Total time: 
Serves: 16
 
Traditional German Pretzels are fantastic with a pint of beer! Salty and sweet, with an awesome chewy texture, these are a real treat! Traditional German pretzels are cooked in a similar fashion to bagels, first par-boiled, then baked. This results in the amazing chewiness which is complimented by the slightly bitter flavor from the rye.
Ingredients
For the Dough
  • 325g Strong white flour
  • 75g Rye flour
  • 2 Tsp Demarara Sugar
  • 1 Tsp Salt
  • 1 Tsp Dried yeast
  • 250ml Warm water
For the Glaze
  • 3 Tsp fine salt
  • 1 Tsp Caster sugar
  • 3 Tbs Warm water
  • Coarse sea salt
For the Simmer Bath
  • 1 Tbs Caster sugar
  • 2lt Water
Instructions
  1. Pour the flour, rye flour, demarara sugar, salt and yeast into a large mixing bowl.
  2. Mix these together then pour in the warm water. Using a wooden paddle mix this until a dough comes together.
  3. Turn the dough out onto a lightly floured work surface, dust the top with flour as well, then knead the dough for 5 minutes until it is smooth and elastic. Dough containing rye flour can be notoriously sticky, so dust the dough with a little extra flour every time it becomes too sticky.
  4. Place the dough back in the mixing bowl, cover it with cling wrap and allow the dough to rise in a warm place for 60 minutes.
  5. Turn the dough out onto the work surface and knead for a further 2 minutes.
  6. Roll the dough into a sausage and cut it into 4 equal pieces. Roll each of these into a sausage and cut these into 4 pieces.
  7. Roll each of these into a rope of 30cm or 12 inches. Form the rope into a semi-circle then twist the ends with a single twist before folding the ends over to meet the inside of the circle.
  8. Place the formed pretzels on a greased baking sheet, cover loosely with clingwrap and allow the pretzels to rise for a further 30 minutes in a warm place.
  9. Fill a large pan with about 2 liters of water and 1 tablespoonful of caster sugar and bring this to a low simmer.
  10. Drop a few of the pretzels into the simmering pan and allow them to cook for 2 minutes per side. Remove these from the water and return them to the baking sheet. Repeat this until all of the pretzels have been boiled.
  11. Combine the salt, sugar and warm water for the glaze and stir this until the salt and sugar has dissolved. Brush the glaze liberally onto the pretzels, then sprinkle with coarse salt.
  12. Bake the pretzels in a preheated oven at 200c or 400f for 25 minutes until crisp and golden and the pretzels sound hollow when tapped.
  13. Remove the pretzels from the oven and transfer them to a wire rack to cool before serving.


How to Bake Panettone – Italian Christmas Bread. Bake Your Own Italian Christmas Cake at Home.

panettone,panettone bread recipe,panettone chistmas cake recipe,italian christmas cake recipe,italian chrismas bread recipe,italian fruit bread recipe,italian fruit cake recipe,how to make panettone,how to bake panettone,video recipe fo panettone,receta, panettone, panettone bread pudding, panettone italiano, panettone bread, panettone cake, panettone ricetta,how to bake panettone in a normal baking tin


How to Bake Panettone - Italian Christmas Bread. Bake Your Own Italian Christmas Cake at Home.
Author: 
Recipe type: Christmas / Cake
Cuisine: Italian
Prep time: 
Cook time: 
Total time: 
 
Panettone is a fruity Italian Christmas bread. It has an astonishing shelf-life of months, and can be prepared well ahead of time. This Panettone recipe is quick and easy to make, even if you don't have a traditional Panettone tin.
Ingredients
  • 400g Strong white flour
  • 75g Butter, softened
  • 50g Caster sugar
  • A pinch of nutmeg
  • Rind of 1 lemon, finely grated
  • 2 Tsp Dried yeast
  • 2 Eggs, lightly beaten
  • 150ml Milk, warmed
  • 125g Seedless raisins
  • 50g Candied citrus peel
Instructions
  1. Place the flour in a large mixing bowl. Add the butter and using your fingertips, rub the butter into the flour until it resembles fine bread crumbs.
  2. Pour in the caster sugar, nutmeg, lemon and orange rind, yeast, raisins and candied peel.
  3. Add the eggs and the warm milk and mix this until a dough comes together.
  4. Turn the dough out onto a lightly floured work surface and knead this for 5 minutes until smooth and elastic, sprinkling a little flour on every time it gets too sticky.
  5. Return the dough to the bowl, cover with cling wrap and allow yo rise for 1 hour and 15 minutes in a warm place.
  6. Traditionally, panettone is baked in a tall cylindrical pan, 120mm or 5 inches in diameter, and 180mm or just over 7 inches tall. This is how you will bake the bread in a regular deep cake pan.
  7. Line the bottom of the pan with a circle of baking paper.
  8. Cut off a length of baking paper just slightly longer than the circumference of the pan. Fold the paper in half lengthways.
  9. Insert the paper into the pan to line the surround.
  10. After the first rise, punch the dough down, then tip it out onto the work surface. Knead the dough for 3 to 5 minutes, then transfer it to the pan. Press the dough into the pan, cover loosely with cling wrap and allow this to rise for a further 45 minutes in a warm place.
  11. Bake the panettone in a preheated at 180c or 350f for 45 minutes until it is a deep golden brown color and sounds hollow when tapped. Check the top for browning halfway through and cover loosely with foil if it is browning to quickly.
  12. Remove the loaf from the oven and turn it out onto a wire rack to cool. Sift a generous layer of icing sugar over the top of the loaf. Allow the loaf to cool completely before cutting.
  13. This loaf will keep for months stored loosely wrapped in a cool, dry place.


Black Olive, Feta & Spinach Muffins. Savory Muffins Recipe with a Taste of the Mediterranean.

savory muffins recipe,savoury muffins recipe,how to make savory muffins,how to make savoury muffins,Black Olive Feta & Spinach Muffins,muffins using olives and feta,muffins using spinach and feta,muffins using black olives and feta,mediterranean style muffins,muffins with feta cheese,muffins in baking paper,make muffins using baking paper,savory muffin recipe vegetarian, savory muffins recipe easy, savory muffin recipes healthy, savory muffin recipe breakfast


Black Olive, Feta & Spinach Muffins. Savory Muffins Recipe with a Taste of the Mediterranean.
Author: 
Recipe type: Baking / Muffins / Breakfast
Prep time: 
Cook time: 
Total time: 
Serves: 12
 
These olive, feta and spinach muffins are dead-easy and quick to make. The flavor is outstanding, and this is simply the best savory muffins recipe around.
Ingredients
  • 240g Self-raising flour
  • 3ml Salt
  • 10ml Baking powder
  • 60g Baby spinach, finely chopped
  • 200g Feta cheese
  • 200g Balck olives, pitted and cut into rounds
  • 1 Egg
  • 300ml Milk
  • 50ml Melted butter
Instructions
  1. Sift the flour, salt and baking powder into a large mixing bowl.
  2. Add the finely chopped baby spinach and the black olive rounds and mix them into the flour, then crumble in the feta cheese.
  3. In a jug, whisk together the milk, egg and melted butter, and pour this into the mixing bowl.
  4. Using a wooden paddle, mix the batter until all of the ingredients are just wet. Over-mixing the batter will result in tough muffins.
  5. Press a square of baking paper into one of the muffin pan holes then fill this with batter. The weight of the batter will hold the paper in place. Continue this until all 12 holes are filled with equal amounts of batter.
  6. Bake the muffins in a preheated oven at 180c or 350f for 30 minutes. Test for doneness by pressing a toothpick or skewer into one of the muffins. If it comes out clean, the muffins are ready, if not, return them to the oven for another 5 minutes.
  7. Remove the muffins from the oven and allow them to cool for 20 minutes on a wire rack before serving.


How to Bake Sponge Pudding with Pears. Malva Pudding with Pears – Quick and Easy Sponge Pudding Recipe.

sponge pudding,sponge pudding with pears,baked sponge pudding,best sponge pudding recipe,sponge pudding video recipe,how to make sponge pudding,quick and easy sponge pudding,malva pudding, malva pudding recipe,how to make malva pudding,malva pudding with pears,easy malva pudding recipe,malva sponge pudding, sponge pudding recipes, sponge pudding and custard, syrup sponge pudding,5], easy old english puddings


How to Bake Sponge Pudding with Pears. Malva Pudding with Pears - Quick and Easy Sponge Pudding Recipe.
Author: 
Recipe type: Dessert / Pudding
Cuisine: English / South African
Prep time: 
Cook time: 
Total time: 
Serves: 8
 
Sponge pudding is a quick and easy way to cater for larger groups. The recipe is dead-simple and it can be made ahead of time and re-heated with no hassle. In South Africa, this is called Malva pudding, and it is an all-time favorite.
Ingredients
  • 8 x Canned pear halves
  • 2 Eggs
  • 250ml Cream
  • 380ml Evaporated milk
  • 1 Cup Sugar
  • 1 Cup all-purpose flour
  • 2 Tsp Baking powder
  • 2.5ml Salt
Instructions
  1. Slice the canned pears and line the bottoms of the 8 ramekins with the slices.
  2. In a large mixing bowl combine the sugar, flour, baking powder and salt.
  3. In a jug, combine the cream, evaporated milk and lightly beaten eggs, then pour this into the flour mixture.
  4. Whisk this until it is smooth. Set the batter aside and allow it to stand for 15 minutes.
  5. Ladle equal amounts of the batter into each of the 8 ramekins.
  6. Bake puddings in a preheated oven at 180c or 350f for 45 minutes until well risen and golden brown.
  7. Remove from the oven and allow to cool for 5 minutes. If you like the pudding on the sweeter side, drizzle a little of the pear syrup over each dessert before serving.


How to Make English Muffins. Light & Fluffy Inside, Crispy Outside – Best English Muffin Recipe.

muffins,english muffins,how to make english muffins,homemade english muffins,perfect english muffins recipe,best english muffins recipe,how to make english muffins at home,english muffins for eggs benedict,eggs benedict recipe, english muffins calories, english muffins ingredients, english muffins nutrition, english muffins breakfast, how to make english muffins from scratch,english muffin dough recipe


How to Make English Muffins. Light & Fluffy Inside, Crispy Outside - Best English Muffin Recipe.
Author: 
Recipe type: Bread, Dough
Cuisine: English
Prep time: 
Cook time: 
Total time: 
Serves: 12
 
A great English muffins requires a rich dough with excellent rising properties. This recipes give you a fantastically light and fluffy inside and crispy outside, with tons of flavor.
Ingredients
  • 4½ Cups all-purpose flour
  • 1¾ Full cream milk
  • 45g Butter
  • 1¾ Tsp Kosher salt
  • 1 Tbs Sugar
  • 1 Large egg, lightly beaten
  • 1 Tsp Baking soda
  • 2 Tsp Dry yeast
  • Cornmeal for dusting
Instructions
  1. Place the flour, salt, sugar, baking soda and yeast in the bowl of your food processor or stand mixer.
  2. Warm the milk and butter together until the butter melts, then whisk in the egg.
  3. Pour this mixture into the dry ingredients and run the processor or mixer until a dough comes together.
  4. Turn the dough out onto a well floured work surface and dust the top of the dough with flour as well.
  5. Knead the dough for 2 minutes, sprinkling with extra flour whenever it gets too sticky.
  6. Roll the dough out to a thickness of 1 inch or 25mm and using a cookie cutter, press out the muffins. Re-roll the off-cuts and continue pressing out muffins until all the dough is used. This recipe will make 12 to 14 muffins.
  7. Dust a large baking sheet with cornmeal, transfer the muffins to the sheet, then dust the tops of the muffins with cornmeal.
  8. Cover the muffins lightly with cling wrap and allow them to rise for 20 minutes in a warm place.
  9. Heat a heavy based pan over medium heat and cook the muffins for 3 to 5 minutes per side until browned and crisp.
  10. Return the muffins to the baking sheet and bake them in a preheated oven at 170c or 325f for 12 minutes.
  11. Remove from the oven and cool on wire racks. The muffins will keep for up to 2 weeks stored in an airtight container.


Scroll to top

Kitchen Conversions

Convert:
Masses
to:
Volumes
to:
Temperatures
to:
Lengths
to: