Queso Blanco is an infinitely flexible ingredient. In this episode we make an alternative to the overplayed tartare sauce - queso blanco sauce makes a perfect dip for seafood, with a mild flavor that does not overpower the food it is served with.
Ingredients
200g Queso Blanco cheese
200ml Cultured Buttermilk
2 Pickled Jalepenos
Salt to taste
Dried red chilli flakes to garnish
Instructions
Dice the queso blanco into small pieces, chop the pickled jalepeno chillies, and measure out the cultured buttermilk. You will also want a teaspoon of red chilli flakes to garnish.
Place all of the ingredient except the chilli flakes into a jug. Using a stick blender, zap this until smooth and creamy.
Season the creamy sauce with salt to taste. Decant the dip to serving bowls, garnish each with a pinch of chilli flakes and serve immediately.
Butter-Fried Queso Blanco. Slices of Queso Blanco Fried until Golden, Topped with Heavenly Sauce.
Author: Whats4Chow
Recipe type: Cheese
Cuisine: Mexican
Prep time:
Cook time:
Total time:
Serves: 2
In our previous episode we made fresh queso blanco or Mexican white cheese. Today we're going fry slices of this cheese in butter until golden, then top it with rich combination of cocktail tomatoes, garlic, sliced pickled gherkin, capers and a unique instant ricotta.
Ingredients
2 x 20mm / ¾ inch Slices of Queso Blanco cheese
40g Butter
8 Cherry / cocktail tomatoes
1 Tbs Chopped garlic
1 Pickled Gherkin, sliced
2 Tbs Pickled capers
90ml Fresh cream
Salt to taste
Dried red chilli flakes to garnish
Instructions
Cut 2 slices of queso blanco from the center of the round of cheese. Cut them 20mm or ¾ inch thick.
Measure out the garlic, butter, red chilli flakes, cream and capers.
Slice the tomatoes in half length-ways, and slice the gherkins.
Heat your pan over medium high heat, add the butter.
Add the cheese to the pan and wipe it around in the butter to coat all over.
Fry the cheese on the flat sides for 2 to 3 minutes until golden.
Turn the cheese over and fry for a further 2 to 3 minutes until golden.
By this stage, the cheese will have softened, so use a spatula to remove it from the pan to avoid damaging it.
Add the tomatoes to the pan and stir these around in the butter for 60 seconds.
Add the garlic and stir this for further 15 seconds until fragrant.
Add the capers and sliced gherkin and stir this briefly to heat it through.
Pour in the cream. Almost immediately, you will see the cream react with the acid in the tomatoes, capers and gherkin.
This reaction in combination with heat causes the cream to convert to full cream ricotta cheese instantly.
Stir this briefly and remove the pan from the heat.
Transfer the fried cheese to platters, top each with half of the sauce.
Garnish the plates with a scattering of red chilli flakes and serve immediately.
Queso Blanco - How to Make Mexican White Cheese. Fresh Mexican Same-Day Cheese.
Author: Whats4Chow
Recipe type: Cheese
Cuisine: Mexican
Prep time:
Cook time:
Total time:
Queso Blanco is a fresh Mexican white cheese. The term fresh refers to the cheese not being aged. It can be eaten the same day it is made. The outstanding feature of Queso Blanco is that it does not melt when cooked, making it the ideal protein to add to soups, stews, stir-fries and even grills.
Ingredients
1 Gallon / 3.75lt Full cream cows or goats milk
60ml Cider vinegar (plus a little extra on the side)
Salt to taste (non-iodated)
Instructions
Pour the milk into a large pot over medium low heat. Over a period of 20 to 30 minutes bring the milk up to a temperature of 83c or 180f stirring regularly.
Once at this temperature, hold the temperature here for 10 minutes by toggling the heat on and off as required.
Pour in the cider vinegar and stir continuously while the curds form. If the whey is not clear after a minute or so, add a little more vinegar, stirring continuously while you do this, until the whey is clear.
Remove the pot from the heat and pour the curds into a muslin lined colander in your sink. Allow the curds to drain briefly, then fold the edges of the muslin over the cheese.
Place and upturned side plate on top the cheese and weigh this down with about 5lb of weight.
Let the cheese press and drain for 3 hours.
Unwrap the cheese and trim the rough edge from the cheese. The trimmings can be used in any dish, so don't discard them.
You will see that the cheese has a medium firm feel, and is remarkably similar in texture and taste to haloumi cheese.
If you're not using the cheese immediately, salt both sides of the cheese and refrigerate wrapped in cling-wrap.
In our next episode we will use this queso blanco to make an amazing butter-fried Queso Blanco cheese dish.
Beef Jerky / Biltong is essentially concentrated beef, having lost 50 to 60% of it's mass in water. This results in burger patties that have more than twice the beef flavor when compared to raw beef. By powdering the jerky / biltong and combining it with the beef mince, you end up with a patty that has tons of super-beefy flavor --- out of this world!!!
Ingredients
30g Beef Jerky / Biltong per 100g ground beef
Salt to taste
Instructions
Thinly slice 30g of jerky for each 100g of beef mince. Once sliced, chop it even finer.
Using your spice grinder, zap the chipped jerky until it is a fine fluffy powder.
Place the beef mince in a large mixing bowl. Add the jerky powder along with a generous pinch of salt.
Massage this together until everything is totally combined.
Using you burger press, press the patties out and transfer them to a platter, separated by grease-proof paper or foil.
Allow these to mature for at least 3 hours, preferably overnight in your refrigerator.
When you're ready to cook your creations, make an indentation in the center of each patty and proceed.
South African Beef Jerky - How to Make Beef Jerky using the Traditional South African Biltong Method.
Author: Whats4Chow
Recipe type: Beef / Preserves
Cuisine: South African
Dried beef is a popular snack in almost every country of the world. In the USA it's called beef jerky, in South Africa it's called Biltong. This episode covers how to make jerky using the Traditional South African Biltong recipe.
you will need 3kg of beef. You can use almost any cut of meat, here I am using the tail ends of the rump.
Whichever cut you decide to use, remember that flavor is in the fat, so your result will be tastier if the beef cut has a strip of fat down the edge.
Cut the beef length-ways into long strips of and inch or 25mm in thickness.
In a bowl, combine the salt, sugar, saltpeter, bicarbonate of soda, cracked black pepper, crushed coriander seeds, chilli flakes and garlic powder.
Arrange the meat in a stainless steel tray and rub the curing mixture evenly into the meat.
Using a sterilized spray bottle, spritz a coating of brown vinegar onto all surfaces of the meat.
Place the pan, uncovered, in your refrigerator overnight.
The following day, half fill a bowl with brown vinegar a dip each strip of beef in the bowl.
Press meat hooks through the thinnest side of each strip.
To dry the beef, hang it in well ventilated area, or in your drying cabinet if you have one. Do not let the strips touch while they dry.
There is no formula as to the length of drying time. This is largely dependent on the moisture content of the meat, the thickness of the cuts, and the ambient temperature and humidity. As a rough guideline, these 1 inch pieces will take 2 to 3 days to dry in a drying cabinet, and 4 to 6 days drying naturally. The time is also directly proportional to how dry you want the beef to be.
Once you are happy that the beef is dried to your satisfaction, unhook it and slice it into thin slices for serving.
Indian Butter Chicken. How to Make Delicious, Fragrant Butter Chicken at Home.
Author: Whats4Chow
Recipe type: Indian Curry
Cuisine: Indian
Prep time:
Cook time:
Total time:
Serves: 4-8
In Today's episode we make delicious, fragrant Indian Butter Chicken, using the Tandoori Chicken we baked yesterday.
Ingredients
1.2kg Cooked Tandoori chicken
100g Butter
160ml Cream
45g Garlic, finely chopped
55g Ginger, finely chopped
5 Green chillies, chopped
1Tsp Paprika
900g Tomatoes
480ml Chicken Stock
Salt to taste
Fresh coriander to garnish
Instructions
Finely chop the garlic, ginger and green chillies. Measure out the paprika, butter, chicken stock and cream. Chop the tomatoes, and cut the entire chicken into bite sized pieces.
Heat the butter in a pan over medium high heat and fry the garlic, ginger and chilli for 2 minutes until fragrant.
Add the paprika and stir this until totally combined.
Add the chopped tomato and the chicken stock. Bring this to a boil, reduce the heat and simmer the tomato for 10 to 15 minutes. The tomatoes must be soft and tender.
Remove the pan from the heat and allow it to cool for 5 minutes. Using your stick blender, puree the tomatoes until smooth.
Return the pan to the heat, add the chicken and bring this to a boil. Reduce the heat and simmer the chicken for 10 minutes until it is absolutely tender.
Add the cream, stir this in until totally combined. Season with salt to taste and serve immediately garnished with fresh coriander. As an accompaniment, any Indian bread will serve well.
Authentic Tandoori Chicken. Tradition Indian Tandoori Chicken, Spiced and Grilled to Perfection.
Author: Whats4Chow
Recipe type: Indian Curry
Cuisine: Indian
Prep time:
Cook time:
Total time:
Serves: 4
In this first episode of 2015 we make authentic Tandoori Chicken. This is the first in a 2-part series covering Tandoori Chicken and Butter Chicken.
Ingredients
1.4kg Chicken
For the Paste
50g Garlic paste
10g Ginger paste
30ml Lemon juice
25g Chilli paste
5ml Salt
For the Marinade
5g Cumin Powder
10g Garam Masala
25g Ginger paste
30ml Lemon Juice
50ml Oil
25g Chilli paste
A few strands of saffron
20ml Yoghurt
To Serve
Sliced onion
Chaat Masala to sprinkle
Cream
Lemon wedges
Instructions
Cut away any excess skin from the neck and butt of the chicken and remove the wing tips. Slice through the breast bone and open the chicken up.
Turn the chicken oven, and with a downward thrust, dislocate the pelvis of the bird.
Using a sharp knife, cut deep incisions into the thighs, drumsticks and breast of the chicken.
In a bowl, combine the garlic paste, ginger paste, lemon juice, chilli paste and salt.
Brush all of the paste onto the chicken making sure to get it into the incisions as well. Let this stand for 30 minutes.
While the chicken stands, combine the cumin powder, garam masala, ginger paste, lemon juice, chilli paste, saffron, oil, salt and yoghurt. Mix this until the oil is totally combined.
Spoon this mixture over the chicken, then allow this to marinate in your refrigerator for 6 hours.
Remove the chicken from the refrigerator, scoop up any over-run marinade and pour it back onto the chicken.
Lift the chicken up, slide a rack underneath, then bake the chicken in a pre-heated oven at 180c or 350f for 80 minutes.
Remove the chicken from the oven, cut it into portions and serve garnished with fresh onion slices, chaat masala, a drizzle of cream and a few lemon wedges.
Chinese Tea Eggs - Marbled Eggs Flavored with Aromatic Chinese Tea and Spices
Author: Whats4Chow
Recipe type: Eggs
Cuisine: Chinese
Prep time:
Cook time:
Total time:
Serves: 10
Chinese tea eggs are sold by street vendors and roadside stops all over China. These aromatic and tasty treats not only look beautiful, but taste like heaven.
Ingredients
10 Eggs
For the Tea Mixture
3 Tbs Light soy sauce
3 Tbs Rice wine or dry sherry
1 Whole star anise
1 Tbs Brown sugar
1 Cinnamon stick
2 Tbs Chinese black tea or 2 teabags black tea
1 Tbs 5-Spice
Instructions
Place the eggs in a saucepan, cover with cold water and bring this to a boil. Lower the heat and simmer the eggs for 10 minutes.
Drain the pot and cool the eggs under cold running water.
Using the back of a teaspoon, tap the egg shells until the entire shell is crazed with cracks.
Place the light soy sauce, rice wine, star anise, brown sugar, cinnamon stick, sliced ginger, black tea and 5 spice in a pot and pour in 1 liter of water.
Bring this to a boil, lower the heat and simmer the mixture for 20 minutes.
Add the eggs to the pot, bring the mixture back to a boil, lower the heat and simmer the eggs gently for 45 minutes.
Remove the pot from the heat and allow the eggs to cool to a manageable temperature in the tea mixture.
When they are cool enough to handle, peel the shells from the eggs to reveal the beautifully marbled and fragrant eggs.
Slice the eggs into halves or quarters, transfer to platters and serve warm or cold.
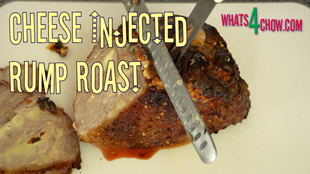
Cheese Injected Beef Rump Roast. Prime Beef Rump Injected with Cheese Wizz, Rubbed with Chilli Sugar and Roasted to Perfection.
Author: Whats4Chow
Recipe type: Beef
Prep time:
Cook time:
Total time:
Serves: 4-6
In todays episode we're going to roast a perfect beef rump roast, injected with Cheese Wizz, rubbed with our special chilli sugar rub. You will nedd to have a meat syringe to inject the cheese. If you don't own one, never fear, they only cost about 10 dollars on eBay.
6 Soft sundried tomato halves (the type in olive oil)
Feta cheese
Instructions
To start you will need a nice 1.4kg or just over 3 pound rump roast cut. Look for a piece that has good marbling and a fair strip of fat on the edge.
Place the Cheese Wizz in a bowl along with the butter and warm it up in your microwave to soften and liquify the cheese the cheese. Stir this thoroughly until the butter and the cheese are totally combined.
Load half of this into your meat syringe and start injecting the meat with the cheese. Do this by pressing the needle almost all the way through the meat. Start pressing the plunger down while simultaneously withdrawing the needle from the meat. Load the other half of the cheese into the syringe and continue injecting the meat at even spaces until all of the cheese has been injected into the rump.
In a bowl, combine the brown sugar, flaked salt and chilli flakes. Sprinkle these liberally all over the roast and rub them in yo the surface. Be careful not to apply to much pressure as this will force the cheese out of the meat.
Place the roast on a rack in your roasting pan and bake the meat in a preheated oven at 180c or 350f for 90 minutes.
Remove the roast from the oven and allow it to stand for 5 minutes.
Transfer the roast to a carving board and slice the meat into thin slices at an angle across the grain.
You will notice that the whole inside of the meat has been infused with the cheese, and the little cheese that has oozed out during cooking has created a beautiful cheesy crust on the top of the roast.
As a serving suggestion, plate a few slices of the beef, top it with soft sundried tomato, the type preserved in olive oil, then crumble a little feta over the top before serving with the accompaniments of your choice.
How to Make Sundried Tomatoes in Your Oven. Perfectly Preserved Tomatoes with Brilliant Color.
Author: Whats4Chow
Recipe type: Vegetable / Preserving
Prep time:
Total time:
How to Make Sundried Tomatoes in Your Oven. This Episode shows you how to make perfectly preserved sundried tomatoes in your oven. Sundried tomatoes with perfect color and excellent shelf-life.
Ingredients
12 Medium size tomatoes
½ Tsp Bicarbonate of soda
½ Tsp Saltpetre
1 Tsp Salt
1 Tsp Sugar
250ml Water
Instructions
Cut the tomatoes in half through the middle. If you prefer, you can skin the tomatoes first, and you can also scoop out the seeds. This is all entirely up to your personal preference. Removing the skin will temper a little of the acidity, but may result jn a less flavorful result. Removing the seeds has no effect on the flavor, but will certainly speed up the drying time.
In a jug, combine the bicarbonate of soda, saltpeter, salt, sugar and water. Stir this until everything has dissolved.
The bicarb preserves the amazing color of the tomatoes, while the saltpeter inhibits the growth of bacteria. Salt adds and enhances flavor, while the sugar combats the toughening effect salt has.
Arrange the halved tomatoes on a rack in a large roasting tin. Brush the tomatoes liberally with the solution.
Place the pan in your oven set to a temperature of 50c. Leave the door of the oven slightly open to allow moisture to escape.
The drying time will be anything between 18 and 36 hours depending on the moisture content of the tomatoes, whether the tomatoes have been de-seeded, and whether they have been skinned.
There is no formula and correct or incorrect procedure for the timing. I prefer my dried tomatoes leathery, but still soft and pliable. If you prefer yours totally dry and on the brittle side, then dry for longer.
At this stage, you need to decide how you're going to store your dried tomatoes. The first way is to pack them in an airtight container, or to vacuum pack them in small quantities.
I prefer mine in oil. To do this, pack them into a sterilized bottle and top the bottle up with oil until the tomatoes are covered. You can add raw garlic cloves and basil or marjoram leaves at this stage to further flavor the tomatoes. I prefer not to do this as it does limit your recipe choices if the tomatoes are already flavored.
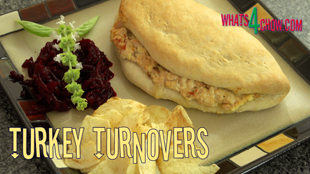
Turkey Fold-Over. How to use Turkey Left-Overs - Delicious Baked Turkey Buns.
Author: Whats4Chow
Recipe type: Left-Overs Recipe Ideas
Cuisine: American
Prep time:
Cook time:
Total time:
Serves: 4
How to use Turkey Left-Overs. Baked turkey turn-overs are agreat way to use any left-over turkey meat. In fact you can even use any of the left-over meat in combinations, or on their own, mixed with the other ingredients.
Ingredients
For the Dough
500g Strong White flour
10g Instant yeast
10g Salt
10g Sugar
300ml Lukewarm water
For the Filling
250g Cooked Turkey or other left-over meat
3 Tbs finely chopped pickled jalapeno
200ml Sour cream
80g Feta cheese
6 Tbs Chopped sun-dried tomato
Instructions
To make the dough, place the flour, yeast, salt and sugar in a large mixing bowl. Stir these together briefly, then pour in the warm water.
Using a wooden paddle, stir this until a dough starts to come together, then using your hands in the bowl, compress the dough together to pick up and loose bits.
Turn the dough out onto a lightly floured work surface and knead it for 5 minutes until it is smooth and elastic.
Place the dough back in the mixing bowl, cover the bowl with cling-wrap and allow the dough to rise for 40 minutes in a warm place.
While the dough rises, finely chop your cooked meat. Place this in a bowl and add the finely chopped pickled jalapeños, sour cream, feta cheese and chopped sun-dried tomato. Mix this until totally combined.
Cover a wire rack with foil and give it a light coating of oil. Turn the dough out and knead it briefly.
Flatten the dough into a large disc and cut it into quarters. Roll each quarter into a ball, flatten the ball, then roll into a circle of 20cm or 8 inches in diameter.
Spoon a quarter of the filling across the center of the dough. Pick up the far side of the dough and pull it of the filling. Use your finger tips to tamp the edges down.
This will not seal the edges, it simply thins them out, and prevents them from flying up while cooking. The edge will open during cooking, but only enough to reveal the filling.
Place the completed crescents on the rack, cover the rack with and upturned roasting pan and allow this to rise for 20 minutes in a warm place.
Bake the fold-overs in a preheated oven or gas barbecue at 180c or 350f for 25 minutes until lightly golden.
Remove from the heat and serve immediately with the accompaniments of your choice.
These gourmet hotdogs are huge! A footlong Russian sausage is wrapped in a soft bun dough flavored with sun-dried tomato and parmesan cheese, then baked to golden perfection!
Ingredients
2 Footlong Russian sausages
2 Cups All-purpose flour
10g Instant yeast
7.5ml Salt
15ml Sugar
250ml Warm water
60ml Sun-dried tomato, finely chopped
30g Parmesan cheese, shredded
⅓ Cup All-purpose flour (to work the dough)
Instructions
Place the flour, yeast, salt and sugar in a large mixing bowl. Mix them together briefly, then pour in the water. Mix this to a very soft and sticky dough.
Add the chopped sun-dried tomato, shredded parmesan cheese and the oil.
Mix this until totally combined, cover the bowl with cling-wrap and allow the dough to rise for 40 minutes in a warm place.
After 40 minutes, the dough will be well risen and the gluten clearly visible. From the second batch of flour, lightly flour the work surface and turn the dough out.
Sprinkle the top of the dough with flour and start to work the flour into the dough. Continue sprinkling extra flour until all of the flour has been worked into the dough. The dough will be soft, smooth, and elastic.
Divide the dough in half and roll each half into a sausage of 10 inches long. Flatten the dough out until it is about 3 inches wide by 12 inches long, and oval in shape.
Place a Russian sausage on the dough, lift the far edge of the dough over the sausage and stretch it down the other side.
Lift the near side of the dough up and stretch over to enclose the sausage. The ends of the sausage will still protrude from the dough.
Grease a piece of foil and transfer the dogs to the foil. Place the foil on top of a wire rack and using a sharp knife slash through the tops of the dogs at an angle, making sure to cut the dough and the sausage.
Cover this with an upturned roasting pan and allow the dogs to rise for a further 20 minutes.
Heat you gas barbecue or your oven to 180c / 350f and bake the dogs for 25 minutes and the rolls are lightly golden and sound hollow when tapped on the side.
Remove from the barbecue or oven and serve immediately with the accompaniments of your choice.