Butter-Fried Queso Blanco. Slices of Queso Blanco Fried until Golden, Topped with Heavenly Sauce.

Queso Blanco (Cheese), queso fresco, white cheese, recipe, receta, how to make cheese, como hacer queso, Mexican, queso blanco recipe, queso blanco cheese recipe, queso blanco fried, queso blanco velveeta, como hacer queso blanco, Queso Blanco Recipe, Homemade Queso Blanco, preparacion queso, elaboracion de queso, Mexican Queso Dip, Mexican Recipe, Mexican Food, Mexican Cuisine, Queso Ranchero


Butter-Fried Queso Blanco. Slices of Queso Blanco Fried until Golden, Topped with Heavenly Sauce.
Author: 
Recipe type: Cheese
Cuisine: Mexican
Prep time: 
Cook time: 
Total time: 
Serves: 2
 
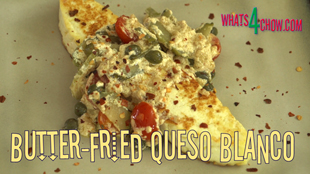
In our previous episode we made fresh queso blanco or Mexican white cheese. Today we're going fry slices of this cheese in butter until golden, then top it with rich combination of cocktail tomatoes, garlic, sliced pickled gherkin, capers and a unique instant ricotta.
Ingredients
  • 2 x 20mm / ¾ inch Slices of Queso Blanco cheese
  • 40g Butter
  • 8 Cherry / cocktail tomatoes
  • 1 Tbs Chopped garlic
  • 1 Pickled Gherkin, sliced
  • 2 Tbs Pickled capers
  • 90ml Fresh cream
  • Salt to taste
  • Dried red chilli flakes to garnish
Instructions
  1. Cut 2 slices of queso blanco from the center of the round of cheese. Cut them 20mm or ¾ inch thick.
  2. Measure out the garlic, butter, red chilli flakes, cream and capers.
  3. Slice the tomatoes in half length-ways, and slice the gherkins.
  4. Heat your pan over medium high heat, add the butter.
  5. Add the cheese to the pan and wipe it around in the butter to coat all over.
  6. Fry the cheese on the flat sides for 2 to 3 minutes until golden.
  7. Turn the cheese over and fry for a further 2 to 3 minutes until golden.
  8. By this stage, the cheese will have softened, so use a spatula to remove it from the pan to avoid damaging it.
  9. Add the tomatoes to the pan and stir these around in the butter for 60 seconds.
  10. Add the garlic and stir this for further 15 seconds until fragrant.
  11. Add the capers and sliced gherkin and stir this briefly to heat it through.
  12. Pour in the cream. Almost immediately, you will see the cream react with the acid in the tomatoes, capers and gherkin.
  13. This reaction in combination with heat causes the cream to convert to full cream ricotta cheese instantly.
  14. Stir this briefly and remove the pan from the heat.
  15. Transfer the fried cheese to platters, top each with half of the sauce.
  16. Garnish the plates with a scattering of red chilli flakes and serve immediately.


Queso Blanco – How to Make Mexican White Cheese. Fresh Mexican Same-Day Cheese.

white cheese, queso blanco, queso fresco, Queso Blanco (Cheese), Mexican, how to make cheese, queso blanco recipe, queso blanco dip, queso blanco dip recipe, queso blanco cheese recipe, queso blanco cheese, queso blanco fried, queso blanco frito, how to make queso blanco, como hacer queso blanco, homemade cheese, Mexican cheese dip,how to make queso blanco at home,easy queso blanco recipe,mexican white cheese


Queso Blanco - How to Make Mexican White Cheese. Fresh Mexican Same-Day Cheese.
Author: 
Recipe type: Cheese
Cuisine: Mexican
Prep time: 
Cook time: 
Total time: 
 
Queso Blanco is a fresh Mexican white cheese. The term fresh refers to the cheese not being aged. It can be eaten the same day it is made. The outstanding feature of Queso Blanco is that it does not melt when cooked, making it the ideal protein to add to soups, stews, stir-fries and even grills.
Ingredients
  • 1 Gallon / 3.75lt Full cream cows or goats milk
  • 60ml Cider vinegar (plus a little extra on the side)
  • Salt to taste (non-iodated)
Instructions
  1. Pour the milk into a large pot over medium low heat. Over a period of 20 to 30 minutes bring the milk up to a temperature of 83c or 180f stirring regularly.
  2. Once at this temperature, hold the temperature here for 10 minutes by toggling the heat on and off as required.
  3. Pour in the cider vinegar and stir continuously while the curds form. If the whey is not clear after a minute or so, add a little more vinegar, stirring continuously while you do this, until the whey is clear.
  4. Remove the pot from the heat and pour the curds into a muslin lined colander in your sink. Allow the curds to drain briefly, then fold the edges of the muslin over the cheese.
  5. Place and upturned side plate on top the cheese and weigh this down with about 5lb of weight.
  6. Let the cheese press and drain for 3 hours.
  7. Unwrap the cheese and trim the rough edge from the cheese. The trimmings can be used in any dish, so don't discard them.
  8. You will see that the cheese has a medium firm feel, and is remarkably similar in texture and taste to haloumi cheese.
  9. If you're not using the cheese immediately, salt both sides of the cheese and refrigerate wrapped in cling-wrap.
  10. In our next episode we will use this queso blanco to make an amazing butter-fried Queso Blanco cheese dish.
  11. Makes 600-800g of cheese


Super Beefy Burger Patties. Beef Jerky / Biltong Enhanced Burger Patties.

burger patties,beef burger patties,how to make the best beef burger pattie,super-beefy beef burger patties, burger patties recipe, burger patties from mince, burger patties price, burger patties recipe, burger patties making, burger party recipe, best burger recipe, Burger-Hamburger,biltong flavored burger patty,beefy jerky flavored beef burger patty,how to flavor beef burger patty,best recipe beef burger patty


Super Beefy Burger Patties. Beef Jerky / Biltong Enhanced Burger Patties.
Author: 
Recipe type: Burgers
Cuisine: American
 
Beef Jerky / Biltong is essentially concentrated beef, having lost 50 to 60% of it's mass in water. This results in burger patties that have more than twice the beef flavor when compared to raw beef. By powdering the jerky / biltong and combining it with the beef mince, you end up with a patty that has tons of super-beefy flavor --- out of this world!!!
Ingredients
  • 30g Beef Jerky / Biltong per 100g ground beef
  • Salt to taste
Instructions
  1. Thinly slice 30g of jerky for each 100g of beef mince. Once sliced, chop it even finer.
  2. Using your spice grinder, zap the chipped jerky until it is a fine fluffy powder.
  3. Place the beef mince in a large mixing bowl. Add the jerky powder along with a generous pinch of salt.
  4. Massage this together until everything is totally combined.
  5. Using you burger press, press the patties out and transfer them to a platter, separated by grease-proof paper or foil.
  6. Allow these to mature for at least 3 hours, preferably overnight in your refrigerator.
  7. When you're ready to cook your creations, make an indentation in the center of each patty and proceed.


South African Beef Jerky – How to Make Beef Jerky using the Traditional South African Biltong Method.

beef jerky,dried beef,how to make beef jerky, jerky, Jerky (Dish), beef jerky dehydrator, beef jerky healthy, beef jerky recipe oven, beef jerky in oven, beef jerky commercial, beef jerky recipe, beef jerky how its made, beef jerky time, Easy Beef Jerky, Easiest Beef Jerky, Make Venison Jerky Elk Jerky, homemade jerky, cut beef jerky, slicing jerky meat,biltong recipe,how to make biltong,best biltong recipe


South African Beef Jerky - How to Make Beef Jerky using the Traditional South African Biltong Method.
Author: 
Recipe type: Beef / Preserves
Cuisine: South African
 
Dried beef is a popular snack in almost every country of the world. In the USA it's called beef jerky, in South Africa it's called Biltong. This episode covers how to make jerky using the Traditional South African Biltong recipe.
Ingredients
  • 3kg Beef (Rump, rump tail, silverside, porterhouse etc)
  • 75g Non-iodated salt
  • 10g Sugar
  • 2g Saltpeter
  • 2g Bicarbonate of soda
  • 2ml Cracked black pepper
  • 15ml Crushed coriander seed
  • ½ Tsp Chilli flakes
  • ½ Tsp Garlic powder
  • Brown vinegar
Instructions
  1. you will need 3kg of beef. You can use almost any cut of meat, here I am using the tail ends of the rump.
  2. Whichever cut you decide to use, remember that flavor is in the fat, so your result will be tastier if the beef cut has a strip of fat down the edge.
  3. Cut the beef length-ways into long strips of and inch or 25mm in thickness.
  4. In a bowl, combine the salt, sugar, saltpeter, bicarbonate of soda, cracked black pepper, crushed coriander seeds, chilli flakes and garlic powder.
  5. Arrange the meat in a stainless steel tray and rub the curing mixture evenly into the meat.
  6. Using a sterilized spray bottle, spritz a coating of brown vinegar onto all surfaces of the meat.
  7. Place the pan, uncovered, in your refrigerator overnight.
  8. The following day, half fill a bowl with brown vinegar a dip each strip of beef in the bowl.
  9. Press meat hooks through the thinnest side of each strip.
  10. To dry the beef, hang it in well ventilated area, or in your drying cabinet if you have one. Do not let the strips touch while they dry.
  11. There is no formula as to the length of drying time. This is largely dependent on the moisture content of the meat, the thickness of the cuts, and the ambient temperature and humidity. As a rough guideline, these 1 inch pieces will take 2 to 3 days to dry in a drying cabinet, and 4 to 6 days drying naturally. The time is also directly proportional to how dry you want the beef to be.
  12. Once you are happy that the beef is dried to your satisfaction, unhook it and slice it into thin slices for serving.


Indian Butter Chicken. How to Make Delicious, Fragrant Butter Chicken at Home.

Butter Chicken (Dish), butter chicken recipe, authentic butter chicken recipe, how to make butter chicken, indian recipes, Indian Cuisine (Cuisine), butter chicken curry recipe, tandoori, butter chicken curry, butter chicken recipe indian, butter chicken recipe with fresh cream, butter chicken recipe sanjeev kapoor, butter chicken vahchef, butter chicken restaurant style, tandoori masala chicken tikka masala,chicken tikka butter masala, Butter Chicken Masala Recipe, Punjabi butter chicken recipe


Indian Butter Chicken. How to Make Delicious, Fragrant Butter Chicken at Home.
Author: 
Recipe type: Indian Curry
Cuisine: Indian
Prep time: 
Cook time: 
Total time: 
Serves: 4-8
 
In Today's episode we make delicious, fragrant Indian Butter Chicken, using the Tandoori Chicken we baked yesterday.
Ingredients
  • 1.2kg Cooked Tandoori chicken
  • 100g Butter
  • 160ml Cream
  • 45g Garlic, finely chopped
  • 55g Ginger, finely chopped
  • 5 Green chillies, chopped
  • 1Tsp Paprika
  • 900g Tomatoes
  • 480ml Chicken Stock
  • Salt to taste
  • Fresh coriander to garnish
Instructions
  1. Finely chop the garlic, ginger and green chillies. Measure out the paprika, butter, chicken stock and cream. Chop the tomatoes, and cut the entire chicken into bite sized pieces.
  2. Heat the butter in a pan over medium high heat and fry the garlic, ginger and chilli for 2 minutes until fragrant.
  3. Add the paprika and stir this until totally combined.
  4. Add the chopped tomato and the chicken stock. Bring this to a boil, reduce the heat and simmer the tomato for 10 to 15 minutes. The tomatoes must be soft and tender.
  5. Remove the pan from the heat and allow it to cool for 5 minutes. Using your stick blender, puree the tomatoes until smooth.
  6. Return the pan to the heat, add the chicken and bring this to a boil. Reduce the heat and simmer the chicken for 10 minutes until it is absolutely tender.
  7. Add the cream, stir this in until totally combined. Season with salt to taste and serve immediately garnished with fresh coriander. As an accompaniment, any Indian bread will serve well.


Authentic Tandoori Chicken. Tradition Indian Tandoori Chicken, Spiced and Grilled to Perfection.

tandoori chicken, Tandoori Chicken (Dish), how to make tandoori chicken, tandoori chicken masala, baked tandoori chicken, Indian style tandoori chicken, indian cooking, spicy chicken recipe, chicken tandoori, indian chicken recipe, Tandoori Chicken Recipe, tandoori chicken curry recipe, tandoori chicken tikka recipe, tandoori chicken indian recipe, tandoori chicken marinade, tandoori chicken recipe sanjeev kapoor


Authentic Tandoori Chicken. Tradition Indian Tandoori Chicken, Spiced and Grilled to Perfection.
Author: 
Recipe type: Indian Curry
Cuisine: Indian
Prep time: 
Cook time: 
Total time: 
Serves: 4
 
In this first episode of 2015 we make authentic Tandoori Chicken. This is the first in a 2-part series covering Tandoori Chicken and Butter Chicken.
Ingredients
  • 1.4kg Chicken
For the Paste
  • 50g Garlic paste
  • 10g Ginger paste
  • 30ml Lemon juice
  • 25g Chilli paste
  • 5ml Salt
For the Marinade
  • 5g Cumin Powder
  • 10g Garam Masala
  • 25g Ginger paste
  • 30ml Lemon Juice
  • 50ml Oil
  • 25g Chilli paste
  • A few strands of saffron
  • 20ml Yoghurt
To Serve
  • Sliced onion
  • Chaat Masala to sprinkle
  • Cream
  • Lemon wedges
Instructions
  1. Cut away any excess skin from the neck and butt of the chicken and remove the wing tips. Slice through the breast bone and open the chicken up.
  2. Turn the chicken oven, and with a downward thrust, dislocate the pelvis of the bird.
  3. Using a sharp knife, cut deep incisions into the thighs, drumsticks and breast of the chicken.
  4. In a bowl, combine the garlic paste, ginger paste, lemon juice, chilli paste and salt.
  5. Brush all of the paste onto the chicken making sure to get it into the incisions as well. Let this stand for 30 minutes.
  6. While the chicken stands, combine the cumin powder, garam masala, ginger paste, lemon juice, chilli paste, saffron, oil, salt and yoghurt. Mix this until the oil is totally combined.
  7. Spoon this mixture over the chicken, then allow this to marinate in your refrigerator for 6 hours.
  8. Remove the chicken from the refrigerator, scoop up any over-run marinade and pour it back onto the chicken.
  9. Lift the chicken up, slide a rack underneath, then bake the chicken in a pre-heated oven at 180c or 350f for 80 minutes.
  10. Remove the chicken from the oven, cut it into portions and serve garnished with fresh onion slices, chaat masala, a drizzle of cream and a few lemon wedges.


Scroll to top

Kitchen Conversions

Convert:
Masses
to:
Volumes
to:
Temperatures
to:
Lengths
to: