Crispy Deep Fried Sous Vide Chicken - Tender & Juicy Deep-Fried Chicken Recipe
Author: Whats4Chow
Recipe type: Chicken / Deep-Fried
Cuisine: American
Serves: 12
Today we're going to sous vide a batch of chicken pieces. The cooked chicken will then be coated and briefly deep-fried to crispy perfection.
Ingredients
For the Chicken
12 Chicken pieces
30ml Caster sugar
90ml Cayenne pepper
15ml Garlic powder
30ml Chicken stock powder
30ml Vegetable stock powder
For the Coating
400g All-purpose flour
100g Rice flour
15ml Aromat / aromex / flavormate
15ml White pepper
60g Cayenne pepper (NOT 60ml)
Instructions
To season the chicken, you will need 30ml caster sugar, 90ml cayenne pepper, 15ml garlic powder, 30ml good quality chicken stock powder and 30ml good quality vegetable stock powder.
Combine these all thoroughly.
Pat the chicken pieces dry with kitchen towel and place them in a large pan.
Sprinkle half of the seasoning over the pieces, flip them over and coat the reverse side with the remaining powder.
Allow this to stand for 30 minutes before continuing.
Fold the tops of 2 medium size vacuum bags open and place half of the chicken into each bag, making sure to keep it all in a single layer.
Fold the tops of the bags back and proceed to vacuum pack the chicken, making sure to double seal the bags.
Half fill your pot with water and heat it to 75c. You can use a digital pot like this one, or a dedicated sous vide pot, or even a regular pot on an induction range.
Once the water has reached 75c, place the packed chicken in the water. Use a plate or a pot lid to keep the bags submerged, as they will want to float as they heat up.
Set your timer for 3 hours and find something else to do to pass the time.
Remove the bags from the bath and cut them open.
This chicken is now perfectly cooked through, well seasoned, juicy and supremely tender.
The juices from the bags can be used to make really good gravies, sauces or used as a soup base.
For the coating, combine 400g all-purpose flour, 100g rice flour, 15g Aromat / Aromex or equivalent, 15ml white pepper and 60g of cayenne pepper.
Mix this all until well combined.
Use kitchen paper to pat the chicken pieces dry.
Whisk 6 eggs in a large measuring jug.
To coat the chicken, dunk a piece of chicken in the egg to wet it all over.
Drop it into the flour mixture and give it a good solid coating.
Transfer this to a plate and continue with the remaining pieces.
Heat a large pan of oil to 180c or 350f. Carefully drop the chicken into the oil piece by piece. Depending on the size of your pan you may have to fry multiple batches.
Fry yhe chicken for 4 minutes, turning halfway through.
Remove the chicken from the oil, drain on kitchen paper and continue with the next batch.
Here you can see just how juicy and tender the chicken is, with a super-crispy coating. This coating recipe will fry noticeably darker than most coatings as a result of the cayenne pepper. This is quite normal. The result is a deep, rich, full flavor that will have your guests coming back for more.
Thai Green Curry Chicken Roll - Easy Cold Cuts Recipe
Author: Whats4Chow
Recipe type: Cold Cuts recipes
Cuisine: Thailand
In today's episode we're making a super tasty Thai green curry chicken roll. With all the amazing flavors of lemongrass, galangal, green chillis and coriander, this chicken roll is an absolute winner.
Ingredients
1Kg Chicken breast fillet
20g Powdered gelatin
100g Thai green curry paste
20g Chicken stock powder
100ml Coconut cream
Instructions
To start, cut 1kg of chicken breast into cubes and spread them out in a baking tray. Place the tray in your freezer for 45 to 60 minutes until the chicken is partially frozen.
This will give you a cleaner grind when you mince the chicken.
After this time, run the chicken through your grinder using a coarse 8mm cutting plate.
Change the plate to a fine 3mm plate and run the chicken through the grinder again.
Transfer the finely ground chicken to a large mixing bowl and add 20g grams of powdered gelatin, 20 grams of good quality chicken stock powder, 100g of Thai green curry paste and a100ml of coconut cream.
Mix this all thoroughly for 5 minutes until completely combined and the mixture has started to emulsify.
Line your ham press with a bread film bag and transfer the chicken mixture to the press, compressing it as you go to avoid any air pockets.
It is not absolutely necessary to line the press, however this does make the removal of the loaf easier and the cleanup much quicker. You will also achieve a much smoother surface finish on the roll.
Fold the excess plastic over the chicken and insert the pressing plate, followed by the lid.
Insert your probe thermometer through the hole in the lid.
Place the press in a water bath set to 75c and allow the meat to cook slowly over 2 to 3 hours until the internal temperature reaches 72c.
The water level in the water bath should be just an inch below the top of the press.
Once cooked, quick-chill the press by placing it in your sink filled with iced water. When the internal temperature reaches 30c, transfer the press to your refrigerator overnight.
The following day, remove the chicken roll from the press. Any gelatin on top of the loaf can be used as a fantastic soup base, or to flavor sauces or gravies.
Slice the chicken roll into nice thin even slices and you're done.
How to Make Tortillas from Beef - Sous Vide Meat Sheets - Meat Wraps
Author: Whats4Chow
Recipe type: Beef / Sous Vide
Today's episode brings an interesting and tasty treat when we sous vide a thinly press sheets of ground beef, effectively turning it into a wrap which be used to enclose any fillings of your choice. You will need a vacuum packing machine and any type of digital pot with temperature control.
Ingredients
1kg Ground Beef
20g Fine salt
20g Beef Stock Powder
100ml Chilled water
Instructions
To start, place a kilogram of ground beef in your food processor. Add 20g of fine salt and 20g of good quality beef stock powder.
Finally, pour in 100ml of chilled water.
Place the bowl on the machine and zap the mixture until it is superfine. The mixture will emulsify and come together and start spining around the bowl.
Divide the mixture into 125g portions.
For these size portions, you will need 9 vacuum bags of 200mm by 230mm.
Fold the tops of the bags back to avoid messing on the part of the bag that will be sealed.
Place a portion of meat mixture into each bag and fold back the tops of the bags.
Lay the bags on the work surface and press the meat down to flatten it out. This will make the vacuum process easier.
Pop the bags into the vacuum packer and seal the tops. Make sure to double seal both sides of the bags, to ensure that you have no leaks.
Use your rolling pin to roll the meat out until it is evenly spread across the bags, working it right into the corners.
Work out any uneven rolling by rubbing the sheet down with your hands.
Transfer all of the packets to your digital pot. The pot should be half-filled with water, and pre-heated to 75-80c.
You can use a dedicated sous vide cooker, a digital pressure cooker on the keep warm setting, or a regular pot on an induction range.
Allow the packages to stand in the pot for 45 minutes.
While that carries on, I am going to make a simple filling for my meat wraps.
I have 300g of cooked, finely chopped spinach, 300g of good quality crumbly feta cheese, and 6 anchovies, finely chopped.
Crumble the feta into the cooked spinach and mix it together.
Add the anchovies to yhe bowl and mix these in thoroughly.
And that's that.
After 45 minutes, remove the packages from the pot and cut them open. You will have perfectly cooked, flexible sheets of beef.
Working with one sheet at a time, spread some of the filling over the beef, leaving an inch of border at the top and bottom of the sheet.
Roll the meat up and transfer it to a serving platter.
Use a blowtorch to grill off the top of the roll and add some color. Alternatively, you could grill this off in your oven as well.
Add the accompaniments of your choice and you're ready to serve and enjoy.
Incidentally, once the meat sheets have emerged from their water bath, they can be refrigerated or frozen for later use. Simply place them in hot water to defrost and reheat and you're ready to go.
Perfect Burger Buns - How to Bake the Best Burger Buns Ever - Independence Day 2018 Special
Author: Whats4Chow
Recipe type: Burgers & Barbecue
Cuisine: American
Serves: 24 x 100g
After a short holiday following episode 600, I'm back. Tangzhou milk buns have a supremely soft, light and feathery texture all their own, however they are actually too soft to be used as burger buns. I have adjusted the original tangzhou recipe, keeping the technique, to make a firmer bun with the same light and airy texture, that makes for the perfect burger bun. In addition, these buns have a much better shelf-life, and freeze exceptionally well too.
Ingredients
Group 1:!
1.35kg All-purpose flour
15ml Salt
10g Active dry yeast
30ml Sugar
Group 2:!
375ml Water
75g All-purpose flour
Group 3:!
450ml Full cream milk
3 Eggs, beaten
90ml Sunflower oil
Instructions
To start, place 1.35kg of all-purpose flour in your stand mixer bowl along with 15ml of salt, 10g of active dry yeast and 30ml of sugar.
Give these a quick stir to combine.
Add 75g of all-purpose flour to a medium size pot and pour in 375ml of water.
Use a whisk to mix until smooth.
Measure out 450ml of full cream milk, 90ml of sunflower oil and beat 3 eggs. Put these aside for later.
Place the pot over medium low heat and gently heat the flour water mixture. Whisk the mixture continuously.
As the mixture heats up it will start to thicken. Continue whisking to keep the mixture smooth.
The mixture will soon thicken to a porridge consistency, and will become slightly translucent.
Remove the pot from the heat and whisk in the milk.
Pour in the eggs and whisk these in.
And finally, whisk in the oil.
Pour this mixture into the mixing bowl on your stand mixer.
Start the mixer kneading on medium slow speed, and allow this to continue kneading for 15 minutes until the dough is nice and smooth.
Remove the bowl from the machine, cover with clingwrap and allow the dough to rise in a warm place for 90 minutes until at least doubled in size.
Turn the dough out onto you work surface. Do not dust the surface or dough with flour. It will not be necessary, and will actually harm the texture of the buns.
Knead the dough briefly to knock any large air bubbles out.
Using your scale, divide the dough into 100g portions for regular burger buns, 120g portions for large buns, and 150g potions for giant buns. I am making regular sized buns which are perfect for 100g or quarter pound patties.
To form the buns, stretch the dough from the top of the portion of dough to the bottom, working around the edge of the dough.
Circle the dough in your index finger and thumb and crimp the bottom of the bun together.
Place the bun on the work surface, cup your hand over the bun and finish rounding it with a circular motion.
Press the bun flat and transfer it to a baking sheet lined with baking parchment.
Continue with the remaining buns, leaving about a half inch of space between each one.
Cover the buns loosely with clingfilm and allow the buns to rise in a warm place for 45 minutes until they are touching as they are here.
minutes into this rise, start preheating your oven to 200c or 400f.
Brush the buns with beaten egg and sprinkle the tops liberally with hulled sesame seeds.
Bake the buns in the center of your oven for 15 to 20 minutes until golden on top.
Remove the buns from the oven and transfer them to cooling racks.
If we cut one of these beauties open, we see the amazing light airy, feathery texture, with excellent oven spring and an improved firmness, making these buns the perfect burger buns.
Thanks for joinig us today, please like, subscribe and share, and we'll see you again soon.
With festive season just upon us, today we’re going to make a batch of amazing coffee wine. This project started some time ago as an experiment, and the initial results were so pleasing that it warranted further investigation. In the preliminary experiment, I used a generic champagne yeast which produced a very drinkable wine comparable to a good sauvignon blanc.
In light of this, I contacted Anchor Yeast, a subsidiary of Lallimand Yeast in South Africa.
The specialists in the wine yeast division were very helpful in isolating 4 different wine yeasts in order that I could find the very best yeast for this purpose. At this point I would like to make this very clear… this is not a yeast competition, it is an exercise to find the best yeast for making coffee wine.
In addition, the reason I went with Anchor and Lallamand is purely based on their expertise, knowledge and reputation in this field. They were kind enough to supply with 4 sample batches of yeast and all of the relevant data sheets, however I was in no way financially rewarded for using their products. This is a purely scientific endeavour, and in no way meant as an advertisment for Anchor Yeast or Lallamand. In addition, I really wanted to use products that are available world-wide in order that you can give this a try yourself.
I started with the generic champagne yeast as my control batch.
This first of the Lallamand yeasts is the Vin 7. This is yeast developed specifically for the production of Sauvignon Blanc wines. At this stage of the project, I thought this would be my most promising prospect.
Next up is the Vin 13. This yeast has been developed for the production of both Sauvignon blanc and chardonnay.
Then there is NT 202, a yeast developed for the production of aged red wines like Shiraz.
And last but not least is the NT 50, a yeast developed for fruity red wines like Pinotage, that are short aged, and released fast to the market.
To make this project more manageable, I am making small batches of each variant usin 2 liter bottles and Pat Mack’s brew caps. These caps have a built-in pressure release valve in the lid, and for this exercise they are just much easier to use than fermentation bubblers.
The fact that wine in this instance will start off carbonated is immaterial as it will be degassed during the clarification process anyway.
The coffee of choice is a product made by Nescafe’ in South Africa, called Ricoffy. This a blend of pure coffee granule, chicory, dextrins and dextrose. The dextrins and dextrose are yeast friendly, and will ensure a good strong fermentation. This coffee blend is available world-wide through numerous international South African food product franchise outlets. I will leaves links to these in the description. Once again, I would like to stress that this is not and advertisement for Nestle’ or Ricoffy.
Each of 5 bottles receive 90g of Ricoffy granules and 200g of white sugar.
500ml of hot water is added along with a further 500ml of cold water.
Give each bottle a good shake to dissolve the coffee granules and sugar entirely.
Top each bottle up with a further 750ml of cold water, give them another shake, then measure the temperature.
If the temperature is higher than 30c, wait until it drops to 30c before pitching an eighth of a teaspoon of yeast into each bottle.
Place the brew caps or fermentation bubblers on the bottles and place these in a warm but shady place to ferment for 30 days.
The primary reason for this long fermentation is that I want the wines to be totally sugared out in order that we can taste the absolute essence of each variant in its driest form. After this, the wine can be back-sweetened to taste. In addition, in a controlled experiment of this nature, every variant must be treated in exactly the same way.
After the 30 days, each batch was tasted to ensure that all of the sugars had been consumed.
The wine was then poured off into clean sterilized bottles, taking care to leave the majority of yeast and sediment behind.
At this stage, if you opt to use brew caps, the wine will be very fizzy and the racking will require a good deal of patience. This will not be a problem if you use a fermentation bubbler.
The wines will still be almost totally opaque, due to microscopic coffee sediment and yeast in suspension.
To clear the wine, transfer the bottles to your refrigerator for a full 24 hours.
After this time, measure 160ml of water and add 5ml or a teaspoon of gelatin. Allow this stand for about 30 minutes until the gelatin has bloomed in the water.
Microwave the mixture in short bursts until it reaches 150f or 66c, and you’re ready to go.
Pour 30ml of the gelatin solution into each bottle and give it a gentle top-stir with a swizzle stick.
Return the bottles to your refrigerator to clear. The gelatin solution bonds the proteins and particulates in the wine making them heavy enough to precipitate to the bottom of the bottles.
This clearing process can take up to a week to complete.
After this time, pass each wine through a fine filter, or a ceramic filter if available, to keep the coagulated sediment behind.
The wine can be treated with sulphite in the form of Camden tablets to kill any remaining yeast, however I opted to simply bottle and refrigerate.
We live in the heart of the R62, the longest wine route in the world. As a result we have no shortage of wine officianados, and I took full advantage of this. I invited a whole bunch of them to a formal wine tasting, and these are the results.
The Vin 7 which seemed to be the most likely candidate turned out to be a bit thin and lacking in aroma and flavor, however it was still very drinkable.
The Vin 13 was a little more robust, with more coffee aromas coming through, along with a slight cranberry flavor.
The NT50 was again more robust with stronger coffee and berry flavors and aromas. It was very similar to the generic champagne yeast used as the control.
The tote favorite was with no dought, the NT202, which was far ahead of the other wines in aroma and flavor.
The clairty and appearance of all of the varieties was absolutely brilliant, and overall the tasting was met with much interest and enthusiasm.
At this stage I would like to thank Anchor Yeast and Lallamand for supplying the yeast variants and expertise.
Thats it for today folks, please like, subscribe and share this with your friends and family, and we’ll see you again real soon.
With Thanksgiving just days away, these grissini sticks make a perfect entre' to grace the start of your feast. Sometimes called pencil crackers or pretzel sticks, you can coat the snacks with salt, sesame seeds or poppy seeds, or any combination of these.
Ingredients
500g All-purpose flour
2 Tsp Sugar
2 Tsp Salt
2 Tsp Baking powder
140ml Water
60ml Sunflower oil
2 Eggs (plus 1 for spraying)
Instructions
To start, measure out 500g of all-purpose flour, 2 eggs, 2 teaspoons salt, 2 teaspoons sugar, 2 teaspoons baking powder, 140ml water and 60ml sunflower oil.
Place all of these in your food processor.
Pop the lid on and process on high speed for about 60 seconds.
Tipping the processor from side to side helps to achieve a more even mix.
You will end up with a fine crumbly dough that resembles cous cous.
When pressed, the mixture will hold together very well.
Tip the dough out onto your work surface and compress it into a block.
Wrap the block in cling-wrap and allow this to stand for 30 minutes before continuing.
After this time, unwrap the dough and cut it into 4 pieces.
Working with 1 piece at a time, flatten a piece out.
Run this through your pasta roller.
Continue folding the dough after each pass and running it through on setting 1 until you have a tidy sheet. This will take 3 to 4 passes.
Reduce the setting to 2 and run it through again.
If the dough starts to feel sticky, sprinkle will flour and rub this into the surface.
Reduce the setting to 3 and run the dough through twice on this setting.
Square off the ends and continue with the remaining 3 pieces.
The offcuts can be rerolled to make a fifth sheet.
Run the sheets through the 6mm pasta cutter to cut the sheets into strips.
Line 3 large baking sheets with baking parchment and arrange the strips on the trays with just a few millimetes between each strip.
Whisk a large egg with 50ml of water and pour this into a misting bottle. Spray the egg wash over the pastry.
Grind salt over the damp strips and you're ready to go.
Here you can also use seeds as previously mentioned.
Bake the strips in a preheated oven at 220c or 450f for 10 to 15 minutes until golden and crispy.
Transfer the sticks to a tall pilsner glass to create a fantastic table display.
Have a wonderful Thanksgiving, please like, subscribe and share and we'll see you again tomorrow.
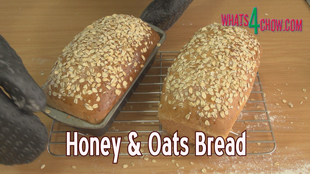
How to Make Honey & Oat Bread - a Simple Homemade Health Bread
Author: Whats4Chow
Recipe type: Bread
Honey and oat bread is absolutely outstanding, with a magnificent texture, superb oven spring and a flavor from heaven. It is really simple to make as long as you stick to the steps and timings.
Ingredients
520ml Warm water
10g Active dry yeast
80ml Honey
850g All-purpose flour
¾ Cup rolled oats
½ Cup sunflower seeds
45ml Vegetable oil
2.5 Tsp Salt
1 Egg beaten, for brushing
Extra rolled oats for topping
Instructions
Honey and oat bread is absolutely outstanding, with a magnificent texture, superb oven spring and a flavor from heaven. It is really simple to make as long as you stick to the steps and timings.
To start, dissolve 80ml of honey in 520ml of warm water.
Add 10g of instant yeast and stir this in briefly.
Cover the mixture and allow this to activate for 20 minutes.
While the yeastmixture stands, measure 850g of all-purpose flour and pour this into your stand mixer bowl.
Add 3 quarters of a cup of rolled oats and a half cup of sunflower seeds to the flour.
In addition, you need 2 and a half teaspoons salt.
Once the yeast has activated it will be very frothy. Add 45ml of cooking oil to the yeast mixture and stir to combine.
Pour this into the mixer bowl.
Fit the dough hook and close the mixer.
Knead the dough for 12 minutes on medium slow speed.
Once kneading has completed remove the bowl from mixer, cover with cling-wrap and allow the dough to rise for 60 minutes in a warm place.
After rising, turn the dough out onto a lightly floured work surface and knead it briefly to knock it down.
Weigh the dough and divide it into 2 equal portions.
Working with one piece at a time, flatten the dough into a large oval shape.
Fold the top edge down two thirds of the way. Fold the bottom edge up over this.
Repeat this with the second loaf.
Wipe the insides of 2 medium size loaf tins with oiled kitchen paper.
Transfer the loaves to the tins and press them into the tins firmly.
Cover the bread loosely with cling-wrap and allow this to rise for a further 30 minutes in a warm place.
Halfway through this time, preheat your oven to 180c or 350f.
Brush the loaves with beaten egg and sprinkle the loaves liberally with more rolled oats.
Bake the loaves for 40 to 45 minutes until golden and they sound hollow when tapped.
Remove the loaves from the oven and allow them to cool in the tins for 5 minutes before turning out onto a rack to cool completely.
And there we have it... the perfect bread, with a lovely crispy crust, great texture, superb aroma and amazing taste.
How to Make Strawberry Jam - Whole Strawberry Jam Recipe
Author: Whats4Chow
Recipe type: Jams and preserves
Serves: 450-500g
With strawberry season in full swing in our part of the world, it's time to use up the excess strawberries by making a batch of delectable strawberry jam.
Ingredients
900g Strawberries
350g White sugar
20ml Lemon juice
(15ml Methylated spirits / denatured spirits - for the pectin test)
Instructions
To start, trim away the leaves from 900g berries.
Cut the larger strawberries into quarters lengthways, and the smaller berries in half.
Measure out 350g of sugar and 20ml of lemon juice.
Place the berries in a large heavy base pan over medium low heat and pour in the lemon juice.
Cook the berries gently for about 10 mjnutes until softened.
Use a fork to crush one third of the berries to release the juices and pectin.
Scoop out a teaspoon of the juice and place it in a small cup.
Pour 15ml of methylated spirits into the cup and shake it up.
If the juice coagulates into a large mass, there is enough pectin in the mixture to set the jam. If there are a few lumps, then the jam should still set successfully. If there are many small lumps, there is a pectin deficiency, and you will need to add a further 20ml of lemon juice to the pan, or alternatively, add pectin following the manufacturers instructions.
This has coagulated into a large mass and there is more than enough pectin present.
After the pectin test, add the sugar to the pan.
Continue cooking on medium low heat until the sugar dissolves.
Once all the sugar hass dissolved increase the heat to high and boil the jam rapidly until the mixture reaches 105c or 220f which is the setting point for the jam.
Transfer the hot jam to sterilized jars and you're done.
And here is our delicious creation, with excellent color, a brilliant gloss, and sumptuous big pieces of strawberry.
Here the jam is pictured on a slice of fresh honey and oat bread which will be featured in our next episode.
Thanks for joining us today, p,ease like, subscribe and share, and we'll see you again tomorrow.
How to Make Panna Cotta - Quick & Easy Panna Cotta Recipe
Author: Whats4Chow
Recipe type: Dessert
Cuisine: Italian
Serves: 6
Panna Cotta is a legendary Italian dessert. This creamy molded sensation is super easy to make, and can be made up to three days ahead of time and stored in the refrigerator covered with cling wrap. This is how to make your own.
Ingredients
4 Tsp Powdered gelatin
90ml Water (room temp)
Half cup sugar
1 Liter heavy cream
2 Tsp Vanilla extract
Instructions
To start, pour 90ml of room temperature water into a large mixing bowl.
Pour in 4 teaspoons of powdered gelatin and put this aside to bloom.
Pour a half cup of sugar into a saucepan.
Add a litre of heavy cream to the pot.
Turn on the heat to medium and heat the cream to around 66c stirring regularly.
Turn off the heat, or remove the pot from the heat if your using an electric range.
Pour the hot cream over the gelatin and stir it thoroughly to combine.
Add 2 teaspoons vanilla extract and stir this in.
Ladle the creamy mixture into your ramikins. This will be sufficient for six 175ml ramikins if filled to brim, and seven if filled to the line.
Place the ramekins on a tray or in a pan and transfer these to your refrigerator for a minimum of 3 to 4 hours to set.
To turn the panna cotta out of the ramekins, run a thin blade around the edge of the bowl.
Dunk the ramekin in another bowl half filled with hot water.
Hold it in the water for 15 to 20 seconds.
Flip the ramekin over to turn it out onto the serving plate.
Serve the creamy treats immediately garnished with fruit and topped with a little extra pouring cream.
Thanks for joining us today, please subscribe, like and share and we'll see you again soon.
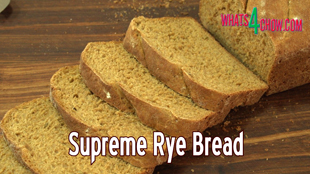
Supreme Rye Bread - The Soft Rye Bread Everybody Will Love
Author: Whats4Chow
Recipe type: Bread
Cuisine: German
Serves: 2
Today we're going to bake a unique rye bread that everyone will love. This bread has the amazing flavor of rye bread, but the light texture of a regular white farm loaf.
Ingredients
625ml Warm water
60g Black strap molasses
30g Butter, melted
30ml Brown sugar
18g Soy lecithin (available at most health shops)
20g Instant yeast
600g Strong white bread flour
300g Stoneground rye flour
20ml Salt
10ml Caraway or fennel seeds
Instructions
To start, pour 625ml of warm water into your mixer bowl.
Add 60g of black strap molasses and stir this in briefly.
Pour in 2 tablespoons brown sugar, 30g of melted butter, 20g instant yeast and 18g of soy lecithin.
The lecithin binds the oil in the melted butter to the water. This dramatically increases the shelf life of the bread. In addition, rye flour has a low gluten content and the lecithin replaces this shortage in order that rye loaf will rise as well as regular bread does.
Use your stick blender to shear the lecithin into the liquids.
Cover the bowl and give it 15 minutes for the yeast to activate.
In the meantime, measure out 600g strong white bread flour, 300g stoneground rye flour, 4 teastoons salt and 2 teaspoons caraway or fennel seeds.
Add these four ingredients to the yeast liquid.
Place the bowl on your mixer with the dough hook attached and knead the dough on slow speed for 2 minutes. Increase the speed to medium slow for a further 8 minutes.
You will have a beautifully smmoth dough that is only slightly sticky.
Cover the bowl with cling-wrap and allow the dough to rise in a warm place for 60 minutes.
While the dough rises, rub the insides of 2 large loaf pans with butter.
Scatter flour over the inner surfaces of the pans and tip out any excess flour.
As you can see this dough rises very well.
Turn the dough out onto a lightly fliured work surface and knead it briefly to knock it down.
Weigh the dough and divide it into 2 equal portions of around 850g.
Working with one portion at a time, work the dough into a rectangle as with as the bread pan. Fold the top edge down two thirds of the way, then fold the botykm edge up over this.
Place the rolled dough into the pan with seam side down. Flatten the roll to fill the bottm of the pan.
Cover both pans and allow these yo rise for a further 30 minutes in a warm place.
Once again, you can see clearly just how well this rises.
Use a razor sharp knife to slash the tops of the loaves. Not only does this lokk cool, but it deflates the lids and prevents them from blowing while baking.
Bake the loaves in a preheated oven at 220c or 430f for 25 to 30 minutes until the loaves sound hollow when tapped.
Remove the loaves from the onen and turn them out onto a wire rack to cool.
Allow the bread to cool for at least 30 minutes before cutting.
Here we can see the beautiful light texture with incredibly good oven spring.
Thats it for today folks, thanks for joining us, please like, subscribe and share, and we'll see you again tomorrow.
How to Make Naturally Fermented Sauerkraut - courtesy of Microcosm Publishing
Author: Whats4Chow
Recipe type: Vegetable / Fermenting
Cuisine: German
A few episodes back I introduced a new book all about natural fermentation, called Basic Fermentation, published by Microcosm Publishing. Consequently they have sent me the final hard cover copy to replace my preliminary copy. It is full of excellent fermentation recipes, all very clearly explained and accompanied with good quality full color photography. You can check out their website by clicking the link in the description below. Today we're going to feature another recipe from this book when we make a batch of delicious home-fermented sauerkraut.
Ingredients
Cabbage
Kosher salt
Instructions
We will be using a new technique to do this, as well as the traditional method.
For the new technique, you will need to own a ham press which will negate the need for pressing plates and weights.
To start, strip away any dodgy leaves on your cabbage.
This cabbage is about 1.2kg once stripped. I will use half of this for each method.
Use a large knife to cut the cabbage into quarters.
Use a cleaver to cut away the heart from each quarter.
Cut each quarter into thin strips.
I have transferred half of this to a large non-reactive bowl, and measured out 18g of kosher salt. This is 3% of the weight of the cabbage. This makes it really simple to calculate the salt requirement no matter what quantity of cabbage you start with.
Pour the salt over the cabbage and mix this in.
Pack the cabbage into the ham press a little at a time, pressing it down firmly after each addition. This is a 1.5 liter press, and 600g of cabbage fits perfectly, filling to an inch below the rim.
Insert the pressure plate and secure the lid and you're done.
For the traditional method, place the remaining cabbage in a large non-reactive bowl and add 3% salt to the cabbage. Mix the salt into the cabbage.
Pack the cabbage into a tall cylindrical glass or ceramic container, pressing it down firmly after each addition.
Now you will need something to press the cabbage. I am using a glass tumbler with closed end in contact with the cabbage.
To press this down, I have a short langth of bamboo, but you could use anything from a pencil to a butter knife for this.
Place the stick across the tumbler.
Loop a long elastic band underneat the container and bring the ends up to the stick. The elastic will pull the stick downwards, applying pressure to the tumbler and the cabbage.
Transfer the container and the ham press to a warm shady place to ferment.
After 10 to 14 days, your sauerkraut will be ready to eat. This is when you will notice the vast difference between home-fermented kraut and the packaged or canned versions. This is bright in appearance, with loads of crunch and an amazingly vibrant pickle flavor.
All you need to now is enjoy your masterpiece.
Thanks for joining us today, please subscribe, like and share and we'll see you again tomorrow.