How to Make a Pot Still for Under $60 – all Parts Available on our Website!!!

how to build a pot still,how to build a pot still for under $60,how to build a pot still at home,quick and easy pot still plans,building a pot still from readily available parts,simple pot still plans,no welding pot still plans,no brazing pot still plans,no soldering pot still plans,how to make an easy pot still,how to make a distiller for under $60,make a pot still at home

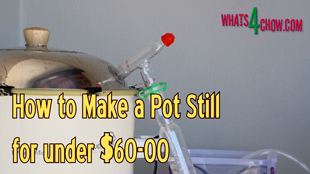
In this episode we’re going to build a pot still for under $60. This is the cost at the time of filming, and does not include the pot and lid.
Let’s look at the list of items you require. Click on the photos to go to the relevant product pages.

Riser Column
First in line is the angled 3-way riser with a thermometer adapter. This gets glued into a 22mm hole drilled through the pot lid. You will need a dome lid like this wok lid or a high hat lid. If you cannot find a dome lid or high hat lid, you will need an elbow joint like this one –

Bend Connector

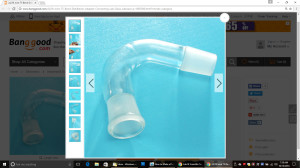
The riser need to be almost horizontal in order that down-pipe is almost vertical. I have sealed the joint with clear silicon polymer to combat pressure leaks. I have also sealed the glass joint in the top of lid and the handle.
To accommodate the thermometer a plastic cap unscrews at the top. The thermometer goes through cap and is held in place by a silicon grommet.

Silicone Tubing
To seal the joint where the lid meets the pot you will need natural medical grade silicon rubber tubing. The tubing gets cut down one side along the length, then clipped over the edge of the pot. We will look at that shortly.

Lab Clamps
Next up is the lab clamp clips that hold the glassware securely together.

Condenser
The second piece of glassware is the condenser. This condenses the alcohol vapor back to liquid.
The vapor enters the top from the 3 way connector and passes through the cooling coil, then drips out the bottom as liquid alcohol.
Cooling water is pumped from the bottom of the column and exits at the top. This increases the efficiency of the condenser.

Water Pipe
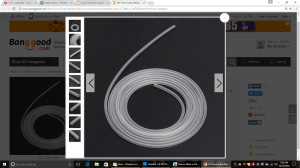
To connect the cooling pump, you will need a few lengths of pvc fish tank pipe. For this setup you need to order about 2 meters of 6mm pipe.

Pump 220Pump 110To pump the cooling water you need a small submersible pump. These come in 110v and 220v. These pumps are very small and very inexpensive, however amazingly reliable. Bare in mind that these small pumps don’t have a substantial head, only about 40cm or 16 inches. This means that they have to mounted in the cooling reservoir at the same height as the condenser. If you want your coolant to be on the floor, you will need to look at a much bigger pump. These are available from the same supplier, just be sure to order the correct voltage.

Alcohol Meter
You will also want to have a set of spirit alcohol meters to measure the alcohol content of your efforts. This set comes with these graduated measures giving a capability of measuring anything from 0% ABV to 100% ABV. The set also comes with thermometer and a conversion table to adjust readings of alcohol according to the temperature of the liquid.

Measuring Funnel
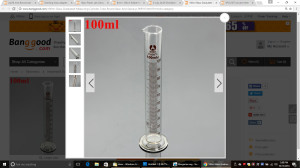
To use these devices you will require a small 100ml measuring cylinder. The cylinder is filled with distillate, then the alcohol meter is floated in the distillate.

Dripper Tube
Finally, but not absolutely necessary is the angle dripper joint. This finishes off the condenser column neatly and drips the distillate precisely into the catch jar.
I have included links to all of these products on our website, and you can get there by clicking the onscreen link.
Here is the system as I set it up and do a test run.
First, notice the silicon rubber tubing has been slit down the length on one side only and clipped onto surround of the pot. The two ends are glued together using silicon glue.
I have poured 3 liters of wine into the pot.
Place the lid on the pot and secure the lid with at least 8 bull clips.
Notice the lab clip used to secure the joint between the riser and the condenser.
Place the pump in the cooling reservoir and attach the pipes to the condenser.
The outlet pipe simply feeds water back to the reservoir.
Insert the thermometer into the grommet above the riser.
Place bowl or beaker below the condenser to catch the distillate.
Turn the power or gas on. After a while as the head temperature reaches about 50c you will see condensation start forming in the riser.
Turn on the cooling pump.
As the temperature rises, the distillate will condense and run into the catchment.
In our next episode we will look more closely at how to fraction the distillate. You will see how to calculate the foreshots, heads, hearts and tails. You will see what to dispose of and how to blend the remaining distillate to make a pleasing and tasteful product.

Please note that you will be buying these products from Banggood.com

Banggood.com offers various methods of transport. The free transport option can take up to 8 weeks depending on where you are situated, and how useless your customs department is – paid transport options are far quicker.

Any questions to do with damages in transit, or incorrectly supplied products must be supported by Banggood.com

That being said, I have ordered a ton of stuff from Banggood.com and have had nothing undelivered, broken or incorrectly supplied. All of the equipment featured in this post was purchased from Banggood. It was very well packaged and nothing arrived damaged. Due to the low prices, I did not have to pay import duties in SA, but this may differ from country to country.


Clear, Edible, Heat Sealable Film – How to Make Chef Ferran Adria’s Clear Film

chef ferran adrias clear edible film,how to make chef ferran adrias clear film,how to make edible clear film,how to make liquid filled ravioli,how to make edible heat-sealable film,how to make clear edible film,molecular gastronimics edible clear film,using edible clear film in your heat sealer,chef ferran adria edible clear film,molecularrecipes.com clear film


Clear, Edible, Heat Sealable Film - How to Make Chef Ferran Adria's Clear Film
Author: 
Recipe type: Molecular Gastronomy
 
A few weeks back we made edible candy wrappers. Today's episode is all about edible film. This was first presented by Chef Ferran Adria in 2009, and is an extremely versatile ingredient, especially considering that it can be heat sealed. This opens up a whole new range like liquid filled ravioli and flavored oil sachets that simply melt when placed in water based dishes like soups.
Ingredients
  • 20g Potato starch
  • 10ml Soy Lecithin
  • 2ml Glycerine
  • 400ml Water
Instructions
  1. Pour the water into a small saucepan.
  2. Add the potato starch and the soy lecithin. Soy lecithin is available from most health food stores.
  3. Add the glycerine and stir this in briefly.
  4. Use your stick blender to sheer the ingredients into the mixture. You cannot mix this by hand, and if you don't have a stick blender, you can use a regular blender before transferring the ingredients to the pot.
  5. Place the pan over medium heat, bring it to a boil, lower the heat and simmer the liquid for a minute or so until it has thickened.
  6. Pour the mixture through a filter. This will smooth the mixture and remove any bubbles.
  7. Pour enough of the mixture into a teflon pan to coat the base to a depth of 1mm. Continue coating pans until all of the liquid has been used.
  8. Place the pans on a level surface to dry naturally. Drying will take anything from 12 to 24 hours, depending on the ambient temperature and humidity.
  9. As it dries you will see the edges starting to lift. Once dried, gently peel the film from the pan.
  10. At this point, you can cut the film into any shape you like.
  11. To make the sachets, simply fold the film over and pop it into your sealer or vacuum packer. If you're using a vacuum packer, use the seal only function.
  12. Trim of the excess edges with your scissors.
  13. You can fill the sachets with any dry ingredients or any oil based ingredients.
  14. To demonstrate this, I am making a curry flavored butter by simply heating butter with curry spice blend and chilli flakes.
  15. Insert a small funnel into a sachet and fill it halfway with the flavored butter.
  16. Seal the open end with your heat sealer and voila, there it is.
  17. And here is a rectangular one....
  18. Visit the commercial product site to see a whole load of other ideas as well --- http://www.molecularrecipes.com/techniques/edible-film-create-amazing-see-through-recipes/


How to Make Curry in the Oven – Delicious Full Flavored Spicy Oven Curry

how to make curry,how to make chicken curry,how to make curry in the oven,oven curry recipe,oven curry recipe youtube,oven curry recipe video recipe,making curry in your oven,how to make curry in the oven,spicy chicken curry in the oven,spicy homemade chicken curry,how to make curry without a pot,best chicken curry recipe,making homemade chicken curry,use your oven to make curry


How to Make Curry in the Oven - Delicious Full Flavored Spicy Oven Curry
Author: 
Recipe type: Curry
Cuisine: Indian
Prep time: 
Cook time: 
Total time: 
Serves: 6-8
 
Today we're making curry in the oven. So why would you do this? Sometimes the pot you normally use is in the refrigerator, or is being used for some other dish, then this trick is very useful. The added bonus is that making curry in this way is maintenance free.... there is very little stirring or hassle of any kind.
Ingredients
  • 4 Chicken drumticks
  • 4 Chicken thighs
  • 2 Potatoes
  • 2 Onions
  • ½ Green Pepper
  • ½ Red Pepper
  • ½ Yellow pepper
  • 60ml Chicken Masala curry spice blend
  • 500ml Chicken stock
  • 15ml Garlic granules
  • 15ml Ground ginger
  • 10ml Golden syrup
  • 15ml Chilli powder
  • Salt to taste
  • 30ml Tapioca flour dissolved in a little water
Instructions
  1. Use you kitchen sheers to cut the chicken legs and thighs into chunky pieces. Arrange the pieces in large roasting pan skin side up.
  2. Dice the onions and scatter this evenly over the chicken.
  3. Cube the potatoes and scatter these evenly across the pan.
  4. Roll-cut the carrots and scatter these across the pan.
  5. Cut the peppers into blocks and add these to the pan.
  6. Pour the chicken stock over the ingredients.
  7. Place the curry powder in a shaker bottle and dispense this evenly across the top of the pan.
  8. Cover the pan with foil and bake this in a preheated oven at 160c or 320f for 2 hours.
  9. After 2 hours, remove the pan from the oven and carefully remove the foil.
  10. Stir up the ingredients thoroughly.
  11. Add the garlic granules and stir this in.
  12. Return the pan to the oven for a further 60 minutes.
  13. Remove the pan from the oven and scoop all of the solid ingredients from the pan using a slotted spoon. Put this aside.
  14. Pour the sauce from the roasting pan into a frying pan.
  15. Heat the sauce over medium high heat and add the ground ginger, golden syrup and chilli powder.
  16. Dissolve the tapioca flour in a little water and pour this in.
  17. Adjust the seasoning with salt and stir this all together.
  18. Bring the pan to a boil, lower the heat and simmer for a minute until thickened.
  19. Pour the sauce over the chicken and serve immediately accompanied with sliced banana, fruit chutney, desiccated coconut and sambal.
  20. And there it is, an amazingly fragrant and spicy curry made in the oven.


How to Play Food Pool & Help Alan Oosthuizen

how to play food pool,equipment used in food pool,food pool drinking game,food pool party game,rules of food pool,food pool euipment and rules

Help Alan Out!!!


How to Play Food Pool & Help Alan Oosthuizen
Author: 
Recipe type: Food Games
 
Today's episode is something totally different.... you're going to learn about food pool. First we have the food pool cue. Amateur models are single long piece of cheap meat stick. This one is clearly the professional model, being a 2 piece construction with high-tech joint in the center and a fine tip to aid with spin shots.
Instructions
The Objective of Food Pool
  1. The objective of food pool is to knock your opponents egg off the edge of the table by hitting his egg with your egg.
The Equipment Required & Equipment Regulations
  1. The cue must be between 50 and 60 cm (20-24 inches) in length.
  2. The cue must be manufactured from any type of dried sausage - jerky, cabanossi, pepperoni etc.
  3. The cue may be a single piece or 2 piece construction.
  4. Cues with 2 piece construction may not have and overlap of more than 1 inch or 2.5cm.
  5. The thickness of the cue may not exceed ¾ inch or 20mm.
  6. The cue may not be excessively dried to increase rigidity.
  7. The balls consist of eggs - these may be fresh eggs or hard boiled.
  8. The balls must be industry standard large eggs - weighing from 48g to 53g.
  9. Each player must mark his egg on all sides to ensure identification during the game.
  10. The table consists of any flat, hard, smooth, level surface and can be any size.
The Rules of the Game
  1. Any number of players can participate, depending on the size of the table.
  2. Players start standing evenly spaced around the edge of the table.
  3. Players eggs are placed 12 inches or 30cm from the edge of the table.
  4. Players have turns to shoot in a fixed pre-agreed order.
  5. The first player shoots, followed by the second player etc. Once the first round has been played, players may leave their starting positions in order to reach their balls.
  6. Once the first round has been played, players who don't manage to at least touch another player's ball will forfeit their shot in the following round.
  7. Players must play clean shots -- double hits are not allowed and will result in forfeit of their following round shot.
  8. A player that sinks an opposing player's ball is entitled to play another shot. This continuance applies until the player does not sink a ball.
  9. A player that inadvertently sinks his own ball while sinking another is out the game as well.
  10. A player may not lift or tilt the table to manipulate the run of the ball, or to facilitate mass annihilation of the other player's balls.
  11. Player's may form alliances, but be warned -- this does not last long!!!
  12. The last player left on the table is the winner... then let the next game begin!!!


Amazing Pizza Dough Recipe – the Pizza Dough That Behaves at Home!!!

best pizza dough recipe,authentic pizza dough recipe,easy pizza dough recipe,quick pizza dough recipe,excellent pizza dough recipe,how to make pizza bases,home made pizza bases,best homemade pizza bases,crispy pizza bases,best pizza base recipe,making pizzas at home,pizza dough recipe youtube,pizza dough recipe video


Amazing Pizza Dough Recipe - the Pizza Dough That Behaves at Home!!!
Author: 
Recipe type: Pizza Dough
Cuisine: Italian
 
In today's episode we're going to look at an amazing pizza dough. The industry rule regarding pizza is you need supper high temperatures to bake and achieve the beautifully charred base and well browned rim. The problem is that almost no domestic home has an oven that can reach 350c or 662f. This dough will bake superbly at regular domestic oven maximum temperature of 250c or 482f. You will get a beautifully crisp, charred base and lovely coloring on the edges.
Ingredients
  • 500g Double zero or All Purpose flour
  • 20g Brewers yeast
  • 60ml Oil
  • 5ml Salt
  • 250ml Warm water
  • 1.25ml Sugar
Instructions
  1. Dissolve the sugar in the warm water.
  2. Pour the granulated brewer's yeast and stir this briefly to dissolve. Allow this to stand and activate for 10 minutes.
  3. Brewer's yeast is available in most food stores in the baking department alongside the baking yeast.
  4. After 10 minutes you will see a mass of froth on top the yeast.
  5. Pour in the oil and stir to combine.
  6. In your stand mixer bowl, add the flour and the salt. Try to use double zero or all purpose flour. You will get a better texture from these.
  7. Place the bowl on your mixer and pour the wet ingredients into the flour.
  8. Fit the dough hook and knead the mixture on medium low speed for 5 to 6 minutes.
  9. After this time you will have a beautifully soft dough that is not sticky at all.
  10. Remove the bowl from the machine, cover with cling-wrap and let the dough rise for 60 to 90 minutes until more than doubled in size.
  11. After this rising time, turn the dough out onto a lightly floured work surface and knead it briefly to knock it down.
  12. Weigh the dough and divide it into 4 equal pieces. Each piece will make a 30cm or 12 inch base.
  13. Working with 1 piece at a time work the dough into a disc shape, then roll it out to a 30cm or 12 inch pizza base.
  14. Dust the dough lightly with flour if it becomes slightly stick while rolling.
  15. To make up the pizzas, top with your desired toppings and bake in a preheated oven at 250c or 482f for 15 to 20 minutes.
  16. And there it is... the pizza dough that behaves at home.
  17. In the near future, I will be make a selection of classic pizzas using these bases.


How to Make Venison Liver Pate’ – Amazing, Tasty Homemade Venison Liver Pate’ at Home!!!

venison liver pate',how to make venison liver pate',homemade venison liver pate',venison liver pate' recipe,venison liver pate' youtube,venison liver pate' video recipe,make venison liver pate' at home,best venison liver pate' recipe,how to make venison liver pate' at home,venison liver pate' with brandy and cream,easy venison liver pate',gourmet venison liver pate' recipe


How to Make Venison Liver Pate' - Amazing, Tasty Homemade Venison Liver Pate' at Home!!!
Author: 
Recipe type: Venison & Pate'
Cuisine: French
Serves: 500g
 
Apologies for my absense over the past 3 weeks. My wife suffered a massive heart attack and almost died. Very fortunately she pulled through and was welcomed back home over this past weekend. So now we're back on track and will continue with our normal programing, as well as continuing with our distilling series and molecular gastronomy series. In today's episode we're going to make a masterpiece venison liver pate'.
Ingredients
Group 1
  • 450g Venison liver
  • 250ml Cultured buttermilk
Group 2
  • 4 Spring onions
  • 1 Clove garlic
  • 2.5ml Roughly chopped fresh thyme
  • 5ml Roughly chopped fresh rosemary
  • 15g Butter
Group 3
  • 3.75ml Crushed Juniper berries
  • Pinch of ground nutmeg
  • Pinch of ground cinnamon
  • Pinch of ground coriander seed
  • Pinch of ground clove
  • Pinch of ground black pepper
Group 4
  • 50ml Brandy
  • 30ml Cream (plus extra for thinning)
  • 60ml Melted butter
  • Extra melted butter for sealing
  • Salt and pepper to taste
Instructions
  1. I am using kudu liver, but any large deer liver is good.
  2. Rinse the liver, then use a sharp paring knife to remove the sinews from the liver.
  3. The easiest way to do this is to grab any visible sinew with one hand and scrape the flesh from the sinew using your knife edge with the other hand.
  4. Once the sinew is removed, cut the liver into half inch cubes.
  5. Place the cubed liver in a container and pour in enough cultured buttermilk to cover the liver.
  6. Place the lid on the container and let this stand in you refrigerator for an hour to 2 hours.
  7. After this time, place this liver in a colander and rinse it thoroughly under cold running water, then pat the cubes dry with a dish towel.
  8. In the next stages you will need to roughly chop the rosemary and thyme, slice the garlic, cut the spring onion into rounds and measure out the butter.
  9. In addition, you will need a pinch each of ground nutmeg, ground cinnamon, ground coriander seed, ground clove and ground black pepper and 3.75ml crushed juniper berries.
  10. Measure out the brandy, the cream and the melted butter.
  11. Heat a large pan over medium heat and add the un-melted butter.
  12. When the butter starts to sizzle, add the livers, garlic, rosemary, thyme and spring onions.
  13. Saute this for 5 minutes until the whites of the onion are softened and the liver is browned all over.
  14. After this time, add the dry spices and stir these in until well combined.
  15. Pour the brandy in at the edge of the pan and use your gas lighter or blowtorch to set it alight. Make sure you're standing slightly away from the pan to avoid burning yourself.
  16. Allow the flames to burn down, then stir everything carefully until they extinguish completely, then remove the pan from the heat.
  17. Pour in the melted butter and cream.
  18. Use your stick blender to machine this until fine. You can also do this in a regular blender or food processor.
  19. Add extra cream to thin the paste as you go. You want to end up with a very soft paste, similar to anchovy spread.
  20. Remember that the pate' will firm up considerably on refrigeration and if you don't thin it sufficiently and this stage you will find difficult to spread the finished product.
  21. Once you're happy with the consistency, season the pate with salt and pepper to taste and stir these in.
  22. Tip the pate' out into a sieve placed over a bowl.
  23. Use a spatula to scrape and force the pate' through the sieve.
  24. Transfer the pate' to suitable bowls and flatten out the surface.
  25. Melt enough butter to pour over the pate' in order to seal the tops of the bowls, then transfer the pate' to your refrigerator to set for at least 2 hours.
  26. And there it is.... an amazing, delicious venison liver pate'.


Scroll to top

Kitchen Conversions

Convert:
Masses
to:
Volumes
to:
Temperatures
to:
Lengths
to: