How to Make Beef Bacon – Kosher Beef Bacon, Corned Beef & Pastrami

how to make beef bacon,how to make kosher bacon,how to make corned beef,how to make bully beef,how to make pastrami,how to cure beef bacon,homemade bacon,homemade corned beef,homemade pastrami,how to make your own bacon,curing and smoking bacon at home,homemade bacon video recipe,homemade bacon youtube recipe


How to Make Beef Bacon - Kosher Beef Bacon, Corned Beef & Pastrami
Author: 
Recipe type: Curing & Smoking Meats
 
Beef bacon, corned beef and pastrami are all very similar in the way that they are produced and as a result this episode will cover all 3. The differences between the different meats comes in the way they are finished off and this will be explained as we go.
Ingredients
  • 2.4kg Beef brisket
For the Curing
  • 2lt + 2lt Water
  • 200g Kosher salt
  • 140g Prague powder #2
  • 15ml Garlic powder
  • 4 Bay leaves
  • 15g Whole black pepper corns
  • 10ml Whole juniper berries
  • 90g Brown sugar
Instructions
  1. To start, we need to measure out the curing ingredients which include kosher salt, black peppercorns, whole juniper berries, bay leaves, garlic powder, and brown sugar.
  2. In a separate bowl measure the Prague powder #2.
  3. Pour 2 liters of water into a pot and all of the spices except for the Prague powder.
  4. Bring this to boil and allow it to simmer for 10 minutes.
  5. Remove the pot from the stove and quick chill the brine by floating the pot in a sink of cold water.
  6. Once the brine has cooled significantly, add another 2 liters of water to the brine along with the Prague powder. Stir the brine until the Prague powder has dissolved.
  7. While the brine continues cooling, you can unpack your meat. This is a nice big slab of brisket, or beef belly around 2.4kg in weight.
  8. By this stage the brine has cooled completely. Pour it into a large food safe container and add the brisket.
  9. Due to the high content of salts in the brine, the meat will float. You need to weigh it down beneath the surface of the brine using a bowl or plate.
  10. Put the lid on the container and transfer this to your refrigerator for 7 full days to cure.
  11. After the curing time remove the meat from the brine and wash it thoroughly under cold running water. You will notice how firm the meat is, along with amazing rosy pink tinge that is the hallmark of well-cured meat.
  12. Now, if you want corned beef this is where you will simply simmer the meat in water until the internal temperature reaches 67c or 152f.
  13. For beef bacon and pastrami we're going continue with the process.
  14. Dry the meat using a clean dish towel then place it on a rack in your refrigerator for 24 hours to air dry.
  15. This drying process will make the meat more receptive to the smoking process.
  16. Fire up your smoker. I am using the Smoke Daddy Vortex in this demonstration. I have the extreme left hand burner running to provide heat.
  17. Place the meat on the right hand side away from the direct heat, close the barbecue and allow this to smoke for around 3 hours until the internal temperature of the meat is 67c or 152f.
  18. This will give you beef bacon, at at this stage all you need to do is wrap it and refrigerate it. Although the bacon has technically been pasteurized, it does still require slicing and frying.
  19. All you need to make pastrami is to steam or simmer the meat until the internal temperature reaches 67c or 152f. This steaming is normally only carried out a few days after the smoking process, which allows the smoke to really penetrate the meat.
  20. And there it is, beautiful smoked beef bacon.... one step further than corned beef, and one step short of pastrami.

 

Freeze Distillation – Ice Distillation – The Simplest Form of Distilling Alcohol

freeze distilling,freeze distillation,ice distilling,ice distillation,how to freeze distil alcohol,how to ice distil alcohol,how to save bad wine,how to improve bad wine,the most basic form of distilling,how to distil wine,how to make bad wine good,the science of distilling,how to distill wine youtube,how to distil wine video


Freeze Distillation - Ice Distillation - The Simplest Form of Distilling Alcohol
Author: 
Recipe type: Distilling
 
A couple of episodes back I mentioned that we would be covering a basic course in home distilling. This is the first episode of this series. Before we continue, distilling is illegal in some countries, so please check with your local authorities before getting involved in this. In any event, the process is very interesting, and the science and understanding behind it will at the very least, enrich your life.
Ingredients
  • 2 liters wine (any wine of your choice)
Instructions
  1. A couple of episodes back I mentioned that we would be covering a basic course in home distilling. This is the first episode of this series. Before we continue, distilling is illegal in some countries, so please check with your local authorities before getting involved in this. In any event, the process is very interesting, and the science and understanding behind it will at the very least, enrich your life.
  2. This first in the series covers the most basic form of distilling called freeze distillation. Again, before we continue, this method of distillation is only good for fortifying commercially produced wines, beers or ciders.
  3. To explain this, let's look at the distillation process. When the mash, or fermented liquid is distilled, there are a couple of components that emerge first. Methanol, ethanol and volatile oils are the main make-up of these. Ethanol is drinking alcohol, while methanol is toxic, and the volatile oils just taste really bad.
  4. When distilling with a pot still or refraction still, the methanol and volatiles emerge first, and these are called the heads. These heads are removed at a rate of 100ml per 20 liters of mash.
  5. With freeze distilling there is no way to remove the heads, and this is the reason this process is only good for commercially produced wines. Commercially produced wines use specially developed yeasts that inhibit the development of methanol and volatiles, making it safe for use with freeze distillation. So now the question is, why would you do this?
  6. Freeze distillation is ideal for fortifying wines, or increasing the alcohol content, and especially useful for saving poor quality wines, or wines that have gone bad.
  7. So let's start. Freeze distilling relies on the simple principal that alcohol and water freeze at different temperatures.
  8. Water, as we all know, freezes at around zero Celsius, while ethanol freezes at -114c. This massive disparity means that if we freeze wine in our regular household freezer between -15 and -25c, the water content of the wine freezes, while the ethanol content remains liquid. This liquid is then drained from the frozen block giving you and fortified and very well clarified wine.
  9. Here are the calculations that will give you some insight into the resulting alcohol content of your distillate.
  10. Keep in mind that it is not only the ethanol that does not freeze. Included in the distillate will be most of the syrups or flavor component of the wine. This is negligible amount, but will add color and concentrated flavor to the resulting product.
  11. If you start with a liter of wine with an ABV of 13% and collect 500ml of melt runoff, then you will have a fortified wine with an ABV of just below 26%. If you collect just 250ml of runoff, you will have an ABV of just under 52%.
  12. So let's start. I am going to do this in 2 different ways. The first method is by far the quickest, but is not nearly as accurate as the second method.
  13. Line a large colander with cling-wrap. Pour in a liter of wine.
  14. The second method involves pouring a liter of wine into a food safe bottle.
  15. Place both of these in your freezer. Just remember that water based liquids expand when frozen, and for this reason, you really don't want to tighten the cap of the bottle.... screw it on loosely, otherwise you might end up bursting the bottle in the freezer.
  16. The following day when everything is well frozen remove these from the freezer.
  17. Remove the cap from the bottle and invert the bottle in a measuring jug.
  18. Place the colander over a large bowl. Lift the frozen wine and slide cling-wrap out from underneath the frozen wine.
  19. Simply leave both on the counter top to start defrosting. The time it takes to collect the runoff is dependent on the ambient room temperature.
  20. As time passes, you will notice the ice content of each method become more and more pale as the alcohol and syrup content of the frozen wine drains from the main mass.
  21. Using the calculations mentioned earlier, it is entirely up to you as to how much distillate you collect, and just how strong you want your distillate to be.
  22. I have collected 500ml from each 1 liter batch, meaning that my distillate has been fortified by 200 percent, giving me an end ABV of 26%.
  23. You will also notice the the resulting distillate is much clearer in appearance than the original wine. This is due to the fact that a large percentage of impurities in the wine are trapped in the ice, and the small percentage that does escape into distillate precipitates to the bottom of the distillate almost immediately.
  24. All that remains now is to pour the distillate or fortified wine into a food safe bottle for storage.
  25. And there it is, a 26% ABV fortified wine made from dirt-cheap rose'.
  26. I will bee publishing 1 video on distilling per week until this short course is complete. In the meantime, we will continuing with normal food programming.


Sugar Chilli Pork Roast – The MOST Tender Roast Ever!!! Perfect for the 4th of July!!!

roast pork recipe,roast pork video recipe,roast pork recipe youtube,roast pork neck,sugar chilli roast pork,roasted pork neck with sugar chilli crust,how to roast pork,the best roast pork recipe,4th of July roasted pork recipe,4th of July pulled pork recipe,super-tender roast pork,how to make tender roast pork,4th july recipes youtube,independence day recipes youtube


Sugar Chilli Pork Roast - The MOST Tender Roast Ever!!! Perfect for the 4th of July!!!
Author: 
Recipe type: Pork / Roast
Prep time: 
Cook time: 
Total time: 
Serves: 6-8
 
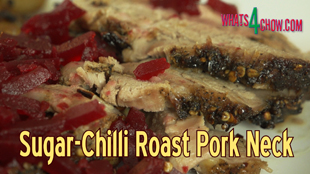
Just a few weeks ago I featured delicious sugar chilli pork neck steaks. A few viewers asked whether it is possible to make whole sugar chilli pork neck roast. So I put this my list of things to try and it turned out magnificently, except for the fact that it turned out so juicy and so tender that it was quite difficult to slice cleanly.... and I quite honestly don't see that as a problem. Alternatively, shred the pork and serve as deliciously tender and sumptuous pulled pork.
Ingredients
  • 1.5kg / 3.5lb Whole deboned pork neck
  • 80g Demerara sugar (or treacle sugar)
  • 20ml Coarse cracked black pepper
  • 20ml Dried chilli flakes
  • 20ml Himalayan rock salt (fine)
Instructions
  1. To start you need a whole deboned pork neck, around 1.5kg or 3.5 pounds.
  2. In a bowl, combine the demerara sugar, coarse cracked black pepper, dried chilli flakes and Himalayan rock salt. I prefer this salt as it contains no iodine, and imparts a slight acidity to the food resulting in a much rounder flavor.
  3. Start sprinkling this mixture over the pork and pressing it firmly into surface of the meat. Continue until the slab of meat is coated well and all of the sugar chilli rub is used.
  4. Place the pork in a roasting tin and scrape any over overrun rub over the top of the pork.
  5. I am adding boiled potato wedges to the pan as well.
  6. Roast the pork in a preheated oven at 250c or 480f for 60 minutes undisturbed.
  7. On removing the pork from the oven, the first thing you will notice is the amazing charred crust that has formed on the pork.... not to mention the insanely incredible aroma.
  8. By this stage the potatoes will also be well roasted and will have absorbed some of the amazing pan flavors.
  9. Serve this immediately with the accompaniments of your choice.
  10. I will be publishing a video shortly where I will show you the trick to these amazing roast potatoes.
  11. Stay tuned for our next episode where we're looking a very simple way to distil alcohol at home with basic kitchen equipment, and I mean basic.


Sticky Mocha Coffee Chicken – Amazing Sticky Coffee Chicken – Sticky Chicken with a Difference!!!

sticky mocha coffee chicken,sticky coffee chicken recipe,how to make sticky chicken,best sticky chicken recipe,how to make coffee chicken,sticky chicken video recipe,sticky chicken recipe youtube,mocha coffee chicekn recipe,easy sticky chicken recipe,homemade sticky chicken recipe,how to make sticky chicken at home,using xanthan gum


Sticky Mocha Coffee Chicken - Amazing Sticky Coffee Chicken - Sticky Chicken with a Difference!!!
Author: 
Recipe type: Chicken / Poultry
Prep time: 
Cook time: 
Total time: 
Serves: 4-8
 
Sticky chicken is awesome in any description, but this sticky mocha coffee chicken is at least a few steps ahead of the competition. A few episodes ago we introduced xanthan gum, the thickener of the future. This recipe owes its amazing stickiness and phenomenal mouth-feel to this simple ingredient
Ingredients
  • 150ml Light Soy sauce
  • 125ml Brown sugar
  • 60ml Sherry
  • 80ml Strong brewed coffee (at least double strength)
  • 60ml Olive oil
  • 8 Chicken pieces (drumsticks & thighs)
  • Salt and pepper to taste
Instructions
  1. Combine the light soy sauce, brown sugar, sherry, strong black coffee, and oil.
  2. Normally there would be no way to combine the oil with the rest of the ingredients, and this is where xanthan gum comes in. Xanthan gum is a strong hydrocolloid which with its bipolar nature will effectively bind the oil and water based ingredients.
  3. Add the xanthan gum and zap the mixture for 60 seconds using your stick blender. You can also do this in a regular blender.
  4. Place the chicken pieces into a vacuum packing bag. If you don't have a vacuum packer, use a ziplock bag and extract as much air as possible.
  5. Pour the marinade.
  6. If you're using basic front-loading vacuum packer, it is a good idea to elevate the machine. This allows you to extract the air from the bag without sucking liquid into the vacuum pump, which will almost certainly damage the machine.
  7. It it also a good idea to do second seal to ensure that the bag does not leak.
  8. Transfer the bag to your refrigerator and allow the chicken to marinate for at least four hours.
  9. After the marinating time, cut the bag open and empty everything into a tray or container of some sort.
  10. Heat a heavy non-stick pan or a well seasoned cast iron pan over medium high heat. Do not add butter or oil.
  11. Lift the chicken pieces fron the marinade and place them in the pan skin side up.... obviously with the drumsticks this could be a little confusing.
  12. Fry the chicken for 3 minutes per side. It may appear that the chicken is burning, but this is simply the marinade becoming super-caramelized.
  13. After both sides have had 3 minutes, turn the chicken pieces back to their first side and pour in the marinade.
  14. Turn the heat down to medium and allow the chicken to simmer for 15 minutes.
  15. At the 15 minute mark, turn the pieces over and continue simmering the chicken for a further 5 minutes.
  16. Make sure to shake the pan back and forward every minute to ensure that the chicken is well coated with the sticky sauce.
  17. Remove the chicken from the pan and serve with the accompaniments of your choice. As a hint these sticky chicken marvels go incredibly well with prawn crackers.


Scroll to top

Kitchen Conversions

Convert:
Masses
to:
Volumes
to:
Temperatures
to:
Lengths
to: