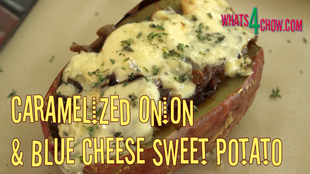
Caramelized Onion & Blue Cheese Sweet Potatoes. Baked, Stuffed Sweet Potatoes with Balsamic Onion & Blue Cheese.
Author: Whats4Chow
Recipe type: Vegetarian / Vegan / Sweet Potato
Prep time:
Cook time:
Total time:
Serves: 2
These stuffed sweet potatoes are out of this world! Filled with caramelized balsamic onions and blue cheese, the flavor combination is outstanding!!!
Ingredients
- 2 Large sweet potatoes
- Oil
- 2 Large onions
- 30ml Brown sugar
- 15ml Balsamic vinegar
- 15ml Fresh rosemary, finely chopped
- 75g Strong blue cheese
- 5ml Fresh thyme, finely chopped
Instructions
- Scrub the sweet potatoes clean and cut away any ugly marks.
- Place the potatoes in a roasting pan and brush them liberally with oil. Bake the potatoes in a preheated oven at 200c or 400f for 60 minutes until tender.
- Remove from the oven and allow to cool for a few minutes.
- While the potatoes bake, cut the onions into half rounds. Heat a pan over medium high heat and add 30ml of oil. Fry the onions for 10 to 15 minutes until well browned.
- Add the sugar and balsamic vinegar and continue to fry for 3 to 5 minutes until well caramelized. Remove the pan from the heat and stir in the fresh chopped rosemary.
- Using gloves or tongs to hold the potatoes, cut a deep valley into each potato.
- Spoon half of the onion into each of the potatoes.
- Crumble half of the strong blue cheese over each potato then melt the cheese under the grill in your oven.
- Remove the potatoes from the oven, transfer them to platters and serve immediately garnished with little finely chopped fresh thyme.