Potato Pizza Recipe – Potato Pizza Crust with a Difference – Cheesy Potato Bake

potato pizza crust,potato pizza,potato pizza recipe,cheesy potato bake


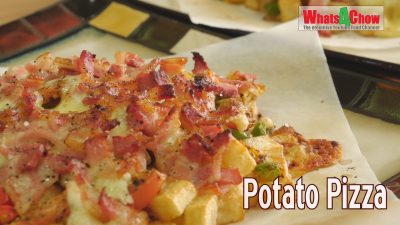
Potato Pizza Recipe - Potato Pizza Crust with a Difference - Cheesy Potato Bake
Author: 
Recipe type: Pizza
Cuisine: Italian
Serves: 2
 
Today we're going to make a magnificent potato pizza. The recipe is really simple, super-tasty and will have your guests lining up for more.
Ingredients
For the Pizza
  • 1 x Large ripe tomato
  • 10ml Crushed garlic
  • 15ml Dried Italian herb mix (below)
  • 8 x Rashers streaky bacon
  • 100g Mozzarella
  • 80g Cheddar or Monterey Jack
  • Salt & pepper to taste
  • 650g Potatoes
  • Oil for deep frying
For the Italian Herb Blend:
  • 45ml Dried savory
  • 45ml Dried basil
  • 45ml Dried marjoram
  • 45ml Dried oregano
  • 45ml Dried chives
  • 30ml Dried rosemary
  • 15ml Dried thyme
  • 15ml Dried sage
  • 15ml Dried parsley
Instructions
  1. To start, you need a quarter red, yellow and green pepper, a large ripe but firm tomato, 10ml crushed garlic, and 15ml Italian herb blend. If you can't find the herb blend in your supermarket, I have included the recipe below in the description.
  2. Chop the tomato and place it in a bowl, dice the peppers and add these.
  3. Add the garlic, and finally the dried herb blend. Stir this all together thoroughly and put it aside for the flavors to develop.
  4. Take eight rashers of well smoked streaky bacon and cut this into bits, across the grain.
  5. Cut 100g mozzarella cheese into squares, and slice 80g cheddar or Monterey Jack into 8 slices.
  6. Peel 650g potato and dice it into cubes of 10mm in size.
  7. Cut 2 squares of baking parchment, 300mm in size and place these on a baking sheet.
  8. Fry the diced potato in your deep fryer at 180c or 350f until crispy and golden.
  9. At this stage, turn on the grill, or upper element of your oven to maximum to preheat.
  10. Transfer half of the fried cubes to each of the parchment squares.
  11. Spread them into a circle keeping them slightly heaped up at the same time.
  12. Divide the tomato pepper mixture evenly between the two and spread these over the top of the potato.
  13. Pick up any stray bits and place these on top.
  14. Place the cheddar slices on top of the heap in a cross formation.
  15. Complete the cheese by scattering the mozzarella blocks evenly over each pizza.
  16. Top each pizza with half of the bacon bits.
  17. Give each pizza a generous grind of salt and pepper, and you're ready to bake.
  18. Transfer the baking sheet to the center of your oven to grill until the cheese is well melted, and the bacon is fully cooked and browning nicely on the edges.
  19. Remove the pizzas from the oven and serve piping hot with a tall beer to keep it company.

(potato pizza crust,potato pizza,potato pizza recipe,cheesy potato bake)

Beef Samosa Recipe From Start to Finish – Including Samosa Pastry Recipe – Homemade Samosa

samosa recipe,beef samosa recipe,somosa pastry,samosa pastry recipe,samosa filling recipe,homemade samosa,homemade samosa recipe,homemade samosa sheet,how to make samosa,how to make samosas at home


Beef Samosa Recipe From Start to Finish - Including Samosa Pastry Recipe - Homemade Samosa
Author: 
Recipe type: Street Food
Cuisine: Indian
 
Beef Samosa Recipe From Start to Finish - Including Samosa Pastry Recipe - Homemade Samosa South Africa has the largest East Indian population outside of India. One of their signature foods is samosa, or as it is called in South Africa, samoosa. Today we are going to make beef samosas from start to finish, including the samosa pastry.
Ingredients
For the Filling
  • 600g Ground beef
  • 400g Onions diced
  • 200g Mixed peppers diced
  • 600ml Beef stock
  • 45ml Masala
  • 15ml Hot curry powder
  • 30ml Oil
  • 15ml Ground cumin
  • 15ml Ground ginger
  • 15ml Garlic powder
  • 45ml Tapioca flour dissolved in a little water
For the Pastry:
  • 500g All purpose flour
  • 10ml Salt
  • 30ml Oil
  • 180ml Warm water
Instructions
  1. Starting with filling, you need 600g lean ground beef, 400g diced onion and 200g diced mixed red, yellow and green peppers.
  2. Measure out 45ml masala, 15ml extra hot curry powder, 15ml ground cumin, 15ml ground ginger and 15ml garlic powder.
  3. Mix 600ml beef stock and dissolve 45ml tapioca flour in a little water.
  4. And finally 30ml oil.
  5. Add all of the spices to the ground beef, and pour in the oil.
  6. Massage the spices into the beef until everything is very well combined.
  7. Heat a large pan over medium high heat, add 30ml of oil and fry the onions and peppers for 3 to 4 minutes until the onion is translucent.
  8. Scoop the onion from the pan and put it aside.
  9. Add a little mor oil to the pan and crumble the ground beef into the pan.
  10. Stirfry the beef for 4 to 5 minutes, chopping as go to break up any lumps.
  11. Return the onion mixture to the pan and mix this in.
  12. Pour in the stock and mix this in.
  13. Make well in the center of the pan and pour in tapioca slurry, stirting continuously.
  14. Allow the pan to cook for 1 to 2 minutes until the mixture has thickened considerably.
  15. Season the curry to taste with salt and pepper, turn off the heat and put this aside to cool completely.
  16. For the pastry, measure 500g all-purpose flour, 30ml oil, 180ml tepid water and 10ml salt.
  17. Place all of these in your food processor, starting with the dry ingredients.
  18. Place the lid on the bowl and zap the mixture until it starts to come together. The mixture will resemble cous cous, and will hold together well when pressed.
  19. Pour the crumbly mixture into a bowl and compress it into a block.
  20. Wrap the block in clingwrap and allow this to rest at room temperature for 30 minutes.
  21. After 30 minutes, unwrap the dough and divide it into 4.
  22. Working with one piece at a time, flatten the dough out.
  23. Run the dough through your pasta machine on number 1 a few times, folding it double after each pass.
  24. When the dough is nice and smooth, reduce the rollers to number 2 and repeat this process.
  25. Continue with this until you reach setting number 5, and the pastry is just less than a millimeter in thickness.
  26. Put this aside and continue with the remaining pastry.
  27. Cut each strip in half down the center, giving 8 strips of 7.5cm in width.
  28. Cut each of the strips into lengths of 30cm, giving you 16 strips in total. The offcuts can be rerolled.
  29. Place a heaped tablespoon of the filling at the end of one of the strips.
  30. Fold the corner of the strip up diagonally to cover the filling.
  31. Fold the parcel once more, this time straight up.
  32. Next, fold diagonally, and so on, until the samosa is completed.
  33. Seal the end with a little water.
  34. Continue with the remaining samosas.
  35. At this stage, you can choose the freeze your samosas for a later date. This is why we used tapioca flour to thicken the curry. Tapioca flour is freeze thaw stable, and will give you a far superior frozen product.
  36. To cook your samosas, fill an pan with oil to an inch in depth. Heat this to 180c or 350f and carefully lower a few samosas into the oil.
  37. Fry the samosas until golden turning often to ensure even browning.
  38. Serve the samosas piping hot accompanied with fruit chutney and yogurt for dipping.

(samosa recipe,beef samosa recipe,somosa pastry,samosa pastry recipe,samosa filling recipe,homemade samosa,homemade samosa recipe,homemade samosa sheet,how to make samosa,how to make samosas at home)

Chicken & Prawn Curry – Best Chicken & Prawn Recipe, How to Make Creamy Chicken and Prawn Curry!

chicken and prawn recipe,chicken and prawn recipes,chicken and prawn curry,chicken and prawn curry recipe,how to make chicken and prawn curry,chicken and prawn curry with coconut milk,thai chicken and prawn curry recipe,easy chicken and prawn curry,easy chicken and prawn curry recipe,quick chicken and prawn curry recipe


Chicken & Prawn Curry - Best Chicken & Prawn Recipe, How to Make Creamy Chicken and Prawn Curry!
Author: 
Recipe type: Curry
Cuisine: Indian
Serves: 4-6
 
Today we're going to make chicken and prawn curry. This is one of the best curries around, just full of prawn flavor with a wonderful creamy finish.
Ingredients
  • 800g Prawns (13-15 size) (whole)
  • 500g Chicken breast fillet
  • 500ml Chicken stock
  • 500g Onions
  • Quarter Red pepper
  • Quarter Yellow pepper
  • 45ml Masala
  • 15ml Chilli powder (or to taste)
  • 15ml Cumin powder
  • 15ml Crushed garlic
  • 75ml Oil
  • 60ml Tapioca flour
  • 500ml Cream
  • 6 extra whole prawns to garnish
  • Fresh coriander to garnish
Instructions
  1. To start you will need 800g of 13-15 size prawns, whole in the shell with head on, and 500ml chicken stock.
  2. Snap the heads from the prawns and throw the heads into a large pot.
  3. Use your scissors to cut the shell along the spine of the prawn.
  4. Remove the shells and tail and throw these in the pot as well.
  5. Open the spine of each prawn and dig out the vein. You can normally grab it with your fingers, however you can also pull it out using a skewer or toothpick.
  6. Place the prawn meat into a bowl and refrigerate until later in the recipe.
  7. Pour the chicken stock into the pot with the prawn heads and shells. I am using a pressure cooker, and will cook this for 20 minutes once the pot has pressurised. If you're using a regular pot, put lid on and simmer the mixture for 35 minutes.
  8. While the prawn stock cooks, dice a quarter red pepper and a quarter yellow pepper, cut the prawn meat into bite size chunks, cut 500g onions into quarter rounds, and cut 500g chicken breast fillet into pieces similar in size to the prawn chunks.
  9. Once the stock has finished cooking, strain the mixture through a colander. Use a pair of tongs to squeeze out any trapped liquid, then put the stock aside.
  10. Measure 45ml masala spice, 15ml chilli powder, 15ml cumin and 15ml crushed garlic and add these to the chicken.
  11. Massage these into the chicken unyil evetything is well coated.
  12. Pour in 75ml of oil and mix this all again.
  13. Heat a large pan over medium high heat, add 15ml oil and the onion and peppers. Stirfry these for 4 to five minutes until the onion is translucent. Remove this from the pan and set it aside.
  14. Add the chicken to the pan and stirfry this for 4 to 5 minutes until cooked through.
  15. Return the onion and peppers to the pan and stir to combine.
  16. Pour in the prawn stock and stir everything again.
  17. Add the prawn chunks ans spred these across the top of the pan, making sure they are submerged.
  18. Allow this to cook for 60 seconds.
  19. Make well in the center of the pan. Dissolve 60ml tapioca flour in a little water and pour this to the pan. Stir to combine thoroughly and allow this to cook and thicken for 60 seconds.
  20. Pour in 500ml of cream and stir this in thoroughly. Don't bring the mixture to a boil at this stage as the cream will split, you simply want to reheat the mixture.
  21. Turn off the heat and you're ready to serve.
  22. Serve this creamy chicken and prawn curry with the accompaniments of your choice, garnished with an extra grilled prawn and fresh coriander.
  23. (chicken and prawn recipe,chicken and prawn recipes,chicken and prawn curry,chicken and prawn curry recipe,how to make chicken and prawn curry,chicken and prawn curry with coconut milk,thai chicken and prawn curry recipe,easy chicken and prawn curry,easy chicken and prawn curry recipe,quick chicken and prawn curry recipe)


Pickled Onion Rings -Turbo-Charge Your Burgers, Salads & Garnishes with Pickled Onion Rings!

pickled onion rings,pickled onion rings recipe,how to make pickled onion rings,homemade pickled onion rings


Pickled Onion Rings -Turbo-Charge Your Burgers, Salads & Garnishes with Pickled Onion Rings!
Author: 
Recipe type: Pickling and preserving
Serves: 1kg
 
Pickled onion rings are great way to turbo charge any burger, and they also work fantastically as garnishes and salads with just about any meal.
Ingredients
  • 800g Onions (white or red)
  • 3Tbs Non-iodated salt
  • 110g Sugar
  • 2.5ml Coriander seed
  • 2.5ml Mustard seed, or coarsely ground mustard
  • 2.5ml Black peppercorns
Instructions
  1. Pickled onion rings are great way to turbo charge any burger, and they also work fantastically as garnishes and salads with just about any meal.
  2. To start, you'll need 800g onions.
  3. Top and tail the onions and remove the skins.
  4. Cut each onion through the center lengthways and cut the halves into slices of 3mm in thickness.
  5. Place the sliced onion in a large non-reactive bowl.
  6. Measure 3 tablespoons of non-iodated salt, either pickling salt, kosher salt or Himalayan.
  7. Sprinkle this over the onion and mix it in thoroughly.
  8. Allow the onions to stand for 60 minutes.
  9. While the onions sweat, place 110g sugar, 2.5ml coriander seed, 2.5ml mustard seed, or roughly ground mustard and 2.5ml black pepper corns in a saucepan.
  10. Pour in 750ml white wine vinegar.
  11. Heat the pot over medium high heat and bring to a boil. Lower temperature and simmer the mixture for 30 minutes.
  12. While this continues, rinse and strain the onions.
  13. Place a sterilised 1 liter jar in a saucepan, and fill it with the onion rings.
  14. Pour hot water, not boiling water, into the pot around the jar. This will minimize any thermal shock to the glass when the boiling vinegar is added.
  15. Strain the vinegar through a sieve or coffee filter and pour it into the jar until the onions are completely covered.
  16. Any leftover vinegar mixture can be refrigerated for your next batch.
  17. Clip the jar closed and allow the bottle to cool in the water.
  18. The onions will last indefinitely stored in a cool dark place, however, they should be refrigerated once opened.
  19. (pickled onion rings,pickled onion rings recipe,how to make pickled onion rings,homemade pickled onion rings)

pickled onion rings,pickled onion rings recipe,how to make pickled onion rings,homemade pickled onion rings

Moist Chocolate Cake Recipe – How to Make the Best Chocolate Cake!

moist chocolate cake,moist chocolate cake recipe,chocolate cake,best chocolate cake,how to make chocolate cake,homemade,easy chocolate cake recipe,quick chocolate cake recipe,foolproof chocolate cake recipe,no flop chocolate cake,flop proof chocolate cake,beginners chocolate cake recipe,how to make moist chocolate cake,award winning chocolate cake recipe,how to make the best chocolate cake at home,chocolate,cake,recipe,dessert,chocolate frosting recipe


Moist Chocolate Cake Recipe - How to Make the Best Chocolate Cake!
Author: 
Recipe type: Baking, Cake
Cuisine: British
Serves: 8
 
Moist Chocolate Cake! Today we're going to look at a very special chocolate cake recipe. This chocolate cake is supremely moist and full of chocolaty flavor. It is quick and easy to make, and has a shelf life of 5 to 7 days.
Ingredients
  • 225g Cake / all-purpose flour
  • 350g Caster sugar
  • 85g Cocoa powder
  • 7.5ml Baking powder
  • 7.5ml Bicarbonate of soda (baking soda)
  • 2 Large eggs
  • 250ml Full cream milk
  • 125ml Sunflower oil
  • 10ml Vanilla exctract
  • 250ml Boiling water
For the Icing
  • 200g Dark chocolate
  • 175ml Cream
Instructions
  1. To start, add 225g cake flour or all-purpose flour to your mixer bowl, along with 350g caster sugar, 85g good quality cocoa powder, 7.5ml baking powder and 7.5g bicarbonate of soda or baking soda, 2 large eggs, 250ml full cream milk, 125ml sunflower oil and 10ml vanilla extract.
  2. Place the bowl on your mixer with the beater paddle attached and mix the batter until smooth.
  3. Add 250ml boiling water a little at a time and continue mixing until well combined. The batter will be thin and glossy.
  4. Butter two 20cm or 8 inch cake tins and line the bottoms of each tin with baking parchment. The butter effectively sticks the parchment to the tin and prevents batter from flowing underneath the parchment.
  5. Pour half of the batter into each tin.
  6. Bake the cakes in a preheated oven at 180c or 350f for 25 to 35 minutes or until skewer inserted into the center of the cakes comes out clean. Once baked, remove the cakes from the oven and allow them to cool completely in their tins.
  7. While the cakes bake, measure out 200g of dark chocolate and cut it into bits.
  8. You will also need 175ml of cream.
  9. Melt the chocolate in your microwave in 20 second bursts, stirting between each cycle.
  10. Pour in the cream and stir this in until combined. Don't panic if the chocolate seams to granulate. Simply pop this back into the microwave for 20 seconds, and will be as smooth as silk.
  11. Set this aside to cool completely and set. If you are in a warm climate, you may need to refrigerate the mixture until it reaches a spreadable consistency.
  12. Turn the cakes out of the tins and spread the icing onto the cakes evenly.
  13. And there it is, an absolutely, supremely moist chocolate cake fit for Royalty.

moist chocolate cake,moist chocolate cake recipe,chocolate cake,best chocolate cake,how to make chocolate cake,homemade,easy chocolate cake recipe,quick chocolate cake recipe,foolproof chocolate cake recipe,no flop chocolate cake,flop proof chocolate cake,beginners chocolate cake recipe,how to make moist chocolate cake,award winning chocolate cake recipe,how to make the best chocolate cake at home,chocolate,cake,recipe,dessert,chocolate frosting recipe

Scroll to top

Kitchen Conversions

Convert:
Masses
to:
Volumes
to:
Temperatures
to:
Lengths
to: