Supreme Rye Bread – The Soft Rye Bread Everybody Will Love

rye bread,rye bread recipe,soft rye bread,recipes,baking cooking,how to make rye bread,homemade rye bread,best rye bread recipe,recipes,baking,cooking,how to make soft rye bread,how to make rye bread rise,using lecithin in baking,soy lecithin,baking with,dough,kneading dough


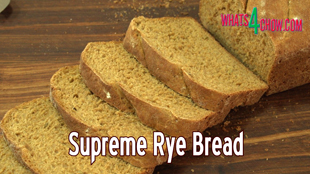
Supreme Rye Bread - The Soft Rye Bread Everybody Will Love
Author: 
Recipe type: Bread
Cuisine: German
Serves: 2
 
Today we're going to bake a unique rye bread that everyone will love. This bread has the amazing flavor of rye bread, but the light texture of a regular white farm loaf.
Ingredients
  • 625ml Warm water
  • 60g Black strap molasses
  • 30g Butter, melted
  • 30ml Brown sugar
  • 18g Soy lecithin (available at most health shops)
  • 20g Instant yeast
  • 600g Strong white bread flour
  • 300g Stoneground rye flour
  • 20ml Salt
  • 10ml Caraway or fennel seeds
Instructions
  1. To start, pour 625ml of warm water into your mixer bowl.
  2. Add 60g of black strap molasses and stir this in briefly.
  3. Pour in 2 tablespoons brown sugar, 30g of melted butter, 20g instant yeast and 18g of soy lecithin.
  4. The lecithin binds the oil in the melted butter to the water. This dramatically increases the shelf life of the bread. In addition, rye flour has a low gluten content and the lecithin replaces this shortage in order that rye loaf will rise as well as regular bread does.
  5. Use your stick blender to shear the lecithin into the liquids.
  6. Cover the bowl and give it 15 minutes for the yeast to activate.
  7. In the meantime, measure out 600g strong white bread flour, 300g stoneground rye flour, 4 teastoons salt and 2 teaspoons caraway or fennel seeds.
  8. Add these four ingredients to the yeast liquid.
  9. Place the bowl on your mixer with the dough hook attached and knead the dough on slow speed for 2 minutes. Increase the speed to medium slow for a further 8 minutes.
  10. You will have a beautifully smmoth dough that is only slightly sticky.
  11. Cover the bowl with cling-wrap and allow the dough to rise in a warm place for 60 minutes.
  12. While the dough rises, rub the insides of 2 large loaf pans with butter.
  13. Scatter flour over the inner surfaces of the pans and tip out any excess flour.
  14. As you can see this dough rises very well.
  15. Turn the dough out onto a lightly fliured work surface and knead it briefly to knock it down.
  16. Weigh the dough and divide it into 2 equal portions of around 850g.
  17. Working with one portion at a time, work the dough into a rectangle as with as the bread pan. Fold the top edge down two thirds of the way, then fold the botykm edge up over this.
  18. Place the rolled dough into the pan with seam side down. Flatten the roll to fill the bottm of the pan.
  19. Cover both pans and allow these yo rise for a further 30 minutes in a warm place.
  20. Once again, you can see clearly just how well this rises.
  21. Use a razor sharp knife to slash the tops of the loaves. Not only does this lokk cool, but it deflates the lids and prevents them from blowing while baking.
  22. Bake the loaves in a preheated oven at 220c or 430f for 25 to 30 minutes until the loaves sound hollow when tapped.
  23. Remove the loaves from the onen and turn them out onto a wire rack to cool.
  24. Allow the bread to cool for at least 30 minutes before cutting.
  25. Here we can see the beautiful light texture with incredibly good oven spring.
  26. Thats it for today folks, thanks for joining us, please like, subscribe and share, and we'll see you again tomorrow.


How to Make Naturally Fermented Sauerkraut – courtesy of Microcosm Publishing

naturally fermented sauerkraut,sauerkraut recipe,how to,homemade,pickled cabbage,pickled cabbage recipe,naturally pickled cabbage,making homemade sauerkraut,how to make sauerkraut,naturally fermented sauerkraut,natural fermentation recipes,microcosm publishing,book on fermenting,fermented recipes,fermenting recipes,fermentation recipes,cooking


How to Make Naturally Fermented Sauerkraut - courtesy of Microcosm Publishing
Author: 
Recipe type: Vegetable / Fermenting
Cuisine: German
 
A few episodes back I introduced a new book all about natural fermentation, called Basic Fermentation, published by Microcosm Publishing. Consequently they have sent me the final hard cover copy to replace my preliminary copy. It is full of excellent fermentation recipes, all very clearly explained and accompanied with good quality full color photography. You can check out their website by clicking the link in the description below. Today we're going to feature another recipe from this book when we make a batch of delicious home-fermented sauerkraut.
Ingredients
  • Cabbage
  • Kosher salt
Instructions
  1. We will be using a new technique to do this, as well as the traditional method.
  2. For the new technique, you will need to own a ham press which will negate the need for pressing plates and weights.
  3. To start, strip away any dodgy leaves on your cabbage.
  4. This cabbage is about 1.2kg once stripped. I will use half of this for each method.
  5. Use a large knife to cut the cabbage into quarters.
  6. Use a cleaver to cut away the heart from each quarter.
  7. Cut each quarter into thin strips.
  8. I have transferred half of this to a large non-reactive bowl, and measured out 18g of kosher salt. This is 3% of the weight of the cabbage. This makes it really simple to calculate the salt requirement no matter what quantity of cabbage you start with.
  9. Pour the salt over the cabbage and mix this in.
  10. Pack the cabbage into the ham press a little at a time, pressing it down firmly after each addition. This is a 1.5 liter press, and 600g of cabbage fits perfectly, filling to an inch below the rim.
  11. Insert the pressure plate and secure the lid and you're done.
  12. For the traditional method, place the remaining cabbage in a large non-reactive bowl and add 3% salt to the cabbage. Mix the salt into the cabbage.
  13. Pack the cabbage into a tall cylindrical glass or ceramic container, pressing it down firmly after each addition.
  14. Now you will need something to press the cabbage. I am using a glass tumbler with closed end in contact with the cabbage.
  15. To press this down, I have a short langth of bamboo, but you could use anything from a pencil to a butter knife for this.
  16. Place the stick across the tumbler.
  17. Loop a long elastic band underneat the container and bring the ends up to the stick. The elastic will pull the stick downwards, applying pressure to the tumbler and the cabbage.
  18. Transfer the container and the ham press to a warm shady place to ferment.
  19. After 10 to 14 days, your sauerkraut will be ready to eat. This is when you will notice the vast difference between home-fermented kraut and the packaged or canned versions. This is bright in appearance, with loads of crunch and an amazingly vibrant pickle flavor.
  20. All you need to now is enjoy your masterpiece.
  21. Thanks for joining us today, please subscribe, like and share and we'll see you again tomorrow.


How to Make Tempura Onion Rings – Gourmet Deep Fried Onion Rings

tempura onion rings,deep-fried onion rings,how to,recipe,cooking,fried food,onion rings,tempura onion rings recipe,how to make,homemade tempura onion rings,easy gourmet onion rings,gourmet fried onions,best onion ring recipe,best deep fried onions,making deep-fried onion rings,barbecue accompaniments,grill accompaniments,crispy onion rings


How to Make Tempura Onion Rings - Gourmet Deep Fried Onion Rings
Author: 
Recipe type: Vegatables / Onions
 
Onion rings can be absolutely awesome, or they can be sloppy, oily and terrible. This tempura onion recipe is one of the best I have tried, and really takes the humble onion ring into the realm of gourmet cuisine.
Ingredients
  • 500ml Buttermilk
  • 15ml Tabasco sauce
  • 5ml Salt
  • 2-3 Large onions
  • 2 Eggs
  • 475ml Soda water (well chilled)
  • 1 Cup all purpose flour
  • 1 Cup Rice flour
  • 2.5ml Salt
  • 2.5ml Black pepper
  • 2 Cups all purpose flour
Instructions
  1. To start, add 15ml or a tablespoon of Tabasco sauce to a jug.
  2. Pour in 500ml of buttermilk, and add 5ml or a teaspoon of salt.
  3. Give this a good stir and set it aside.
  4. Cut 2 large onions into rings of about 10mm or a half inch thick. Place these in a large pan.
  5. Pour the buttermilk mixture over the onions, and rearrange the rings so that they are in a single layer.
  6. Cover the pan with cling-wrap and transfer it to your refrigerator for a few hours, preferably overnight. Make sure to turn the onions a few times during this time.
  7. The following day, remove the onions from the refrigerator, and measure 2 cups of all-purpose flour into a bowl.
  8. Start preheating your oil to 180c or 350f.
  9. Whisk 2 eggs in another bowl.
  10. Pour 475ml of soda water into the eggs and mix this briefly.
  11. Add a cup of sifted all-purpose flour and a cup of sifted rice flour to the egg soda mixture. Whisk this until smooth.
  12. Add a generous gring of salt and cracked black pepper and mix these in.
  13. Use a skewer to lift an onion ring from the marinade and dredge it in the flour.
  14. Drop this into the batter, and continue until you have coated about a dozen rings.
  15. Make sure to submerge the rings in the batter while doing this.
  16. Use the skewer to hook the rings out of the batter and drop them in the oil. Allow the rings to fry for 5 minutes, turning halfway through.
  17. The rings will be superbly crispy and lightly golden.
  18. Use a slotted spoon to lift them from the oil before continuing with the next batch of rings.
  19. When frying, make sure you oil is up to temperature, and that you don't overcrowd the pan. This will drop the temperature and will result in overly oily onion rings.
  20. Serve your creation piping hot as a snack, or accompaniment to your main course and enjoy.
  21. Thanks for joining us today, please like, subscribe and share and we'll see you again tomorrow.


How to Make Coffee Burger Buns – Flavorful, Aromatic Burger Buns with a Difference!

burger buns recipe,gourmet burger buns recipe,coffee burger buns,espresso burger buns,best burger buns recipe,special burger buns recipe,how to,how to make,burgers,cooking,homemade burger buns,homemade coffee burger buns,brazilian burger buns,soft burger buns,easy burger buns recipe


How to Make Coffee Burger Buns - Flavorful, Aromatic Burger Buns with a Difference!
Author: 
Recipe type: Bread / Burgers / Burger buns
Serves: 8 - 12
 
The flavors of coffee and beef work very well together whether incorporated in dry rubs or bastings. Today we're going to take this marriage to a new level by making a batch of amazing coffee burger buns.
Ingredients
  • 950g Strong white bread flour
  • 60g Butter grated
  • 15ml Sugar
  • 10ml Salt
  • 10g Instant dry yeast
  • 30ml Full cream milk powder
  • 600ml Espresso, cooled to 35c
  • 1 Egg whisked with 25ml water
Instructions
  1. To start, measure out 10g instant yeast, 1 tablespoon sugar, grate 60g of butter and run 600ml of espresso through your coffee machine. Allow the espresso to cool to 35c before proceeding.
  2. Pour the espresson into a bowl and add the sugar and yeast. Give this a brief stir, cover the bowl and set this aside for 10 to 15 minutes to activate.
  3. Measure 950g of strong white bread flour into your mixer bowl.
  4. Add 2 tablespoons full cream milk powder and 2 teaspoons salt. Stir this to combine.
  5. Add 60g of grated butter.
  6. Place the bowl on your mixer with the beater paddle attached.
  7. Mix the flour for about 60 seconds to cut the butter into flour.
  8. Add the yeast coffee mixture to the bowl and mix this until all of the liquid has been absorbed into the flour.
  9. Open the mixer and swap out the beater paddle for a dough hook.
  10. Close the machine and allow the dough to knead for 8 to 10 minutes on medium slow speed.
  11. You will have a beautifully smooth, soft dough that is not at all sticky.
  12. Cover the bowl with cling-wrap and allow the dough to rise in a warm place for 60 minutes until doubled in bulk.
  13. Turn the dough out onto a lightly flour work surface and knead briefly to knock it down.
  14. Roll the dough into a log and divide it into 8 equal pieces for large buns, 10 for medium and 12 for regular size.
  15. Working with one piece at a time stretch the dough from the edge down to the bottom all the way around the roll.
  16. Finish it off by cupping your fingers over the roll and rounding it using a circular movement.
  17. Place the rolls on a baking sheet lined with parchment.
  18. Cover the rolls with a clean dish towel and allow these to tise again for 30 minutes.
  19. After 30 kinutes the rolls will have doubled in size.
  20. Whisk and egg with 25ml of water and brush the tops of the buns.
  21. Use a razor sharp blade to slash the tops of the buns.
  22. Bake the buns in a preheated oven at 200c or 400f for 20 minutes until golden and well risen.
  23. Remove from the oven and transfer the buns to cooling racks.
  24. Allow them to cool for at least 15 minutes before cutting.
  25. And there we have a batch of beautifully textured and aromatic coffee burger buns.
  26. Thanks for joining us today, please like, subscribe and share, and we'll see you again tomorrow.


How to Make Chai Tea Syrup Concentrate

chai tea,how to,how to make,chai tea syrup,chai tea concentrate,chia tea syrup concentrate,chai latte,skinny chai latte,chai iced tea,home made chai tea,chai tea recipe,hot drinks recipes,cold drinks recipes,beverages,beverage recipes


How to Make Chai Tea Syrup Concentrate
Author: 
Recipe type: Beverages
Cuisine: Indian
 
Chai tea has been all the rage for some time now, and it doesn't look like it's going anywhere soon. Today we're going to make a concentrated chai syrup that will enable to make your chai tea, chai latte and iced latte in a blink.
Ingredients
  • 500ml Filtered water
  • 60ml Honey
  • 4 Black tea bags
  • 2 Tsp Pure vanilla extract
  • 2 Tsp Ground cinnamon
  • 2 Tsp Ground ginger
  • ¼ Tsp Ground cloves
  • 1 Tbs Ground cardamom
  • 1 Whole star anise
  • ¼ Tsp Ground nutmeg
Instructions
  1. Measure out 500ml of filtered water, 60ml honey, 4 black tea bags, 2 teaspoons pure vanilla extract, 2 teaspoons ground cinnamon, 2 teaspoons ground ginger, a quarter teaspoon ground cloves, a tablespoon ground cardamom, one whole star anise and a quarter teaspoon ground nutmeg.
  2. Place all of these into a small pot.
  3. Place the pot over medium heat, bring the mixture to a boil, reduce the heat and allow the blend to simmer for 30 minutes partially covered with the lid.
  4. After 30 minutes, remove the pot from the heat and strain the mixture through a fine coffee filter. This process will require some patience as it will take about an hour to drip through. Help it along by giving it a stir every few minutes.
  5. These quantites will yield about 220ml of chai syrup, which at 30ml per portion will give you about 7 servings.
  6. To make chai, simply add 30ml of syrup to 240ml of hot or cold milk. For a chai latte, combine 30ml of the syrup with 120ml of steamed milk and top this with 120ml of textured milk froth.
  7. Thanks for joining us today, please subscribe, like and share, and we'll see you again tomorrow.


Scroll to top

Kitchen Conversions

Convert:
Masses
to:
Volumes
to:
Temperatures
to:
Lengths
to: