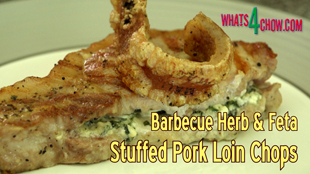
Barbecue Herb and Feta Stuffed Pork Loin Chops with Crispy Crackling
Author: Whats4Chow
Recipe type: Pork
Cuisine: Mediterranean
Prep time:
Cook time:
Total time:
Serves: 4
With the festive season just round the corner, today's episode is a legendary barbecue. Thick cut pork loin chops, butterflied and stuffed with fresh herb and feta is an absolute winner.
Ingredients
For 4 Barbecue Stuffed Pork Loin Chops
4 x 450g Thick cut pork loin chops
100g Feta cheese
10ml Chopped fresh oregano
10ml Chopped fresh sage
10ml Chopped fresh rosemary
10ml Chopped fresh thyme
25ml Chopped fresh basil
10ml Chopped fresh garlic
45ml Olive oil
Instructions
To make the stuffing, place the fresh chopped herbs, garlic, feta and olive oil in a bowl and mash it to a paste.
Have your butcher cut the pork chops 30mm thick, or 1 and a quarter inch.
Use a sharp paring knife to cut the rind away from the chop.
Run the knife between the rib bone and the meat and remove the bone.
Stand the pork on the fatty edge and slice down the center along the length to butterfly the meat.
Stop slicing when you reach the fatty strip.
Flap the butterflied meat open and stuff a quarter of the filling into the chop.
Continue until all of the chops are processed.
Place the rinds on a platter and salt both sides of the rinds liberally with salt.
Place the stuffed chops on a platter and brush both them with melted butter, followed by a liberal grinding of salt and pepper.
Turn them over and repeat this process.
Heat a ribbed skillet on your barbecue over high heat. In this case I have the skillet over 2 burners, running on full flame.
Place the salted rinds on the skillet and close the lid.
Allow these to grill for 6 minutes with the rind side facing down.
Open the grill, flip the rinds over and add the pork chops to the skillet.
Close the barbecue and allow these to grill for a further 5 minutes.
Open the grill and turn the pork chops.
Close the barbecue again and allow this to grill for a further 5 minutes.
After this time, remove the chops from the grill and move the pork rind to the hottest part of the skillet skin side down.
Press them down onto the skillet until they are well blistered and crisp.
Serve your amazing creation immediately with the accompaniments of your choice.
Vegan Steakhouse Melts - Vegan Patties Folded and Stuffed with Vegan Cheese
Author: Whats4Chow
Recipe type: Vegan / Vegetarian
Serves: 10-12
These vegan steakhouse melts are super easy to make and there is a ton of flavor in the patties and the cheesy sauce.
Ingredients
For the Patties
580ml TVP (textured vegetable protein)
500ml Vegetable stock
60ml Tomato sauce
20ml Marmite or vegamite
10ml Dried garlic granules
10ml Chilli flakes
30ml Light soy sauce
10ml Salt
125ml Strong white bread flour
For the Cheese Sauce
2 Medium potatoes
2 Medium carrots
75ml Nutritional yeast flakes
5ml Salt
Instructions
Starting with the cheese sauce, place the chopped carrots and potatoes in a medium size pot.
Pour in enough boiling kettle water to cover the vegetables.
Place the pot over high heat and bring this to a boil. Allow this to boil for 20 to 25 minutes until the potatoes and carrots are very tender.
In the meantime, combine the vegetable stock with the tomato sauce, marmite or vegamite, garlic granules, chilli flakes, light soy sauce and salt.
Pour this over the textured vegetable protein and stir this thoroughly.
Cover the bowl and put this aside for 30 minutes to reconstitute.
Drain the potatoes and carrots and transfer them to a tall jug.
Use your stick blender to liquidise the vegetables.
Add the nutritional yeast flakes and salt and blend these in. This is the cheese sauce.
Add the strong white bread flour to the textured vegetable protein and stir this in. Get in there with your hands and mix this thoroughly until the mixture turns very sticky.
Transfer the cheese sauce to a piping bag and snip a half inch off the end of the bag.
Use your patty press to press out a patty. Carefully drop the patty onto a piece of plastic film.
Pipe cheese over one half of the patty leaving a border open around the edge.
Lift the plastic film and fold the patty over the cheese. Crimp the edges of the patty together being careful not squeeze out the filling.
Transfer this to a large platter and continue with the remaining melts.
Heat a large pan over medium heat and add just enough oil to coat the base of the pan.
Carefully place the melts in the pan. Fry the melts for 6 minutes, turning halfway through.
Serve the steakhouse melts immediately with the accompaniments of your choice.
And there we have it, grilled vegan steakhouse melts.
In the previous Serious Distilling episode I introduced the Still Spirits Turbo 500 distilling system.
Today we’re going to look at the differences between the alembic pot distilling configuration and the reflux distilling setup.
Historically, the alembic or pot still came first, so let’s start there.
The alembic setup consists of a copper dome which replaces the existing stainless steel lid on the boiler. The copper condenser unit attaches to the top of the dome by means of a large threaded nut.
When distilling spirits in an alembic setup, some of the flavor of the mash or wash naturally passes through the process into the end product. In other words, if you distill a mash made from apples, some of the flavor, aroma and characteristics of the original fermented apple juice will end up I the distillate.
This is what gives pot distilled drinks their unique taste, aroma and character.
When a mash is pot distilled, the alcohol content of the resulting distillate starts at between 80 and 86 percent ABV and decreases steadily as the distilling run progresses.
Here we can see the condenser attached to the dome. During the run the vapors rise up and exit through the top of the dome.
As the vapors travel through the condenser, the cold water running through the cooling sleeve condenses the vapor to liquid which drips from the end of the condenser into a catchment.
And now onto the reflux setup. The reflux column attaches to the stainlees steel lid of the boiler.
The column is pre-packed with a layered combination of stainless steel saddles and pure copper saddles. These saddles increase the efficiency of the reflux action by dramatically increasing the surface area inside the column.
A large threaded nut secures the column, and the lid fits onto the boiler as normal.
During a reflux distilling run, the vapors rise up the column and continually condense and run back down the column. Only the lightest vapors escape to the secondary condenser. This is the ethanol.
This means that none of the flavors or aromas of the wash will pass on to the end product. Acetone, being the lightest and most volatile compound will pass through first, and this is removed as the foreshot and disposed of. The remaining result of the distilling run will be ethanol with an ABV between 95 and 97 percent purity. The 3 to 5 percent impurity is water that has passed through in the run as a result of the hygroscopic nature of pure alcohol.
The resulting ethanol is then blended with specially formulated flavoring syrup to make a multitude of different drinks. Still Spirits has literally dozens of flavorants to choose from, and these are just a few. You can see these on the Brewcraft website by clicking the link in the description.
Once you have chosen your preferred configuration, whether it be alembic of reflux, you need to understand the dynamics of the yeasts used for each setup.
With the reflux setup, you want to produce alcohol. You are not concerned about flavors or aromas. To achieve this you need a robust yeast like the Still Spirits Turbo Yeast range. These will produce a high alcohol sugar wash in anything between 24 and 48 hours. The trade-off for this insanely quick fermentation is that you should use the matching turbo carbon to absorb excess volatiles that are produced in the wash. This is not absolutely necessary, but will lead to an improvement in the quality of the end product.
In addition, it is advisable to clear the wash using the kieselsol and chitosan 2 part clearing agent. This precipitates any left over yeast and particulate in the wash which may lead to off flavors in the distillate if not removed from the wash before distilling.
When it comes to alembic or pot distilling, specially developed yeast are made specifically for this. These yeasts contain enzymes which break down complex sugars into simple consumable sugars resulting in a more consistent fermentation and a more rounded flavor profile.
These yeast have been developed specifically for pot distilling and produce only negligible quantities of acetone and aldehyde during fermentation.
These volatiles, however small are still removed from the run as foreshots and tails, as they will negatively affect the flavor of the end product.
Again, it is advisable to use the 2 part Turbo clearing kit to clear the wash before distilling.
In summary, if you’re after a setup that will produce artisan style products, then the alembic setup will be your choice.
If you’re looking for a setup to produce absolutely consistent, high commercial quality drinks, then clearly the reflux setup is for you.
Stay tuned for the next serious distilling episode where were going to put the alembic setup through its paces when we make a batch of corn whiskey from start to finish.
Hunan Sweet and Sour Pork - How to Make Sweet & Sour Pork - Homemade Chinese Food!!!
Author: Whats4Chow
Recipe type: Pork
Cuisine: Chinese
Prep time:
Cook time:
Total time:
Serves: 2-4
Hunan crispy sweet and sour pork takes sweet and sour to a whole new level. This succulent dish has a slight bite and tons of amazing flavor. Hunan sweet and piquant pork is super easy to make and will earn accolades from your friends and loved ones.
Ingredients
450g Pork neck steaks or shoulder
For the Coating
2 Eggs
2.5ml Salt
60ml Tapioca flour
The Vegetables
2 Medium carrots
3 Spring onions, whites only
1 Clove garlic, chopped
15ml Chilli sauce
For the Glaze
60ml Caster sugar
45ml White wine vinegar
30ml Light soy sauce
Instructions
Slice the pork into thin strips and transfer this to a mixing bowl.
In a jug, combine the tapioca flour, salt and eggs and whisk this to a smooth batter.
Pour the batter over the pork and mix it in thoroughly. Put this aside.
Peel and cut the carrots into julienne and slice the spring onion whites into rounds.
Measure out the chopped garlic and the chilli sauce.
For the glaze, combine the caster sugar, white wine vinegar and light soy sauce and whisk this until all of the sugar has dissolved.
Half fill your wok with oil and heat this to 190c or 375f.
Carefully drop half of the pork into the oil piece by piece. You need to drop each piece in separately otherwise the pieces will stick together in a clump.
Fry the pork for 3 minutes until crispy and lightly golden.
Use a slotted spoon to lift the pork from the oil, put it to one side and continue with the remaining pork.
Carefully drop the julienne carrots into the oil and deep fry these until tender and golden. Use your slotted spoon to lift these from the oil.
Heat another wok over high heat. Pour in 15ml of oil to the wok and add the spring onions, garlic and chilli sauce. Stirfry these for 15 seconds until fragrant, then add the pork and carrots to the wok.
Pour in the glaze and continue to stirfry this for a further 3 minutes until the glaze has reduced and coated all of the ingredients with a shiny, sticky coating.
Remove the pork from the wok and serve immediately with rice or noodles.
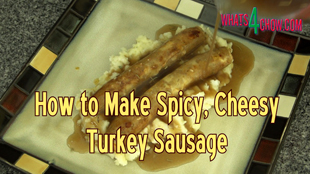
How to Make Spicy, Cheesy Turkey Sausage - Full-Flavor Homemade Turkey Sausage!!!
Author: Whats4Chow
Recipe type: Sausage
Cuisine: Mexican
Serves: 3kg
This spicy turkey cheese sausage is out of this world. Tender juicy ground turkey, spiced with Mexican spice blend and loads of mature cheese will have you guests lining up for more.
Ingredients
2.6kg Turkey meat, cubed
300g Well matured cheddar or Monterey Jack
250ml Chilled water
22mm Collagen casings
For the Spice Blend
30ml Ground cumin
30ml Ground coriander seed
30ml Paprika
30ml Oregano
10ml Chilli powder
10ml Garlic powder
50g Salt
Instructions
Starting with the spice blend, place the ground cumin, ground coriander seed, paprika, oregano, chilli powder, garlic powder and salt on a bowl and mix this until combined.
Place the cubed turkey meat in a large roasting tin. You can use any part of the turkey, however the drumstick meat will yield the best result.
Sprinkle the spice mixture over the meat and mix this in thoroughly.
Transfer the pan to your freezer for 45 minutes to firm up. This is absolutely necessary as it aids your grinder to get a good clean grind with no fat smearing, resulting in a much better texture of sausage.
Remove the meat from your freezer and and run it through the grinder with a 4mm plate fitted.
Add the coarsely grated cheese to the meat and mix this in briefly.
Pour in the well chilled water and mix everything together until all of water has been absorbed by the meat.
Load the meat mixture into the hopper of your sausage stuffer.
Fit an 18mm funnel to the stuffer and feed the 22mm collagen casing onto the funnel.
Crank the stuffer until the meat reaches the end of the funnel, then twist off the casing.
Apply gentle pressure to the casing at the end of the funnel and start cranking the handle.
When the end of the casing is almost reached, stop cranking, remove the casing from the funnel and twist off the end.
Continue with this process until all of the filling has been used.
To make up individual sausages, crimp the sausage between your thumb and forefinger.
Twist the sausage a few times, then snip it off in the center of the twisted section. Continue until all of the sausages are formed.
Wrap the sausages and transfer them to your refrigerator overnight for the flavors to fully develop before cooking and serving.
To cook the sausage, fry them gently in butter over medium heat until golden on all sides.
Serve immediately with the accompaniments of your choice.
With Thanksgiving literally just days away, here is a quick and easy turkey drumstick roulade that is suitable for smaller or larger crowds of guests. Each roulade will cater for 2 to 3 people and this recipe is for 2 drumsticks. Simply multiply the recipe out if you have more guests.
Ingredients
2 x 1kg Turkey drumsticks
60g Butter, melted
Salt and cracked black pepper
For the Stuffing
125ml Dried cranberries
Champagne (or sparkling white wine)
2 x Canned pineapple rings
750ml Cubed and dried Brioche bread
2.5ml Dried sage
100g Fermented, aged salami
For the Glaze
60ml Honey
10ml White wine vinegar
Instructions
To start you need to debone the drumsticks and remove all the nasty tendons.
Cut through the skin around the narrow end of the drumstick.
Use a sharp scissors to cut through all the tendons underneath the skin.
Locate the inside of the leg and slice through the flesh along the length of the drumstick.
You will find one thick tendon running along the bone. Cut away the connective tissue to free the tendon.
Use your scissors to cut down either side of the bone so that the flesh lies flat.
Use the edge of your paring knife blade to scrape the flesh down the bone towards the joint.
Use your scissors to cut around the joint to free the bone.
Use your fingers to feel for the tendons in the meat.
Lift each tendon and cut them free with your scissors.
On the fat side of the drumstick, there are a number of tendons enclosed in the muscle. Cut the connecting tissue to separate the muscle and expose the tendons.
Lift these up and trim them away and you're done.
Continue with the other drumstick.
For the stuffing, place the dried cranberries in a small bowl and pour in enough champagne to cover. Allow these to stand while you continue with the other filling ingredients.
Slice 2 canned pineapple rounds into 8 wedges each.
Measure out the dried brioche cubes, the dried sage and the salami.
Place all of these in a mixing bowl and pour in the cranberries and champagne. Mix this together thoroughly, then let it stand for 30 minutes.
Place one of the deboned drumsticks on your work surface.
Spread half of the filling across the center of the meat and press it down firmly.
Grind a liberal dose of salt and cracked black pepper over the whole lot.
Lift the edges of the meat and roll them over the filling to meet in the center.
Tie a single loop of twine around the center of the roulade to secure it.
Tie a slip knot in the remaining twine and loop it around the narrow end. Pull it tight to secure this end.
Run the twine up the length and use half hitch loops to secure the rest of the roulade.
Loop the twine around the fat end, run it up the back of the drumstick and tie it to the beginning twine.
Put this aside and continue with the remaining drumstick.
Roughly chop an onion and scatter the pieces across the bottom of a medium size roasting tin.
Place the 2 roulades on top of the onion.
Brush the turkey liberally with the melted butter and give it another liberal grind of salt and cracked black pepper.
Roast this in a preheated oven at 170c or 340f for 60 minutes.
Remove the pan from the oven, turn the roulades over and give this side a good grind of salt and cracked black pepper.
Return the pan to the oven for another 45 minutes.
Remove the roulades from the oven and brush them liberally with the honey vinegar mixture.
Allow this to stand for 5 minutes for the meat to relax.
Pour all of the pan juices, including any solids that may have escaped from the roulades, into a tall jug.
Use your stick blender to machine this to a smooth gravy.
Cut away the twine from the roulades and slice them into 6mm slices. The meat is extremely tender and juicy, and it will not be possible to slice thinner than this.
Serve immediately with a generous dose of the gravy, and the accompaniments of your choice.
How to Make Mossbolletjies - South Africa's Traditional Brioche - Aniseed Flavored Tear & Share Bread
Author: Whats4Chow
Recipe type: Bread
Serves: 12-18
Mossbolletjies are a traditional South African bread. With sweetness and feathery texture of brioche, the flavor and aroma is enhanced with aniseed, and makes for the perfect tear and share bread.
Ingredients
1kg Cake flour
10ml Salt
100g Sugar
10g Instant yeast
30g Whole aniseed (or fennel seed)
100g Butter
250ml White grape juice
125ml Warm milk
250ml Warm water
30ml Sugar mixed with 30ml lukewarm water to brush after baking (optional)
Instructions
Pour the cake flour into your stand mixer bowl, along with the salt, sugar, instant yeast and whole aniseed. If you can't find aniseed, substitute this with whole fennel seed.
Mix this together and put it aside.
Pour the grape juice into a small saucepan and add the butter. Heat this gently over medium low heat just until the butter has dissolved. Remove this from the heat.
Finally measure out the warm milk and warm water.
Place your mixer bowl on your mixer. Pour in the butter mixture, the water, and the milk.
Attach the dough hook to the mixer and knead the dough for 2 minutes on the slowest speed, followed by 6 minutes on medium slow.
Remove the bowl from the machine, cover it with cling-wrap and put this in a warm place to rise for 30 minutes or doubled in size.
While the dough rises, line a large baking pan with parchment.
Turn the dough out onto a floured work surface. The dough will be slightly sticky so you will need to flour the top of the dough as well.
Knead the dough for about 3 minutes to knock it down. Once the dough is smooth, grab handfuls of the dough and squeeze them off from the main mass and arrange these tightly in the baking pan.
You can make the balls as big or small as you like. I wand to present these as tear and share dinner rolls, so I have made mine a little bigger than normal.
Cover the pan with cling-wrap and allow to rise again for 40 to 45 minutes in a warm place.
Bake the rolls in a preheated oven at 180c or 350f for 25 to 30 minutes until deep golden in color.
Remove from the oven and turn the buns out onto a rack to cool. Allow them to cool for at least 15 minutes before serving.
These little wonders are so easy to make, and I guarantee they will steal the show.
Over the past couple of months our short course in brewing and distilling has covered all the basics from freeze distilling to very basic pot distilling. Today is the start of the serious stuff with unboxing of the Still Spirits Turbo 500 distilling system.
Designed in New Zealand and sold across the globe, in South Africa this system is supplied and serviced by Brewcraft. All of their contact details are below in the description, and on our website.
I contacted Ryan from Brewcraft and he has very kindly sent us a full T500 system and a full Grainfather brewing and distilling system to complete this series. The series will run at 1 episode per week for the following 16 weeks and by the time you’re finished the course, you should know just about everything you need to know about brewing and distilling, and both of these magnificent brewing and distilling systems.
In this first of the series, we are going to introduce the Still Spirits T500 in all it’s glory, and get real close up and personal as we unbox the unit. The system does come in various configurations, and you can find these details on the Brewcraft website.
The core of the system is the boiler. Immediately the quality of the build is apparent.
The brushed stainless steel is at least 800 microns in thickness… certainly not a flimsy unit. There is a solid, quality drainage tap fitted, and the double spring loaded lid clips are superb. The finish on the edges and in fact everything so far is amazing.
The following item is the column reflux condenser. Once again, the build quality is outstanding. This comes with all of the required piping. Included is the digital probe thermometer and all of the various tap fittings you could possibly need to hook up the cooling system.
You also get a complimentary bottle of distilling conditioner and a pack of reusable ceramic boil enhancers. All of these will covered in much more detail during the course of this series.
Next up is the alembic dome for pot distilling. Beautifully finished in heavy gauge brushed copper, the finish is protected with a good coat of heat resistant polymer.
This fits to the top of the boiler and is capped off with the copper condenser.
This option also comes with all the necessary piping, the matching digital probe thermometer and all of the necessary tap connections.
All of the aforementioned equipment comes with full and comprehensive operating manuals.
Other very useful optional extras include the water flow regulator which will control the flow in the cooling system and the EZfilter System for filtering your reflux distilled alcohol.
In our next episode we will be covering the differences between pot distilling and reflux distilling, including the different types of yeast used, additives and clearing agents.
In summary, when you see this system first hand, you cannot help being impressed. Stick with us for the next 15 episodes where we put all of this and more through it’s paces while you learn just about everything you need to know to distill amazing drinks at home.
For those viewers not interested in distilling, our regular food programming will continue as normal.
How to Make Peppadew Poppers - Crumbed, Deep-fried Stuffed Piquante' Peppers
Author: Whats4Chow
Recipe type: Peppers / Deep-Fried
Prep time:
Cook time:
Total time:
Serves: 20-30
Peppadews, and registered brand Peppadew originate in South Africa and must be undoubtedly South Africa's greatest culinary contribution this century. These piquant pickled peppers have a thousand different and delicious applications and today we're going to look at one of my favorites.... peppadew poppers. These are very similar to chilli poppers, but with a unique flavor all their own, and far less fire.
Ingredients
100g Blue Cheese
Yogurt (approx. 45-60ml)
20-30 Pickled peppadews
½ Cup Finely crushed cornflakes
½ Cup All-purpose flour
2 Eggs
Instructions
Starting with the filling, add just enough yogurt to a 100g of strong blue cheese to make a paste. The paste must be just thinned enough to be pipe-able.
Use a fork to mix this until smooth.
Spoon the creamy mixture into a piping bag.
Use the edge of a ruler to squish the cheese down the bag, then snip about 10mm or just less the a half inch from the tip of the bag.
Use the ruler again to press the mass of cheese down to the tip.
For the coating, whisk 2 eggs thoroughly until all of the albumen has broken down.
Combine the finely crushed cornflakes and all purpose flour.
You will need to count out 20 to 30 pickled peppadews and drain the syrup from them.
Use the filled piping bag to pipe the cheese mixture into each peppadew.
To coat the poppers, sprinkle a layer of the cornflake mixture over a large platter. This where the coated peppadews will set, and the crumbs will prevent the coating from sticking to the platter and getting damaged.
Working with one popper at a time, roll the popper in the crumb mixture.
Transfer this to the egg to wet all of the crumb.
Then back to the crumbs to get a good solid coating all over.
Transfer this to the platter to set and continue with the rest of the poppers.
Allow the coating to set for 20 minutes.
Half fill your wok or a large pan with oil and heat this to 180c or 350f.
Carefully drop the poppers into the oil in batches. The poppers will fry very quickly... about 45 to 60 seconds.
Use slotted spoon to lift the golden poppers from the oil and drain any excess oil on kitchen paper.
How to Make Strong Orange Wine - Super Charged Orange Wine - 18% ABV
Author: Whats4Chow
Recipe type: Brewing and Distilling
Hi and welcome to the monumentous 500th episode with Whats4Chow.com To celebrate today, we're going to make a batch of really good orange wine. The process is very simple, however you will be looking at at a good few weeks of patience before you can enjoy the fruits of your labor.
Ingredients
For the Wine
4 Liters orange juice, freshly squeezed
1kg White sugar
50g Turbo yeast (Still Spirits brand, #8)
To Clear the Wine
1g Gelatin
60ml Water
Instructions
To start, I have juiced 4 liters of juice from 9kg of oranges. Place this in a 5 liter food safe container and pour in the sugar.
Put the cap on the bottle and shake it up vigorously until the sugar has dissolved.
Remove the cap and pour in 50g of Still Spirits Turbo yeast. This yeast is amazing in that it has anti-foaming agents and nutrients included in the mix.
Place the cap back on the container and give another vigorous shake. This will dissolve the yeast and introduce more oxygen into the wash.
Remove the regular cap and screw on a cap with a fermentation lock.
Fill the lock with water up to the line and you're ready to start the waiting game.
From here you want the fermentation to continue for 7 to 10 days until it comes to an absolute stop.
During this time, we had a sudden heat wave which caused just over a liter of our brew to bubble out through the airlock. Bare this in mind if you live in a warm climate. You may want to use a much bigger fermentation bottle.
Notice that the mash has cleared substantially and that there is a layer of fruit solids and yeast at the bottom of the bottle.
Rack this of using a syphon pipe into another sterile bottle.
To clear the wine, sprinkle 1 gram of gelatin into 60ml of water.
Allow this to stand for 30 minutes until it has re-hydrated.
Once hydrated, heat this in your microwave to 70c or 158f.
Give it a good stir and pour it into the wine. Use a long sterile stirrer to gently stir this into the wine.
Screw a regular cap onto the bottle and place this in your refrigerator.
Let this stand in the refrigerator undisturbed for 7 to 10 days to clear.
After this time almost all of the remaining haze will have precipitated to the bottom of the bottle.
Use your siphon to rack this off onto bottles. Attach a toothpick to the end of the siphon to hold the pipe clear of the precipitated haze.
Cap the bottles and return them to the refrigerator. You can drink the wine immediately, however it does improve significantly after a few weeks of aging in your refrigerator. It will also continue to clear significantly as well.
And there it is, a magnificent batch of orange wine... just in time for episode 500 with Whats4Chow.com
Crispy Feta and Cream Cheese Fritters - Light & Airy Cheese Fritters Deep-Fried to Golden Perfection
Author: Whats4Chow
Recipe type: Cheese / Deep-Fried
Cuisine: Mediterranean
Prep time:
Cook time:
Total time:
These cheesy fritters are light and airy, and just full of flavor. Best of all, they are fail proof, so you could even get your children to mix the batter, however I don't suggest allowing kids to do the deep-frying.
Ingredients
250ml Cultured buttermilk
250g Cream cheese (plain or flavored)
250g Feta cheese
2 Eggs, beaten
1½ Cups Self-raising flour
Instructions
Measure out 250g of feta cheese, 250g of cream cheese , 250ml of cultured buttermilk, beat 2 eggs, and weigh 1½ cups of self raising flour.
Place all of these in your food processor.
Zap these until well blended and smooth, then allow the batter to stand for 15 minutes.
Half fill your wok, or a large pan with oil and heat this to 170c or 340f.
Spoon slightly heaped tablespoons of the batter into the oil.
Allow these to fry for 3 minutes, turning halfway through.
Use you tongs to lift the fritters from the oil and drain any excess oil on kitchen paper. Continue frying the remaining fritters.
Serve these light and crispy snacks as is and enjoy.
Deep-Fried Super-Cheesy Bites - A Creamy, Crunchy, Sweet & Savory Taste of Heaven!!!
Author: Whats4Chow
Recipe type: Dessert
Prep time:
Cook time:
Total time:
Serves: 16
These deep-fried super-cheesy bites are insanely good. Strong blue cheese and fruit jam enclosed in American cheese slices then crumbed a deep-fried results in the most amazing sweet savory flavor and texture combination.
Ingredients
16 Slices American processed cheese
3 Heaping tablespoons fruit preserve / jam
80g Creamy blue cheese
250ml Fine bread crumbs
250ml All-purpose flour
2 Eggs, beaten
Oil for deep-frying
Instructions
You will need 16 slices of American cheese. For those not in North America, this the processed cheese slices that come individually wrapped in plastic sheets.
In addition, measure out 3 heaping tablespoon of a good quality fruit preserve and open a block of creamy blue cheese.
You will also need an 8cm, or just more than 3 inch gow gee press. These are readily available on eBay and Amazon for next to nothing.
To start assembling, open a cheese slice and keeping the plastic wrapper in place, use the back of the press to cut out the circle then position the circle over the press.
Place ⅔ of a teaspoon of the preserve in the center of the cheese, followed by a small piece of blue cheese.
Grab the handles of the press and close this just firmly enough to seal the edges of the cheese. If you press to hard, the cheese will split.
Continue until all of the cheesy bites are formed.
To coat the bites, measure out a cup of all-purpose flour, a cup of fine bread crumbs, and whisk 2 eggs.
Sprinkle a layer of breadcrumbs over a large platter. This is where the coated cheesy bites will set, and the crumbs prevent the coating from sticking to the platter and getting damaged.
Working with cheesy bite at a time, dredge the bite in the flour.
Transfer this to the egg to wet all of the flour.
Then it's into the bread crumbs to get a good solid coating all over.
Transfer this to the platter to set, and continue with the remaining pockets.
Allow the coating to set for 20 minutes.
Half fill a large pan with oil and heat this to 180c or 350f.
Carefully drop the cheesy bites into the oil and fry these for 3 minutes, turning over halfway through.
As the first cheesy bites are ready, use a slotted spoon to remove them from oil, and drain any excess oil on kitchen paper.
Serve the bites immediately accompanied with whipped cream and a good dessert wine.
And there we have it, a crunchy, creamy, sweet and savory taste of heaven.