Sugar Chilli Steaks with Creamy Mushroom Sauce – How to Make Sugar Chilli Steaks at Home!!!

sugar chilli steak,how to make sugar chilli steak,homemade sugar chilli steaks,best grilled steak recipe,best steak recipe,best steak recipe youtube,best steak recipe video,the best steak ever,how to make the best steak ever,how to grill a steak,the best way to cook a steak,spicy grilled steak recipe,hot chilli steak recipe,sweet chilli steak recipe,mushroom sauce recipe,how to make mushroom sauce


Sugar Chilli Steaks with Creamy Mushroom Sauce - How to Make Sugar Chilli Steaks at Home!!!
Author: 
Recipe type: Steak / Beef
Prep time: 
Cook time: 
Total time: 
Serves: 4
 
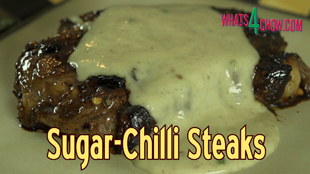
Sugar chilli steak is flavor experience you will never forget. The caramelized sweet and spicy glaze offset by the creamy mushroom sauce is quite honestly one of the best combinations around.
Ingredients
For the Steaks
  • 4 x 250g Sirloin or Rump steaks
  • 60ml Demarara sugar (or treacle sugar)
  • 15ml Coarse ground black pepper
  • 15ml Chilli flakes
  • 10ml Salt
For the Mushroom Sauce
Instructions
  1. Combine the Demarara sugar, chilli flakes, coarsely cracked black pepper and salt.
  2. Press generous amounts of the mixture into the surface of both sides of the steaks.
  3. Stand the steaks up on their fatty edge and press 3 skewers through the steaks to secure them in this position.
  4. Flip the block over and give fatty strip a liberal dose of salt. Put these aside.
  5. To make the sauce you will need 300ml of the gourmet creamy mushroom soup we made yesterday..... click the link to see this video if you missed it.
  6. Pour the soup into a small saucepan. Dissolve the tapioca flour in a little water and stir this into the soup.
  7. Bring this to a simmer over medium heat and allow it to simmer for 90 seconds until thickened.
  8. Remove this from the heat and keep it warm.
  9. Heat a large frying pan over medium high heat and add 30g of butter.
  10. Place the steaks in the pan, fatty side down and allow this to fry for 6 minutes until the fat is well rendered.
  11. Remove the skewers from the steaks and drop them flat in the pan.
  12. Continue to grill these for 3 to 4 minutes per side until we glazed and caramelized.
  13. Remove the steaks from the heat and allow them to rest for a minute before serving topped with the creamy mushroom sauce.


Gourmet Creamy Mushroom Soup – The Best Homemade Creamy Mushroom Soup

creamy mushroom soup,gourmet creamy mushroom soup,best creamy mushroom soup recipe,how to make creamy mushroom soup,homemade creamy mushroom soup,best creamy mushroom soup recipe,creamy mushroom soup youtube,creamy mushroom soup recipe video,creamy mushroom soup video,easy creamy mushroom soup recipe,cream of mushroom soup,cream of mushroom soup recipe,how to make the best mushroom soup,making the best mushroom soup


Gourmet Creamy Mushroom Soup - The Best Homemade Creamy Mushroom Soup
Author: 
Recipe type: Soup
Prep time: 
Cook time: 
Total time: 
Serves: 6-8
 
This creamy mushroom soup is unforgettable. It is super-easy to make, and will become legend with your friends and family.
Ingredients
  • 500g Mushrooms
  • 1500ml Chicken stock
  • 10ml Garlic powder
  • 375ml Cultured sour cream
  • 60ml Tapioca flour
  • 30ml Medium cream, or sweet sherry
  • 60ml Chives, finely chopped
  • Extra chives for garnish
Instructions
  1. Place the mushrooms in a pot along with the chicken stock and garlic powder. Your can use white button mushrooms, brown mushrooms, or any mushroom of your choice.
  2. Bring the pot to a boil over medium-high heat, reduce the heat and allow the mushrooms to simmer for 45 minutes.
  3. Remove the pot from the heat. Add the sherry and cultured sour cream and stir this in thoroughly.
  4. Dissolve the tapioca flour in a little water and stir this into the soup.
  5. Use your stick blender to process this until very fine.
  6. Return the pot to the heat and bring it to a simmer. Allow the soup to simmer for 5 minutes until thick and creamy.
  7. Remove the soup from the heat and stir in the chopped chives before serving garnished with more chives with crusty farm loaf.


Plaited Swedish Easter Bread – Best Easter Bread Recipe!!! Easter Special 2016

easter bread,easter bread recipe,sweet easter bread recipe,swedish easter bread recipe,scandinavian easter bread recipe,home made easter bread,make easter bread at home,hot cross bun easter bread,better than hot cross buns,how to make easter bread,how to make easter bread at home,easy easter bread recipe,making easter bread at gome,best easter bread recipe


Plaited Swedish Easter Bread - Best Easter Bread Recipe!!! Easter Special 2016
Author: 
Recipe type: Bread
Cuisine: Swedish
 
This Easter bread is outstanding with an amazing soft texture, insanely magical aroma and spectacular flavor. This bead is every bit as good as the best hot cross buns you have ever tasted.
Ingredients
  • 12.5ml Active dry yeast
  • 60ml Warm water
  • 240ml Milk
  • 125g Butter
  • 125ml White sugar
  • 2.5ml Salt
  • 2.5ml Ground cinnamon
  • 1.25ml Ground nutmeg
  • 1 Egg
  • 2 Cups all-purpose flour
  • 2 Cups Strong white bread flour
For the Egg Wash
  • 1 Egg whisked with 25ml milk
For the Glaze
  • 15g Softened butter
  • ¾ Cup icing sugar
  • 2.5ml Vanilla extract
  • 20ml Milk
Instructions
  1. Add the instant yeast to your stand mixer bowl. Pour in the warm water and give it a brief stir.
  2. Place the butter and milk in a jug and warm this in your microwave and heat it just enough to melt the butter. Pour this into the yeast mixture.
  3. Add the sugar, salt, ground cinnamon, ground nutmeg and one egg.
  4. Place the bowl on your mixer with the beater attached and mix this together for 60 seconds.
  5. Add the flour to the bowl and mix this briefly, just until all of the flour is incorporated into the liquid.
  6. Swap out the beater for your dough hook and knead the dough for 7 minutes on medium low speed.
  7. Remove the bowl from the mixer, cover the bowl with cling-wrap and let this rise in a warm place for 60 minutes.
  8. After rising, turn the dough out onto a lightly floured work surface. Knead the dough briefly then roll it out into a log.
  9. Cut the dough into 2 equal pieces.
  10. Roll each of these into a log and divide these into 3 pieces each.
  11. Roll each of the pieces into a long strand of about 50cm or 20 inches.
  12. Group three of the strands in a parallel formation and crimp the one end together. Proceed with a simple plait along the length of the loaf.
  13. Crimp the other end together to finish, then repeat this with the second loaf.
  14. Transfer the loaves to a baking sheet wrapped in parchment, cover the loaves loosely with cling-wrap and allow this to rise again for 45 minutes.
  15. After rising, brush the loaves with the egg wash and bake them in a preheated oven at 180c or 350f for 30 minutes.
  16. While the loaves bake, prepare the glaze by mixing the soft butter, icing sugar and milk together until smooth.
  17. Remove the loaves from the oven, transfer them to a cooling rack and drizzle the glaze over the bread.
  18. Allow the loaves to cool for at least 20 minutes before tearing apart and serving with butter.


Quick Chocolate Mousse Cups – Easter Special 2016

chocolate mousse cups,quick chocolate mousse recipe,quick chocolate mousse cups recipe,how to make quick chocolate mousse at home,how to make chocolate porcupine quills,how to make chocolate quills,homemade chocolate quills,how to make mousse in chocolate cups,cheats chocolate mousse,simple chocolate mousse in chocolate cups,molding chocolate at home,simple chocolate mousse,making chocolate mousse at home


Quick Chocolate Mousse Cups - Easter Special 2016
Author: 
Recipe type: Dessert
Serves: 6
 
This simple dessert is the perfect end to a great meal. Quick chocolate mousse cups can be a life saver.... the chocolate cups and quills can be made in advance, and the quick chocolate mousse is just that.... quick.
Ingredients
For The Quills
  • White compound chocolate
  • Dark compound chocolate
For the Mousse
  • 75ml Cream
  • 225ml Cream
  • 50g Dark compound chocolate
Instructions
  1. To make the chocolate porcupine quills, melt the white and dark chocolates. Tear off 6 rectangles of baking parchment from the roll and fold these in half length-ways.
  2. Spread 2 inches of dark chocolate down the center-line of the parchment, followed by 2 equally spaced dollops.
  3. Fill in the spaces with the white chocolate followed by a 1.5 inch spread at the end.
  4. Fold the parchment over and use your dough scraper or any other straight edged tool to shape the quill. Transfer this to your refrigerator to set and continue with the remaining quills.
  5. To make the quick mousse, measure out the chocolate chips and the 2 batches of cream. Pour the 75ml batch of cream into the chocolate and melt this in your microwave 15 seconds at a time, stirring thoroughly between heatings. Set this aside to cool.
  6. Place the remaining cream in you mixer bowl and whip this until the whisk just begins to leave trails.
  7. Add the chocolate cream mixture and continue to beat this until the whisk leaves a definite trail in the mixture.
  8. Unmold the chocolate cups and the quills, and transfer the quick mousse to a piping bag.
  9. Pipe the mousse into the chocolate cups. Adjust the lengths of the quills by snapping off a bit of the base, and stand these up in the mousse. Garnish the plate with fresh mint and serve immediately.


Double Surprise Easter Eggs – Easter Special 2016 – How to Make Easter Eggs at Home!!!

how to make easter eggs,homemade easter eggs,how to make easter eggs at home,easy easter eggs,making homemade easter eggs,making chocolate easter eggs,double surprise easter eggs,nesting easter eggs,how to make nesting easter eggs,homemade nesting easter eggs,chocolate easter eggs inside easter eggs,simple guide to making easter eggs


Double Surprise Easter Eggs - Easter Special 2016 - How to Make Easter Eggs at Home!!!
Author: 
Recipe type: Easter / Chocolate
 
Easter is just a few days away, so today we're going to make double surprise Easter eggs. You will need 2 different size Easter egg molds. These el cheapo molds work just fine. You can find them at most baking suppliers, and even some kitchen shops.
Ingredients
  • Compound / Cooking dark chocolate
  • Compound / Cooking white chocolate
  • Mini Gummy bears
  • Astros or Smarties
Instructions
  1. Melt your dark and white chocolate in a double boiler. Pick up a little white chocolate with a teaspoon and shake it back and forward over the smaller mold to create the marbled pattern.
  2. Use a dough scraper to scrape away the over-spray. Place the mold in the refrigerator to set for 5 minutes.
  3. Use tablespoon measure to drop the dark chocolate into both molds.
  4. Lift the smaller mold and tip it to the side and simultaneously rotate the angle of the mold. This will spread the chocolate up to the edge of the mold. Don't be too concerned if the chocolate goes over the edge as you're going to scrape this away with the dough scraper. Once completely coated, turn the mold upside down and drop it on the work surface.
  5. Repeat this process with the larger mold.
  6. Turn the smaller mold back over and scrape away the overrun chocolate. Repeat this with the larger mold.
  7. Place these in the refrigerator for 10 minutes to set. Use the dough scraper to clean up the work surface.
  8. Remove the molds from the refrigerator and proceed to give them another coat of chocolate, turn them upside down and allow them to set briefly.
  9. Scrape away the overrun chocolate and get the molds into the fridge to set.
  10. After the chocolate has set solid, about 15 minutes, remove the molds from the refrigerator and pop the eggs from the mold.
  11. Place a pot into a roasting pan and pour boiling kettle water into the pan. Allow the pot to heat up for a minute. You will also need a bowl of Astros and some mini gummy bears.
  12. Pick up 2 halves of the small egg. Touch the edges of the egg halves on the hot pot for 3 seconds. Fill the one half with Astros and press the two halves together to join.
  13. Pick up two halves of the larger egg and melt the edges on the pot. Place a few of the gummy bears into the one half along with one of the small eggs. Place the other half on top and press gently to seal.
  14. And there you have it, the double surprise Easter egg.


Deep Fried Dragon Salt Chicken – How to Make Dragon Salt Chicken at Home!!!

Deep Fried Dragon Salt Chicken - How to Make Dragon Salt Chicken at Home!!!,how to make dargon salt,dragon salt recipe,dragon salt chicken,crispy deep-fried chicken with dragon salt,crispy deep-fried chicken recipe dragon salt,how to make spicy dragon salt,home meade dragon salt chicken,crispy deep-fried chicken homemade,spicy deep-fried chicken with dragon salt,homemade spicy deep-fried chicken,make dragon salt chicken at home,spicy deep-fried chicken video,spicy deep-fried chicken youtube


Deep Fried Dragon Salt Chicken - How to Make Dragon Salt Chicken at Home!!!
Author: 
Recipe type: Deep-Fried Chicken
Cuisine: Mongolian
 
Dragon salt is an extremely versatile and tasty addition to your kitchen. It can be used to flavor roast chicken, grilled kebabs, steaks and pork. In this episode we're making the dragon salt and using it to flavor a batch of crispy deep fried chicken.
Ingredients
For the Dragon Salt
  • 10ml Himalayan rock salt
  • 30ml Ground black pepper
  • 30ml Garlic powder
  • 30ml Ground ginger
  • 30ml Chilli powder
  • 30ml Dried dill
  • 10ml Lemongrass powder
  • 15ml Smoked paprika
  • 10ml Dried basil
  • 10ml Celery salt
For the Rest
  • Chicken pieces
  • Oil for frying
  • All-purpose flour
  • 4 Eggs
Instructions
  1. Combine the Himalayan rock salt, ground black pepper, garlic powder, ground ginger, chilli powder, dried dill, lemon grass powder, smoked paprika, dried basil and celery salt.
  2. This is the dragon salt. For the purposes of our recipe, we need this to be really fine. To achieve this zap the powder in your spice blender until fine. Transfer the powder to a sprinkle bottle. Store any excess powder in an airtight container.
  3. Place the chicken pieces in a large roasting tin in a single layer and sprinkle the dragon salt liberally over the chicken. Turn the pieces over and repeat with the other side.
  4. Place this in your refrigerator for at least 4 hours to marinate.
  5. Place 2 cups of all-purpose flour in a large mixing bowl. Beat 4 eggs and place these in a large dish. (you may need more flour and eggs depending on how many chicken pieces you are coating)
  6. Take some of the flour and sprinkle this over a large platter. This is where the coated chicken will set, and the flour prevents the chicken coating from sticking to the platter.
  7. To coat the chicken, dredge the chicken in the flour. Dunk the chicken in the egg to wet all of the flour. Return the chicken to the flour to get a good solid coating. For the double dip, return the chicken to the egg to wet all of the flour, them back to the flour to get a good thick, solid coating. Transfer the chicken to the platter and continue with the remaining pieces. Allow the coating to set for 20 minutes.
  8. Half fill a large pan with oil and heat this to 160c or 320f. Fry the chicken in batches for 20 minutes per batch, turning once, halfway through.
  9. Remove the chicken from the oil and drain any excess on kitchen paper before serving.


How to Make Jalapeno Tabasco Sauce – Making Green Tabasco Sauce at Home!!!

how to make tabasco sauce,how to make jalapeno tabasco sauce,how to make green tabasco sauce,tabasco sauce recipe,tabasco sauce how to make it,making homemade tabasco sauce,making tabasco sauce at home,homemade tabasco,hot chilli sauce recipe,hot pepper sauce recipe,jalapeno pepper sauce recipe,jalapeno sauce recipe video,jalapeno sauce youtube,best tabasco sauce recipe


How to Make Jalapeno Tabasco Sauce - Making Green Tabasco Sauce at Home!!!
Author: 
Recipe type: Sauce / Hot Pepper Sauce / Tabasco
Cuisine: American
 
Tabasco sauce is legendary and has become a household name in just about every country across the world. Today we're going to make the Jalapeño version of Tabasco, but if you have access to Tabaso chillis, you can use these if you prefer. This recipe does not take 3 years like the original Tabasco recipe does, but will yield a sauce that tastes almost exactly the same as the legend.
Ingredients
  • 375g Jalapeno peppers
  • 7g Prague powder #2
  • 190ml White grape vinegar
  • 30ml White grape vinegar
  • 15ml Tapioca flour (if you use xanthum gum, follow the package instructions)
  • Extra vinegar for the relish (to use the pulp)
Instructions
  1. Weigh out the peppers and the Prague powder. The Prague powder will inhibit and growth of unfriendly bacteria and preserve the color of the chillis during fermentation.
  2. Cut the stems away from the peppers and slice them into rings. If you have sensitive skin, you may want to wear gloves. Whatever you do, don't rub your eyes or nose.
  3. Place the chopped peppers and the Prague powder in your food processor and process until fine.
  4. Transfer the processed chillis to a large mouth glass jar. Using a canning funnel really helps when doing this.
  5. Place a double layer of kitchen paper over the top of the jar and tie this securely in place with a length of butcher's twine. And elastic band will also do fine.
  6. Place this in a dark place at a temperature of around 22 - 25c or 72 - 77f for 4 weeks to ferment.
  7. After fermenting, you will notice that the flesh of the peppers is quite mushy. You may also have a little white fungus growing on the surface of the chilli. This is friendly bacteria and can simply be stirred into the chilli.
  8. Pour in 190ml of white grape vinegar, put the lid on and give it a good shake from a minute or two. Place the jar back in its dark home and allow this to stand for 2 weeks. Give it good shake every day or two as this helps the vinegar to break down the solids.
  9. After 2 weeks, transfer the peppers to a tall jug and use your stick blender to liquidize any solids that remain. Place the smooth liquid back into its jar, put the lid on and allow this to stand for a further 2 weeks in a dark place, giving it shake-up every day or two.
  10. After 2 weeks, strain the pulp through a fine filter and gently press the pulp down to extract as much of the liquid as possible. From this quantity you will get about 250ml of liquid.
  11. Transfer the pulp to another sterilized jar and add just enough white grape vinegar to cover the pulp along with 10ml of white sugar. Stir this together, put the lid on, and in 2 weeks you will have an amazing pickled jalapeño relish.
  12. Now on the the sauce.... you will notice that it is still quite thin and if allowed to stand, the solids in the liquid, as fine as they are, will settle to the bottom of the liquid.
  13. To stabilize this and to make the sauce syrupy like the original calls for a very special thickening agent. Tapioca flour does the job perfectly. Xanthum gum also does a great job as it has the same properties as tapioca. You cannot use flour or cornflour.
  14. Mix the tapioca flour with 30ml of white grape vinegar and stir this into the pepper sauce. You will notice a color change. This is temporary as when the tapioca cooks it turns transparent and will not affect the color of the sauce at all.
  15. Pour the sauce into a small pot and bring this to a boil over medium heat, stirring continuously.
  16. You will notice as it comes to a boil how it suddenly turns syrupy and the sauce will coat the back of the spoon.
  17. Remove from the heat and allow this to cool for 15 minutes.
  18. Use a funnel to transfer the sauce to suitable miniature bottles, pop the corks or caps on and you're done.


How to Make Irish Pork Bangers from Scratch at Home – St Patrick’s Day Special!!!

how to make irish pork bangers from scratch,irish pork bangers recipe,how to make irish pork bangers at home,irish breakfast sausage,irish breakfast sausage recipe,irish bangers and mash recipe,sausage making - irish pork bangers,making sausage at home,home made sausage recipes,st patrick's day - irish pork bangers,how to make irish pork bangers easy,home made irish pork bangers,irish pork sausage recipe,easy irish sausage recipe,make pork bangers at home,breakfast sausage at home


How to Make Irish Pork Bangers from Scratch at Home - St Patrick's Day Special!!!
Author: 
Recipe type: Sausage
Cuisine: Irish
 
With St Patrick's Day on the 17th, here is the perfect recipe to celebrate with. Irish pork bangers are similar in texture to English bangers, but they have a flavor and aroma all their own.
Ingredients
  • 1.8kg Pork shoulder, deboned, skin off
  • 1 Egg white
  • 125ml Guinness draught beer
  • 70g Dry bread crumbs
  • 40g Fine non-iodated salt
  • 15ml Ground black pepper
  • 10ml Dried marjoram
  • 5ml Ground Nutmeg
  • 2.5ml Dried Thyme
  • 2.5ml Dried Rosemary
  • 100-125ml Iced water
Instructions
  1. Cut the pork shoulder into long strips, narrow enough to fit through the meat grinder's feeder tube.
  2. Transfer the strips to a large tray or platter in a single layer and place this in you freezer for 45 minutes.
  3. While the meat chills, beat the egg white with your stick blender until all of the albumen has broken down and the white is frothy.
  4. Pour in the Guinness draught beer, breadcrumbs, salt, black pepper, dried marjoram, ground nutmeg, dried thyme and dried rosemary. Process this to a paste.
  5. Remove the pork from the freezer and grind this through your 8mm or one third inch plate.
  6. Add the paste to the meat and massage this into the ground pork. The mixture will be pretty stiff and will need about 100ml of iced water to loosen it up. Massage this in, then return the pork to the freezer for 30 minutes.
  7. After 30 minutes, run the meat through the grinder once more, this time using a fine 3mm plate.
  8. Load the ground meat into the hopper of your sausage filler. Attach the funnel and feed the casing onto the funnel. I am using collagen casings as they are just so much easier and cleaner to work with.
  9. Twist the end of the casing and start filling the sausages. Take care not to fill them too tightly as this will cause them to split when cooking.
  10. It is easier to twist off the links as you go, twisting in the opposite direction for each link.
  11. Once all the links are formed, snip them apart with a sharp scissors and refrigerate the sausages overnight for the flavors to develop.
To Cook the Sausages
  1. Pour enough water into a frying pan to barely cover the base of the pan.
  2. Place the pan over medium-high heat and add the sausages. Simmer the sausages for 3 minutes per side.
  3. After simmering, most of the water will have evaporated, and the sausages will have started to release some of their fat. Add 30g butter to the pan and fry the sausages for 3 to 4 minutes per side until well browned and caramelized.
  4. Remove the sausages from the pan and serve immediately.


How to Smoke Peppers – How to Make Smoked Chilli Flakes at Home

how to smoke chilli peppers,how to smoke jalapeno peppers,how to make smoked chilli flakes,homemade smoked chilli flakes,how to smoke and dry chillis,how to smoke and dry peppers at home,making smoked chilli flakes,makiing smoked pepper flakes,using the smoke daddy vortex,smoked chilli recipe,smoked peppers recipe,how to smoke chillis video,how to smoke peppers video,how to smoke chillis youtube,how to smoke peppers youtube


How to Smoke Peppers - How to Make Smoked Chilli Flakes at Home
Author: 
Recipe type: Smoking / Drying
 
Smoked chilli flakes add a whole new flavor to your food while also adding the heat. I am using Jalapeños, but you can use and peppers of your choice. To Provide the smoke, I am using the Smoke Daddy Vortex.
Ingredients
  • Jalapeño peppers
  • 20ml Bicarbonate of soda
  • 1 lt Water
Instructions
  1. Dissolve 20ml of bicarbonate of soda in a liter of cold water. The chillis will be soaked in this solution the preserve their color. Green and red chillis will darken as they smoke and dry, but will retain their characteristic color instead of turning an unsightly black.
  2. To prepare the peppers, cut of the stems and quarter them length-ways. Transfer the peppers to the bicarb solution and allow them to soak for 5 minutes.
  3. Drain the chillis and transfer them to stainless steel mesh sieves or spatter screens.
  4. A while back, I unboxed and introduced the Vortex passive smoke generator. This is what we're using today.
  5. Place the peppers on the right hand side of your barbecue, and the Vortex smoker near the center. Use your blow torch or a heat gun to set the Vortex smoking. In addition ignite the left hand side burner.
  6. Aldo note the probe thermometer on the right hand side. This helps to monitor the target temperature of 67c or 153f.
  7. Let the peppers smoke for a total of 4 hours.
  8. Remove the peppers from the barbecue. You will notice that they have shriveled significantly, but are not totally dried.
  9. At this stage, you can store the chillis in oil, or continue with the drying process by placing the peppers in an oven at 67c or 153f until totally dried. This can take anything from 4 to 10 hours.
  10. Once totally desiccated, chop the chillis into flakes and store indefinitely in an airtight container.


Irish Guinness Bread – St Patrick’s Day Special Recipe!!!

irish guinness bread,how to make irish guinness bread,irish guinness bread recipe,easy guinness bread recipe,fool-proof guinness bread recipe,homemade guinnes bread recipe,st patricks day guinness bread recipe,how to make irish bread,irish bread recipe,st patrick's day recipe,beer bread recipe,easiest bread recipe,quick and easy guinness bread,irish recipes,guinness bread video recipe,guinness bread recipe youtube


Irish Guinness Bread - St Patrick's Day Special Recipe!!!
Author: 
Recipe type: Bread
Cuisine: Irish
Prep time: 
Cook time: 
Total time: 
 
Irish Guinness bread is without a doubt one of the nicest breads I have ever tasted. In addition, it is also one of the simplest breads to make. In fact, even if you have never boiled an egg, you will be able to make Guinness bread.
Ingredients
Dry Ingredients
  • 250ml Rolled oats
  • 500ml Whole wheat flour
  • 125ml Brown sugar
  • 10ml Baking soda (bicarb)
  • 5ml Baking powder
  • 2.5ml Salt
Wet Ingredients
  • 60ml Melted butter
  • 10ml Vanilla extract
  • 250ml Cultured butter milk
  • 360ml Guinness Draught
Instructions
  1. In a large mixing bowl, combine the rolled oats, whole wheat flour, brown sugar, baking soda, baking powder and salt. Stir these together until well combined.
  2. In a second mixing bowl, combine the melted butter, vanilla extract, cultured buttermilk and Guinness draught beer.
  3. Use a ball whisk to mix this until well combined, then add the dry ingredients. Mix this together until you have a batter that resembles porridge.
  4. Pour the batter into an 8 inch square non-stick pan. If your pan is not non-stick, give it a good rub-down with butter.
  5. Bake the bread in a preheated oven at 220c or 425f for 30 minutes. Reduce the heat to 200c or 400f and continue yo bake for a further 30 minutes.
  6. Let the loaf cool in the oven for 30 minutes before turning it out onto a cooling rack.
  7. And there we have it, Irish Guinness bread... with a super-crispy and caramelized crust and a soft airy crumb.
  8. This bread is best served warm with a generous dose of butter and honey.


How to Cure, Age and Smoke Bacon at Home – Best Homemade Bacon!!!

bacon,smoking,pork,curing,injecting,how to make bacon,how to cure and smoke bacon and ham,how to cure and smoke bacon,how to cure and smoke bacon at home,how to cure and smoke canadian bacon,how to cure and cold smoke bacon,cured and smoked back bacon,how to make cure and smoke homemade bacon,smoked bacon recipe,how to make bacon,how to cure bacon,wet cured bacon,how to cure pork,easy bacon recipe


How to Cure, Age and Smoke Bacon at Home - Best Homemade Bacon!!!
Author: 
Recipe type: Curing and Smoking / Charcuterie
Cuisine: Italian
 
Bacon is one of the real joys of life. Nothing beats the amazing aroma of bacon sizzling in the pan.... and home-cured bacon takes this to a whole new level. This video will show you how to cure the bacon and smoke the bacon.
Ingredients
  • 2kg Pork loin, bone in, skin on
  • 2lt + 2lt Water
  • 300g Salt
  • 140g Prague powder #2
  • 15ml Garlic Powder
  • 4 Bay Leaves crushed
  • 15g Black Pepper
Instructions
  1. Measure out the Prague powder, salt, garlic powder, black pepper corns and bay leaves.
  2. Place the black peppercorns into your spice grinder and tear the bay leaves into this.
  3. Process this until reasonably fine. Add this to a pot along with all of the other dry ingredients, excluding the Prague powder.
  4. Pour in 2 liters of hot water. Bring this to a boil, reduce the heat and allow this to simmer for 10 minutes. Quick chill the brine by floating the pot in a sink of cold water, then put this aside.
  5. To prepare the pork loin, we need to debone it and remove the skin. You can also use deboned and skinned pork belly if you prefer.
  6. To skin the pork stand it up on its end and pull the skin back from the top. Use a sharp knife the peel the skin back from the fatty layer, leaving as much fat behind as possible. You can use the skin to make crackling.
  7. To remove the bone, start at the top with your knife, running it down the rack of ribs, using them as a guide for the blade. These ribs still have some meat on them, so save them for the barbecue.
  8. Place the prepared pork loin in a large non-reactive container.
  9. Once the brine has cooled add 2 liters of cold water and the Prague powder and stir this in until completely dissolved.
  10. Pour the curing brine into the container. The pork will float in the brine and you will need to place a bowl or plate on top of it to keep it submerged.
  11. Place the lid on the container and allow this to cure in your refrigerator for 7 days.
  12. After curing, remove the pork from the brine and pat it dry. Place the bacon on a rack over a roasting tin and allow this to air-dry for 5 days in your refrigerator.
  13. After the drying time, this is what you have.... a lovely, rosy pink colored slab of green bacon. This can be consumed as you would any regular bacon, however smoking the bacon really does add the extra dimension to its taste and aroma.
  14. Lift the rack up and balance it across the corners of the pan.
  15. Fire up your smoker and ignite a single burner furthest from where you intend placing the pork. If you're fortunate enough to be using a Smoke Daddy smoke generator, then the smoke will be chugging out in no time, and you can place the pork in the barbecue.
  16. Smoke the bacon for 3 and a half hours until you reach the target internal temperature of 65c or 149f. You will need a probe thermometer to monitor this.
  17. And there we have it. A beautifully cured smoked pork loin just waiting to be sliced and fried to perfection.


How to Cure & Age Capicola – Homemade Capicola – Perfect Charcuterie

capicola,coppa,how to make capicola,how to make coppa,curing and aging capicola,curing and aging coppa,charcuterie,how to make capicola at home,homemade capicola,how to make coppa at home,homemade coppa,curing and dry aging meats,how to cure and age meats,charcuterie making capicola,capicola recipe,capicola recipe youtube,capicola recipe video


How to Cure & Age Capicola - Homemade Capicola - Perfect Charcuterie
Author: 
Recipe type: Curing Meats / Charcuterie
Cuisine: Italian
 
Capicola or cured and dry-aged pork neck is absolutely amazing. The outstanding aroma and robust, rounded flavor, make this one of the most popular Italian cured meats.
Ingredients
  • 2.5kg Pork neck
  • 70g Salt
  • 15g Sugar
  • 15g Prague Powder #2
  • 8g Cracked Black Pepper
  • 4g Crushed Juniper Berries
  • 2 Bay Leaves Crushed
  • 2ml Ground Nutmeg
  • Paprika
Instructions
  1. Measure out the Prague powder, salt, sugar, nutmeg, black pepper corns, bay leaves and juniper berries.
  2. Place the juniper berries, black peppercorns and bay leaves into your spice grinder and process this until fine.
  3. Add the ground spices to the rest of the powders and mix this together thoroughly.
  4. Place the pork neck on your work surface and roll it tightly length-ways. Use butchers twine to tie the roll firmly. This helps the roll keep its shape.
  5. Place the meat in a roasting tin or catch tray and sprinkle the curing mixture evenly over the meat. Pat the powder into the surface of the meat as you go until all of the meat has a coating.
  6. Turn a vacuum packing bag half inside out. Feed the meat into the bag and unfold the bag to close it around the meat. Pop this into your vacuum packer and seal it up good and tight. It is a good idea to give the bag a double seal for security.
  7. Place the vacuum packed meat in your refrigerator for 7 days to cure. You can also seal the meat in a ziplock bag, but then you must massage and flip the meat every day while it is curing.
  8. After the curing time, remove the meat from the bag and rinse it thoroughly under cold running water. Use a clean dish towel to pat the meat dry.
  9. Place the meat on a board and sprinkle liberally with paprika all over and press this into the surface of the meat. Place the meat on a rack and allow this to age for 5 to 6 weeks at a temperature of 14 to 18c, or 57f to 65f, and humidity of 60-70%.
  10. After this time, cut the strings away from the capicola. Cutting the roll open reveals the beautifully colored cured meat with a firm texture and an absolutely amazing aroma.
  11. Slice the meat thinly by hand or machine and you're ready to taste heaven.


Scroll to top

Kitchen Conversions

Convert:
Masses
to:
Volumes
to:
Temperatures
to:
Lengths
to: