How to Smoke Salt - Part 5 of Smoking and Curing Foods - Smoke Daddy Cold Smoke Generator
Author: Whats4Chow
Recipe type: Smoking & Curing
Prep time:
Cook time:
Total time:
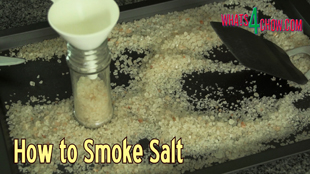
Smoked salt is really easy to make in a hot or cold smoker. Smoked salt adds a whole new dimension to grilled foods, fried foods and even salads.
Ingredients
Coarse salt - either Himalayan rock salt or sea salt
Smoking wood chips of your choice
Instructions
The important thing to remember is the differences between sea salts and rock salts. Himalayan rock salt is a compressed, dense salt, and as a result will take on the flavor the smoke, but very little of the color. Sea salt is far more porous and will take on the flavor and color of smoking.
With the color not being of much importance, I still prefer using Himalayan rock salt for its amazing taste and slight acidity.
To start, spread the coarse salt evenly across a baking pan.
Load up your smoker with your favorite wood chips and set these smoking. I am using the Smoke Daddy Cold Smoke Generator for this demonstration and this unit together with any lidded barbecue is the perfect solution for cold and hot smoking.
Place the pan of salt in the barbecue, close the lid and allow this to smoke for 90 minutes to 180 minutes, depending on your personal preference.
Remove the salt from the smoker. With Himalayan rock salt you will notice only a slight darkening in color, but the smokey aroma will clearly tell you that your job is done.
Transfer the salt to grinders and store these in a cool dry place.
How to Cold Smoke Cheese - Cold Smoking Cheese Using Smoke Daddy Cold Smoke Generator!!!
Author: Whats4Chow
Recipe type: Cold Smoking
Prep time:
Cook time:
Total time:
How to Cold Smoke Cheese. Cold Smoked Cheese is outstanding, and adds a whole new dimension to anything it is added to, and even better just on its own.
The key to cold smoking is keeping the temperature below 100f or 37c, but preferably below 86f or 30c.
I am going to smoke a block of commercial mozzarella and a block of gouda. Cut the cheese into 1 inch square lengths.
Place the cheese on a rack in a roasting tin. Load your smoker up with wood chips. Any of the milder chips like apple, cherry or alder will give a very pleasing result.
Set the chips alight and place the cheese in the smoker. For a mild result, smoke the cheese for 90 minutes to 2 hours. There is no rule regarding timing. Skamorze, or European smoked mozzarella is smoked for 5 to 7 hours until golden brown, however this heavily smoked cheese is an aquired taste.
Once you're happy with the color, remove the cheese from the smoker and vacuum pack it or wrap tightly in cling-wrap for at least 24 hours. This gives the aromatic smokey coating time to penetrate the cheese.
Lemon cream crepes are insanely good, and really easy to make. You will need a batch of crepes to make the masterpieces and you can get the crepe recipe by clicking HERE.
To start, pour the sweetened condensed milk into your mixer bowl, along with the lemon zest and lemon juice.
Start your mixer and add the egg yolks. Allow this mix for about a minute until creamy and thoroughly combined.
Transfer the mixture to your double boiler and start heating this over medium heat. If you don't have a double boiler, place a smaller pot into a larger pot. Pour enough water into the large pot to cover the base of the pot without touching the smaller pot.
Stir the mixture continuously as it heats up over about 10 minutes. The creamy mixture will gradually thicken to a smooth custard. Remove this from the heat and put it aside.
Using your mixer or food processor, whip the cream until it is stiff and leaves trails, or holds peaks.
To assemble the crepes, place a crepe on a serving platter and spoon some of the filling onto half of the crepe. Place another crepe on top of this with a slight offset.
Spoon filling over half of this crepe then fold it over.
Load the whipped cream into your piping bag and pipe the crepes with a decorative swirl. Dust with icing sugar and serve immediately.
These apple-wood smoked chicken thighs are absolutely amazing and will certainly have your guests talking for ages.
Ingredients
8-12 Chicken thighs
60ml Syrup (corn syrup, cane syrup or honey)
30ml White wine vinegar
Peppadew Piquant Pepper & Cilantro Seasoning (if you can't find this look below for the homemade version which will closely approximate the taste)
For the Homemade Rub
15ml Fine Himalayan Salt - or any non-iodated salt
30ml Red Bell Pepper Falkes
10ml Onion Powder
10ml Garlic Powder
30ml Powdered Dried Cilantro Leaves
10ml Chilli Flakes
5ml Ground Black Pepper
10ml Lemon Pepper
10ml Powdered Sugar
Instructions
For the coating, pour the syrup and white wine vinegar into a jug and mix until totally combined. You can use cane syrup, corn syrup or even honey.
Place the chicken thighs in a large mixing bowl and pour the syrup mixture over the chicken. Mix the chicken around in the bowl until everything is well coated.
Cover the bowl and allow this to stand for 30 minutes.
Transfer the chicken to a rack in a pan and sprinkle both sides of the thighs liberally with the seasoning. I am using my favorite Peppadew Cilantro seasoning. Peppedew products are sold in USA, UK and Australia, but if you can't find it, I have included a home made version in the printable recipe above.
Lift the rack up and balance it diagonally across the corners of the pan. This will allow the smoke to reach the underside of the chicken effectively, while the pan becomes a drip-tray.
Load up your smoker with apple wood chunks and bring it up to a temperature of 135c or 275f. Place the chicken in the smoker and allow this to smoke for 2 to 2.5hrs until the internal temperature reaches 76c or 170f. Use a reliable probe thermometer to measure the internal temperature, and measure from the thickest part of the largest thigh.
Remove the amazingly aromatic and tasty thighs from the smoker and serve immediately with the accompaniments of your choice.
These donuts are light and crispy, made from a super-quick dough using baking powder and egg as the raising agent.
Ingredients
1 Cup sugar
2 Eggs
30g Butter, melted
1 Cup milk
15ml Vanilla extract
600g All-purpose flour
45ml Baking powder
1 Tbs ground nutmeg
7.5ml Salt
Instructions
The ingredients are divided into 3 sets and should be measured and ready before you start. The first set is the sugar and eggs. The second set, the melted butter, vanilla extract and milk. The third set, the all-purpose flour, baking powder, nutmeg and salt.
Place the eggs and sugar in the bowl of your mixer and beat them together for 2 to 3 minutes until light and creamy.
Pour in the melted butter, milk and vanilla. Allow this to mix until totally combined.
Replace the beaters with dough hooks and pour the flour mixture into the bowl. Mix the dough until everything is well combined. The dough will be soft and sticky.
Turn the dough out onto a well floured work surface and sprinkle more flour over the top of the dough as well.
Start compressing and folding the dough over and over, sprinkling with extra flour every time it becomes too sticky.
Continue to knead the dough lightly for about 3 minutes until it is smooth and elastic.
Roll the dough out to a thickness of 10mm or just less than a half inch. If you don't have a donut cutter use a tumbler or a food mold to cut out circles. Pull away the off-cuts, re-roll them and cut out more circles.
To make the holes, poke skewer or chopstick into the center of the circle. Start swivelling the chopstick around until the hole has stretched to the desired size.
Heat a half-filled pan of oil to 180c or 350f and carefully drop the donuts into the oil. Fry the donuts for 4 minutes, turning every minute to ensure even coloring.
Remove the donuts from the oil, drain on kitchen paper and proceed with your preferred decorations, whether icing sugar, caster sugar or glaze.
In yesterday’s episode we unpacked the Smoke Daddy cold smoker unit. Today we’re going to install it on our barbecue.
To start, I have used a metal hole cutter to cut holes through the side carcass of the barbecue. This particular barbecue has a double wall, but the extra length of the outlet pipe accommodates this extra thickness with no problem.
Simply slide the outlet pipe through the hole. Use the locking nut and washer to secure the pipe on the inside of the barbecue. There is no need to over-tighten the nuts… finger-tight is just fine.
To operate the unit, I am using a small lump of charcoal. Drop this into the unit and set it alight using your blow-torch. At this stage, I have both lids off and the air pump is running on full output.
This particular model, the Magnum, will take up to 6 cups of wood chips. For this demo, I am adding just 2 cups which should give me an hour or 2 of good smoke. I have found that soaking the chips in water for 30 minutes will slow the burn, but also reduces the smoke rate.
Within a minute or 2 of adding the wood, the charcoal will set this smoldering and the smoke will start pumping through the outlet pipe.
All that remains is to adjust the air flow rate on the pump and you’re ready to go.
You can click the onscreen link to see the full range of Smoke Daddy products.
As promised last episode, our cold smoke generator has arrived, and our series on cold smoking, hot smoking and curing meats is starting today. This first episode is the introduction and un-boxing of this amazing product that we will be using throughout the course. So here we go…
Before we continue, you can see the full range of Smoke Daddy products on our website by clicking the onscreen link.
Smoke Daddy manufactures this product in the USA and it is shipped worldwide. In addition, the airpump that runs the venturi airflow system is available in 110v, 220v and 240v versions.
First to come out is the cast aluminium bottom cap with vents and bakelite handle.
Then the cast aluminium top cap, also with a heat proof bakelite handle.
Next up is the main body of the unit, consisting of a very solid aluminium cylinder with the air inlet pipe already threaded and attached. The stainless steel burning grate also slots into the cylinder, which we’ll look at just now.
This is followed by the stainless outflow pipe with all the fittings necessary to attach it to the barbecue or smoking chamber. In addition, the bakelite threaded nut which secures the bottom cap in place.
The unit also comes with a sturdy wire brush for cleaning the unit.
The operation manual is in full color, printed on good quality stock and includes information on all of Smoke Daddy’s products, as well as a selection of recipes for cold and hot smoking.
And last, but not least is the air pump. This pumps air through the top of the unit creating a venturi flow in the smoking chamber. This increases the efficiency of the burn and delivers the smoke to the barbecue. The pump output is variable via the rotating dial, giving you ultimate control over the burn rate and amount of smoke produced.
Back to the main unit. The stainless grating simply drops into the main cylinder and is supported by a c-clip towards the bottom of the cylinder.
The outlet pipe simply screws into the threaded outlet hole situated directly opposite the air pump delivery pipe. The extra length of the outlet pipe allows you fit the unit to barbecues or chambers with varying wall thicknesses.
The air pump hose is heat proof silicone and simply presses onto the outlet nipple on the pump.
Stay tuned for our next episode where we will be demonstrating how to mount the unit to a barbecue.
Thanks for joining us today, please subscribe to our channel, and we’ll see you again tomorrow.
Visit our website on http://Whats4Chow.com for more details.
This is episode #327 with Whats4Chow.com – please subscribe for notifications and updates.
How to Make Chocolate Eclairs - Part 2 of Choux Pastry & Cream Puffs
Author: Whats4Chow
Recipe type: Dessert / Cakes / Baking
Cuisine: French
Prep time:
Cook time:
Total time:
Serves: 8-10
In our previous episode we made choux pastry and used this to make cream puffs, or profiteroles. If you missed it, click the onscreen link. Today we're going to make chocolate eclairs.
Ingredients
1 Portion Choux pastry piped into 3 to 4 inch logs and baked per previous episode
For the Pastry Cream
3 Eggs
50g Sugar
Pinch of Salt
20g All-purpose flour
15g Cornflour
300ml Hot milk (almost boiling)
5ml Vanilla extract
For the Chocolate Glaze
55g Grated dark chocolate / bitter chocolate
60ml Hot cream (almost boiling)
7.5ml Golden syrup
2.5ml Vanilla extract
Instructions
We're starting with the pastry cream which is the filling. Place the eggs, sugar and salt in a large mixing bowl and whisk these together briefly.
Pour in the sifted all purpose flour and cornflour and whisk this in until smooth.
Start adding the hot milk a little at a time, whisking after each addition. Be careful not to add it too quickly as this will cook and curdle the egg. Continue until all of the milk is combined.
Transfer the mixture to a saucepan or wok and heat this over medium heat stirring continuously. As the mixture heats up and starts to cook it will start to form lumps. This is quite normal. Continue whisking and as the egg and flour in mixture cooks it will smooth out to a thick creamy custard. Turn off the gas, cover the custard with a cloche and allow it to cool completely.
For the chocolate glaze, place the grated chocolate in a mixing bowl and pour in the hot cream. Whisk this in until all of the chocolate has melted.
Add the syrup and vanilla extract and stir this thoroughly. Put the chocolate aside to cool.
Cut the pastries down the center length-ways and pipe the custard cream onto the lower halves.
Invert the lids and dip them in the chocolate glaze. Put the lids onto the eclairs and refrigerate for a few hours to set before serving.
How to Make Choux Pastry - How to Make Cream Puffs - Perfect Cream Puffs Every Time!!!
Author: Whats4Chow
Recipe type: Dessert
Cuisine: French
Prep time:
Cook time:
Total time:
Serves: 12
Choux pastry is like something out of a fairytail. The mysterious light crispiness cannot actually expressed in words. Despite this indescribable wonder, choux pastry is very easy to make. Today we're going to make up batch, and use this to make cream puffs.
Ingredients
For the Choux Pastry
120ml Water
55g Butter at room temperature
65g All-purpose flour
2.5ml sugar
1.25ml Salt
2 Eggs, lightly beaten
For the Filling
250ml Cream
15ml Caster sugar
2.5ml Vanilla extract
Instructions
Combine the all purpose flour, salt and sugar, weigh out the butter, measure the water, and lightly beat 2 large eggs.
Heat a saucepan over medium high heat and add the water and butter. Having the butter at room temperature ensures that the butter will melt before the water boils.
When the water comes to a boil, turn off the gas or remove the pan from the heat.
Pour in the flour mixture and mix this into the butter to get a rough paste.
Put the pan back on over medium heat and cook the roux. As you stir, the paste will become smooth and silky. This step will take about 2 to 3 minutes.
Transfer the roux to a mixing bowl and allow this to cool for 5 minutes. In this step we're going to add the egg little by little, beating it into the roux after each addition.
At this stage we don't know how much egg we're going to need to get the correct consistency. This is why we're adding bit by bit. The consistency we're looking for is a soft silky paste that falls slowly from the fork in a ribbon formation.
Transfer the pastry to your piping bag. I am using a large star nozzle which inhibits the formation of cracks in the pastry as it rises.
Line a baking sheet with baking parchment and pipe out a 10 to 12 puffs. Each one will be about 2 tablespoons on pastry.
Bake the puffs in a preheated oven at 200c or 400f for 15 minutes. Reduce the oven heat to 180c or 350f and bake for a further 25 minutes until golden and crispy.
Remove the puffs from the oven and use a sharp pointed blade to punch 2 slots into the sides of each puff. Turn the oven off and put the sheet back in the oven with door slightly ajar. Allow the puffs to cool like this.
To make the filling add the cream, sugar and vanilla essence to your food processor with the whisks attached. You can also do this with a hand mixer. Whisk the cream until it is stiff and holds a peak.
Cut the puffs through the center. Fill each puff with cream, either using a spoon or a piping bag and replace the lids.
Dust the tops with a good dose of icing sugar and serve immediately.