Chinese Tea Eggs – Marbled Eggs Flavored with Aromatic Chinese Tea and Spices

chinese tea eggs, chinese tea eggs recipe,how to make chinese tea eggs,homemade chinese tea eggs, tea egg recipe, tea eggs, Tea Egg (Dish), how to make tea eggs, chinese tea eggs five spice, chinese tea eggs recipe best, chinese tea eggs youtube, egg marble, black tea, dragons egg, chinese five spice, Marbled Tea Egg, how to make tea egg, Street Food, asian egg recipe, egg recipe, easy tea eggs, street snacks, streetfood, street-food, star anise


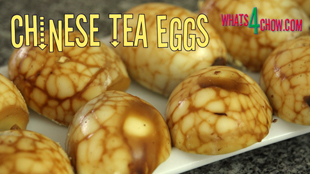
Chinese Tea Eggs - Marbled Eggs Flavored with Aromatic Chinese Tea and Spices
Author: 
Recipe type: Eggs
Cuisine: Chinese
Prep time: 
Cook time: 
Total time: 
Serves: 10
 
Chinese tea eggs are sold by street vendors and roadside stops all over China. These aromatic and tasty treats not only look beautiful, but taste like heaven.
Ingredients
  • 10 Eggs
For the Tea Mixture
  • 3 Tbs Light soy sauce
  • 3 Tbs Rice wine or dry sherry
  • 1 Whole star anise
  • 1 Tbs Brown sugar
  • 1 Cinnamon stick
  • 2 Tbs Chinese black tea or 2 teabags black tea
  • 1 Tbs 5-Spice
Instructions
  1. Place the eggs in a saucepan, cover with cold water and bring this to a boil. Lower the heat and simmer the eggs for 10 minutes.
  2. Drain the pot and cool the eggs under cold running water.
  3. Using the back of a teaspoon, tap the egg shells until the entire shell is crazed with cracks.
  4. Place the light soy sauce, rice wine, star anise, brown sugar, cinnamon stick, sliced ginger, black tea and 5 spice in a pot and pour in 1 liter of water.
  5. Bring this to a boil, lower the heat and simmer the mixture for 20 minutes.
  6. Add the eggs to the pot, bring the mixture back to a boil, lower the heat and simmer the eggs gently for 45 minutes.
  7. Remove the pot from the heat and allow the eggs to cool to a manageable temperature in the tea mixture.
  8. When they are cool enough to handle, peel the shells from the eggs to reveal the beautifully marbled and fragrant eggs.
  9. Slice the eggs into halves or quarters, transfer to platters and serve warm or cold.


Cheese Injected Beef Rump Roast. Prime Beef Rump Injected with Cheese Wizz, Rubbed with Chilli Sugar and Roasted to Perfection.

beef rump roast,perfect beef rump roast,how to roast beef rump,how to roast beef rump in your oven,cheese injected beef rump roast,beef rump roast recipe,cheesy beef rump roast, beef rump roast recipe oven, beef rump roast marinade, beef rump roast smoker, beef rump roast pressure cooker, beef rump roast crock pot recipes, best roast beef recipe, beef rump roast slow cooker recipes, the best rump roast, tender rump roast


Cheese Injected Beef Rump Roast. Prime Beef Rump Injected with Cheese Wizz, Rubbed with Chilli Sugar and Roasted to Perfection.
Author: 
Recipe type: Beef
Prep time: 
Cook time: 
Total time: 
Serves: 4-6
 
In todays episode we're going to roast a perfect beef rump roast, injected with Cheese Wizz, rubbed with our special chilli sugar rub. You will nedd to have a meat syringe to inject the cheese. If you don't own one, never fear, they only cost about 10 dollars on eBay.
Ingredients
  • 1.4kg Beef Rump Roast
  • 100g Cheese Whizz (soft spreading processed cheese)
  • 15g Butter
  • 2 Tbs Brown sugar
  • 1 Tbs Salt
  • 1 Tbs Chilli flakes
For the Serving Suggestion
  • 6 Soft sundried tomato halves (the type in olive oil)
  • Feta cheese
Instructions
  1. To start you will need a nice 1.4kg or just over 3 pound rump roast cut. Look for a piece that has good marbling and a fair strip of fat on the edge.
  2. Place the Cheese Wizz in a bowl along with the butter and warm it up in your microwave to soften and liquify the cheese the cheese. Stir this thoroughly until the butter and the cheese are totally combined.
  3. Load half of this into your meat syringe and start injecting the meat with the cheese. Do this by pressing the needle almost all the way through the meat. Start pressing the plunger down while simultaneously withdrawing the needle from the meat. Load the other half of the cheese into the syringe and continue injecting the meat at even spaces until all of the cheese has been injected into the rump.
  4. In a bowl, combine the brown sugar, flaked salt and chilli flakes. Sprinkle these liberally all over the roast and rub them in yo the surface. Be careful not to apply to much pressure as this will force the cheese out of the meat.
  5. Place the roast on a rack in your roasting pan and bake the meat in a preheated oven at 180c or 350f for 90 minutes.
  6. Remove the roast from the oven and allow it to stand for 5 minutes.
  7. Transfer the roast to a carving board and slice the meat into thin slices at an angle across the grain.
  8. You will notice that the whole inside of the meat has been infused with the cheese, and the little cheese that has oozed out during cooking has created a beautiful cheesy crust on the top of the roast.
  9. As a serving suggestion, plate a few slices of the beef, top it with soft sundried tomato, the type preserved in olive oil, then crumble a little feta over the top before serving with the accompaniments of your choice.


How to Make Sundried Tomatoes in Your Oven. Perfectly Preserved Tomatoes with Brilliant Color.

sun dried tomato, dried tomatoes, Sundried tomatoes, how to make Sundried tomatoes, Sundried tomato recipe, dried tomatoes recipe, make sun dried tomato, Sun-dried Tomato, how to make sundried tomatoes in your oven, how to make your own sun dried tomatoes in the oven, Oven-Dried Tomatoes, easy oven dried tomatoes, homemade oven dried tomatoes, dried dehydrated tomatoes,sundried tomatoes in olive oil,hot to make sundried tomatoes in olive oil


How to Make Sundried Tomatoes in Your Oven. Perfectly Preserved Tomatoes with Brilliant Color.
Author: 
Recipe type: Vegetable / Preserving
Prep time: 
Total time: 
 
How to Make Sundried Tomatoes in Your Oven. This Episode shows you how to make perfectly preserved sundried tomatoes in your oven. Sundried tomatoes with perfect color and excellent shelf-life.
Ingredients
  • 12 Medium size tomatoes
  • ½ Tsp Bicarbonate of soda
  • ½ Tsp Saltpetre
  • 1 Tsp Salt
  • 1 Tsp Sugar
  • 250ml Water
Instructions
  1. Cut the tomatoes in half through the middle. If you prefer, you can skin the tomatoes first, and you can also scoop out the seeds. This is all entirely up to your personal preference. Removing the skin will temper a little of the acidity, but may result jn a less flavorful result. Removing the seeds has no effect on the flavor, but will certainly speed up the drying time.
  2. In a jug, combine the bicarbonate of soda, saltpeter, salt, sugar and water. Stir this until everything has dissolved.
  3. The bicarb preserves the amazing color of the tomatoes, while the saltpeter inhibits the growth of bacteria. Salt adds and enhances flavor, while the sugar combats the toughening effect salt has.
  4. Arrange the halved tomatoes on a rack in a large roasting tin. Brush the tomatoes liberally with the solution.
  5. Place the pan in your oven set to a temperature of 50c. Leave the door of the oven slightly open to allow moisture to escape.
  6. The drying time will be anything between 18 and 36 hours depending on the moisture content of the tomatoes, whether the tomatoes have been de-seeded, and whether they have been skinned.
  7. There is no formula and correct or incorrect procedure for the timing. I prefer my dried tomatoes leathery, but still soft and pliable. If you prefer yours totally dry and on the brittle side, then dry for longer.
  8. At this stage, you need to decide how you're going to store your dried tomatoes. The first way is to pack them in an airtight container, or to vacuum pack them in small quantities.
  9. I prefer mine in oil. To do this, pack them into a sterilized bottle and top the bottle up with oil until the tomatoes are covered. You can add raw garlic cloves and basil or marjoram leaves at this stage to further flavor the tomatoes. I prefer not to do this as it does limit your recipe choices if the tomatoes are already flavored.


Turkey Fold-Over. How to use Turkey Left-Overs – Delicious Baked Turkey Buns.

how to use turkey left-overs,thanksgiving left-overs,christmas left-overs,turkey fold-overs,turkey turnovers,, Turkey Leftover Ideas, Turkey Leftover Recipe, Leftover Turkey, Leftover Turkey Recipe, leftover roast turkey meat, thanksgiving leftover recipes, turkey leftover recipes, thanksgiving leftovers recipes, what to do with leftovers, turkey club sandwich, thanksgiving turkey leftover idea, turkey sandwich


Turkey Fold-Over. How to use Turkey Left-Overs - Delicious Baked Turkey Buns.
Author: 
Recipe type: Left-Overs Recipe Ideas
Cuisine: American
Prep time: 
Cook time: 
Total time: 
Serves: 4
 
How to use Turkey Left-Overs. Baked turkey turn-overs are agreat way to use any left-over turkey meat. In fact you can even use any of the left-over meat in combinations, or on their own, mixed with the other ingredients.
Ingredients
For the Dough
  • 500g Strong White flour
  • 10g Instant yeast
  • 10g Salt
  • 10g Sugar
  • 300ml Lukewarm water
For the Filling
  • 250g Cooked Turkey or other left-over meat
  • 3 Tbs finely chopped pickled jalapeno
  • 200ml Sour cream
  • 80g Feta cheese
  • 6 Tbs Chopped sun-dried tomato
Instructions
  1. To make the dough, place the flour, yeast, salt and sugar in a large mixing bowl. Stir these together briefly, then pour in the warm water.
  2. Using a wooden paddle, stir this until a dough starts to come together, then using your hands in the bowl, compress the dough together to pick up and loose bits.
  3. Turn the dough out onto a lightly floured work surface and knead it for 5 minutes until it is smooth and elastic.
  4. Place the dough back in the mixing bowl, cover the bowl with cling-wrap and allow the dough to rise for 40 minutes in a warm place.
  5. While the dough rises, finely chop your cooked meat. Place this in a bowl and add the finely chopped pickled jalapeños, sour cream, feta cheese and chopped sun-dried tomato. Mix this until totally combined.
  6. Cover a wire rack with foil and give it a light coating of oil. Turn the dough out and knead it briefly.
  7. Flatten the dough into a large disc and cut it into quarters. Roll each quarter into a ball, flatten the ball, then roll into a circle of 20cm or 8 inches in diameter.
  8. Spoon a quarter of the filling across the center of the dough. Pick up the far side of the dough and pull it of the filling. Use your finger tips to tamp the edges down.
  9. This will not seal the edges, it simply thins them out, and prevents them from flying up while cooking. The edge will open during cooking, but only enough to reveal the filling.
  10. Place the completed crescents on the rack, cover the rack with and upturned roasting pan and allow this to rise for 20 minutes in a warm place.
  11. Bake the fold-overs in a preheated oven or gas barbecue at 180c or 350f for 25 minutes until lightly golden.
  12. Remove from the heat and serve immediately with the accompaniments of your choice.


Gourmet Russian Hotdogs. Footlong Russian Sausage Baked in Soft Flavored Dough.

gourmet hotdogs,gourmet russian hotdogs,hot dog recipe,how to make a russian hotdog, gourmet hot dog, gourmet hot dogs recipe, gourmet hot dogs london, gourmet hot dogs denver, gourmet hot dogs toronto, gourmet hot dogs nyc, gourmet hot dogs manly, gourmet hot dogs perth, gourmet hot dogs chicago,gourmet hotdog buns,gourmet hotdog buns recipe,soft hotdog buns,how to make the best hotdog buns,gourmet hotdog rolls


Gourmet Russian Hotdogs. Footlong Russian Sausage Baked in Soft Flavored Dough.
Author: 
Recipe type: Fast Food
Cuisine: American
Prep time: 
Cook time: 
Total time: 
Serves: 2-4
 
These gourmet hotdogs are huge! A footlong Russian sausage is wrapped in a soft bun dough flavored with sun-dried tomato and parmesan cheese, then baked to golden perfection!
Ingredients
  • 2 Footlong Russian sausages
  • 2 Cups All-purpose flour
  • 10g Instant yeast
  • 7.5ml Salt
  • 15ml Sugar
  • 250ml Warm water
  • 60ml Sun-dried tomato, finely chopped
  • 30g Parmesan cheese, shredded
  • ⅓ Cup All-purpose flour (to work the dough)
Instructions
  1. Place the flour, yeast, salt and sugar in a large mixing bowl. Mix them together briefly, then pour in the water. Mix this to a very soft and sticky dough.
  2. Add the chopped sun-dried tomato, shredded parmesan cheese and the oil.
  3. Mix this until totally combined, cover the bowl with cling-wrap and allow the dough to rise for 40 minutes in a warm place.
  4. After 40 minutes, the dough will be well risen and the gluten clearly visible. From the second batch of flour, lightly flour the work surface and turn the dough out.
  5. Sprinkle the top of the dough with flour and start to work the flour into the dough. Continue sprinkling extra flour until all of the flour has been worked into the dough. The dough will be soft, smooth, and elastic.
  6. Divide the dough in half and roll each half into a sausage of 10 inches long. Flatten the dough out until it is about 3 inches wide by 12 inches long, and oval in shape.
  7. Place a Russian sausage on the dough, lift the far edge of the dough over the sausage and stretch it down the other side.
  8. Lift the near side of the dough up and stretch over to enclose the sausage. The ends of the sausage will still protrude from the dough.
  9. Grease a piece of foil and transfer the dogs to the foil. Place the foil on top of a wire rack and using a sharp knife slash through the tops of the dogs at an angle, making sure to cut the dough and the sausage.
  10. Cover this with an upturned roasting pan and allow the dogs to rise for a further 20 minutes.
  11. Heat you gas barbecue or your oven to 180c / 350f and bake the dogs for 25 minutes and the rolls are lightly golden and sound hollow when tapped on the side.
  12. Remove from the barbecue or oven and serve immediately with the accompaniments of your choice.


Barbeue Minted Lamb Chops. Thick-cut Lamb Chops in Mint Marinade Barbecued to Perfection.

barbecue lamb chops,lamb chops on the barbecue,grilled lamb chops recipe,barbecue minted lamb chops, bbq minted lamb chops,mint marinade for lamb chops,minted lamb chops recipe,how to barbecued minted lamb chops recipe,barebue lamb recipes,lamb chops on the barbecue,how to barbecue lamb chops,barbecue mint lamb chops, Barbeque Flavoured Lamb, Barbecue Flavoured Lamb, Barbecued Marinated Lamb Leg Recipe, Butters and Marinades for the Barbecue, barbecued lamb chops marinade


Barbeue Minted Lamb Chops. Thick-cut Lamb Chops in Mint Marinade Barbecued to Perfection.
Author: 
Recipe type: Lamb / Barbecue
Prep time: 
Cook time: 
Total time: 
Serves: 2
 
How to barbecue the perfect minted lamb chops. Lamb chops need special treatment on the barbecue to be moist and tender - this will show you how to get the best results.
Ingredients
  • 4 Lamb loin chops cut 25mm / 1 inch thick
For the Marinade
  • ¼ Cup Oil
  • 30ml White wine vinegar
  • Generous handful of finely chopped mint
  • Pinch of Salt
  • ½ Tsp Ground white pepper
  • 1 Tbs Sugar
Instructions
  1. Add the finely chopped mint, oil, white vinegar, salt and ground white pepper to a jug and stir these until emulsified.
  2. Place the chops in a small roasting tin and spoon the marinade evenly over the meat. Allow this to marinate in your refrigerator for 2 to 6 hours.
  3. Remove the chops from the refrigerator and rinse most of the mint leaves off of the meat by swishing the chops in the marinade. Reserve the marinade for basting during the cooking process.
  4. Stand the chops up on their fatty side and press 3 skewers through the chops.... 2 just above the fatty strip and one towards the top of the chops.
  5. Flip the chops over and season the fat liberally with salt.
  6. Heat your barbecue to medium high heat and place the chops directly on the grid over the heat with the fatty side down.
  7. Grill the fat for 6 to 8 minutes until it charred crispy and well rendered.
  8. Remove the skewers from the chops and lay them on their sides. Baste liberally with the marinade and grill them for 4 to 6 minutes depending on your preference of doneness. 4 minutes will give you medium rare.
  9. Turn the chops over, baste liberally again and continue to grill for a further 4 to 6 minutes.
  10. Turn again, baste again and grill for 1 minute. Then 1 final turn, baste again and grill for another minute.
  11. Remove the chops from the barbecue and allow them to stand briefly before serving with the accompaniments of your choice.


KFC Chicken Tenders. KFC Chicken Strips the Real Way!!! Homemade KFC Recipes!!!

kfc chicken tenders,kfc chicken strips,deep-fried chicken strips,crispy fried chicken strips,how to make kfc at home,homemeade kfc recipes,original recipe kfc chicken,secret recipe kfc chicken,11 herbs and spices kfc secret recipe,the real kfc recipe, homemade chicken fingers, how to make chicken fingers, chicken finger recipe, chicken strips, how to make chicken strips, homemade chicken strips, kfc chicken tenders recipe


KFC Chicken Tenders. KFC Chicken Strips the Real Way!!! Homemade KFC Recipes!!!
Author: 
Recipe type: Chicken / Poultry / KFC
Cuisine: American
Prep time: 
Cook time: 
Total time: 
Serves: 8-12
 
A few weeks back we did a 3-Part series on KFC. Numerous requests have come in regarding KFC Chicken Tenders, so here it is. If you have not viewed the previous episodes in our KFC series, please click the onscreen link in the video, or the links below and view these first in order to understand the curing process.
Ingredients
  • 8 Fresh chicken breasts
For the Spice Blend
  • 3 Tsp Paprika
  • 2 Tsp Onion salt
  • 1 Tsp Dried sage
  • 1 Tsp Garlic powder
  • 1 Tsp Oregano
  • 1 Tsp Cayenne pepper
  • 1 Tsp Cracked black pepper
  • 1 Tsp Dried basil
  • 1 Tsp Dried marjoram
  • 1 Tsp Dried coriander
For the Curing Brine
  • 100g Dairy or Kosher salt (any non-iodated salt is fine)
  • 1 Tsp Whole black peppercorns
  • 1 Corn of whole allspice
  • 12.5g Saltpetre
  • 1 Tsp Ginger
  • 50g Sugar
  • 15g Bicarbonate of soda
For Coating
  • 3 Cups all-purpose flour
  • 4-6 Eggs
Instructions
  1. Combine the spices for the spice mixture, stir to combine and divide these in half.
  2. Place all of the curing ingredients in a pot along with one half of the spice mixture and pour in 2.5 lt of hot water. Stir until everything has dissolved, then bring it to a boil. Remove the pot from the heat and quick chill it by placing the pot in a sink of cold water.
  3. Place the chicken breasts in a large container and pour in the cooled curing brine. Place the lid on the container and allow this this cure for a full 24 hours in your refrigerator.
  4. After 24 hours, remove the breasts from the brine and slice it at an angle across the grain into slices of 10mm or just less than a half inch thick.
  5. To coat the chicken, combine the spice blend with the flour, and lightly whisk the eggs.
  6. Before you start coating the chicken, sprinkle a layer of the seasoned flour over a large platter. For this quantity of chicken you will need more than one platter.
  7. To continue with the coating, dredge the chicken in the flour mix, then dunk it in the egg, making sure to wet all of the flour.
  8. Dredge the chicken the flour again making sure to get a good solid coating...... then back to the egg making sure to wet all of the flour.
  9. Finally a last coating of flour finishes it off. Transfer the chicken to the platter and continue with the rest of the chicken.
  10. Allow all of the coated chicken to set for 20 minutes before frying.
  11. Fill your pan with oil to a depth of 1 inch and heat this to 160c or 310f and fry the chicken for 4 minutes per side until crispy and golden.
  12. Remove the chicken from the oil and drain any excess oil on kitchen paper. Repeat this until all of the chicken is cooked.


Deep-Fried Burger Buns – South African Vetkoek, Crispy on the Outside, Soft on the Inside!!!

south african vetkoek recipe,how to make vetkoek,deep-fried burger buns,crispy fried burger buns,how to make deep-fried burger buns, deep fried burger buns, deep fried hamburger buns, Burgers, Best Burger recipe ever, deep fried hamburger, Homemade Hamburger Buns, deep-fried Honey Bun, Hamburger (Dish), Best Burger Recipes, Burger Lab


Deep-Fried Burger Buns - South African Vetkoek, Crispy on the Outside, Soft on the Inside!!!
Author: 
Recipe type: Bread, Burger Buns, Deep-fried
Cuisine: South African
Prep time: 
Cook time: 
Total time: 
 
Deep-Fried Burger Buns!!! In South Africa these crispy golden buns are called Vetkoek, and are filled with any number of tasty fillings. These buns also make fantastic burger buns with their crispy golden outside and soft moist inside.
Ingredients
  • 500g Strong white flour
  • 10g Instant yeast
  • 10g Salt
  • 10g White sugar
  • 300ml Warm water
  • Oil for deep-frying
Instructions
  1. Add the flour, yeast, salt and sugar to a large mixing bowl. Stir these to combine and pour in the warm water.
  2. Using a wooden paddle, mix this until a dough comes together and it comes away from the sides of the bowl.
  3. Turn the dough out onto a lightly floured work surface and knead the dough for 5 minutes until it is smooth and elastic.
  4. Return the dough to the bowl, cover the bowl with cling-wrap and allow this to rise for 60 minutes in a warm place.
  5. After rising, punch the dough down and divide it in half for giant buns, quarters for large, eights for regular buns and sixteens for cocktail buns. In this demonstration I am making a mix of large, standard and cocktail sizes.
  6. Knead the pieces briefly and shape them into flattened balls. Transfer the buns to a greased baking sheet, cover with a damp tea towel and allow them to rise again for 20 minutes.
  7. Heat your oil to 180c or 350f and fry the buns in batches for 3 to 4 minutes per side and they are crispy and golden.
  8. Remove the buns from the oil and drain any excess oil on kitchen paper. Allow them to cool for at least 15 minutes before cutting.
  9. To cut the buns, it is easier to punch a hole in the edge, then snip the crispy outside along the edge with your scissors to reveal the beautifully soft and moist inside.


Perfect Hotdog Rolls. Soft and Flavorful Hotdog Buns – Easy Recipe by Whats4Chow.com

hotdog rolls,hotdog buns,perfect hotdog rolls,how to make perfect hotdog rolls,how to make perfect hotdog buns,hotdog rolls recipe,hotdog buns recipe,soft hotdog rolls recipe,soft hotdog buns recipe,how to make soft hotdog rolls,how to make soft hotdog buns, hot dog buns, hot dog roll, Hot Dog (Dish), hot dog rolls ingredients, hot dog rolls recipe uk,hotdog rolls at home,homemade hotdog rolls,homemade hotdog buns


Perfect Hotdog Rolls. Soft and Flavorful Hotdog Buns - Easy Recipe by Whats4Chow.com
Author: 
Recipe type: Fast Food / Bread
Cuisine: American
Prep time: 
Cook time: 
Total time: 
Serves: 8
 
Perfect Hotdog rolls / buns are really easy to make, and despite the long rising times are well worth the effort.
Ingredients
  • 450g Strong white flour
  • 200ml Warm water
  • 25g Melted butter
  • 50g Sugar
  • 2 Eggs
  • 1 Tsp Salt
  • 2 Tsp Yeast
Instructions
  1. Add the sugar and yeast to the warm water and stir until the sugar has dissolved. Allow this to rest for 10 minutes.
  2. In a separate bowl, beat 1 egg and 1 additional egg yolk. Place the white of the second egg in a tumbler, add 4 tablespoons of water and whisk this together. Put this aside until later.
  3. In another bowl, melt the butter in your microwave.
  4. Place the flour in a large mixing bowl, add the egg and egg yolk, salt, melted butter and the yeast mixture.
  5. Using a wooden paddle, mix this until a dough comes together and it all comes away from the side of the bowl.
  6. Turn the dough out onto a lightly floured work surface and knead it well for 10 minutes until it is very smooth and elastic. Sprinkle lightly with a little extra flour every time the dough becomes too sticky to handle.
  7. Return the dough to the mixing bowl, cover the bowl with clingwrap and allow the dough to rise for 60 minutes in a warm place.
  8. Once risen, turn the dough out and using your scale divide the dough into 8 equal pieces.
  9. Lightly flour your work surface and press each piece out 3 inch by 5 inch rectangles.
  10. Fold the long side of the rectangle over the centerline, then the other log side over this. Turn the roll over and transfer it to a greased baking sheet. Repeat this until all of the rolls are formed.
  11. Place the rolls on the sheet with about half an inch or 12mm between them. Like this, as they rise they will support one another and rise upwards instead of sideways.
  12. Dust the tops of the rolls with flour, cover loosely with a damp tea towel and allow the rolls to rise again for 60 minutes.
  13. Heat your oven to 190c or 375f. Brush the rolls with the egg white mixture, then bake the rolls for 15 minutes until golden brown.
  14. Remove the rolls from the oven and transfer them to a wire rack to cool.


Carne’ Asada – Mexican Marinated Beef Grilled to Perfection by Whats4Chow

carne' asada,mexican marinated beef,how to make carne' asada,carne'asada recipe,learn to make carne' asada, mexican food, Homemade Carne Asada, Carne Asada Tacos, Authentic carne asada, grilled beef, Backyard BBQ, authentic carne asada marinade, carne asada marinade, carne asada seasoning, carne asada taco recipe, carne asada burrito, carne asada burrito recipe, BBQ carne asada, grilling carne asada


Carne' Asada - Mexican Marinated Beef Grilled to Perfection by Whats4Chow
Author: 
Recipe type: Beef / Barbecue
Cuisine: Mexican
Prep time: 
Cook time: 
Total time: 
Serves: 4-6
 
Carne'Asada is a popular Mexican marinated beef dish, thinly sliced very thinly as a filling for tortillas, or served on its own with refried beans on the side.
Ingredients
  • 1kg Skirt, flank or rump tail steak
For the Marinade
  • 4 Cloves garlic, minced
  • 1 Jalapeno chilli, seeded and minced
  • 1 Tsp ground cumin
  • 1 Generous handful fresh coriander, roughly chopped
  • Salt and pepper to taste
  • Juice of 2 limes
  • 2 Tbs White wine vinegar
  • ½ Tsp Sugar
  • ½ Cup Oil
Instructions
  1. Place the beef in a roasting pan or a large shallow tray.
  2. In a jug, combine the minced garlic, jalapeno chilli, ground cumin, fresh coriander, salt and pepper, lime juice, white wine vinegar, sugar and oil.
  3. Mix this until the oil has emulsified, then spoon the marinade evenly over the steak.
  4. Allow this to marinate in your refrigerator for 4 to 6 hours.
  5. Heat your a ribbed skillet on your barbecue or range over medium high heat.
  6. Place the meat with the fat side down and cook it for 8 minutes.
  7. Turn the steak over and cook it for a further 8 minutes. This timing will give you a medium rare result, so you can adjust the times according to your personal preference.
  8. Remove the steak from the skillet and allow it to rest for 5 minutes before slicing into very thin slices and serving.


Smoked Haddock Pate’ – Smoked Haddock Dip – Smoked Haddock Mousse

smoked haddock pate',smoked haddock mousse,smoked haddock dip,smoked fish pate',smoked fish mousse,smoked fish dip, smoked haddock pate recipe, smoked haddock pate cream cheese, smoked haddock pate starter, smoked mackerel pate creme fraiche, smoked mackerel pate horseradish, smoked mackerel pate, smoked mackerel pate recipe, smoked haddock pate delia, smoked haddock pate bbc, recipe with haddock, Mackerel (Organism Classification)


Smoked Haddock Pate' - Smoked Haddock Dip - Smoked Haddock Mousse
Author: 
Recipe type: Seafood
Prep time: 
Total time: 
Serves: 6
 
Smoked Haddock Pate' or mousse is quick and easy to make, and can also be used as a dip. This recipe will make enough to serve 6 starter portions.
Ingredients
  • 350g Smoked Haddock, poached and flaked
  • 250g Cream cheese
  • 30ml Culture sour cream / creme fraiche
  • Juice from 1 medium lemon
  • 30ml Horseradish sauce
  • ¼ Cup chopped chives
  • ¼ Cup chopped parsely
Instructions
To Poach the Haddock
  1. Place the haddock in a large pan and pour in enough milk to come halfway up the side of the fish.
  2. Bring the milk to a simmer and simmer for 15 minutes, turning the fish once halfway through.
  3. Allow the fish to cool completely
To Make the Pate'
  1. Flake the fish and place it in a mixing bowl.
  2. Place all of the other ingredients in the bowl with the fish and puree the mixture with your stick blender. You can also do this in a food processor, however the result will not be as fine.
  3. Season with salt and pepper.
  4. At this stage the mixture is suitable as a dip. To thicken the pate' to spreading consistency, cover and refrigerate for 3-4 hours.


Crispy Deep-Fried Mozzarella Sticks. Deep-Fried Mozzarella, the Perfect Starter, Accompaniment or Snack!!!

deep-fried mozzarella,cheese sticks, Mozzarella (Cheese), mozzarella recipes, mozzarella cheese recipes, cooking with mozzarella cheese, Mozzarella Sticks (Food), deep fried mozzarella sticks, deep fried mozzarella, deep fried mozzarella balls, deep fried mozzarella recipe, deep fried mozzarella sticks calories, deep fried mozzarella in breadcrumbs, deep fried mozzarella sticks without bread crumbs, deep fried mozzarella cheese, deep fried mozzarella sticks nutrition


Crispy Deep-Fried Mozzarella Sticks. Deep-Fried Mozzarella, the Perfect Starter, Accompaniment or Snack!!!
Author: 
Recipe type: Cheese
Prep time: 
Cook time: 
Total time: 
Serves: 2-6
 
How to make perfect deep-fried mozzarella. The secret to perfect deep-fried mozzarella is in the triple coating - one coat of cornflour and two coats of crumb. watch the video to see just how to do it!!!
Ingredients
  • 6 Batons Mozzarella cheese (commercial block)
  • 3 Eggs, lightly beaten
  • ½ Cup Cornflour
  • ⅔ Cup Finely crushed cornflakes mixed with ⅔ cup all-purpose flour
  • Oil to fry
Instructions
  1. Using commercial mozzarella which is firmer than the good hand made stuff, cut it into batons of 20mm or ¾ inch.
  2. Before we start coating the cheese, sprinkle a good layer of the cornflake mixture onto a platter.
  3. To coat the mozzarella, dip it into the egg to wet it all over.
  4. Dredge it in the cornflour making sure to cover all of the cheese. Return it to the egg making sure to wet all of the cornflour.
  5. Dredge it in the cornflake mixture to get a good solid coating, then back into the egg making sure to wet all of the cornflake mix.
  6. Then back into the cornflake mixture for the final coating. This thick coating will help to stop the cheese oozing out when it melts.
  7. Transfer the coated cheese to the platter. The crumb layer on the platter inhibits the coating from sticking to the plate and being damaged when it is removed from the plate.
  8. Place the platter in your freezer for 2 hours.
  9. Fill your pan with oil to a depth of 20mm and heat this to 180c or 350f.
  10. Carefully lower the coated cheese into the oil and fry this for 3 minutes, turning once halfway through.
  11. Remove the sticks from the oil and drain any excess oil on kitchen paper.
  12. Transfer the crispy mozzarella to platters and serve immediately with a little fresh herb garnish and the dipping sauce of your choice.
  13. The mozzarella will be crisp and golden on the outside and soft and melted on the inside.


Scroll to top

Kitchen Conversions

Convert:
Masses
to:
Volumes
to:
Temperatures
to:
Lengths
to: