How to Make Spring Roll Wrappers. Quick and Easy Homemade Spring Roll Wrappers / Skins.
Author: Whats4Chow
Recipe type: Pastry / Batter
Cuisine: Chinese
Prep time:
Cook time:
Total time:
Serves: 12
How to Make Spring Roll Wrappers / Skins. Making your own spring roll wrappers is quick and easy. Check out this quick demonstration to how to make your own homemade spring roll skins. The recipe is easily scaleable up to any quantity required.
Ingredients
½ Cup All purpose flour
¼ Cup Cornflour
¼ Tsp salt
150ml Water
Instructions
Place the all purpose flour, cornflour and salt in a mixing bowl.
Pour in the water and whisk this until you have a thin smooth batter.
Heat your range over medium heat. Don't place the pan on the range until you're ready to start. Place the pan on the heat and using a brand new camel hair brush, paint the batter onto the surface of the pan. Paint until the entire surface has a thin, but even coating all over. (by brand new I mean it must be absolutely clean, and it must have natural bristles that will not melt or impart plastic chemicals to the food)
The coating sets very quickly, and the pan gets hotter and hotter, the skin will start to peel away from the edges of the pan.
Gently peel the skin from the pan and transfer to a platter. Cover it with a damp tea towel.
To continue, cool the pan down by running under your cold water tap for 10 seconds, then drying it off. Continue with the next wrapper, then cool the pan, and so on until all of the wrappers are done.
This quantity of batter will make 12 8 inch or 20cm wrappers. Simply multiply it out to the quantity you require.
Traditional French Tarragon Chicken. How to make the best tarragon chicken EVER!!!
Author: Whats4Chow
Recipe type: Chicken / Poultry
Cuisine: French
Prep time:
Cook time:
Total time:
Serves: 4
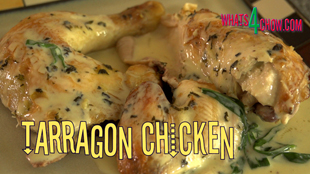
Tarragon chicken is an absolute classic of French cuisine. Traditionally baked whole in a Dutch oven or casserole, this method results quicker and more even cooking, with flesh that is far more moist and has a better infusion of flavor.
Ingredients
1½ Tbs Fresh tarragon, finely chopped
1 Clove garlic, crushed
50g Butter, melted and portioned into 2 x 25g
1.6kg Chicken
150ml Chicken Stock
30ml Dry white wine
1 Tbs Cornflour dissolved in 3Tbs water
Small handful fresh tarragon leaves
150ml Cream
Instructions
Cut through the skin and flesh along the breast bone, then cut through the bone with your shears.
Open the chicken up, turn it over and dislocate the pelvic girdle with a firm downward thrust of your hand.
Cut off and discard the wing tips.place the bird skin side up in a roasting pan and brush it liberally with the melted butter.
Grill the chicken on the second highest rack in your oven for 10 minutes until lightly browned. To clarify the term grill, use the top element only on maximum temperature.
Once this step is complete, reset your oven to 200c or 400f.
Remove the bird from the oven. Combine the the half of the melted butter, the finely chopped fresh tarragon, the garlic, white wine and chicken stock. Spoon this over the chicken.
Cover the roasting pan with foil and bake the chicken at 200c or 400f for 80 minutes.
Remove the pan from the oven and transfer the chicken to a platter and keep it warm.
Strain the juices from the pan into a small saucepan. Add the cornflour slurry and the whole fresh tarragon leaves.
Heat the saucepan over medium high heat, bring it to a boil, reduce the heat and simmer for 2 minutes.
Remove this from the heat and stir in the cream.
Joint the chicken and transfer the pieces to serving platters. Ladle the cream sauce over the chicken and serve immediately with the accompaniments of your choice.
Trev's Gourmet Burger - All-Beef Patty with Crumbed Camembert, Bacon and Roast Red Pepper Relish!!!
Author: Whats4Chow
Recipe type: Burgers / Beef
Cuisine: American
Prep time:
Cook time:
Total time:
Serves: 2
This gourmet burger is all good - 150g all beef patty with another patty of crumbed camembert, topped with crispy bacon and roasted red pepper relish -- you should need a license to eat a burger like this!!!
Ingredients
For the Patties
150g Ground sirloin
150g Ground rump
1 Tsp Salt
For the Relish
1 Large Red Pepper
1 Medium Onion
30ml Balsamic vinegar
30g Butter
Salt to taste
For the Camembert
¼ Cup finely crushed cornfalkes mixed with ¼ cup all-purpose flour
¼ Cup cornflour
1 Eggs lightly beaten
Other
2 Large burger buns
4 Rashers streaky bacon
Lettuce
Butter
Instructions
Starting with the relish, scorch the skin of the red pepper with your blowtorch, gas hob, or under the grill. Place the pepper in a plastic packet, tie the top and allow the pepper to sweat.
While the pepper sweats, chop the onion.
Remove the pepper from the bag and scrape the skin from the pepper. Chop the whole pepper into cubes.
Heat a pan over medium high heat and add the butter. When the butter is bubbling, add the pepper and onion and fry this for 10 min until it is well browned and caramelized. Add the balsamic vinegar and stir this for 60 seconds until the vinegar has thickened to a sticky syrup and coated everything.
Remove this from the heat and transfer it to a jug. Using your stick blender, puree the relish then keep it warm on the side.
Next in line is the camembert. For the coating combine the flour with the finely crushed cornflakes and measure out the cornflour. Whisk the eggs briefly.
Hold the camembert round on its side and cut through the cheese, effectively giving you 2 rounds.
Dip one of the rounds in the egg, then dredge it in the cornflour.
Dip the cheese in the egg making sure to wet all of the cornflour.
Dredge the cheese in the cornflake mixture making to get a good solid coating.
Return the cheese to the egg making sure to wet all of the cornflake mixture, then second coating of the cornflake mixture. Make sure to get a good solid coating.
Repeat this with the second round of cheese, then transfer both rounds to a platter and allow the coating to set for 20 minutes.
My burger mix is 50% ground sirloin mixed with 50% rump, with a fat content of 20%. This is just a recommendation - you can use a good quality ready-made patties of 150g each.
Place the mince in a bowl with 1 teaspoonful of salt and mix well. The salt reacts with the protein binding the meat.... there is no need for egg. Go ahead and form your 2 patties by hand or using a press. Place the patties between 2 pieces of foil and flatten out until they are the slightly bigger than the burger buns. When flattening them out make sure to make the center thinner than the edges, this helps keep the patty flat when it cooks.
Put the patties in the freezer while you continue.
Cut and butter the buns, then toast them in a large pan until crisp and lightly browned on the inside.
Remove the buns from the pan then add the bacon the pan. Fry the bacon until well browned, then remove.
Remove the patties from the freezer and add them to the pan. Fry the patties for 3 minutes per side, then remove these from the pan.
Add 300ml of oil to the pan, allow the oil to heat for a minute, then add the camembert. Fry the camembert for 3 minutes, turning after 90 seconds. Remove the camembert from the pan.
Dress the buns with a healthy bed of lettuce and top this with a little of the relish. Top this with a patty, then the bacon.
Finish the burger off with the camembert and a bit more relish, then serve your masterpiece immediately with the accompaniments of your choice.
Oven-Fried Sweet Potato Chips with Sweet Balsamic Reduction. The Best Sweet Potatoes EVER!
Author: Whats4Chow
Recipe type: Vegetable, Vegetarian, Accompanyment
Prep time:
Cook time:
Total time:
Serves: 4-6
Oven-Fried Sweet Potato Chips with Sweet Balsamic Reduction. The Best Sweet Potatoes EVER! Todays recipe proves that the simpler things in life can be the best. These oven fried sweet potatoes drizzled with sweet balsamic reduction is the stuff of legends.
Ingredients
For the Potatoes
600g Sweet potatoes, cut into 12mm / ½ inch chips
Olive oil to drizzle
Salt and cracked black pepper to season
For the Balsamic Reduction
250ml Balsamic vinegar
2 Tbs Honey
Instructions
Cut the sweet potato into 12mm chips then place them in a roasting pan.
Drizzle the chips with olive oil and mix them around until everything is coated.
Roast the chips in a preheated oven at 220c or 425f for 25 to 30 minutes until lightly golden.
While the potato roasts, combine the honey and balsamic vinegar in a small saucepan.
Heat the saucepan over medium high heat. Bring the mixture to a boil and allow this to reduce for 12 to 15 minutes, stirring occasionally.
Towards the end as the reduction thickens, turn the heat down and stir continuously until the mixture is one third of its original volume. Remove it from the heat and keep warm.
Transfer the potato chips to a serving bowl, drizzle generously with the balsamic reduction, season with salt and crack black pepper and serve immediately.
How to Make Traditional German Pretzels. The Real Recipe with Rye, Parboiled then Baked!!!
Author: Whats4Chow
Recipe type: Breads / Dough / Baking
Cuisine: German
Prep time:
Cook time:
Total time:
Serves: 16
Traditional German Pretzels are fantastic with a pint of beer! Salty and sweet, with an awesome chewy texture, these are a real treat! Traditional German pretzels are cooked in a similar fashion to bagels, first par-boiled, then baked. This results in the amazing chewiness which is complimented by the slightly bitter flavor from the rye.
Ingredients
For the Dough
325g Strong white flour
75g Rye flour
2 Tsp Demarara Sugar
1 Tsp Salt
1 Tsp Dried yeast
250ml Warm water
For the Glaze
3 Tsp fine salt
1 Tsp Caster sugar
3 Tbs Warm water
Coarse sea salt
For the Simmer Bath
1 Tbs Caster sugar
2lt Water
Instructions
Pour the flour, rye flour, demarara sugar, salt and yeast into a large mixing bowl.
Mix these together then pour in the warm water. Using a wooden paddle mix this until a dough comes together.
Turn the dough out onto a lightly floured work surface, dust the top with flour as well, then knead the dough for 5 minutes until it is smooth and elastic. Dough containing rye flour can be notoriously sticky, so dust the dough with a little extra flour every time it becomes too sticky.
Place the dough back in the mixing bowl, cover it with cling wrap and allow the dough to rise in a warm place for 60 minutes.
Turn the dough out onto the work surface and knead for a further 2 minutes.
Roll the dough into a sausage and cut it into 4 equal pieces. Roll each of these into a sausage and cut these into 4 pieces.
Roll each of these into a rope of 30cm or 12 inches. Form the rope into a semi-circle then twist the ends with a single twist before folding the ends over to meet the inside of the circle.
Place the formed pretzels on a greased baking sheet, cover loosely with clingwrap and allow the pretzels to rise for a further 30 minutes in a warm place.
Fill a large pan with about 2 liters of water and 1 tablespoonful of caster sugar and bring this to a low simmer.
Drop a few of the pretzels into the simmering pan and allow them to cook for 2 minutes per side. Remove these from the water and return them to the baking sheet. Repeat this until all of the pretzels have been boiled.
Combine the salt, sugar and warm water for the glaze and stir this until the salt and sugar has dissolved. Brush the glaze liberally onto the pretzels, then sprinkle with coarse salt.
Bake the pretzels in a preheated oven at 200c or 400f for 25 minutes until crisp and golden and the pretzels sound hollow when tapped.
Remove the pretzels from the oven and transfer them to a wire rack to cool before serving.
Pumpkin / Butternut Fritters - Crispy Fried Pumpkin Fritters, the Perfect Accompaniment or Dessert!
Author: Whats4Chow
Recipe type: Vegetable / Accompaniments / Dessert
Cuisine: South African
Prep time:
Cook time:
Total time:
Serves: 8-16
These cinnamon pumpkin frtters are outstanding and can be made with pumpkin or butternut. Crispy and caramelized on the outside and beautifully soft and creamy on the inside, this recipe is a sure winner!
Ingredients
2 Cups Cooked pumpkin or butternut, mashed
½ Cup All-purpose flour
½ Tsp Salt
1 Tsp Ground cinnamon
2 Tsp Baking powder
2 TBS Brown sugar
2 Eggs, lightly beaten
Instructions
Place the cooked pumpkin in a mixing bowl, then add the flour, salt, ground cinnamon, baking powder and brown sugar. Mix this all until combined, then add the eggs.
Mix this until you have a thick sticky batter.
Pour enough oil into a large pan to cover the base of the pan, then heat this over medium high heat.
Spoon heaped tablespoons of the batter into the pan, with a little space in between them.
Fry the fritters for 3 minutes per side until crisp and golden.
Remove the fritters from the pan and drain them on kitchen paper. Continue frying the remaining batter until all of the fritters are cooked.
Deep-Fried Camembert / Brie. Crispy Fried Camembert or Brie Served with Preserved Figs.
Author: Whats4Chow
Recipe type: Cheese / Starter / Dessert
Cuisine: French
Prep time:
Cook time:
Total time:
Serves: 2
Deep-Fried Camembert / Brie. Deep-fried camembert or brie is absolutely amazing - soft and runny on the inside and crisp and crunchy on the outside. The trick to getting this right is in the coating - check out the video to find out more!
Ingredients
125g Camembert or Brie cheese
For the Coating
½ Cup finely crushed cornflakes mixed with ½ cup all purpose flour
½ Cup tapioca flour or cornflour
2 Eggs lightly beaten
For the Garnish
6 Preserved green figs & a little fig syrup
Cashew nuts
Instructions
Cut the cheese into 4 wedges.
Before you coat the cheese, sprinkle a layer of the cornflake crumb mix over a platter. This stops the coating on the cheese from sticking to the platter while the coating sets.
To coat the cheese, dip it in the egg wetting it all over.
Dredge it in the tapioca or corn flour.
Then dip it in the egg again making sure to wet all of the cornflour.
Then it's into the cornflake mixture making sure to get a good solid coating all over.
Then back into the egg making sure to wet all of the cornflake mixture.
And finally another good solid coating of the cornflake mixture.
This may seem like overkill, but the cheese melts very quickly and this good coating inhibits it leaking into the oil while frying.
Transfer the coated cheese to the platter and allow the coating to set for 20 minutes.
Fill a saucepan with oil to a depth of 50mm or 2 inches and heat this to 170c or 325f.
Deep fry the cheese for 3 minutes turning halfway through.
Remove the cheese from the oil and drain on kitchen paper.
Transfer the cheese wedges to platters. Serve with lightly crushed preserved figs, some of the fig syrup and salted cashew nuts.
KFC Chicken Wings Recipe / KFC Hot Wings Recipe. This is Part 3 of the series on KFC Chicken. This Episode covers KFC Hot Wings. If you missed Episode 1 & 2, click on the onscreen link to view them in order to understand the process. Crispy deep-fried KFC chicken wings are legendary - this is how to make them at home.
Ingredients
16-24 Whole chicken wings
For the Spice Blend
3 Tsp Paprika
2 Tsp Onion salt
1 Tsp Dried sage
1 Tsp Garlic powder
1 Tsp Oregano
1 Tsp Cayenne pepper
1 Tsp Cracked black pepper
1 Tsp Dried basil
1 Tsp Dried marjoram
1 Tsp Dried coriander
For the Curing Brine
100g Dairy or Kosher salt (any non-iodated salt is fine)
1 Tsp Whole black peppercorns
1 Corn of whole allspice
12.5g Saltpetre
1 Tsp Ginger
50g Sugar
15g Bicarbonate of soda
1 Tbs Dried chilli flakes
Other
2 Cups all purpose flour
1 Tbs Cayenne pepper
4-6 eggs lightly beaten
Instructions
To start prepare the curing brine as we did in part 1 and part 2.
Remove and discard the wing tips from the wings and cut through the center joint. Place the wings in a sterilized container.
Sprinkle 1 tbs of crushed chilli flakes over the wings, then pour in the brine. Put the lid on the container and allow the chicken to cure for a full 12 hours in your refrigerator.
Combine the second half of the spices with flour and add 1 tbs of cayenne pepper, then sprinkle a layer of the seasoned flour over the surface of a large platter.
Lightly beat 4 eggs.
To coat the wings, first dredge them in the flour, then dip then in the egg.
Dredge them in the flour again to get a good solid coating. Transfer the wings to the floured platter and allow the coating to set for 20 minutes.
Fill your pan with oil to a depth of 25mm or 1 inch and heat this to 150c or 300f. Fry the wings for a full 20 minutes turning halfway through.
Remove the wings from the oil and drain on kitchen paper. Allow them to stand for 5 minutes before serving.
KFC Chicken Burger - Original Recipe - The Real Secret to KFC Fried Chicken 1st by Whats4Chow.com
Author: Whats4Chow
Recipe type: KFC Fried Chicken / Poultry
Cuisine: American
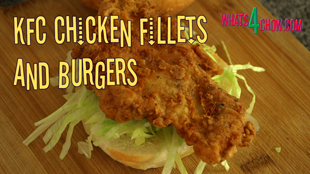
KFC Chicken Burger Video Recipe This is Part 2 of a 3 Part series on how to make KFC Fried Chicken. Part 2 is all about fried chicken breast fillets and in particular, KFC Chicken Fillet Burgers. If you missed Part 1 you will need to view this first in order to understand the process used. You can find Part 1 HERE WHATS4CHOW.COM IS THE FIRST TO PUBLISH THIS METHOD - I AM SURE THAT THIS VIDEO WILL BE COPIED BY NUMEROUS WEBSITES AND VIDEO CHANNELS WITHIN A VERY SHORT SPACE OF TIME - TO THE FREELOADERS WHO INEVITABLY WILL STEAL MY HARD WORK, PLEASE AT LEAST HAVE THE DECENCY TO GIVE OUR CHANNEL AND WEBSITE THE CREDIT IT DESERVES FOR DECODING THE MYSTERY OF KFC'S INSANELY GOOD TASTE, AROMA AND TEXTURE.
Ingredients
The Chicken
8-12 Chicken breast fillets (100g - 125g each)
For the Spice Blend
3 Tsp Paprika
2 Tsp Onion salt
1 Tsp Dried sage
1 Tsp Garlic powder
1 Tsp Oregano
1 Tsp Cayenne pepper
1 Tsp Cracked black pepper
1 Tsp Dried basil
1 Tsp Dried marjoram
1 Tsp Dried coriander
For the Curing Brine
100g Dairy or Kosher salt (any non-iodated salt is fine)
1 Tsp Whole black peppercorns
1 Corn of whole allspice
12.5g Saltpetre
1 Tsp Ginger
50g Sugar
15g Bicarbonate of soda
Other
2 Cups all purpose flour
4-6 eggs lightly beaten
Instructions
Mix the curing brine discussed in episode 1, bring it to a boil stirring frequently, lower the heat and simmer for 5 minutes.
Remove the brine from the heat and allow it to cool completely.
Take 8 to 12 chicken breasts of 100 to 125g each and place them in a large sterilized container.
Pour the curing brine over the breasts, put the lid on the container and allow the breasts to cure in your refrigerator for 12 hours. The reason for time being half that of the chicken pieces is that there is no skin, and the surface area of the breast is far bigger, and the meat is thinner.
After 12 hours, combine the second half of the spice mix with 2 cups of all purpose flour and lightly beat the eggs.
Sprinkle a solid layer of the spice mix over the surface of a large platter.
Remove the chicken from the brine and tap the breasts down to an even thickness of 10mm or just under half an inch using your meat mallet.
To coat the fillets, dredge them in the seasoned flour then dip them in the egg making sure to wet all of the flour.
Dredge them in the flour again making sure to get a good solid coating.
Transfer the coated chicken to the floured platter and allow the coating to set for 20 minutes.
Fill your pan with oil to a depth of 25mm or 1 inch and heat this to 150c or 300f.
Carefully lower a few breasts into the pan and fry them for 20 minutes, turning halfway through.
Remove the fillets from the oil and keep warm in a low oven until the remaining breasts are fried.
To serve, butter the buns, top the lower half with shredded lettuce, then top each of these with chicken.
Top the chicken with tangy mayonnaise, followed by the top of the bun then serve immediately.
KFC Fried Chicken Secret Recipe Kfc fried chicken is legendary, and there must be hundreds of websites and videos claiming to have cracked the secret recipe of 11 herbs and spices. Others get into deep discussions about how the chicken is pressure fried. Over time I have tried many of these copycat recipes and can only say that it was one disappointment after the next. None of them even came close to the real thing. Today I will reveal to you the actual secret behind the legendary taste, aroma and texture of this iconic chicken. Before I continue, I would just like make a point. Whats4Chow.com is the FIRST TO PUBLISH THIS, and I am sure that there will be a load of other channels copying my video within a very short time of this being published. Unfortunately there is nothing I can do to prevent this, but to those free loaders out there that will inevitably copy my work, please have the decency to give our channel and website the credit it deserves for finally decoding the mystery of the world's finest chicken brand. Let's get started by saying that it is not the secret blend of 11 herbs and spices, and it is not the use of pressurized deep fryers, or the type of oil or shortening used to do this. The secret to the insanely good flavor, texture and aroma is in the preparation of the chicken before it even coated. In fact, using this method the chicken tastes very close to the real thing even without the 11 herbs and spices!
Ingredients
The Chicken
8-12 Chicken thighs and drumsticks
For the Spice Blend
3 Tsp Paprika
2 Tsp Onion salt
1 Tsp Dried sage
1 Tsp Garlic powder
1 Tsp Oregano
1 Tsp Cayenne pepper
1 Tsp Cracked black pepper
1 Tsp Dried basil
1 Tsp Dried marjoram
1 Tsp Dried coriander
For the Curing Brine
70g Dairy or Kosher salt (any non-iodated salt is fine)
1 Tsp Whole black peppercorns
1 Corn of whole allspice
12.5g Saltpetre
1 Tsp Ginger
50g Sugar
15g Bicarbonate of soda
Other
2 Cups all purpose flour
4-6 eggs lightly beaten
Instructions
Combine the paprika, onion salt, sage, garlic powder, oregano, chilli powder, black pepper, basil, marjoram and coriander in a bowl and mix it together, then divide this in half.
Pour 2.5lt of filtered water into a pot and add half of the spice mix along with all of the curing brine ingredients.
Bring the pot to a boil, stirring frequently. Reduce the heat and allow the pot to simmer for 5 minutes.
Remove the pot from the heat and allow the brine to cool completely.
Using a carving fork or similar tool, poke holes through the skin of the chicken pieces, then place them in a large sterilized container.
Pour the cooled brine over the chicken pieces, put the lid on and let this cure in your refrigerator for a full 24 hours.
Before I continue, for this recipe to succeed, you cannot omit anything, especially the saltpetre and bicarb. The proper curing process is where the taste, texture and juiciness comes from.
After 24 hours, remove the chicken from the brine.
Combine 2 cups of all purpose flour with the other half of the spices, and lightly beat 4 eggs.
Dredge the chicken in the flour mixture, then dip it in the egg making sure to wet all of the flour. Dredge the chicken in the flour again making sure to get a good solid coating.
Sprinkle a layer of the flour mixture onto a platter, transfer the coated chicken pieces to the platter and allow the coating to set for 20 minutes.
Half fill your wok or pot with oil. Heat the oil to 160c or 325f. Fry the chicken pieces for 20 minutes, turning over halfway.
Remove the chicken from the oil, drain on kitchen paper and serve.
Just a few more notes before we go....
The chicken must fry for at least 20 minutes. If you fry hotter and shorter, the coating will have a chalky texture.
The chicken is cured, and as a result it can stand in a low oven for extended periods of time with no health risks, just as it does in the store. This makes it possible to make a mountain of chicken before your guests arrive.
Smaller cuts like the KFC wings and chicken burgers will be covered in the next few days. Please subscribe for notifications and updates.
Cured Beef Ribeye Carpaccio. How to Cure Beef Ribeye or Fillet at Home. Cured / Pickled Ribeye or Fillet Recipe.
Author: Whats4Chow
Recipe type: Beef Ribeye / Fillet
Cuisine: Italian
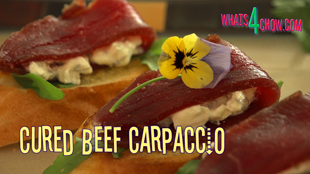
Carpaccio is a starter of thinly sliced beef served raw with various flavor enhancers like balsamic reduction, red wine reduction or vinaigrette. This cured beef ribeye carpaccio made from either ribeye or fillet, has a far more robust flavor, and certainly a far superior texture to its raw counterpart. It is ideal when catering for larger groups, as most of the work is done long before the time.
Ingredients
750g Rib-eye or beef fillet
2.5 liter Water
375g Un-iodated salt (dairy salt / kosher salt)
12.5g Saltpetre
45g Sugar
15g Bicarbonate of soda
2.5ml Black Peppercorns
1 Bay leaf
1 Whole allspice
15ml Ground ginger
5ml Garlic powder
Instructions
Place the water, dairy salt, saltpetre, sugar, bicarbonate of soda, peppercorns, bay leaf, allspice, ground ginger and garlic powder in a pot.
Bring this to a boil, reduce the heat and simmer for 5 minutes stirring every minute.
Remove the pot from the heat a allow the brine to cool completely.
Take 750g of beef fillet or rib-eye or fillet and pat this dry.
Place the meat in a sterilized container. Pour the brine over the beef to completely cover.
Put the lid on the container and allow this to cure in your refrigerator for 3 full days, turning the beef over every 24 hours.
Remove the beef from the brine and place it on a stainless steel rack in a pan. Dry the beef using kitchen paper then allow the beef to air-dry in your refrigerator for 4 days, turning the meat over daily.
After the drying period, the meat will be quite firm, and will have a beautiful burgundy color.
Slice the carpaccio thinly and serve according to your recipe or requirements. As a simple serving suggestion I have served mine on toasted bruschetta with herbed cream cheese and rocket leaves.
How to Bake Panettone - Italian Christmas Bread. Bake Your Own Italian Christmas Cake at Home.
Author: Whats4Chow
Recipe type: Christmas / Cake
Cuisine: Italian
Prep time:
Cook time:
Total time:
Panettone is a fruity Italian Christmas bread. It has an astonishing shelf-life of months, and can be prepared well ahead of time. This Panettone recipe is quick and easy to make, even if you don't have a traditional Panettone tin.
Ingredients
400g Strong white flour
75g Butter, softened
50g Caster sugar
A pinch of nutmeg
Rind of 1 lemon, finely grated
2 Tsp Dried yeast
2 Eggs, lightly beaten
150ml Milk, warmed
125g Seedless raisins
50g Candied citrus peel
Instructions
Place the flour in a large mixing bowl. Add the butter and using your fingertips, rub the butter into the flour until it resembles fine bread crumbs.
Pour in the caster sugar, nutmeg, lemon and orange rind, yeast, raisins and candied peel.
Add the eggs and the warm milk and mix this until a dough comes together.
Turn the dough out onto a lightly floured work surface and knead this for 5 minutes until smooth and elastic, sprinkling a little flour on every time it gets too sticky.
Return the dough to the bowl, cover with cling wrap and allow yo rise for 1 hour and 15 minutes in a warm place.
Traditionally, panettone is baked in a tall cylindrical pan, 120mm or 5 inches in diameter, and 180mm or just over 7 inches tall. This is how you will bake the bread in a regular deep cake pan.
Line the bottom of the pan with a circle of baking paper.
Cut off a length of baking paper just slightly longer than the circumference of the pan. Fold the paper in half lengthways.
Insert the paper into the pan to line the surround.
After the first rise, punch the dough down, then tip it out onto the work surface. Knead the dough for 3 to 5 minutes, then transfer it to the pan. Press the dough into the pan, cover loosely with cling wrap and allow this to rise for a further 45 minutes in a warm place.
Bake the panettone in a preheated at 180c or 350f for 45 minutes until it is a deep golden brown color and sounds hollow when tapped. Check the top for browning halfway through and cover loosely with foil if it is browning to quickly.
Remove the loaf from the oven and turn it out onto a wire rack to cool. Sift a generous layer of icing sugar over the top of the loaf. Allow the loaf to cool completely before cutting.
This loaf will keep for months stored loosely wrapped in a cool, dry place.