Queso Blanco Sauce / Dip – Perfect Mexican Tartare Sauce – No Mayonnaise!!!

Queso Blanco (Cheese), queso fresco, Dip (Type Of Dish), white cheese, Mexican, Queso, como hacer queso, queso blanco recipe, queso blanco dip, queso blanco cheese recipe, queso blanco cheese, queso blanco velveeta, queso blanco frito, queso blanco venezolano, tostitos queso blanco dip, como hacer queso blanco, Homemade Queso Blanco, Jalapeno Dip, Queso Ranchero, Mexican Queso Dip,Mexican cheese dip,Super Bowl


Queso Blanco Sauce / Dip - Perfect Mexican Tartare Sauce - No Mayonnaise!!!
Author: 
Recipe type: Cheese
Cuisine: Mexican
Prep time: 
Total time: 
Serves: 4-8
 
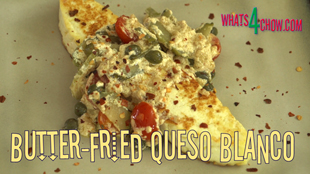
Queso Blanco is an infinitely flexible ingredient. In this episode we make an alternative to the overplayed tartare sauce - queso blanco sauce makes a perfect dip for seafood, with a mild flavor that does not overpower the food it is served with.
Ingredients
  • 200g Queso Blanco cheese
  • 200ml Cultured Buttermilk
  • 2 Pickled Jalepenos
  • Salt to taste
  • Dried red chilli flakes to garnish
Instructions
  1. Dice the queso blanco into small pieces, chop the pickled jalepeno chillies, and measure out the cultured buttermilk. You will also want a teaspoon of red chilli flakes to garnish.
  2. Place all of the ingredient except the chilli flakes into a jug. Using a stick blender, zap this until smooth and creamy.
  3. Season the creamy sauce with salt to taste. Decant the dip to serving bowls, garnish each with a pinch of chilli flakes and serve immediately.


Butter-Fried Queso Blanco. Slices of Queso Blanco Fried until Golden, Topped with Heavenly Sauce.

Queso Blanco (Cheese), queso fresco, white cheese, recipe, receta, how to make cheese, como hacer queso, Mexican, queso blanco recipe, queso blanco cheese recipe, queso blanco fried, queso blanco velveeta, como hacer queso blanco, Queso Blanco Recipe, Homemade Queso Blanco, preparacion queso, elaboracion de queso, Mexican Queso Dip, Mexican Recipe, Mexican Food, Mexican Cuisine, Queso Ranchero


Butter-Fried Queso Blanco. Slices of Queso Blanco Fried until Golden, Topped with Heavenly Sauce.
Author: 
Recipe type: Cheese
Cuisine: Mexican
Prep time: 
Cook time: 
Total time: 
Serves: 2
 
In our previous episode we made fresh queso blanco or Mexican white cheese. Today we're going fry slices of this cheese in butter until golden, then top it with rich combination of cocktail tomatoes, garlic, sliced pickled gherkin, capers and a unique instant ricotta.
Ingredients
  • 2 x 20mm / ¾ inch Slices of Queso Blanco cheese
  • 40g Butter
  • 8 Cherry / cocktail tomatoes
  • 1 Tbs Chopped garlic
  • 1 Pickled Gherkin, sliced
  • 2 Tbs Pickled capers
  • 90ml Fresh cream
  • Salt to taste
  • Dried red chilli flakes to garnish
Instructions
  1. Cut 2 slices of queso blanco from the center of the round of cheese. Cut them 20mm or ¾ inch thick.
  2. Measure out the garlic, butter, red chilli flakes, cream and capers.
  3. Slice the tomatoes in half length-ways, and slice the gherkins.
  4. Heat your pan over medium high heat, add the butter.
  5. Add the cheese to the pan and wipe it around in the butter to coat all over.
  6. Fry the cheese on the flat sides for 2 to 3 minutes until golden.
  7. Turn the cheese over and fry for a further 2 to 3 minutes until golden.
  8. By this stage, the cheese will have softened, so use a spatula to remove it from the pan to avoid damaging it.
  9. Add the tomatoes to the pan and stir these around in the butter for 60 seconds.
  10. Add the garlic and stir this for further 15 seconds until fragrant.
  11. Add the capers and sliced gherkin and stir this briefly to heat it through.
  12. Pour in the cream. Almost immediately, you will see the cream react with the acid in the tomatoes, capers and gherkin.
  13. This reaction in combination with heat causes the cream to convert to full cream ricotta cheese instantly.
  14. Stir this briefly and remove the pan from the heat.
  15. Transfer the fried cheese to platters, top each with half of the sauce.
  16. Garnish the plates with a scattering of red chilli flakes and serve immediately.


Queso Blanco – How to Make Mexican White Cheese. Fresh Mexican Same-Day Cheese.

white cheese, queso blanco, queso fresco, Queso Blanco (Cheese), Mexican, how to make cheese, queso blanco recipe, queso blanco dip, queso blanco dip recipe, queso blanco cheese recipe, queso blanco cheese, queso blanco fried, queso blanco frito, how to make queso blanco, como hacer queso blanco, homemade cheese, Mexican cheese dip,how to make queso blanco at home,easy queso blanco recipe,mexican white cheese


Queso Blanco - How to Make Mexican White Cheese. Fresh Mexican Same-Day Cheese.
Author: 
Recipe type: Cheese
Cuisine: Mexican
Prep time: 
Cook time: 
Total time: 
 
Queso Blanco is a fresh Mexican white cheese. The term fresh refers to the cheese not being aged. It can be eaten the same day it is made. The outstanding feature of Queso Blanco is that it does not melt when cooked, making it the ideal protein to add to soups, stews, stir-fries and even grills.
Ingredients
  • 1 Gallon / 3.75lt Full cream cows or goats milk
  • 60ml Cider vinegar (plus a little extra on the side)
  • Salt to taste (non-iodated)
Instructions
  1. Pour the milk into a large pot over medium low heat. Over a period of 20 to 30 minutes bring the milk up to a temperature of 83c or 180f stirring regularly.
  2. Once at this temperature, hold the temperature here for 10 minutes by toggling the heat on and off as required.
  3. Pour in the cider vinegar and stir continuously while the curds form. If the whey is not clear after a minute or so, add a little more vinegar, stirring continuously while you do this, until the whey is clear.
  4. Remove the pot from the heat and pour the curds into a muslin lined colander in your sink. Allow the curds to drain briefly, then fold the edges of the muslin over the cheese.
  5. Place and upturned side plate on top the cheese and weigh this down with about 5lb of weight.
  6. Let the cheese press and drain for 3 hours.
  7. Unwrap the cheese and trim the rough edge from the cheese. The trimmings can be used in any dish, so don't discard them.
  8. You will see that the cheese has a medium firm feel, and is remarkably similar in texture and taste to haloumi cheese.
  9. If you're not using the cheese immediately, salt both sides of the cheese and refrigerate wrapped in cling-wrap.
  10. In our next episode we will use this queso blanco to make an amazing butter-fried Queso Blanco cheese dish.
  11. Makes 600-800g of cheese


Cheese Injected Beef Rump Roast. Prime Beef Rump Injected with Cheese Wizz, Rubbed with Chilli Sugar and Roasted to Perfection.

beef rump roast,perfect beef rump roast,how to roast beef rump,how to roast beef rump in your oven,cheese injected beef rump roast,beef rump roast recipe,cheesy beef rump roast, beef rump roast recipe oven, beef rump roast marinade, beef rump roast smoker, beef rump roast pressure cooker, beef rump roast crock pot recipes, best roast beef recipe, beef rump roast slow cooker recipes, the best rump roast, tender rump roast


Cheese Injected Beef Rump Roast. Prime Beef Rump Injected with Cheese Wizz, Rubbed with Chilli Sugar and Roasted to Perfection.
Author: 
Recipe type: Beef
Prep time: 
Cook time: 
Total time: 
Serves: 4-6
 
In todays episode we're going to roast a perfect beef rump roast, injected with Cheese Wizz, rubbed with our special chilli sugar rub. You will nedd to have a meat syringe to inject the cheese. If you don't own one, never fear, they only cost about 10 dollars on eBay.
Ingredients
  • 1.4kg Beef Rump Roast
  • 100g Cheese Whizz (soft spreading processed cheese)
  • 15g Butter
  • 2 Tbs Brown sugar
  • 1 Tbs Salt
  • 1 Tbs Chilli flakes
For the Serving Suggestion
  • 6 Soft sundried tomato halves (the type in olive oil)
  • Feta cheese
Instructions
  1. To start you will need a nice 1.4kg or just over 3 pound rump roast cut. Look for a piece that has good marbling and a fair strip of fat on the edge.
  2. Place the Cheese Wizz in a bowl along with the butter and warm it up in your microwave to soften and liquify the cheese the cheese. Stir this thoroughly until the butter and the cheese are totally combined.
  3. Load half of this into your meat syringe and start injecting the meat with the cheese. Do this by pressing the needle almost all the way through the meat. Start pressing the plunger down while simultaneously withdrawing the needle from the meat. Load the other half of the cheese into the syringe and continue injecting the meat at even spaces until all of the cheese has been injected into the rump.
  4. In a bowl, combine the brown sugar, flaked salt and chilli flakes. Sprinkle these liberally all over the roast and rub them in yo the surface. Be careful not to apply to much pressure as this will force the cheese out of the meat.
  5. Place the roast on a rack in your roasting pan and bake the meat in a preheated oven at 180c or 350f for 90 minutes.
  6. Remove the roast from the oven and allow it to stand for 5 minutes.
  7. Transfer the roast to a carving board and slice the meat into thin slices at an angle across the grain.
  8. You will notice that the whole inside of the meat has been infused with the cheese, and the little cheese that has oozed out during cooking has created a beautiful cheesy crust on the top of the roast.
  9. As a serving suggestion, plate a few slices of the beef, top it with soft sundried tomato, the type preserved in olive oil, then crumble a little feta over the top before serving with the accompaniments of your choice.


Crispy Deep-Fried Mozzarella Sticks. Deep-Fried Mozzarella, the Perfect Starter, Accompaniment or Snack!!!

deep-fried mozzarella,cheese sticks, Mozzarella (Cheese), mozzarella recipes, mozzarella cheese recipes, cooking with mozzarella cheese, Mozzarella Sticks (Food), deep fried mozzarella sticks, deep fried mozzarella, deep fried mozzarella balls, deep fried mozzarella recipe, deep fried mozzarella sticks calories, deep fried mozzarella in breadcrumbs, deep fried mozzarella sticks without bread crumbs, deep fried mozzarella cheese, deep fried mozzarella sticks nutrition


Crispy Deep-Fried Mozzarella Sticks. Deep-Fried Mozzarella, the Perfect Starter, Accompaniment or Snack!!!
Author: 
Recipe type: Cheese
Prep time: 
Cook time: 
Total time: 
Serves: 2-6
 
How to make perfect deep-fried mozzarella. The secret to perfect deep-fried mozzarella is in the triple coating - one coat of cornflour and two coats of crumb. watch the video to see just how to do it!!!
Ingredients
  • 6 Batons Mozzarella cheese (commercial block)
  • 3 Eggs, lightly beaten
  • ½ Cup Cornflour
  • ⅔ Cup Finely crushed cornflakes mixed with ⅔ cup all-purpose flour
  • Oil to fry
Instructions
  1. Using commercial mozzarella which is firmer than the good hand made stuff, cut it into batons of 20mm or ¾ inch.
  2. Before we start coating the cheese, sprinkle a good layer of the cornflake mixture onto a platter.
  3. To coat the mozzarella, dip it into the egg to wet it all over.
  4. Dredge it in the cornflour making sure to cover all of the cheese. Return it to the egg making sure to wet all of the cornflour.
  5. Dredge it in the cornflake mixture to get a good solid coating, then back into the egg making sure to wet all of the cornflake mix.
  6. Then back into the cornflake mixture for the final coating. This thick coating will help to stop the cheese oozing out when it melts.
  7. Transfer the coated cheese to the platter. The crumb layer on the platter inhibits the coating from sticking to the plate and being damaged when it is removed from the plate.
  8. Place the platter in your freezer for 2 hours.
  9. Fill your pan with oil to a depth of 20mm and heat this to 180c or 350f.
  10. Carefully lower the coated cheese into the oil and fry this for 3 minutes, turning once halfway through.
  11. Remove the sticks from the oil and drain any excess oil on kitchen paper.
  12. Transfer the crispy mozzarella to platters and serve immediately with a little fresh herb garnish and the dipping sauce of your choice.
  13. The mozzarella will be crisp and golden on the outside and soft and melted on the inside.


Rustic Gourmet Artisan Pizza. How to Make aGourmet Artisan Pizza From Start to End.

no-knead pizza,artisan pizza,rustic artisan pizza,how to make artisan pizza from start to end,best pizza recipe,how to make no-knead pizza base,sour-dough pizza,sour-dough pizza base,sour dough pizza recipe,how to make sour dough pizza,easy sour dough pizza recipe,vegetarian sour dough pizza,vegan sour dough pizza,best sour dough pizza recipe,quick sour dough pizza recipe,Rustic Gourmet Artisan Pizza


Rustic Gourmet Artisan Pizza. How to Make aGourmet Artisan Pizza From Start to End.
Author: 
Recipe type: Pizza
Cuisine: Italian
Serves: 2
 
This pizza is absolutely delicious, with a super-crispy no-knead sour-dough crust topped with marinated mushrooms, sundried tomatoes, peppers, mature cheddar and mozzarella - then garnished with crispy deep-fried shoe-string onions, fresh basil and Parmesan shavings.
Ingredients
For the Dough
  • 500g Strong white flour
  • ¼ Tsp Yeast
  • 2 Tsp Salt
  • 375ml Water
For the Topping
  • 1 Portion marinated mushrooms
  • ¼ Green pepper, thinly sliced
  • ¼ Red pepper, thinly sliced
  • ¼ Yellow pepper, thinly sliced
  • 2 Tbs Sun-dried tomato, thinly sliced
  • 1 Handful fresh basil leaves
  • 60g Mature cheddar, shredded
  • 100g Mozzarella, cut into blocks
For the Garnish
Instructions
  1. Combine the strong white flour, yeast and salt in a large container. Make well in the center and pour in the water.
  2. Mix this until a dough comes together and it comes away from the sides of the container.
  3. Put the lid on the container and let this stand overnight at room temperature.
  4. For the toppings, slice the peppers into thin strips and cut the sun-dried tomato into strips.
  5. Open up your dough container. You will see that it doubled in size, and the gluten will be very well developed.
  6. Lightly oil a 30cm pan and press half of the dough out over the surface of the pan evenly. It helps to oil your hands when doing this.
  7. Transfer the pan to a preheated range set to medium high. Cook the base until the dough is well risen and the underside is well charred. Remove the pan from the heat and transfer the pizza to a baking sheet.
  8. Cool the pan under cold running water for a minute before continuing with the second base.
  9. To make up the pizzas, spread half of the shredded cheddar across each base.
  10. Spread half the mushrooms across each base, followed by the mixed peppers and sun-dried tomatoes.
  11. Scatter the cubed mozzarella across each base along with some of the fresh basil leaves.
  12. Heat your oven to maximum...
  13. Slide the pizzas from the baking sheets directly onto the rack in your oven. Bake the pizzas until the upper crust of the pizza is golden and the cheese is well melted.
  14. Remove them from the oven, garnish with shoe-string onions, more fresh basil and shavings of Parmesan.


The Gourmet Breakfast. Bacon on Egg with Caramelized Pears, Blue Cheese, Camembert and Feta.

gourmet breakfast,how to make a gourmet breakfast,3 cheese gourmet breakfast,best breakfast recipe,, gourmet breakfast menu, gourmet breakfast foods, gourmet breakfast menu ideas, gourmet breakfast basket, gourmet breakfast recipes with eggs, gourmet breakfast ideas, perfect breakfast,best breakfast recipe,easy fancy breakfast,impress your girlfriend breakfast


The Gourmet Breakfast. Bacon on Egg with Caramelized Pears, Blue Cheese, Camembert and Feta.
Author: 
Recipe type: Breakfast
Prep time: 
Cook time: 
Total time: 
 
Bacon, blue cheese and caramelized pear slices make a formidable combination. Add a Chinese Egg Omelette, a crumble of Feta and a couple of slices of Camembert.... that gives you THE Gourmet Breakfast!!!
Ingredients
For Each Serving you will need
  • 3 Rashers streaky bacon
  • 8 Slices of fresh pear
  • 25g Feta cheese
  • 25g Creamy blue cheese
  • 4 Small wedges Camembert cheese
  • 2 Eggs, lightly beaten
Instructions
  1. Heat a 20cm or 8 inch pan over medium high heat and fry the bacon until lightly golden, then remove it from the pan and keep it warm.
  2. Add the pear slices to the pan and fry these for 6 to 8 minutes turning halfway through. The pears should be well browned and tender. Remove these from the pan and keep them warm with the bacon.
  3. Pour in the egg and fry this for 3 minutes per side until golden.
  4. Place the egg in the center of a platter and arrange the fried pears around the edge of the egg.
  5. Place the bacon in the center in such a way that it stznds up on its edges giving the meal some height.
  6. Arrange the Camembert around the bacon at every quarter of the circle. Crumble the feta cheese over the bacon, then crumble the blue cheese over the caramelized pears.
  7. Season with cracked black pepper and serve immediately. There is no need to season with salt as the feta and the blue cheese provide more than enough salt.


Trev’s Gourmet Burger – All-Beef Patty with Crumbed Camembert, Bacon and Roast Red Pepper Relish!!!

gourmet burger,gourmet burger recipe,how to make a gourmet burger at home,best goourmet burger recipe,best gourmet burger ever,how to make the best burger,gourmet burger with crumbed camembert,gourmet burger with bacon and roasted pepper relish,how to make roast red pepper burger relish,roast red pepper burger relish recipe,best relish recipe,best beef burger recipe, , gourmet burger recipes, gourmet burger toppings, gourmet burger ideas, gourmet burger patty recipe


Trev's Gourmet Burger - All-Beef Patty with Crumbed Camembert, Bacon and Roast Red Pepper Relish!!!
Author: 
Recipe type: Burgers / Beef
Cuisine: American
Prep time: 
Cook time: 
Total time: 
Serves: 2
 
This gourmet burger is all good - 150g all beef patty with another patty of crumbed camembert, topped with crispy bacon and roasted red pepper relish -- you should need a license to eat a burger like this!!!
Ingredients
For the Patties
  • 150g Ground sirloin
  • 150g Ground rump
  • 1 Tsp Salt
For the Relish
  • 1 Large Red Pepper
  • 1 Medium Onion
  • 30ml Balsamic vinegar
  • 30g Butter
  • Salt to taste
For the Camembert
  • ¼ Cup finely crushed cornfalkes mixed with ¼ cup all-purpose flour
  • ¼ Cup cornflour
  • 1 Eggs lightly beaten
Other
  • 2 Large burger buns
  • 4 Rashers streaky bacon
  • Lettuce
  • Butter
Instructions
  1. Starting with the relish, scorch the skin of the red pepper with your blowtorch, gas hob, or under the grill. Place the pepper in a plastic packet, tie the top and allow the pepper to sweat.
  2. While the pepper sweats, chop the onion.
  3. Remove the pepper from the bag and scrape the skin from the pepper. Chop the whole pepper into cubes.
  4. Heat a pan over medium high heat and add the butter. When the butter is bubbling, add the pepper and onion and fry this for 10 min until it is well browned and caramelized. Add the balsamic vinegar and stir this for 60 seconds until the vinegar has thickened to a sticky syrup and coated everything.
  5. Remove this from the heat and transfer it to a jug. Using your stick blender, puree the relish then keep it warm on the side.
  6. Next in line is the camembert. For the coating combine the flour with the finely crushed cornflakes and measure out the cornflour. Whisk the eggs briefly.
  7. Hold the camembert round on its side and cut through the cheese, effectively giving you 2 rounds.
  8. Dip one of the rounds in the egg, then dredge it in the cornflour.
  9. Dip the cheese in the egg making sure to wet all of the cornflour.
  10. Dredge the cheese in the cornflake mixture making to get a good solid coating.
  11. Return the cheese to the egg making sure to wet all of the cornflake mixture, then second coating of the cornflake mixture. Make sure to get a good solid coating.
  12. Repeat this with the second round of cheese, then transfer both rounds to a platter and allow the coating to set for 20 minutes.
  13. My burger mix is 50% ground sirloin mixed with 50% rump, with a fat content of 20%. This is just a recommendation - you can use a good quality ready-made patties of 150g each.
  14. Place the mince in a bowl with 1 teaspoonful of salt and mix well. The salt reacts with the protein binding the meat.... there is no need for egg. Go ahead and form your 2 patties by hand or using a press. Place the patties between 2 pieces of foil and flatten out until they are the slightly bigger than the burger buns. When flattening them out make sure to make the center thinner than the edges, this helps keep the patty flat when it cooks.
  15. Put the patties in the freezer while you continue.
  16. Cut and butter the buns, then toast them in a large pan until crisp and lightly browned on the inside.
  17. Remove the buns from the pan then add the bacon the pan. Fry the bacon until well browned, then remove.
  18. Remove the patties from the freezer and add them to the pan. Fry the patties for 3 minutes per side, then remove these from the pan.
  19. Add 300ml of oil to the pan, allow the oil to heat for a minute, then add the camembert. Fry the camembert for 3 minutes, turning after 90 seconds. Remove the camembert from the pan.
  20. Dress the buns with a healthy bed of lettuce and top this with a little of the relish. Top this with a patty, then the bacon.
  21. Finish the burger off with the camembert and a bit more relish, then serve your masterpiece immediately with the accompaniments of your choice.


Deep-Fried Camembert / Brie. Crispy Fried Camembert or Brie Served with Preserved Figs.

Deep-Fried Camembert / Brie,deep fried camembet,deep fried brie,how to deep-fry camembert or brie cheese,crispy deep-fried camembert,crispy deep-fried brie cheese,the secret to deepfrying camembert,how to make deep-fried camembert or brie,deep--fried camembert or brie with preserved figs, Brie (Cheese), camembert,deep-fried, recipe, how to make, brie recipes, brie appetizers, brie desserts, Camembert (Cheese), camembert cheese recipes, receta con queso brie, breaded brie cheese recipe


Deep-Fried Camembert / Brie. Crispy Fried Camembert or Brie Served with Preserved Figs.
Author: 
Recipe type: Cheese / Starter / Dessert
Cuisine: French
Prep time: 
Cook time: 
Total time: 
Serves: 2
 
Deep-Fried Camembert / Brie. Deep-fried camembert or brie is absolutely amazing - soft and runny on the inside and crisp and crunchy on the outside. The trick to getting this right is in the coating - check out the video to find out more!
Ingredients
  • 125g Camembert or Brie cheese
For the Coating
  • ½ Cup finely crushed cornflakes mixed with ½ cup all purpose flour
  • ½ Cup tapioca flour or cornflour
  • 2 Eggs lightly beaten
For the Garnish
  • 6 Preserved green figs & a little fig syrup
  • Cashew nuts
Instructions
  1. Cut the cheese into 4 wedges.
  2. Before you coat the cheese, sprinkle a layer of the cornflake crumb mix over a platter. This stops the coating on the cheese from sticking to the platter while the coating sets.
  3. To coat the cheese, dip it in the egg wetting it all over.
  4. Dredge it in the tapioca or corn flour.
  5. Then dip it in the egg again making sure to wet all of the cornflour.
  6. Then it's into the cornflake mixture making sure to get a good solid coating all over.
  7. Then back into the egg making sure to wet all of the cornflake mixture.
  8. And finally another good solid coating of the cornflake mixture.
  9. This may seem like overkill, but the cheese melts very quickly and this good coating inhibits it leaking into the oil while frying.
  10. Transfer the coated cheese to the platter and allow the coating to set for 20 minutes.
  11. Fill a saucepan with oil to a depth of 50mm or 2 inches and heat this to 170c or 325f.
  12. Deep fry the cheese for 3 minutes turning halfway through.
  13. Remove the cheese from the oil and drain on kitchen paper.
  14. Transfer the cheese wedges to platters. Serve with lightly crushed preserved figs, some of the fig syrup and salted cashew nuts.


Black Olive, Feta & Spinach Muffins. Savory Muffins Recipe with a Taste of the Mediterranean.

savory muffins recipe,savoury muffins recipe,how to make savory muffins,how to make savoury muffins,Black Olive Feta & Spinach Muffins,muffins using olives and feta,muffins using spinach and feta,muffins using black olives and feta,mediterranean style muffins,muffins with feta cheese,muffins in baking paper,make muffins using baking paper,savory muffin recipe vegetarian, savory muffins recipe easy, savory muffin recipes healthy, savory muffin recipe breakfast


Black Olive, Feta & Spinach Muffins. Savory Muffins Recipe with a Taste of the Mediterranean.
Author: 
Recipe type: Baking / Muffins / Breakfast
Prep time: 
Cook time: 
Total time: 
Serves: 12
 
These olive, feta and spinach muffins are dead-easy and quick to make. The flavor is outstanding, and this is simply the best savory muffins recipe around.
Ingredients
  • 240g Self-raising flour
  • 3ml Salt
  • 10ml Baking powder
  • 60g Baby spinach, finely chopped
  • 200g Feta cheese
  • 200g Balck olives, pitted and cut into rounds
  • 1 Egg
  • 300ml Milk
  • 50ml Melted butter
Instructions
  1. Sift the flour, salt and baking powder into a large mixing bowl.
  2. Add the finely chopped baby spinach and the black olive rounds and mix them into the flour, then crumble in the feta cheese.
  3. In a jug, whisk together the milk, egg and melted butter, and pour this into the mixing bowl.
  4. Using a wooden paddle, mix the batter until all of the ingredients are just wet. Over-mixing the batter will result in tough muffins.
  5. Press a square of baking paper into one of the muffin pan holes then fill this with batter. The weight of the batter will hold the paper in place. Continue this until all 12 holes are filled with equal amounts of batter.
  6. Bake the muffins in a preheated oven at 180c or 350f for 30 minutes. Test for doneness by pressing a toothpick or skewer into one of the muffins. If it comes out clean, the muffins are ready, if not, return them to the oven for another 5 minutes.
  7. Remove the muffins from the oven and allow them to cool for 20 minutes on a wire rack before serving.


Ham, Spinach & Three Cheese Quiche with a Quick No-Pre-Bake Pastry.

Ham, Spinach & Three Cheese Quiche,how to make the best quiche,how to bake a quiche,best quiche recipe,, Spinach and Onion Quiche Recipe, How to make a Quiche, Easy Quiche Recipe, quiche lorraine, homemade quiche, quiche crust, quiche fillings, quiche pastry, quiche resepte, quiche recipes south africa, quiche recipes cheese spinach, simple quiche recipe,foolproof quiche recipe,picnic food recipes,packed lunch recipes,ham quiche,


Ham, Spinach & Three Cheese Quiche with a Quick No-Pre-Bake Pastry.
Author: 
Recipe type: Quiche
Prep time: 
Cook time: 
Total time: 
Serves: 6-8
 
This quiche recipe is absolutely amazing, and the base does not require blind pre-baking. Gypsey ham, sinach and three cheeses make for an unforgettable quiche.
Ingredients
For the Filling
  • 100g Ham, roughly chopped
  • 150g Cooked and chopped spinach
  • 6 Spring onions, cut into rounds, sauteed
  • 150g Mixed cheddar, feta and parmesan
  • ¼ Cup chopped parsley
  • ¼ Tsp Ground nutmeg
  • 250ml / 1 Cup Milk
  • 1 Medium onion, chopped, sauteed
  • 3 Eggs, beaten
For the Pastry
  • 100g Cake flour
  • 100g Grated cheddar
  • 100g Butter, melted
  • ¼ Tsp Mustard powder
Instructions
For the Filling
  1. In a large mixing bowl, combine the milk, feta, cheddar, and parmesan. Pour in the chopped ham, cooked spinach, onion and spring onion.
  2. Add the parsely and the nutmeg and stir these in.
  3. Pour in the eggs and stir everything until well combined.
For the Pastry
  1. Add the flour and the cheddar to a mixing bowl. Pour in the melted butter and stir this until a dough comes together.
To make up and bake the quiche
  1. Transfer the dough to a heatproof quiche dish, or pan and press it into the dish as evenly as possible. You can check the evenness by holding the base up to light.
  2. Spoon the filling into the pastry and bake the quiche in a preheated oven at 180c or 350f for 45 minutes.
  3. Remove the quiche from the oven and allow it to cool for 10 to 15 minutes before serving. The quiche can also be served cold, and will keep for a few days covered in your refrigerator.


Greek Style Whole Stuffed Fish. Whole baked fish, stuffed with feta, olives, lemon zest and chives.

whole baked fish,whole fish stuffed and baked,how to stuff a fish,greek style whole fish,fish stuffed with feta and olives,mediterranean stuffed fish,how to bake whole fish,feta and olive stuffed fish,whole stuffed fish,stuffed whole fish, stuffed whole fish recipe, stuffed baked fish, stuffed baked fish recipes easy, stuffed roasted fish, stuffed baked whole fish recipes, grilled stuffed whole fish, herb stuffed whole fish, stuffed fish recipes


Greek Style Whole Stuffed Fish. Whole baked fish, stuffed with feta, olives, lemon zest and chives.
Author: 
Recipe type: Seafood / Fish
Cuisine: Mediterranean / Greek
Prep time: 
Cook time: 
Total time: 
Serves: 2
 
Greek / Mediterranean style baked fish stuffed with feta, olives, chives and lemon zest is really easy to do and will have your guests applauding. Succulent whole fish infused with the flavors of Greece.
Ingredients
  • 1 x 500g Red Snapper, Red Roman or any tall body fish
  • 8 Calamata olives, pitted and cut into rounds
  • 70g Feta cheese
  • 3 Tbs Chives finely chopped
  • 3 Tbs Lemon zest
  • 1 Tbs Olive oil
  • Melted butter to baste
Instructions
  1. Have your fishmonger gut, scale and defin the fish, then butterfly the fish, including the head.
  2. Place the feta in a bowl and pour the olive oil over the cheese. Using a fork, mash the feta until the oil has been absorbed.
  3. Add the olives, chives and zest and mix this in.
  4. Open the fish and spoon the feta mixture into the fish keeping everything closer to the dorsal side.
  5. Close the fish and press it firmly down to compress the filling.
  6. Using butchers twine, tie the fish closed, taking care not to tie too tightly as this will cause the fish to tear while cooking.
  7. Brush the fish liberally with melted butter.
  8. Bake the fish in a preheated oven at 180c / 350f for 20 minutes. Remove the fish and baste again with the butter in the pan.
  9. Return the fish to the oven and bake for a further 15 minute.
  10. Remove the fish from the oven, cut and remove the twine, and serve immediately.


Scroll to top

Kitchen Conversions

Convert:
Masses
to:
Volumes
to:
Temperatures
to:
Lengths
to: